【opencv学习笔记 16图像二值化】代码详细注释
图像二值化
作者:子永
二值图像:只有黑和白
0 代表黑色
1 其实是255 代表白色
全局阈值
局部阈值
import cv2 as cv
import numpy as np
def threshold_demo(image):
"""
全局阈值
:param image:
:return:
"""
# 首先图像灰度化处理
gray = cv.cvtColor(image, cv.COLOR_BGR2GRAY)
# 函数参数 输入的图像 阈值 最大值 方法
# 当方法使用了cv.THRESH_TRIANGLE 等自己寻找阈值时,函数中的参数2 指定的阈值就不起作用
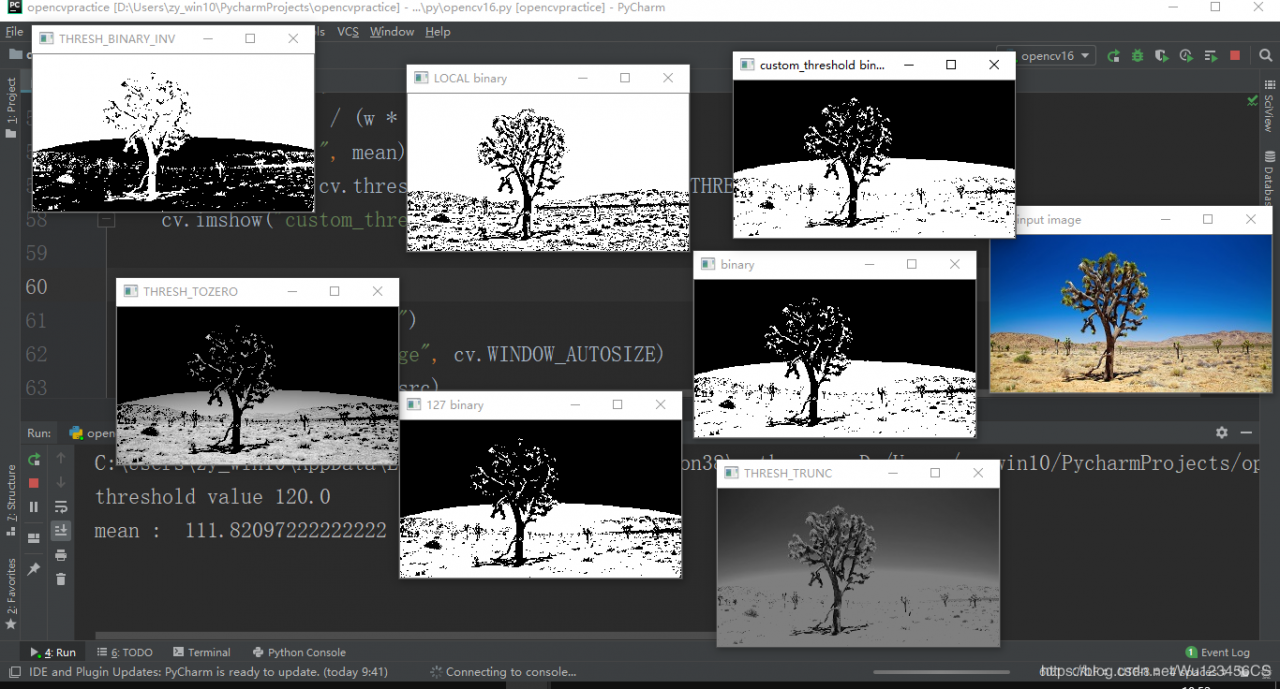
ret, binary = cv.threshold(gray, 0, 255, cv.THRESH_BINARY | cv.THRESH_OTSU)
print("threshold value %s" % ret)
cv.imshow("binary", binary)
# 如果想要自己设定阈值 将参数2设定为自己设定的阈值 最常用
ret, binary = cv.threshold(gray, 127, 255, cv.THRESH_BINARY)
cv.imshow("127 binary", binary)
# 反向
ret, binary = cv.threshold(gray, 127, 255, cv.THRESH_BINARY_INV)
cv.imshow("THRESH_BINARY_INV", binary)
# cv.THRESH_TRUNC 截断 截断设定最大值为127
ret, binary = cv.threshold(gray, 127, 255, cv.THRESH_TRUNC)
cv.imshow("THRESH_TRUNC", binary)
# 小于127的全部变为0
ret, binary = cv.threshold(gray, 127, 255, cv.THRESH_TOZERO)
cv.imshow("THRESH_TOZERO", binary)
def local_threshold(image):
"""
局部阈值 可针对亮度不均匀情况
:param image:
:return:
"""
gray = cv.cvtColor(image, cv.COLOR_BGR2GRAY)
# 自适应阈值 参数:图像 最大值 方法(有俩个可选) 二值化 奇数 常量(均值)
binary = cv.adaptiveThreshold(gray, 255, cv.ADAPTIVE_THRESH_GAUSSIAN_C, cv.THRESH_BINARY, 25, 10)
cv.imshow("LOCAL binary", binary)
def custom_threshold(image):
"""
自己计算图像的均值 设定为阈值
:param image:
:return:
"""
gray = cv.cvtColor(image, cv.COLOR_BGR2GRAY)
h, w = gray.shape[:2]
# 变成一维的数组
m = np.reshape(gray, [1, w * h])
# 求所有的平均值
mean = m.sum() / (w * h)
print("mean : ", mean)
ret, binary = cv.threshold(gray, mean, 255, cv.THRESH_BINARY)
cv.imshow("custom_threshold binary", binary)
src = cv.imread("tree.jpg")
cv.namedWindow("input image", cv.WINDOW_AUTOSIZE)
cv.imshow("input image", src)
threshold_demo(src)
local_threshold(src)
custom_threshold(src)
cv.waitKey(0)
cv.destroyAllWindows()
结果展示
作者:子永