RocketMQ ConsumeQueue与IndexFile实时更新机制源码解析
前言
ConsumeQueue详解
IndexFile详解
IndexHeader
slots槽位
indexes索引数据
实时更新ConsumeQueue与IndexFile源码分析
CommitLogDispatcherBuildConsumeQueue源码分析
CommitLogDispatcherBuildIndex源码分析
IndexFile如何解决Hash冲突
总结
前言前面我们介绍了消息是如何存储的,消息是如何刷盘的,讲的都是CommitLog是如何存储和刷盘的。虽然CommitLog顺序存储着所有消息,但是CommitLog中的消息并没有区分topic、keys等,如果需要消费某个topic的消息或者查找某一条消息只能遍历CommitLog文件去查找,性能相当低下,因此有了ConsumeLog和IndexFile两个文件类型,这两个文件的作用主要是提升消息消费和查询的性能。
ConsumeQueue详解为了提高消费消息查询性能,Broker会为每个Topic在~/store/consumequeue中创建一个Topic名称的目录,并再为该Topic创建目录名为queueId的目录,每个目录存放着若干consumequeue文件,consumequeue属于commitLog的索引文件,可以根据consumequeue定位到具体的消息,consumequeue存储文件见下图

consumequeue文件名由20位数字构成,表示当前文件的第一个索引条目的起始偏移量。与commitLog文件名不同的是,consumequeue后续文件名是固定的,由于consumequeue文件大小是固定不变的。
consumequeue文件大小由mappedFileSizeConsumeQueue配置控制,它的默认大小是30W * ConsumeQueue.CQ_STORE_UNIT_SIZE(20),也就是600W字节大小,ConsumeQueue.CQ_STORE_UNIT_SIZE是consumequeue每个索引条目的大小,每隔索引条目包含了三个消息的重要属性:消息在mappedFile文件中的物理偏移量(8字节)、消息的长度(4字节)、消息Tag的hashcode值,这三个属性占了20个字节,单个索引条目结构如下图所示

RocketMQ除了提供消息的Topic给消息消费外,RocketMQ还提供了根据key来查找消息的功能,producer创建消息时可以传入keys值,用于快速查找消息。
// 构建Message参数
Message msg = new Message("TopicTest",  // 消息topic
    "TagA",// 消息Tag
    "key1 key2 key3",// 消息keys,多个key用" "隔开
    "hello linshifu!".getBytes(RemotingHelper.DEFAULT_CHARSET)); // 消息体
IndexFile可以看做是一个key的哈希索引文件,通过计算key的hash值,快速找到某个key对应的消息在commitLog中的位置。IndexFile由下面三个部分构成:
indexHeader
slots槽位
indexes索引数据
IndexFile结构如下图所示
每个IndexFile的长度是固定的,其中indexHeader占用40字节,slots占用500W * 4字节,Index索引数据占用2000W * 20字节

IndexHeader占用IndexFile的前40个字节,它主要存储着IndexFile索引文件的相关信息,IndexHeader包含如下属性
// org.apache.rocketmq.store.index.IndexHeader
public class IndexHeader {
    // 索引文件第一条消息在commitLog中的存储时间
    private final AtomicLong beginTimestamp = new AtomicLong(0);
    // 索引文件最后一条消息在commitLog中的存储时间
    private final AtomicLong endTimestamp = new AtomicLong(0);
    // 索引文件第一条消息的偏移量
    private final AtomicLong beginPhyOffset = new AtomicLong(0);
    // 索引文件最后一条消息的偏移量
    private final AtomicLong endPhyOffset = new AtomicLong(0);
    // 已经填充slot的hash槽数量
    private final AtomicInteger hashSlotCount = new AtomicInteger(0);
    // 该indexFile种包含的索引单元数量
    private final AtomicInteger indexCount = new AtomicInteger(1);
}
数据结构如下图所示

在IndexFile中间部分存储的是IndexFlie中key的hash槽,每个hash槽存储的是index索引单元的indexNo,添加索引时会将key的hash值%500W的结果计算哈希槽序号,然后将index索引单元的indexNo放入slot槽中,indexNo是int类型,slots槽位总共有500W个,因此slots槽位占用的大小是500w * 4=2000w

index索引由2000W个索引单元构成,每个索引单元大小为20字节,每隔索引单元由下面四个部分构成
keyHash
keyHash是消息索引key的Hash值
phyOffet
phyOffset是当前key对应消息在commitLog中的偏移量commitLog offset
timeDiff
timeDiff是当前key对应消息存储时间与当前indexFile第一个索引存储时间差
preIndex
当前slot的index索引单元的前一个索引单元的indexNo
索引单元数据结构如下

之前的文章我们只了解了Broker的CommitLog文件保存和刷盘的流程,现在我们来了解Broker实时更新ConsumeQueue和IndexFile的流程。
消息保存的过程仅仅会保存CommitLog,ConsumeQueue文件及IndexFile中的数据是通过ReputMessageService将CommitLog中的消息转发到ConsumeQueue及IndexFile。
ReputMessageService和之前的刷盘服务类似,都是异步线程执行的服务。ReputMessageService是DefaultMessageStore的一个内部类,它跟随者消息存储对象DefaultMessageStore创建时共同创建。ReputMessageService刷新ConsumeQueue与IndexFile的逻辑可以从它的run()方法开始分析。
// org.apache.rocketmq.store.DefaultMessageStore.ReputMessageService#run
@Override
public void run() {
// 死循环
    while (!this.isStopped()) {
        try {
             // 睡眠1ms
            Thread.sleep(1);
// 更新consumeQueue和IndexFile
            this.doReput();
        } catch (Exception e) {
            DefaultMessageStore.log.warn(this.getServiceName() + " service has exception. ", e);
        }
    }
}
从上面代码可以看出,更新ConsumeQueue与IndexFile在死循环中执行,每隔1ms执行一次doReput()来更新更新consumeQueue和IndexFile,在doReput()中的主要逻辑如下
如果重放消息偏移量reputFromOffset小于CommitLog的最大offset,则会循环重放消息,更新ConsumeQueue及IndexFile
从CommitLog的重放偏移量开始获取映射缓冲结果SelectMappedBufferResult,SelectMappedBufferResult包含如下属性
// org.apache.rocketmq.store.SelectMappedBufferResult
public class SelectMappedBufferResult {
    // mappedFile文件起始偏移量+position
    private final long startOffset;
    // reputFromOffset开始的缓冲
    private final ByteBuffer byteBuffer;
    // 消息size
    private int size;
    // commitLog的MappedFile
    private MappedFile mappedFile;
}
根据SelectMappedBufferResult校验消息,并创建转发请求DispatchRequest,DispatchRequest中包含更新ConsumeQueue和IndexFile中需要用到的属性,如topic,消息偏移量,消息key,消息存储时间戳,消息长度,消息tagHashCode等。
如果当前消息size>0,则说明当前消息需要被转发更新ConsumeQueue和IndexFile,会调用关键方法DefaultMessageStore.this.doDispatch转发更新
如果当前消息size=0,则说明已经读到了CommitLog当前MappedFile的结尾,因此需要读取下一个MappedFile,并进行转发。
// org.apache.rocketmq.store.DefaultMessageStore.ReputMessageService#doReput
private void doReput() {
    // 1.reputFromOffset ≤ commitLog最大offset,则循环重放
    for (boolean doNext = true; this.isCommitLogAvailable()/*reputFromOffset≤commitLog最大offset*/&&doNext; ) {
        // 2.根据reputFromOffset的物理偏移量找到mappedFileQueue中对应的CommitLog文件的MappedFile
        // 然后从该MappedFile中截取一段自reputFromOffset偏移量开始的ByteBuffer,这段内存存储着将要重放的消息
        SelectMappedBufferResult result = DefaultMessageStore.this.commitLog.getData(reputFromOffset);
        if (result != null) {
            try {
                // 遍历消息,开始reput
                for (int readSize = 0; readSize < result.getSize() && doNext; ) {
                    // 3. 检查消息属性,并构建一个消息的dispatchRequest
                    DispatchRequest dispatchRequest =
                        DefaultMessageStore.this.commitLog.checkMessageAndReturnSize(result.getByteBuffer(), false, false);
                    if (dispatchRequest.isSuccess()) {
                        if (size > 0) {
                            // 4.消息分发,写consumeQueue和Index
                            DefaultMessageStore.this.doDispatch(dispatchRequest);
                            // 设置reputOffset加上当前消息大小
                            this.reputFromOffset += size;
                            // 设置读取的大小加上当前消息大小
                            readSize += size;
                             //如果size=0,说明读取到了MappedFile的文件结尾
                        } else if (size == 0) {
                            // 5. 获取下个文件的起始offset
                            this.reputFromOffset = DefaultMessageStore.this.commitLog.rollNextFile(this.reputFromOffset);
                            // 设置readSize=0,结束循环
                            readSize = result.getSize();
                        }
                    } else if (!dispatchRequest.isSuccess()) {
                       // ...
                }
            } finally {
                result.release();
            }
        } else {
            doNext = false;
        }
    }
}
由上面代码可知,转发更新ConsumeQueue和IndexFile的关键代码在DefaultMessageStore.this.doDispatch(dispatchRequest)中,在doDispatch()方法中循环遍历dispatcherList中的CommitLogDispatcher。
public void doDispatch(DispatchRequest req) {
    for (CommitLogDispatcher dispatcher : this.dispatcherList) {
        dispatcher.dispatch(req);
    }
}
debug代码可以中包含处理转发请求的Dispatcher类,通过类名就可以很容易判断出CommitLogDispatcherBuildConsumeQueue是将CommitLog转发到ConsumeQueue中,CommitLogDispatcherBuildIndex是将消息构建IndexFile,下面我们来分别分析两者是如何处理CommitLog消息转发的。

CommitLogDispatcherBuildConsumeQueue将消息保存到ConsumeQueue如下所示,主要是下面两步
先根据消息Topic和QueueId从consumeQueueTable找到ConsumeQueue,如果找不到会创建一个新的consumeQueue
调用ConsumeQueue#putMessagePositionInfoWrapper,将消息保存到consumeQueue中
// org.apache.rocketmq.store.DefaultMessageStore#putMessagePositionInfo
public void putMessagePositionInfo(DispatchRequest dispatchRequest) {
    // 找到ConsumeQueue,如果找不到会创建一个ConsumeQueue
    ConsumeQueue cq = this.findConsumeQueue(dispatchRequest.getTopic(), dispatchRequest.getQueueId());
    // 消息保存到consumeQueue中
    cq.putMessagePositionInfoWrapper(dispatchRequest, checkMultiDispatchQueue(dispatchRequest));
}
保存consumeQueue存储单元消息如下,主要分为下面三个步骤
将consumeQueue存储单元offset(8字节)+消息长度(4字节)+tags的哈希码(8字节)保存到consumeQueue的缓存byteBufferIndex中
根据consumeQueue的offset找到MappedFile
将缓冲中的存储单元存储到MappedFile中
// org.apache.rocketmq.store.ConsumeQueue#putMessagePositionInfo
private boolean putMessagePositionInfo(final long offset, final int size, final long tagsCode,
        final long cqOffset) {
    this.byteBufferIndex.flip();
    // consumeQueue存储单元的长度
    this.byteBufferIndex.limit(CQ_STORE_UNIT_SIZE);
    // 消息物理偏移量
    this.byteBufferIndex.putLong(offset);
    // 消息长度
    this.byteBufferIndex.putInt(size);
    // 消息tags的哈希码
    this.byteBufferIndex.putLong(tagsCode);
    final long expectLogicOffset = cqOffset * CQ_STORE_UNIT_SIZE;
// 获取最后一个mappedFile
    MappedFile mappedFile = this.mappedFileQueue.getLastMappedFile(expectLogicOffset);
    if (mappedFile != null) {
        // 更新物理offset
        this.maxPhysicOffset = offset + size;
      // 数据保存到consumeQueue
        return mappedFile.appendMessage(this.byteBufferIndex.array());
    }
    return false;
}
CommitLogDispatcherBuildIndex源码分析
除了CommitLogDispatcherBuildConsumeQueue,下面我们来分析在dispatcherList中另一个CommitLogDispatcher的实现类CommitLogDispatcherBuildIndex是如何将Index索引单元保存到IndexFile中的,存储消息索引的核心逻辑如下所示。
获取或者创建最新的IndexFile
将msgId构建Index索引单元并保存到IndexFile中
将Message中的keys用空格分隔成key数组,并循环保存到indexFile中
public void buildIndex(DispatchRequest req) {
    // 获取或者创建最新索引文件,支持重试最多3次
    IndexFile indexFile = retryGetAndCreateIndexFile();
    if (indexFile != null) {
        // 获取结束物理索引
        long endPhyOffset = indexFile.getEndPhyOffset();
        DispatchRequest msg = req;
        // 获取topic和keys
        String topic = msg.getTopic();
        String keys = msg.getKeys();
        // 如果当前消息的commitLogOffset小于当前IndexFile的endPhyOffset时,说明当前消息已经构建过Index索引,因此直接返回
        if (msg.getCommitLogOffset() < endPhyOffset) {
            return;
        }
        // 获取客户端生成的uniqueId(msgId),代表客户端生成的唯一一条消息
        // 消息解密时生成的
        if (req.getUniqKey() != null) {
            indexFile = putKey(indexFile, msg, buildKey(topic, req.getUniqKey()));
        }
        // 客户端传递的keys,消息是从keys属性中获取的
        if (keys != null && keys.length() > 0) {
            String[] keyset = keys.split(MessageConst.KEY_SEPARATOR/*空格*/);
            for (int i = 0; i < keyset.length; i++) {
                String key = keyset[i];
                if (key.length() > 0) {
                    indexFile = putKey(indexFile, msg, buildKey(topic, key));
                    if (indexFile == null) {
                        return;
                    }
                }
            }
        }
    } else {
        log.error("build index error, stop building index");
    }
}
从上面源码可知,保存消息的关键就在putKey方法中主要分为下面三个步骤
获取要保存到IndexFile的keyHashCode(keyHash),hashSlot的绝对位置(absSlotPos),hash槽中的索引值(slotValue),保存消息时间差(timeDiff),索引的绝对位置(absIndexPos)等。
更新Index索引单元信息,keyHashCode(keyHash),消息在commitLog中的偏移量(phyOffset),消息存储时间与索引文件开始存储时间差(timeDiff),前置消息索引值(slotValue)
更新slots的IndexCount
更新IndexHeader中的indexCount,更新物理偏移量(phyoffset),最后存储时间戳(sotreTimestamp)
    public boolean putKey(final String key, final long phyOffset, final long storeTimestamp) {
        // 索引数量小于2000W,否则说明当前索引文件已经满了,不能添加索引
        if (this.indexHeader.getIndexCount() < this.indexNum) {
            // keyHashCode
            int keyHash = indexKeyHashMethod(key);
            // 索引槽位置
            int slotPos = keyHash % this.hashSlotNum;
            // 绝对位置
            int absSlotPos = IndexHeader.INDEX_HEADER_SIZE + slotPos * hashSlotSize;
            try {
                int slotValue = this.mappedByteBuffer.getInt(absSlotPos);
                long timeDiff = storeTimestamp - this.indexHeader.getBeginTimestamp();
                int absIndexPos =
                    IndexHeader.INDEX_HEADER_SIZE + this.hashSlotNum * hashSlotSize/*哈希槽数量*哈希槽大小=500w*4*/
                        + this.indexHeader.getIndexCount() * indexSize;
                // 更新IndexFile索引单元信息
              // keyHash(4)+消息在commitLog中的偏移量(8)+消息存储时间-索引文件开始存储时间(4)+前置消息索引值(4)
                this.mappedByteBuffer.putInt(absIndexPos/*索引位置*/, keyHash);
                this.mappedByteBuffer.putLong(absIndexPos + 4, phyOffset);
                this.mappedByteBuffer.putInt(absIndexPos + 4 + 8, (int) timeDiff);
                this.mappedByteBuffer.putInt(absIndexPos + 4 + 8 + 4, slotValue);
// 更新slots的indexCount
                this.mappedByteBuffer.putInt(absSlotPos/*hash槽的绝对位置*/, this.indexHeader.getIndexCount());
              //...
                // 更新IndexHeader信息
                this.indexHeader.incIndexCount();
                this.indexHeader.setEndPhyOffset(phyOffset);
                this.indexHeader.setEndTimestamp(storeTimestamp);
                return true;
            } catch (Exception e) {
                log.error("putKey exception, Key: " + key + " KeyHashCode: " + key.hashCode(), e);
            }
        }
        return false;
    }
IndexFile如何解决Hash冲突
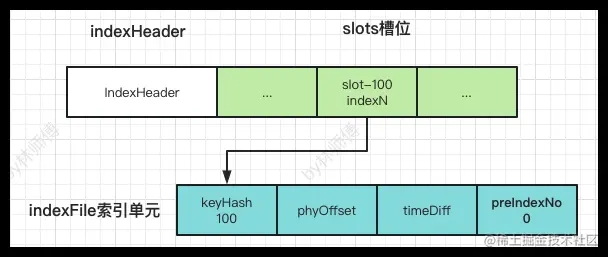
假设在IndexFile的索引IndexN的是一个keyHash为100的索引,如下图所示,此时slots槽位100存储着indexN的序号,在IndexFile索引单元保存的数据keyHash=100,preIndexNo=0。
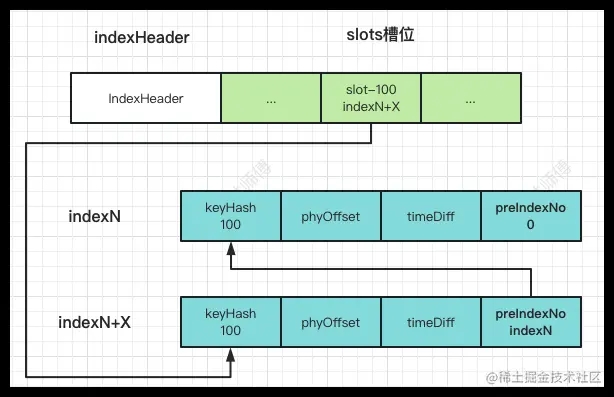
如果又有一个索引单元indexN+X的keyHashCode=100,保存消息时发现solt-100已经指向了索引单元indexN,会将当前索引单元IndxeN+X的preIndexNo更新为indexN,使得当前索引单元indexN+X的前置索引单元指向indeNo,再更新slots-100槽位的值为indexN+X,保存完成后的索引关系如下图所示。相当于在slots槽位下面挂了index索引单元链表,根据key查找消息时,可以根据key计算出keyHashCode,然后顺着链表查询链表中的消息。
ConsumeQueue可以看成是消息消费的索引,不同Topic的ConsumeQueue存储到不同目录中,默认存储在~/store/consumequeue/${topic}目录中,其底层也是使用MappedFile,Broker会按照消息在CommitLog中的顺序,异步转发到ConsumeQueue中,每条消息在ConsumeQueue生成固定大小20字节的存储单元指向CommitLog。
IndexFile保存着Producer发送消息keys中的索引,有了IndexFile就可以根据消息key快速找到消息。IndexFile的数据接口与HashMap类似,它使用链表的方式解决解决哈希冲突,并且使用头插法将数据插入链表中。
以上就是RocketMQ ConsumeQueue与IndexFile实时更新机制源码解析的详细内容,更多关于RocketMQ 实时更新机制的资料请关注软件开发网其它相关文章!