Learning a Deep Convolutional Network for Image Super-Resolution论文分析与pytorch代码
超分辨率技术(Super-Resolution)是指从观测到的低分辨率图像重建出相应的高分辨率图像。
SR可分为两类:从多张低分辨率图像重建出高分辨率图像和从单张低分辨率图像重建出高分辨率图像。基于深度学习的SR,主要是基于单张低分辨率的重建方法,即Single Image Super-Resolution (SISR)。该论文创建了一种深度学习的方法,来实现单张低分辨率图像的重建。
SISR是一个逆问题,对于一个低分辨率图像,可能存在许多不同的高分辨率图像与之对应,因此通常在求解高分辨率图像时会加一个先验信息进行规范化约束。在传统的方法中,这个先验信息可以通过若干成对出现的低-高分辨率图像的实例中学到。而基于深度学习的SR通过神经网络直接学习分辨率图像到高分辨率图像的端到端的映射函数。
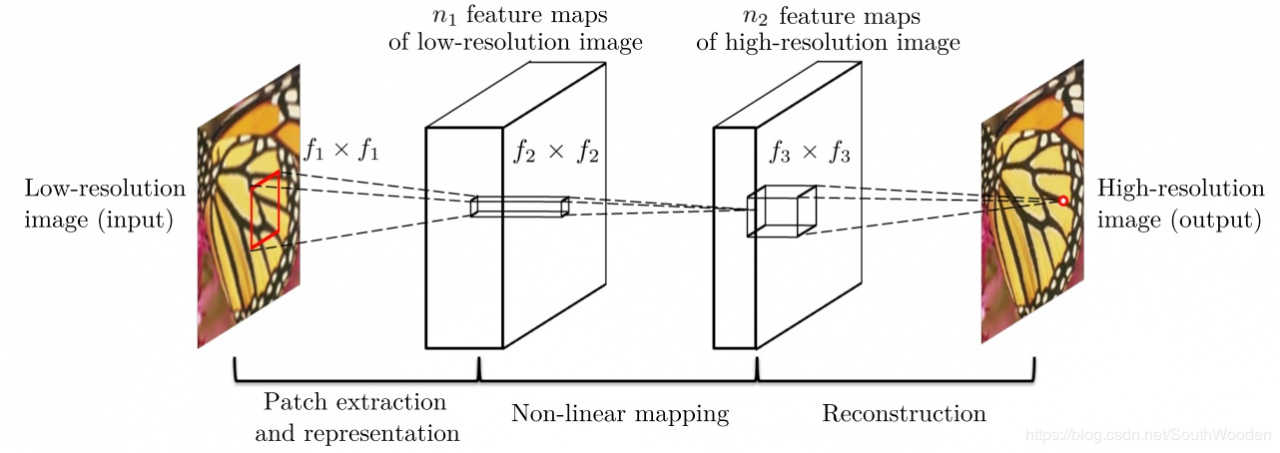
SRCNN算法的框架,SRCNN将深度学习与传统稀疏编码之间的关系作为依据,将3层网络划分为图像块提取和表征(Patch extraction and representation)、非线性映射(Non-linear mapping)以及最终的重建(Reconstruction)。
SRCNN的流程为:
(1)先将低分辨率图像使用双立次差值放大至目标尺寸(如放大至2倍、3倍、4倍),此时仍然称放大至目标尺寸后的图像为低分辨率图像(Low-resolution image),即图中的输入(input);
(2)将低分辨率图像输入三层卷积神经网络,(举例:在论文中的其中一实验相关设置,对YCrCb颜色空间中的Y通道进行重建,网络形式为(conv1+relu1)—(conv2+relu2)—(conv3))
第一层卷积:卷积核尺寸9×9 (f1×f1),卷积核数目64 (n1),输出64张特征图;
第二层卷积:卷积核尺寸1×1(f2×f2),卷积核数目32(n2),输出32张特征图;
第三层卷积:卷积核尺寸5×5(f3×f3),卷积核数目1(n3),输出1张特征图即为最终重建高分辨率图像。
我们首先使用双立方插值将其放大到所需的大小,这是我们执行的唯一预处理。让我们将插值图像表示为Y.我们的目标是从Y中恢复与地面实况高分辨率图像X尽可能相似的图像F(Y)。为了便于呈现,我们仍称Y为“低分辨率的“图像,虽然它与X具有相同的大小。我们希望学习映射F,它在概念上由三个操作组成:
1)补丁提取和表示:该操作从低分辨率图像Y中提取(重叠)补丁,并将每个补丁表示为高维向量。这些向量包括一组特征图,其数量等于向量的维数。
2)非线性映射:该操作是每个高维向量到另一个高维向量的非线性映射。每个映射的矢量在概念上是高分辨率补丁的表示。这些向量包括另一组特征映射。
3)重建:该操作聚合高分辨率补丁表示以生成最终的高分辨率图像。该图像应该与真实标记X相似。
图像恢复中的流行策略是密集地提取补丁,然后通过一组预先训练的基础(例如PCA,DCT,Haar等)来表示它们。这相当于用一组滤波器对图像进行卷积,每个滤波器都是一组基。将这些基础的优化包括在网络的优化中。第一层表示为操作F1 : F1(Y)=max( 0, W1∗Y+B1 )
W1:表示滤波器,大小为c × f1 × f1 × n1
B1:表示偏置, 是n1维向量
c:输入图像的通道数
f1:滤波器的空间大小
n1:滤波器的个数。
很明显,W1在图像上应用n1个卷积,每个卷积的内核大小为c×f1×f1
输出由n1个特征图组成
B1是n1维向量,其每个元素与滤波器相关联。
我们在滤波器响应上应用整流线性单元(ReLU,max(0,x))
第一层为每个补丁提取n1维特征。在第二操作中,我们将这些n1维向量中的每一个映射为n2维向量。这相当于应用具有平凡空间支持1 x 1的n2滤波器。
此解释仅适用于1 x 1过滤器。但是很容易推广到像3 x 3或5 x 5这样的大型滤波器 。在那种情况下,非线性映射不是输入图像的补丁; 相反,它是在3 x 3或5 x 5特征图的“补丁”。第二层的操作是:F2(Y)=max(0,W2∗F1(Y)+B2)
W2:表示滤波器,大小为n1×1×1×n2
B2:表示偏置,大小是n2维。
每个输出n2维向量在概念上是将用于重建的高分辨率补丁的表示。
在传统方法中,经常对预测的重叠高分辨率补丁进行平均以产生最终的完整图像。平均可以被认为是一组特征图上的预定义滤波器(其中每个位置是高分辨率补片的“扁平”矢量形式)。由此推动,我们定义卷积层以产生最终的高分辨率图像:F(Y)=W3∗F2(Y)+B3
W3:表示滤波器,大小是n2×f3×f3×c
B3:是c维矢量。
(1)训练数据集:论文中某一实验采用91张自然图像作为训练数据集,对训练集中的图像先使用双三次差值缩小到低分辨率尺寸,再将其放大到目标放大尺寸,最后切割成诸多33×33图像块作为训练数据,作为标签数据的则为图像中心的21×21图像块(与卷积层细节设置相关);
(2)损失函数:采用MSE函数作为卷积神经网络损失函数;

(3)卷积层细节设置:第一层卷积核9×9,得到特征图尺寸为(33-9)/1+1=25,第二层卷积核1×1,得到特征图尺寸不变,第三层卷积核5×5,得到特征图尺寸为(25-5)/1+1=21。训练时得到的尺寸为21×21,因此图像中心的21×21图像块作为标签数据。(卷积训练时不进行padding)
(1)全卷积网络:所用网络为全卷积网络,因此作为实际测试时,直接输入完整图像即可;
(2)Padding:训练时得到的实际上是除去四周(33-21)/2=6像素外的图像,若直接采用训练时的设置(无padding),得到的图像最后会减少四周各6像素(如插值放大后输入512×512,输出500×500)。因此在测试时每一层卷积都进行了padding(卷积核尺寸为1×1的不需要进行padding)。这样保证插值放大后输入与输出尺寸的一致性。

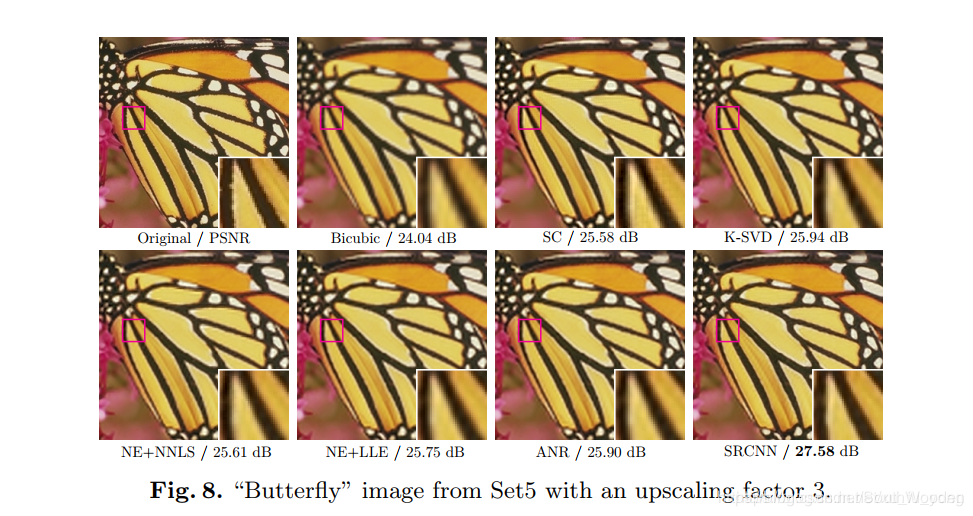
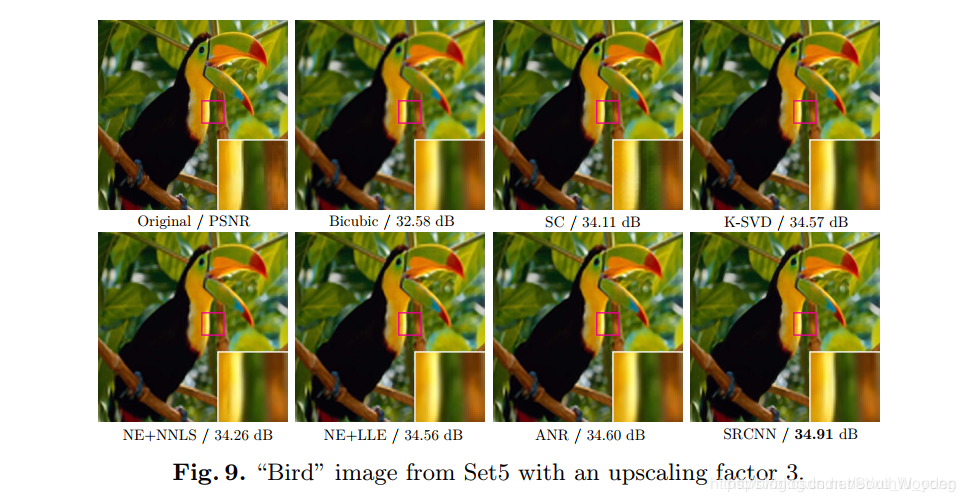
由于没有GPU,在Github上找了相关较为简便的代码加以修改,并不是完全对论文的复现,而是通过其思路实现低分辨率图像输入,得到对应的高分辨率图像输出。
使用说明To train the model with a zoom factor of 2, for 200 epochs and on GPU:
python main.py --zoom_factor 2 --nb_epoch 200 --cuda
At each epoch, a .pth model file will be saved.
To use the model on an image: (the zoom factor must be the same the one used to train the model)
python run.py --zoom_factor 2 --model model_199.pth --image example.jpg --cuda
import torch.nn as nn
import torch.nn.functional as F
class SRCNN(nn.Module):
    def __init__(self):
        super(SRCNN, self).__init__()
        self.conv1 = nn.Conv2d(1, 64, kernel_size=9, padding=4)  # color_channel=1, n1=64,f1=9,
        self.conv2 = nn.Conv2d(64, 32, kernel_size=1, padding=0)  # channel=64,n2=64,f2=9,
        self.conv3 = nn.Conv2d(32, 1, kernel_size=5, padding=2)  # channel=32,n3=1,f3=9,
    def forward(self, x):
        out = F.relu(self.conv1(x))
        out = F.relu(self.conv2(out))
        out = self.conv3(out)
        return out
data.py
from os import listdir
from os.path import join
from torch.utils.data import Dataset
import torchvision.transforms as transforms
from PIL import Image, ImageFilter
def is_image_file(filename):
    return any(filename.endswith(extension) for extension in [".png", ".jpg", ".jpeg"])
def load_img(filepath):
    img = Image.open(filepath).convert('YCbCr')
    y, _, _ = img.split()
    return y
CROP_SIZE = 32
class DatasetFromFolder(Dataset):
    def __init__(self, image_dir, zoom_factor):
        super(DatasetFromFolder, self).__init__()
        self.image_filenames = [join(image_dir, x) for x in listdir(image_dir) if is_image_file(x)]
        crop_size = CROP_SIZE - (CROP_SIZE % zoom_factor) # Valid crop size
        self.input_transform = transforms.Compose([transforms.CenterCrop(crop_size),  # cropping the image
                                      transforms.Resize(crop_size//zoom_factor),  # subsampling the image (half size)
                                      transforms.Resize(crop_size, interpolation=Image.BICUBIC),  # bicubic upsampling to get back the original size
                                      transforms.ToTensor()])
        self.target_transform = transforms.Compose([transforms.CenterCrop(crop_size),  # since it's the target, we keep its original quality
                                       transforms.ToTensor()])
    def __getitem__(self, index):
        input = load_img(self.image_filenames[index])
        target = input.copy()
        # input = input.filter(ImageFilter.GaussianBlur(1))
        input = self.input_transform(input)
        target = self.target_transform(target)
        return input, target
    def __len__(self):
        return len(self.image_filenames)
main.py
import argparse
from math import log10
import torch
import torch.nn as nn
import torch.optim as optim
from torch.utils.data import DataLoader
from data import DatasetFromFolder
from model import SRCNN
parser = argparse.ArgumentParser(description='SRCNN training parameters')
parser.add_argument('--zoom_factor', type=int, required=True)
parser.add_argument('--nb_epochs', type=int, default=200)
parser.add_argument('--cuda', action='store_true')
args = parser.parse_args()
device = torch.device("cuda:0" if (torch.cuda.is_available() and args.cuda) else "cpu")
torch.manual_seed(0)
torch.cuda.manual_seed(0)
# Parameters
BATCH_SIZE = 4
NUM_WORKERS = 0  # on Windows, set this variable to 0
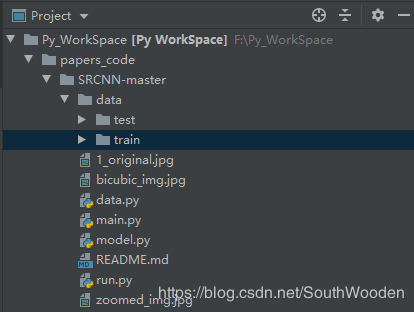
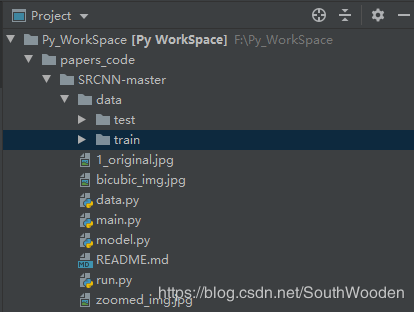
trainset = DatasetFromFolder("F:\\Py_WorkSpace\\papers_code\\SRCNN-master\\data\\train", zoom_factor=args.zoom_factor)
testset = DatasetFromFolder("F:\\Py_WorkSpace\\papers_code\\SRCNN-master\\data\\test", zoom_factor=args.zoom_factor)
trainloader = DataLoader(dataset=trainset, batch_size=BATCH_SIZE, shuffle=True, num_workers=NUM_WORKERS)
testloader = DataLoader(dataset=testset, batch_size=BATCH_SIZE, shuffle=False, num_workers=NUM_WORKERS)
model = SRCNN().to(device)
criterion = nn.MSELoss()
optimizer = optim.Adam(  # we use Adam instead of SGD like in the paper, because it's faster
    [
        {"params": model.conv1.parameters(), "lr": 0.0001},
        {"params": model.conv2.parameters(), "lr": 0.0001},
        {"params": model.conv3.parameters(), "lr": 0.00001},
    ], lr=0.00001,
)
for epoch in range(args.nb_epochs):
    # Train
    epoch_loss = 0
    for iteration, batch in enumerate(trainloader):
        input, target = batch[0].to(device), batch[1].to(device)
        optimizer.zero_grad()
        out = model(input)
        loss = criterion(out, target)
        loss.backward()
        optimizer.step()
        epoch_loss += loss.item()
    print(f"Epoch {epoch}. Training loss: {epoch_loss / len(trainloader)}")
    # Test
    avg_psnr = 0
    with torch.no_grad():
        for batch in testloader:
            input, target = batch[0].to(device), batch[1].to(device)
            out = model(input)
            loss = criterion(out, target)
            psnr = 10 * log10(1 / loss.item())
            avg_psnr += psnr
    print(f"Average PSNR: {avg_psnr / len(testloader)} dB.")
    # Save model
    torch.save(model, f"model_{epoch}.pth")
run.py
import argparse
import numpy as np
import torch
import torchvision.transforms as transforms
from PIL import Image
parser = argparse.ArgumentParser(description='SRCNN run parameters')
parser.add_argument('--model', type=str, required=True)
parser.add_argument('--image', type=str, required=True)
parser.add_argument('--zoom_factor', type=int, required=True)
parser.add_argument('--cuda', action='store_true')
args = parser.parse_args()
img = Image.open(args.image).convert('YCbCr')
img = img.resize((int(img.size[0]*args.zoom_factor), int(img.size[1]*args.zoom_factor)), Image.BICUBIC)   # first, we upscale the image via bicubic interpolation
img.save("F:\\Py_WorkSpace\\papers_code\\SRCNN-master\\bicubic_img.jpg")
y, cb, cr = img.split()
img_to_tensor = transforms.ToTensor()
input = img_to_tensor(y).view(1, -1, y.size[1], y.size[0])  # we only work with the "Y" channel
device = torch.device("cuda:0" if (torch.cuda.is_available() and args.cuda) else "cpu")
print(device)
model = torch.load(args.model).to(device)
input = input.to(device)
out = model(input)
out = out.cpu()
out_img_y = out[0].detach().numpy()
out_img_y *= 255.0
out_img_y = out_img_y.clip(0, 255)
out_img_y = Image.fromarray(np.uint8(out_img_y[0]), mode='L')
out_img = Image.merge('YCbCr', [out_img_y, cb, cr]).convert('RGB')  # we merge the output of our network with the upscaled Cb and Cr from before
                                                                    # before converting the result in RGB
out_img.save("F:\\Py_WorkSpace\\papers_code\\SRCNN-master\\zoomed_img.jpg")
运行操作
打开Anaconda Prompt,进入虚拟环境VE,执行python文件

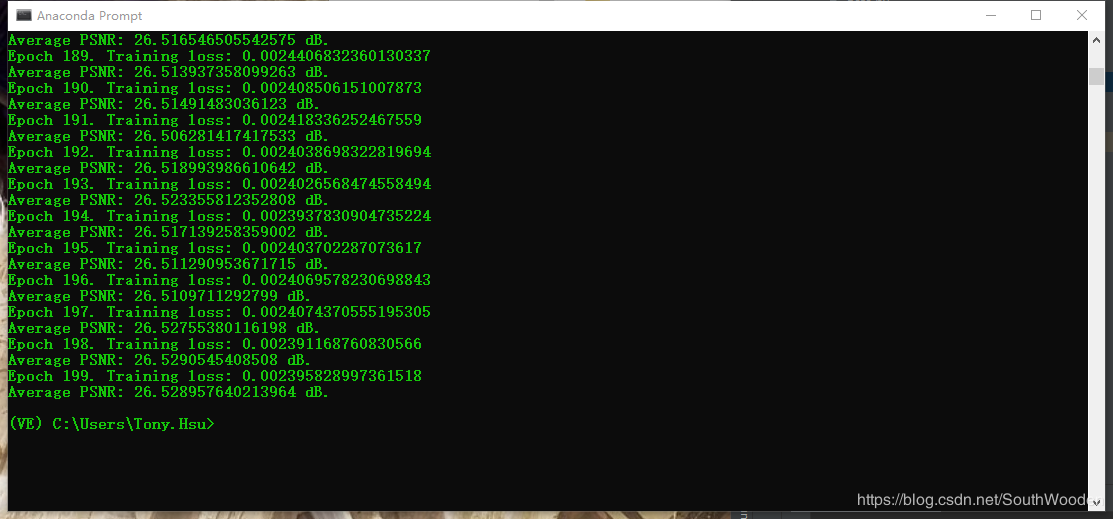


1.代码中 torch.save(model, f"model_{epoch}.pth")不知道.pth文件存在哪了,希望有大神可以告知
2.进一步理解原理,并总结
3.对代码模块进行理解,熟悉pytorch模型,argparse模块等,并总结
(SRCNN)及pytorch实现_Learning a Deep Convolutional Network for Image Super-Resolution
SRCNN
。
作者:TonyHsuM