Deep_Learning_Task05: 卷积神经网络(CNN)/LeNet
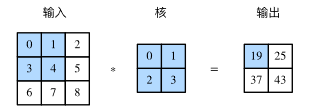
二维互相关(cross-correlation)运算的输入是一个二维输入数组和以和二维核数组,输出也是一个二维数组,其中核数组通常成为卷积和或滤波器(filter),卷积核的尺寸通常小于输入数组,卷积核在输入数组上滑动,在每个位置上,卷积核与该位置处的输入子数组按元素相乘并求和,得到输出数组中相应位置的元素
import torch
import torch.nn as nn
def corr2d(X, K):
    H, W = X.shape
    h, w = K.shape
    Y = torch.zeros(H - h + 1, W - w + 1)
    for i in range(Y.shape[0]):
        for j in range(Y.shape[1]):
            Y[i, j] = (X[i: i + h, j: j + w] * K).sum()
    return Y
X = torch.tensor([[0, 1, 2], [3, 4, 5], [6, 7, 8]])
K = torch.tensor([[0, 1], [2, 3]])
Y = corr2d(X, K)
print(Y)
二维卷积层
二维卷积层将输入核卷积核作互相关运算,并加上一个标量偏置来获得输出
卷积层的模型参数包括卷积核和标量偏值
class Conv2D(nn.Module):
    def __init__(self, kernel_size):
        super(Conv2D, self).__init__()
        self.weight = nn.Parameter(torch.randn(kernel_size))
        # the number of the bias is related to the output channel's number
        self.bias = nn.Parameter(torch.randn(1))
    def forward(self, x):
        return corr2d(x, self.weight) + self.bias
构建图像利用卷积核来检测颜色边缘
X = torch.ones(6, 8)
Y = torch.zeros(6, 7)
X[:, 2: 6] = 0
Y[:, 1] = 1
Y[:, 5] = -1
print(X)
print(Y)
conv2d = Conv2D(kernel_size=(1, 2))
step = 30
lr = 0.01
for i in range(step):
    Y_hat = conv2d(X)
    l = ((Y_hat - Y) ** 2).sum()
    l.backward()
    # gradient descent
    conv2d.weight.data -= lr * conv2d.weight.grad
    conv2d.bias.data -= lr * conv2d.bias.grad
    # gradient zero
    conv2d.weight.grad.zero_()
    conv2d.bias.grad.zero_()
    if (i + 1) % 5 == 0:
        print('Step %d, loss %.3f' % (i + 1, l.item()))
print(conv2d.weight.data)
print(conv2d.bias.data)
填充与步幅
填充与步幅是卷积层的两个超参数,他们可以对给定形状的输入和卷积核改变输出形状
填充——Padding,是指在输入宽和高两侧填充元素
步幅——Stride,是指卷积核在输入数组上滑动时,每次滑动的行数和列数
卷积层的简洁实现
可以利用Pytorch中的nn.Conv2d来实现二维卷积层,主要有下列构造函数参数:
· in_Channels (python:int) - Number of channels in the input image
· out_Channels (python:int) - Number of channels produced by the convolution
· kernel_size (python:int or tuple) - Size of the convolution kernel
· stride (python:int or tuple, optional) - Stride of the convolution.Default: 1
· padding (python:int or tuple, optional) - Zero padding added to both sides of the input. Default : 0
· bias (bool, optional) - if True, adds a learnable bias to the output. Default: True
· forward(N, C, H, W) - 参数是思维张量,返回值也是思维张量
X = torch.rand(4, 2, 3, 5)
print(X.shape)
conv2d = nn.Conv2d(in_channels=2, out_channels=3, kernel_size=(3, 5), stride=1, padding=(1, 2))
Y = conv2d(X)
print('Y.shape: ', Y.shape)
print('weight.shape: ', conv2d.weight.shape)
print('bias.shape: ', conv2d.bias.shape)
池化
二维池化层
池化层主要用来缓解卷积层对位置的过度敏感性。同卷积层一样,池化层对每次输入数据的一个固定形状窗口中的元素计算输出,池化层直接计算池化窗口内的元素的最大值或者平均值,该运算也称为最大池化或者平均池化
池化层可以对输入的高和宽两侧填充,并调整窗口的移动步幅来改变输出形状
在处理多通道数据时,池化层对每个输入通道分别池化,但不会像卷积层那样将各个通道的结果按通道相加,这意味着池化层的输入通道数和输出通道数是相等的
池化层的简介实现
可以利用Pytorch中的nn.MaxPool2d来实现最大池化,构造参数包括:
· kernel_size - the size of the window to take a max over
· stride - the stride of the window. Default value is kernel_size
· padding - implicit zero padding to be added on both sides
·forward ( N, C, H, W) - 返回值也是一个思维张量
X = torch.arange(32, dtype=torch.float32).view(1, 2, 4, 4)
pool2d = nn.MaxPool2d(kernel_size=3, padding=1, stride=(2, 1))
Y = pool2d(X)
print(X)
print(Y)
LeNet
Convolutional Neural Networks
使用全连接层的局限性:
· 图像在同一列邻近的像素在这个向量中可能相距较远,他们构成的模式很难被模型识别
· 对于大尺寸的输入图像,使用全连接层容易导致模型过大
使用卷积层的优势:
· 卷积层保留输入形状
· 卷积层通过滑动窗口将统一卷积核和不同位置的输入重置计算,从而避免参数尺寸过大
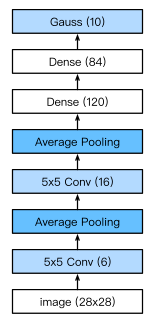
Lenet模型分为卷积层块和全连接层两个部分
 卷积层块中的基本单位是卷积层后接平均池化层:卷积层用来识别图像中的空间模式,如线条和物体局部,之后的平均池化层用来降低卷积层对位置的敏感性(降维)
通过Sequential类来实现Lenet模型
展平操作
class Flatten(torch.nn.Module):  #展平操作
    def forward(self, x):
        return x.view(x.shape[0], -1)
将图像大小重新定型
class Reshape(torch.nn.Module): #将图像大小重定型
    def forward(self, x):
        return x.view(-1,1,28,28)      #(B x C x H x W)
Lenet
net = torch.nn.Sequential(     #Lelet
    Reshape(),
    nn.Conv2d(in_channels=1, out_channels=6, kernel_size=5, padding=2), #b*1*28*28  =>b*6*28*28
    nn.Sigmoid(),
    nn.AvgPool2d(kernel_size=2, stride=2),                              #b*6*28*28  =>b*6*14*14
    nn.Conv2d(in_channels=6, out_channels=16, kernel_size=5),           #b*6*14*14  =>b*16*10*10
    nn.Sigmoid(),
    nn.AvgPool2d(kernel_size=2, stride=2),                              #b*16*10*10  => b*16*5*5
    Flatten(),                                                          #b*16*5*5   => b*400
    nn.Linear(in_features=16*5*5, out_features=120),
    nn.Sigmoid(),
    nn.Linear(120, 84),
    nn.Sigmoid(),
    nn.Linear(84, 10)
)
在卷积层块中输入的高和宽通常在减小,池化层则更大程度减小高和宽的尺寸,但是通道数会因为filter的数目而增加,全连接层则逐层减少输出个数,知道变成图像的类别书是10
获取数据和训练模型
使用Fashion-MNIST作为数据集
获得数据
batch_size = 256
train_iter, test_iter = d2l.load_data_fashion_mnist(
    batch_size=batch_size, root='/home/yuzhui/input/FashionMNIST2065')
print(len(train_iter))
由于卷积神经网络计算比多层感知机要复杂,所以可以使用GPU来加速计算
evaluate_accuracy函数,用来计算模型net在数据集上的准确率
def evaluate_accuracy(data_iter, net,device=torch.device('cpu')):
    """Evaluate accuracy of a model on the given data set."""
    acc_sum,n = torch.tensor([0],dtype=torch.float32,device=device),0
    for X,y in data_iter:
        # If device is the GPU, copy the data to the GPU.
        X,y = X.to(device),y.to(device)
        net.eval()
        with torch.no_grad():
            y = y.long()
            acc_sum += torch.sum((torch.argmax(net(X), dim=1) == y))  #[[0.2 ,0.4 ,0.5 ,0.6 ,0.8] ,[ 0.1,0.2 ,0.4 ,0.3 ,0.1]] => [ 4 , 2 ]
            n += y.shape[0]
    return acc_sum.item()/n
定义函数train_ch5用来训练模型
#训练函数
def train_ch5(net, train_iter, test_iter,criterion, num_epochs, batch_size, device,lr=None):
    """Train and evaluate a model with CPU or GPU."""
    print('training on', device)
    net.to(device)
    optimizer = optim.SGD(net.parameters(), lr=lr)
    for epoch in range(num_epochs):
        train_l_sum = torch.tensor([0.0],dtype=torch.float32,device=device)
        train_acc_sum = torch.tensor([0.0],dtype=torch.float32,device=device)
        n, start = 0, time.time()
        for X, y in train_iter:
            net.train()
            optimizer.zero_grad()
            X,y = X.to(device),y.to(device)
            y_hat = net(X)
            loss = criterion(y_hat, y)
            loss.backward()
            optimizer.step()
            with torch.no_grad():
                y = y.long()
                train_l_sum += loss.float()
                train_acc_sum += (torch.sum((torch.argmax(y_hat, dim=1) == y))).float()
                n += y.shape[0]
        test_acc = evaluate_accuracy(test_iter, net,device)
        print('epoch %d, loss %.4f, train acc %.3f, test acc %.3f, '
              'time %.1f sec'
              % (epoch + 1, train_l_sum/n, train_acc_sum/n, test_acc,
                 time.time() - start))
Training and Testing
# 训练
lr, num_epochs = 0.9, 10
def init_weights(m):
    if type(m) == nn.Linear or type(m) == nn.Conv2d:
        torch.nn.init.xavier_uniform_(m.weight)
net.apply(init_weights)
net = net.to(device)
criterion = nn.CrossEntropyLoss()   #交叉熵描述了两个概率分布之间的距离,交叉熵越小说明两者之间越接近
train_ch5(net, train_iter, test_iter, criterion,num_epochs, batch_size,device, lr)
# test
for testdata,testlabe in test_iter:
    testdata,testlabe = testdata.to(device),testlabe.to(device)
    break
print(testdata.shape,testlabe.shape)
net.eval()
y_pre = net(testdata)
print(torch.argmax(y_pre,dim=1)[:10])
print(testlabe[:10])
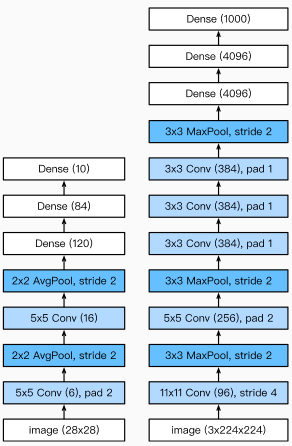
卷积神经网络就是含有卷积层的网络,Lenet交替使用卷积层和最大池化层后接全连接层来进行图像分类
卷积神经网络进阶 深度卷积神经网络-AlexNetleNet的局限性
· 神经网络计算复杂
· 还没有大量的深入研究参数初始化和非凸优化算法等诸多领域
机器学习的特征提取:手工定义的特征提取函数
神经网络的特征提取:通过学习得到数据的多级表征,并逐级表示越来越抽象的概念和模式
AlexNet
特征:
· 8层变化,其中包括5层卷积层和2层全连接隐藏层,以及一个全连接输出层
· 将sigmoid激活函数改成了更简单的ReLu激活函数
· 使用Dropout来控制全连接层的模型复杂度
· 引入数据增强,比如翻转、裁减和颜色变化,进一步扩大数据集来缓解过拟合
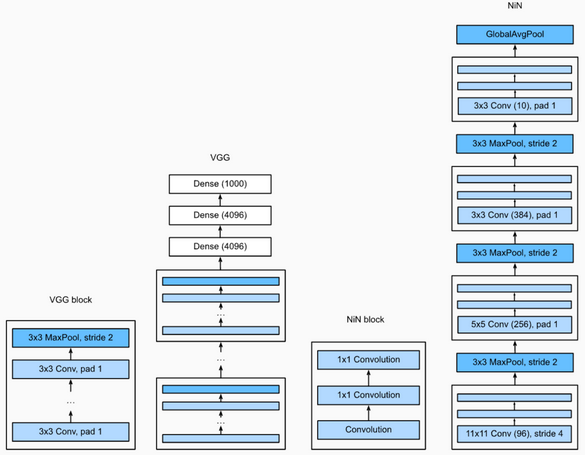
VGG:通过使用简单的基础块来构建深度模型
Block:数个相同的Padding为1、窗口形状为33的卷积层,接上一个步幅为2、窗口形状为22的最大池化层
卷积层保持输入的高和宽不变,而池化层则对其减半
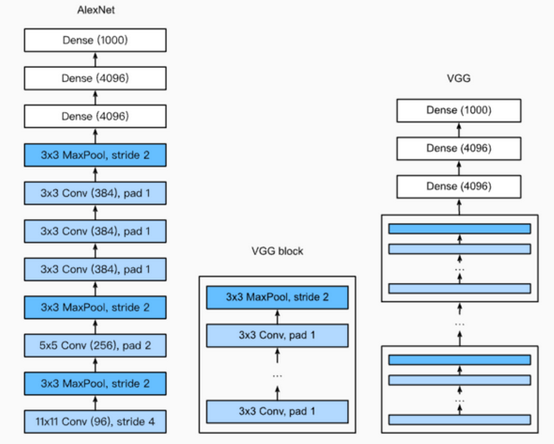
LeNet、AlexNet和VGG:先以由卷积层构成的模块充分抽取 空间特征,再以由全连接层构成的模块来输出分类结果
NiN:串联多个由卷积层和“全连接”层构成的小⽹络来构建⼀个深层⽹络
⽤了输出通道数等于标签类别数的NiN块,然后使⽤全局平均池化层对每个通道中所有元素求平均并直接⽤于分类
11卷积核的作用:
· 放缩通道数,通过控制卷积核的数量达到通道数的收缩
· 增加非线性,11卷积核的卷积过程相当于全连接层的的计算过程,而且还加入了非线性激活函数,从而可以增加网络的非线性
· 计算参数少
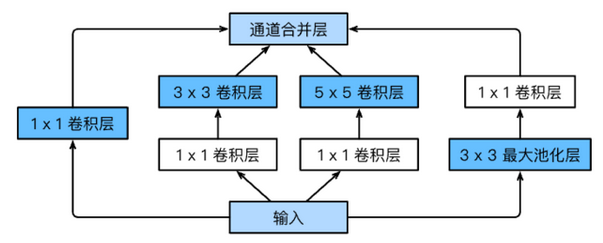
· 由Inception基础块组成
·Inception块相当于⼀个有4条线路的⼦⽹络。它通过不同窗口形状的卷积层和最⼤池化层来并⾏抽取信息,并使⽤1×1卷积层减少通道数从而降低模型复杂度
·可以⾃定义的超参数是每个层的输出通道数,我们以此来控制模型复杂度
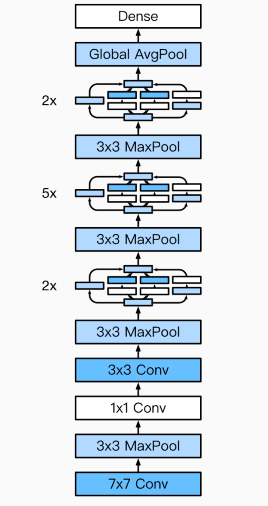
 GoogleNet Model
作者:yonki_e