FastDFS+Ngix的集成+FastDHT去重
开源的轻量级分布式文件系统
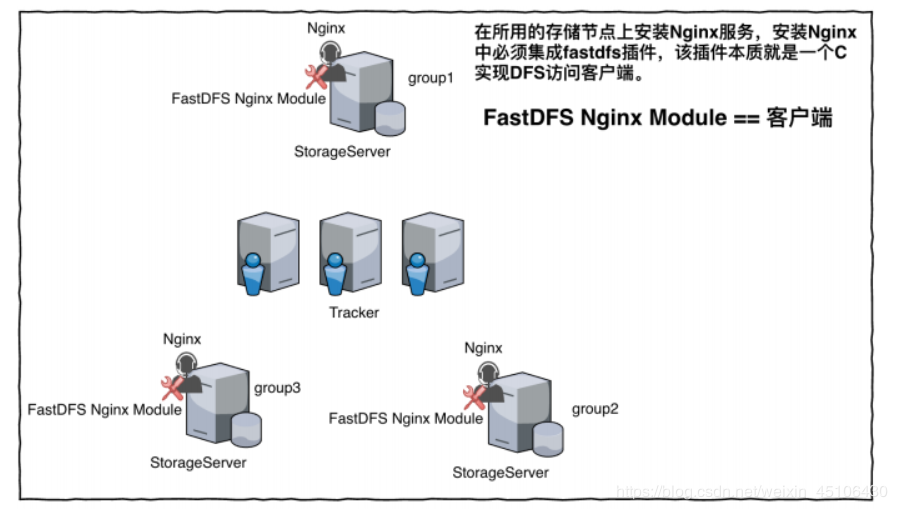
纯粹C语言实现 支持Linux FreeBSD等unix系统 类似CoogleFs/HDFS 但是不是通用的文件系统 只能通过专有的API访问 目前提供了C Java和PHPAPI 高性能,高扩展 不仅可以存储文件,还可以存储文件的元数据信息 架构FastDFS架构中有client tracker 和 storage服务
Client:用于提交文件给FastDFS集群
Tracker: 负责监控和调度Storage服务,起到负载均衡的作用
Storage: 服务负责实际数据的存储
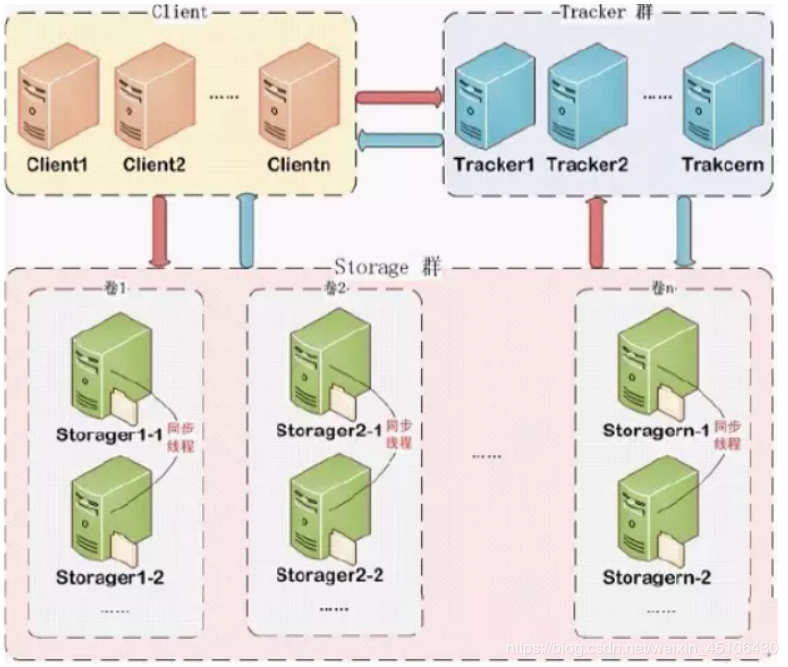
在Storage中,如果卷是一样的,就意味着这些服务之间的数据彼此互相备份,实现数据冗余的备份.而不同的卷则存储整个集群中的部分文件,类似于计算机中的(C盘/D盘…)
Tracker Server主要做工作的调度,在访问上起负载均衡的作用.在memory中记录集群中的group/ 卷 和Storage server的状态信息.是连接client和storage server的枢纽.
因为相关信息存储在memory中,所以tracker server性能非常高,一个较大的集群中有上百个group/ 卷 因此有3台就够了.
StorageServer: 存储服务器,文件和文件属性信息(meta数据) 都存储在服务器的disk上.
上传下载机制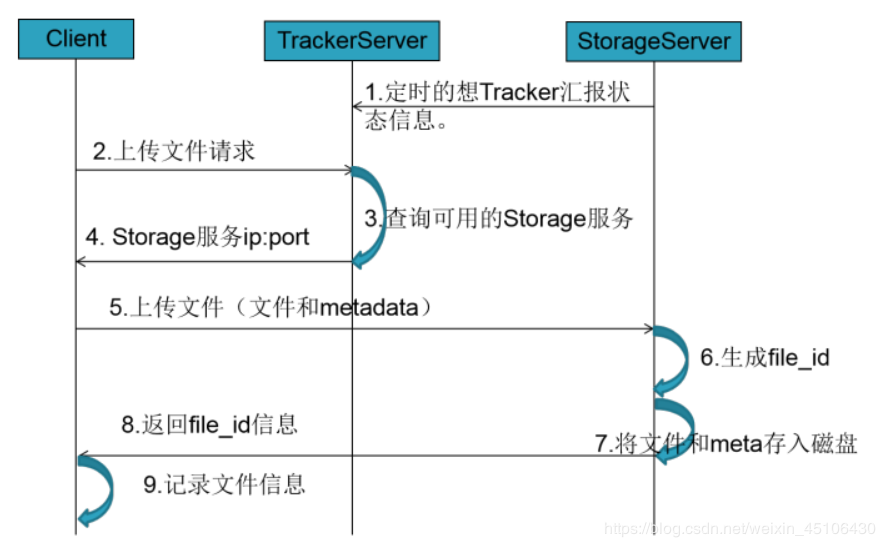
Storage Server会定期的向Tracker服务器汇报⾃身状态信息,例如健康状态和存储容量。
Client连接Tracker Server发送⽂件请求。
Tracker Server根据注册的Storage Server的信息返回⼀台可⽤的Storage Server的调⽤信息。
Client拿到信息后直接连接对应的Storage Server进⾏点到点的⽂件上传(附加元数据-可选)
Storage Server收到⽂件请求后会根据⾃⼰位置信息⽣成File_ID信息,并且将File_ID和⽤户携 带的元数据信息进⾏关联,然后将File_ID返回给Client。
返回的File_ID⽂件服务器并不会存储,需要Client端保留在外围数据库中,以后Client端可以通过File_ID下载对应的⽂件或者元数据。
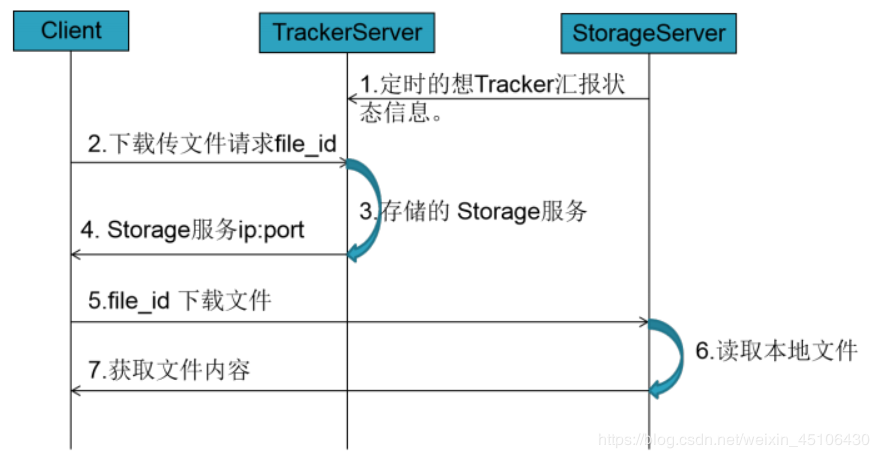
Storage Server会定期的向Tracker服务器汇报⾃身状态信息,例如健康状态和存储容量。
Client连接Tracker Server携带File_ID参数发送⽂件下载请求。
Tracker Server根据注册的Storage Server的信息返回⼀台可⽤的Storage Server的调⽤信息(主 从服务器)
Client拿到信息后直接连接对应的Storage Server进⾏点到点的⽂件下载(读取元数据)。
Storage Server收到⽂件请求后解析File_ID信息,读取本地的⽂件流,将数据写会Client端。
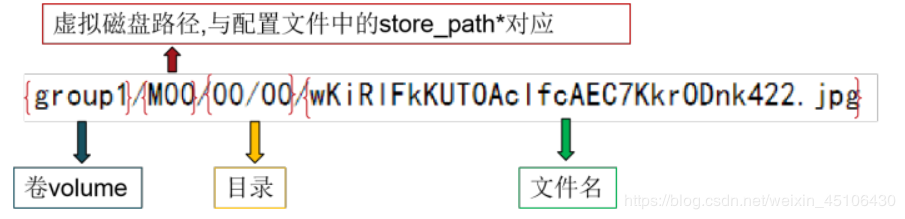
File_ID组成File_ID是由Storage Server⽣成并返回给Client端。File_ID包含了组/ 卷 和⽂件路径。Storage Server可以直接根据该⽂件名定位到该⽂件
10.15.0.10 CentOSA
10.15.0.10 CentOSB
10.15.0.10 CentOSC
资源下载安装
进入https://github.com/happyfish100⽹站下载FastDFS相关资源。建议使⽤⼩编给⼤家处理过的安装包
安装依赖报Libfastcommon https://github.com/happyfish100/libfastcommon/archive/V1.0.35.tar.gz[root@CentOSA/B/C ~]# yum install -y gcc-c++
[root@CentOSA/B/C ~]# tar -zxvf libfastcommon-1.0.35.tar.gz
[root@CentOSA/B/C ~]# cd libfastcommon-1.0.35
[root@CentOSA/B/C libfastcommon-1.0.35]# ./make.sh
[root@CentOSA/B/C libfastcommon-1.0.35]# ./make.sh install
安装FastDFS https://github.com/happyfish100/fastdfs/archive/V5.11.tar.gz
#安装依赖组件
[root@CentOSA/B/C ~]# yum install -y perl-devel
#解压
[root@CentOSA/B/C ~]# tar -zxvf fastdfs-5.11.tar.gz
#编译
[root@CentOSA/B/C fastdfs-5.11]# ./make.sh
[root@CentOSA/B/C fastdfs-5.11]# ./make.sh install
Tip:当软件安装结束后 默认FastDFS启动所需的配置文件放置在/etc/fdfs目录下
#默认配置包
[root@CentOSA/B/C ~]# tree /etc/fdfs/
/etc/fdfs/
├── client.conf.sample
├── storage.conf.sample
├── storage_ids.conf.sample
└── tracker.conf.sample
0 directories, 4 files
#可运行脚本
[root@CentOSA/B/C ~]# ls -l /etc/init.d/fdfs_*
-rwxr-xr-x. 1 root root 961 3月  21 02:08 /etc/init.d/fdfs_storaged
-rwxr-xr-x. 1 root root 963 3月  21 02:08 /etc/init.d/fdfs_trackerd
#执行程序
[root@CentOSA bin]# whereis fdfs_storaged fdfs_trackerd
fdfs_storaged: /usr/bin/fdfs_storaged
fdfs_trackerd: /usr/bin/fdfs_trackerd
配置服务
创建fdfs运行所需的数据目录
[root@CentOSA/B/C ~]# mkdir -p /data/fdfs/{tracker,storage/store01,storage/store02}
[root@CentOSA/B/C ~]# tree /data/
/data/
└── fdfs
    ├── storage
    │   ├── store01 #M00映射
    │   └── store02
    └── tracker #存储日志和元数据
5 directories, 0 files
创建启动所需的配置文件
将三个配置文件的后缀去掉
[root@CentOSA/B/C ~]# cp /etc/fdfs/tracker.conf.sample /etc/fdfs/tracker.conf
[root@CentOSA/B/C ~]# cp /etc/fdfs/storage.conf.sample /etc/fdfs/storage.conf
[root@CentOSA/B/C ~]# cp /etc/fdfs/client.conf.sample /etc/fdfs/client.conf
[root@CentOSA ~]# tree /etc/fdfs/
/etc/fdfs/
├── client.conf
├── client.conf.sample
├── storage.conf
├── storage.conf.sample
├── storage_ids.conf.sample
├── tracker.conf
└── tracker.conf.sample
配置Tracker Server
[root@CentOSA/B/C ~]# vim /etc/fdfs/tracker.conf
# 三台机器的静态ip 10 11 12
bind_addr=10.15.0.10
# the base path to store data and log files
base_path=/data/fdfs/tracker
配置Storage Server
[root@CentOSA/B/C ~]# vim /etc/fdfs/storage.conf
# 三台机器的静态ip 10 11 12
bind_addr=10.15.0.10
#三台机器组名分别是group1 group2 group3
group_name=group1
# the base path to store data and log files
base_path=/data/fdfs/storage
# path(disk or mount point) count, default value is 1
store_path_count=2
# store_path#, based 0, if store_path0 not exists, it's value is base_path
# the paths must be exist
store_path0=/data/fdfs/storage/store01
store_path1=/data/fdfs/storage/store02
# tracker_server can ocur more than once, and tracker_server format is
#  "host:port", host can be hostname or ip address
tracker_server=CentOSA:22122
tracker_server=CentOSB:22122
tracker_server=CentOSC:22122
配置Client端
[root@CentOSA/B/C ~]# vim /etc/fdfs/client.conf
# the base path to store log files
base_path=/tmp
# tracker_server can ocur more than once, and tracker_server format is
#  "host:port", host can be hostname or ip address
tracker_server=CentOSA:22122
tracker_server=CentOSB:22122
tracker_server=CentOSC:22122
注意时钟的同步 ntpdate.time.apple.com 锁clock -w
启动服务器[root@CentOSX ~]# /etc/init.d/fdfs_trackerd start|stop|restart
[root@CentOSX ~]# /etc/init.d/fdfs_storaged start|stop|restart
[root@CentOSA/B/C ~]# ps -aux | grep fdfs
root 5834 0.0 0.0 80052 1676 ? Sl 02:57 0:00 /usr/bin/fdfs_trackerd /etc/fdfs/tracker.conf
root 5861 80.6 0.0 14380 1068 ? R 02:57 0:02 /usr/bin/fdfs_storaged /etc/fdfs/storage.conf
root 5863 0.0 0.0 112728 972 pts/0 R+ 02:57 0:00 grep --color=auto fdfs
文件内部构造
[root@CentOSA ~]# cd /data/fdfs/storage/
[root@CentOSA storage]# ls
data  logs  store01  store02
[root@CentOSA storage]# ls store01/data/
00  0A  14  1E  28  32  3C  46  50  5A  64  6E  78  82  8C  96  A0  AA  B4  BE  C8  D2  DC  E6  F0  FA
01  0B  15  1F  29  33  3D  47  51  5B  65  6F  79  83  8D  97  A1  AB  B5  BF  C9  D3  DD  E7  F1  FB
02  0C  16  20  2A  34  3E  48  52  5C  66  70  7A  84  8E  98  A2  AC  B6  C0  CA  D4  DE  E8  F2  FC
03  0D  17  21  2B  35  3F  49  53  5D  67  71  7B  85  8F  99  A3  AD  B7  C1  CB  D5  DF  E9  F3  FD
04  0E  18  22  2C  36  40  4A  54  5E  68  72  7C  86  90  9A  A4  AE  B8  C2  CC  D6  E0  EA  F4  FE
05  0F  19  23  2D  37  41  4B  55  5F  69  73  7D  87  91  9B  A5  AF  B9  C3  CD  D7  E1  EB  F5  FF
06  10  1A  24  2E  38  42  4C  56  60  6A  74  7E  88  92  9C  A6  B0  BA  C4  CE  D8  E2  EC  F6
07  11  1B  25  2F  39  43  4D  57  61  6B  75  7F  89  93  9D  A7  B1  BB  C5  CF  D9  E3  ED  F7
08  12  1C  26  30  3A  44  4E  58  62  6C  76  80  8A  94  9E  A8  B2  BC  C6  D0  DA  E4  EE  F8
09  13  1D  27  31  3B  45  4F  59  63  6D  77  81  8B  95  9F  A9  B3  BD  C7  D1  DB  E5  EF  F9
FastDFS Shell-运维
上传文件
[root@CentOSA ~]# fdfs_upload_file /etc/fdfs/client.conf yt.txt
group1/M00/00/00/Cg8ACl51FfWAR0YLAAAAHPQAFVc922.txt
[root@CentOSA ~]# ls /data/fdfs/storage/store01/data/00/00
Cg8ACl51FfWAR0YLAAAAHPQAFVc922.txt
下载
[root@CentOSA ~]# fdfs_download_file /etc/fdfs/client.conf group1/M00/00/00/Cg8ACl51FfWAR0YLAAAAHPQAFVc922.txt
信息
[root@CentOSA ~]# fdfs_file_info /etc/fdfs/client.conf group1/M00/00/00/Cg8ACl51FfWAR0YLAAAAHPQAFVc922.txt
source storage id: 0
source ip address: 10.15.0.10
file create timestamp: 2020-03-21 03:13:57
file size: 28
file crc32: 4093646167 (0xF4001557)
删除文件
[root@CentOSA ~]# fdfs_delete_file /etc/fdfs/client.conf group1/M00/00/00/Cg8ACl51FfWAR0YLAAAAHPQAFVc922.txt
[root@CentOSA ~]# ls /data/fdfs/storage/store01/data/00/00/
[root@CentOSA ~]#
文件追加
[root@CentOSX ~]# clear
[root@CentOSX ~]# echo "hello" > 1.txt
[root@CentOSX ~]# echo "word" > 2.txt
[root@CentOSX ~]# fdfs_upload_appender /etc/fdfs/client.conf /root/1.txt
group2/M00/00/00/wKikgl0qX4KEep_PAAAAAIpZx2Y751.txt
[root@CentOSX ~]# fdfs_append_file /etc/fdfs/client.conf
group2/M00/00/00/wKikgl0qX4KEep_PAAAAAIpZx2Y751.txt 2.txt
[root@CentOSX ~]# fdfs_download_file /etc/fdfs/client.conf
group2/M00/00/00/wKikgl0qX4KEep_PAAAAAIpZx2Y751.txt
[root@CentOSX ~]# cat wKikgl0qX4KEep_PAAAAAIpZx2Y751.txt
hello
word
监视状态
[root@CentOSX ~]# fdfs_monitor /etc/fdfs/client.conf
文件校验和
[root@CentOSX ~]# fdfs_crc32 /etc/fdfs/client.conf
group2/M00/00/00/wKikgl0qX4KEep_PAAAAAIpZx2Y751.txt
2911662598
51.txt
[root@CentOSX ~]# cat wKikgl0qX4KEep_PAAAAAIpZx2Y751.txt
hello
word
监视状态
[root@CentOSX ~]# fdfs_monitor /etc/fdfs/client.conf
文件校验和
[root@CentOSX ~]# fdfs_crc32 /etc/fdfs/client.conf
group2/M00/00/00/wKikgl0qX4KEep_PAAAAAIpZx2Y751.txt
2911662598
Nginx集成FastDFS
[root@CentOSA/B/C ~]# tar -zxvf fastdfs-nginx-module.tar.gz
[root@CentOSA/B/C ~]# tree fastdfs-nginx-module
fastdfs-nginx-module
└── src
    ├── common.c
    ├── common.h
    ├── config
    ├── mod_fastdfs.conf
    └── ngx_http_fastdfs_module.c
1 directory, 5 files  #作用:编译nginx时把插件编译进去
#安装相关依赖
[root@CentOSA/B/C ~]# yum install -y pcre-devel
[root@CentOSA/B/C ~]# yum install -y openssl-devel
#从网络获取资源安装nginx
[root@CentOSA/B/C ~]# wget http://nginx.org/download/nginx-1.11.1.tar.gz
#指定安装目录 添加编译模块
[root@CentOSA/B/C nginx-1.11.1]# ./configure --prefix=/usr/local/ngin-1.11.1/ --add-module=/root/fastdfs-nginx-module/src
[root@CentOSA/B/C nginx-1.11.1]# make
[root@CentOSA/B/C nginx-1.11.1]# make install
拷贝配置
[root@CentOSA/B/C nginx-1.11.1]# cp /root/fastdfs-nginx-module/src/mod_fastdfs.conf /etc/fdfs/
[root@CentOSA/B/C nginx-1.11.1]# cd /root/fastdfs-5.11/conf/
[root@CentOSA/B/C conf]# cp http.conf mime.types anti-steal.jpg /etc/fdfs/
配置nginx.conf
[root@CentOSA/B/C ~]# vim /usr/local/ngin-1.11.1/conf/nginx.conf
#找到location 添加如下配置
#access_log logs/host.access.log main;
 location ~ /group[0-9]+/M00 {
 root /data/fdfs/storage/store01;
 ngx_fastdfs_module;
 }
 location ~ /group[0-9]+/M01 {
 root /data/fdfs/storage/store02;
 ngx_fastdfs_module;
 }
location / {
 root html;
 index index.html index.htm;
 }
修改mod_fastdfs.conf
[root@CentOSA/B/C ~]# vim /etc/fdfs/mod_fastdfs.conf
# valid only when load_fdfs_parameters_from_tracker is true
tracker_server=CentOSA:22122
tracker_server=CentOSB:22122
tracker_server=CentOSC:22122
# the group name of the local storage server
#分别将三台机器的group_name改为 group1 group2 group3
group_name=group1/group2/group3
# default value is false
url_have_group_name = true
# must same as storage.conf
store_path_count=2
# must same as storage.conf
store_path0=/data/fdfs/storage/store01
store_path1=/data/fdfs/storage/store02
启动nginx
[root@CentOSA/B/C ~]# cd /usr/local/ngin-1.11.1/
#检查配置是否成功
[root@CentOSA ngin-1.11.1]# ./sbin/nginx -t
ngx_http_fastdfs_set pid=4846
ngx_http_fastdfs_set pid=4846
nginx: the configuration file /usr/local/ngin-1.11.1//conf/nginx.conf syntax is ok
nginx: configuration file /usr/local/ngin-1.11.1//conf/nginx.conf test is successful
[root@CentOSA ngin-1.11.1]# ./sbin/nginx
ngx_http_fastdfs_set pid=4847
ngx_http_fastdfs_set pid=4847
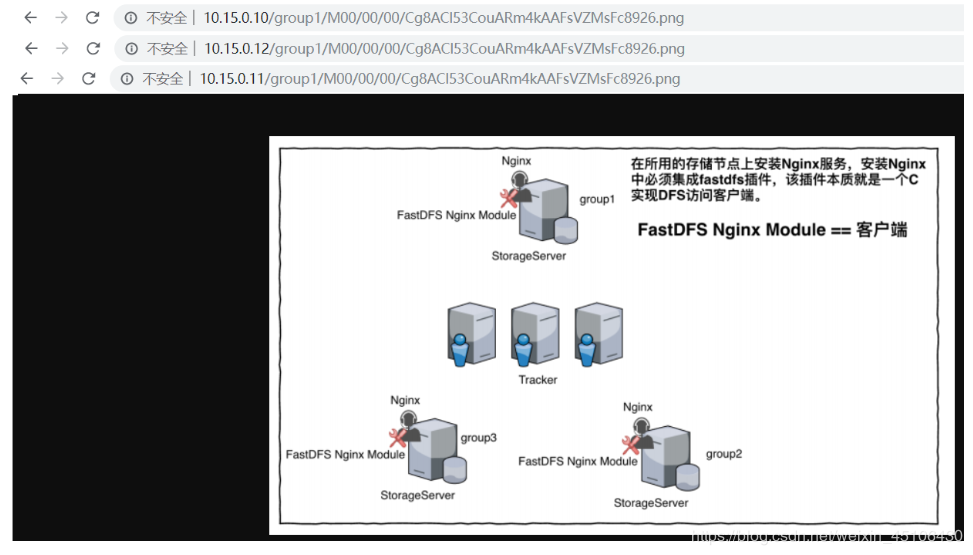
测试上传
[root@CentOSB ~]# fdfs_upload_file /etc/fdfs/client.conf 1584770671369.png
group1/M00/00/00/Cg8ACl53CouARm4kAAFsVZMsFc8926.png
访问web
http://10.15.0.10/group1/M00/00/00/Cg8ACl53CouARm4kAAFsVZMsFc8926.png
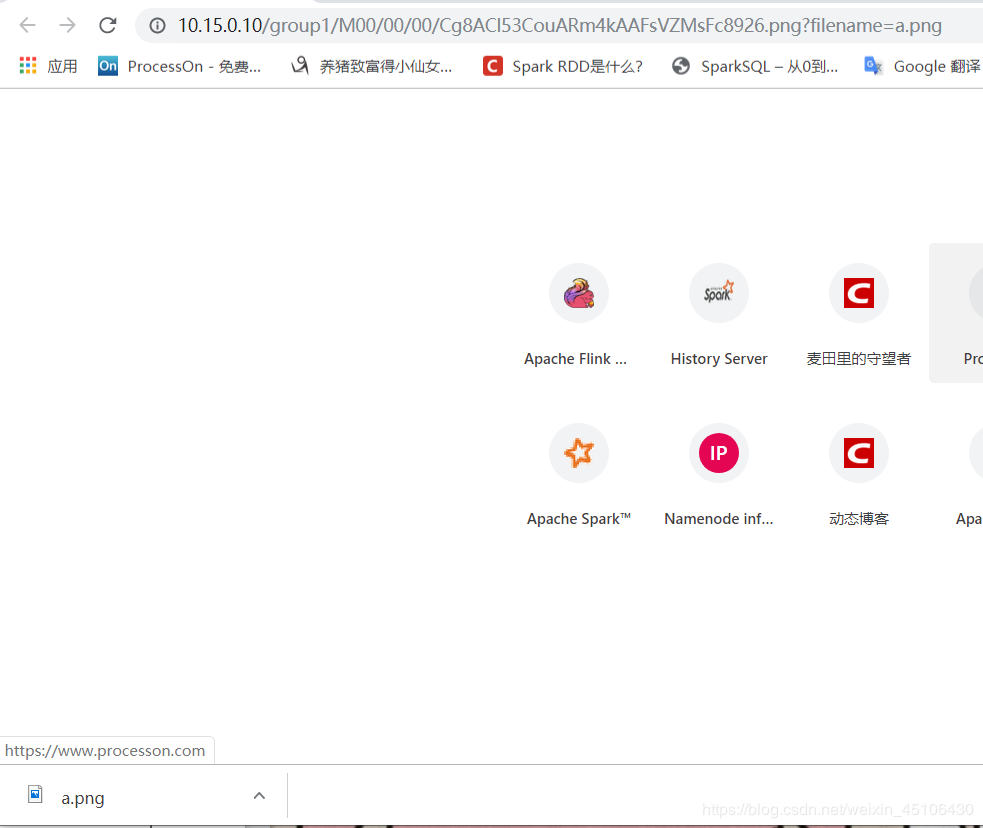
用户再请求的时候,可以选择性添加文件名,用于修改下载的文件名
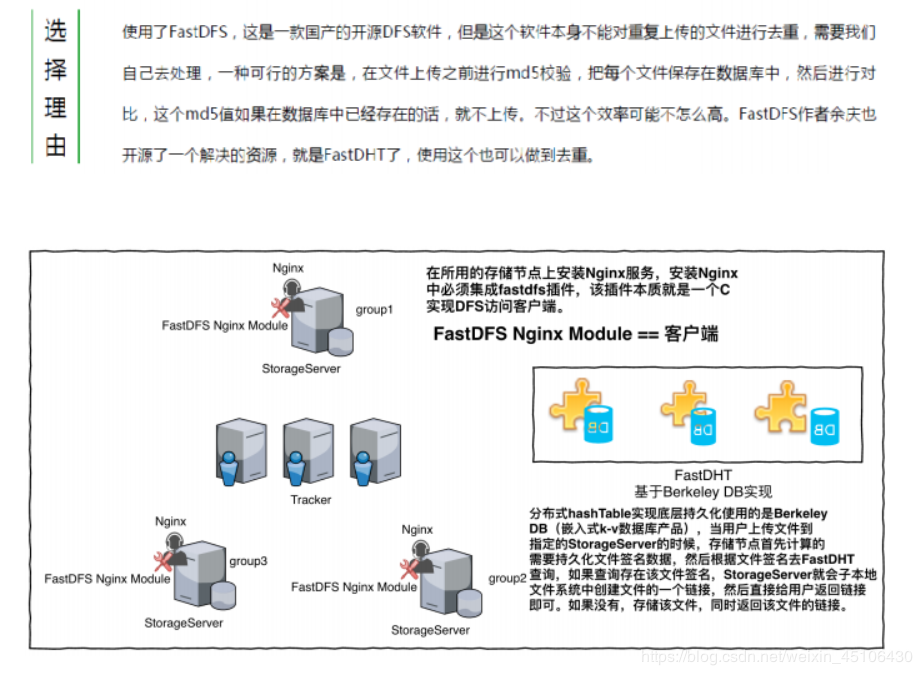
FastDHT文件去重FastDFS除了提供了于nginx的集成,已提供了去重的文件解决方案.该解决方案FastDFS的作者yuqing也再github上以FastDHT分支贡献出来
FastDHT is a high performance distributed hash table (DHT) which based key value pairs. It can store mass key value pairs such as filename mapping, session data and user related data.
#上传安装包
[root@CentOSA/B/C ~]# tar -zxvf db-4.7.25.tar.gz
[root@CentOSA/B/C ~]# cd db-4.7.25
[root@CentOSA/B/C db-4.7.25]# cd build_unix/
[root@CentOSA/B/C build_unix]# ./../dist/configure
[root@CentOSA/B/C build_unix]# make
[root@CentOSA/B/C build_unix]# make install
安装FastDHT
[root@CentOSA/B/C ~]# tar -zxvf FastDHT_v2.01.tar.gz
[root@CentOSA/B/C FastDHT]# ./make.sh
[root@CentOSA/B/C FastDHT]# ./make.sh install
安装结束后会在/etc目录下产生fdht文件夹
[root@CentOSA FastDHT]# tree /etc/fdht/
/etc/fdht/
├── fdht_client.conf
├── fdhtd.conf
└── fdht_servers.conf
0 directories, 3 files
修改fdhtd.conf
[root@CentOSA/B/C ~]# mkdir /data/fastdht
[root@CentOSA/B/C ~]# vim /etc/fdht/fdhtd.conf
# the base path to store data and log files
base_path=/data/fastdht
修改fdht_servers.conf
[root@CentOSA/B/C ~]# vim /etc/fdht/fdht_servers.conf
#未来有三个分区
group_count = 3
#每个节点存储一个分区的数据
group0 = CentOSA:11411
group1 = CentOSB:11411
group2 = CentOSC:11411
修改fdht_client.conf配置文件
[root@CentOSA/B/C ~]# vim /etc/fdht/fdht_client.conf
# default value is 0 (short connection)
keep_alive=1
base_path=/tmp/
启动FSHT服务
[root@CentOSA/B/C ~]# fdhtd /etc/fdht/fdhtd.conf start
[root@CentOSA ~]# tree /data/fastdht/
/data/fastdht/
├── data
│   ├── db000
│   ├── db_recovery_mark.dat
│   ├── fdhtd.pid
│   ├── stat.dat
│   └── sync
│       ├── binlog.00000
│       └── binlog.index
├── __db.001
├── __db.002
├── __db.003
├── logs
│   └── fdhtd.log
└── tmp
4 directories, 10 files
[root@CentOSA/B/C ~]# ps -axu | grep fd
root       4870  0.0  0.0 145576  1680 ?        Sl   14:47   0:02 /usr/bin/fdfs_trackerd /etc/fdfs/tracker.conf
root       4894  0.0  3.5  86396 67056 ?        Sl   14:47   0:01 /usr/bin/fdfs_storaged /etc/fdfs/storage.conf
root      33122  0.9  0.9 198712 17352 ?        Sl   16:04   0:00 fdhtd /etc/fdht/fdhtd.conf start
root      33134  0.0  0.0 112728   972 pts/0    R+   16:04   0:00 grep --color=auto fd
操作FastDHT服务
设置值
[root@CentOSA ~]# fdht_set /etc/fdht/fdht_client.conf yangt:user001 name='yangt',age=20;
This is FastDHT client test program v2.01
Copyright (C) 2008, Happy Fish / YuQing
FastDHT may be copied only under the terms of the GNU General
Public License V3, which may be found in the FastDHT source kit.
Please visit the FastDHT Home Page http://www.csource.org/
for more detail.
success set key count: 2, fail count: 0
读取值
[root@CentOSA ~]# fdht_get /etc/fdht/fdht_client.conf yangt:user001 name,age
This is FastDHT client test program v2.01
Copyright (C) 2008, Happy Fish / YuQing
FastDHT may be copied only under the terms of the GNU General
Public License V3, which may be found in the FastDHT source kit.
Please visit the FastDHT Home Page http://www.csource.org/
for more detail.
name=yangt
age=20
success get key count: 2, fail count: 0
删除值
[root@CentOSA ~]# fdht_delete /etc/fdht/fdht_client.conf yangt:user001 name,age;
This is FastDHT client test program v2.01
Copyright (C) 2008, Happy Fish / YuQing
FastDHT may be copied only under the terms of the GNU General
Public License V3, which may be found in the FastDHT source kit.
Please visit the FastDHT Home Page http://www.csource.org/
for more detail.
success delete keys: name, age
success delete key count: 2, fail count: 0
集成FastDHT
修改etc/fdfs/storage.conf配置文件
[root@CentOSA/B/C ~]# vim /etc/fdfs/storage.conf
# if check file duplicate, when set to true, use FastDHT to store file indexes
# 1 or yes: need check
# 0 or no: do not check
# default value is 0
#检查文件重复 默认是0
check_file_duplicate=1
# set keep_alive to 1 to enable persistent connection with FastDHT servers
# default value is 0 (short connection)
#保证storge server和fastdht的长连接
keep_alive=1
#导入 告诉它FastDHT服务在哪里
##include /home/yuqing/fastdht/conf/fdht_servers.conf
#去掉一个#就是导报指令
#include /etc/fdht/fdht_servers.conf
分别启动fdhtd服务 fastfs
[root@CentOSA/B/C ~]# /usr/local/bin/fdhtd /etc/fdht/fdhtd.conf restart
waiting for pid [33122] exit ...
starting ...
[root@CentOSA/B/C ~]# /etc/init.d/fdfs_trackerd restart
Restarting fdfs_trackerd (via systemctl):  [  确定  ]
[root@CentOSA/B/C ~]# /etc/init.d/fdfs_storaged restart
Restarting fdfs_storaged (via systemctl):  [  确定  ]
上传文件测试
#重复上传一个文件
[root@CentOSC ~]# fdfs_upload_file /etc/fdfs/client.conf demo.log
group1/M01/00/00/Cg8ACl53Je2AA1o-AAAADZmoXFg604.log
[root@CentOSC ~]# fdfs_upload_file /etc/fdfs/client.conf demo.log
group1/M00/00/00/Cg8ACl53Jt2AXAVwAAAADZmoXFg937.log
#查看文件
[root@CentOSA ~]# ls -l /data/fdfs/storage/store02/data/00/00/                              总用量 8
-rw-r--r--. 1 root root 13 3月  22 16:46 Cg8ACl53Je2AA1o-AAAADZmoXFg604.log
#删除重复上传的其中一个文件
[root@CentOSA ~]# fdfs_delete_file /etc/fdfs/client.conf group1/M01/00/00/Cg8ACl53Je2AA1o-AAAADZmoXFg604.log
#查看目录
[root@CentOSA ~]# ls -l /data/fdfs/storage/store02/data/00/00/                              总用量 0
作者:每天都超级可爱