理解Batch Normalization(含实现代码)
上文提过不要在神经网络中使用dropout层,用BN层可以获得更好的模型。经典论文《Batch Normalization: Accelerating Deep Network Training by Reducing Internal Covariate Shift》提出了Batch Normalization 批标准化的概念, towardsdatascience上一文《Intuit and Implement: Batch Normalization》详细解释了BN的原理,并通过在Cifar 100上的实验证明了其有效性。全文编译如下。
神经网络在训练过程中的问题神经网络在训练过程中往往会遇到一些问题:
问题1: 随着网络训练,浅层的权重发生变化,导致深层的输入变化很大。因此每层必须根据每批输入的不同分布重新调整其权重。这减缓了模型训练。如果我们可以使层的输入分布更相似,那么网络可以专注于学习类别之间的差异。
不同批次分布的另一个影响是梯度弥散。梯度弥散是一个大问题,特别是对于S形激活函数(sigmoid)。如果g(x)表示sigmoid激活函数,随着 |x| 增加,g’(x)趋于零。

问题2:当输入分布变化时,神经元输出也会变化。这导致神经元输出偶尔波动到S形函数的可饱和区域。在那里,神经元既不能更新自己的权重,也不能将梯度传递回先前的层。那么我们该如何保证神经元输出到不饱和区域?
如果我们可以将神经元输出限制在零附近的区域,我们可以确保每个层在反向传播期间都会返回一个有效的梯度。这将减少训练时间和提高准确率。
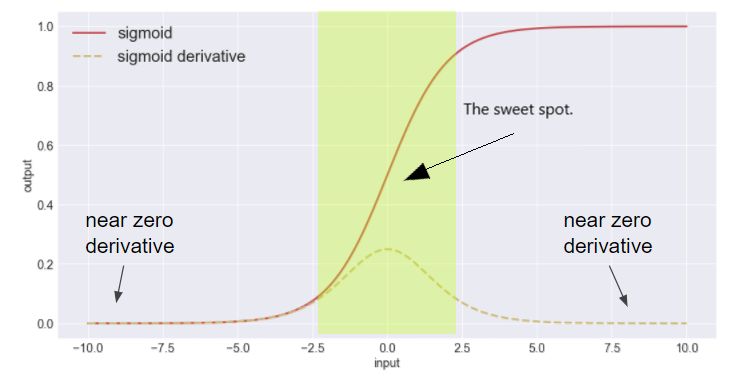
批量标准化减轻了不同层输入对训练的影响。通过归一化神经元的输出,激活函数将仅接收接近零的输入。这确保了梯度的有效回传,解决了第二个问题。
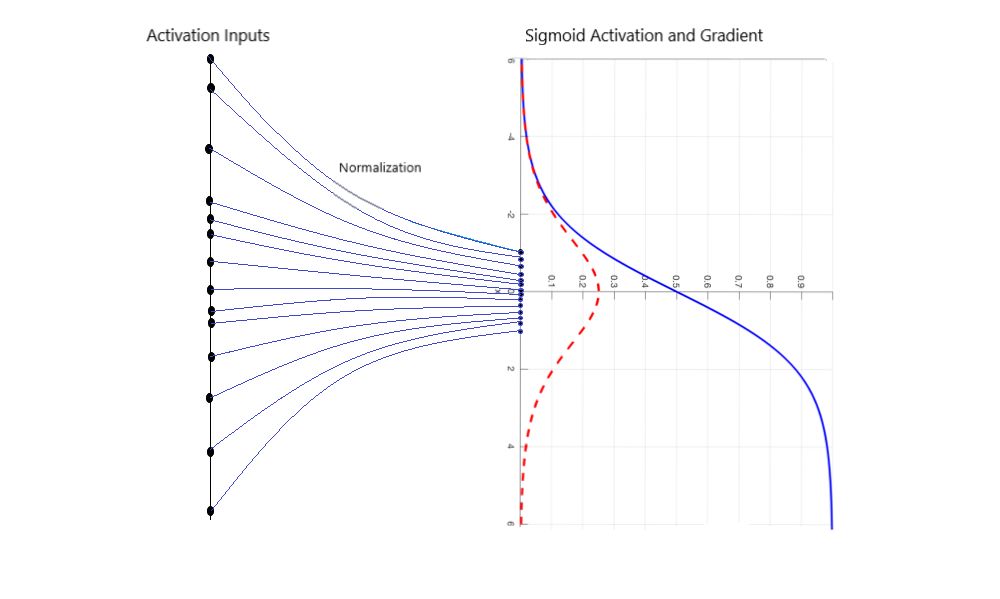
批量归一化将层输出转换为单位高斯分布。当这些输出通过激活功能馈送时,层激活也将变得更加正常分布。
由于上一层的输出是下一层的输入,因此层输入的变化在不同批次输间的变化将显着减少。通过减少层的输入的变化分布,我们解决了第一个问题。
数学解释通过批量归一化,我们为每个激活函数寻找均值为0,方差为1的分布作为输入。在训练期间,我们将激活输入x减去批次均值μ以实现零中心分布。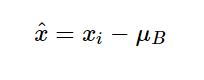
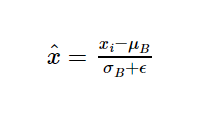
接下来,我们取x并将其除以批处理方差和一个小数字,以防止除以零σ+ε。这可确保所有激活输入分布方差为1。
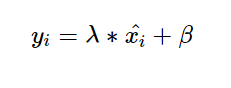
最后,我们将得到的x进行线性变换。这样尽管在反向传播期间网络发生了变化,但仍能确保保持这种标准化效果。
在测试模型时,我们不使用当前批次均值或方差,因为这会破坏模型。相反,我们计算训� �群体的移动均值和方差估计值。这些估计值是训练期间计算的所有批次平均值和方差的平均值。
批标准化的好处1.有助于减少具有可饱和非线性函数的网络中的消失梯度问题。
通过批标准化,我们确保任何激活函数的输入不会进入饱和区域。批量归一化将这些输入的分布转换为0-1高斯分布。
2.正则化模型
Ioffe和Svegeddy提出了这一主张,但没有就此问题进行深入探讨。也许这是归一化层输入的结果?
3.允许更高的学习率
通过防止在训练期间消失梯度的问题,我们可以设置更高的学习率。批量标准化还降低了对参数标度的依赖性。大的学习速率可以增加层参数的规模,这导致梯度在反向传播期间被回传时放大。
导入需要的库
import tensorflow as tf import numpy as np import os import keras from keras.preprocessing.image import ImageDataGenerator, array_to_img, img_to_array, load_img import matplotlib.pyplot as plt import matplotlib.image as mpimg from keras.models import Model, Sequential from keras.layers import Input from keras.callbacks import ModelCheckpoint, EarlyStopping from keras.layers import BatchNormalization from keras.layers import GlobalAveragePooling2D from keras.layers import Activation from keras.layers import Conv2D, MaxPooling2D, Dense from keras.layers import MaxPooling2D, Dropout, Flatten import time
数据加载和预处理
我们使用了Cifar 100数据集,因为它具有一定的挑战性,并且不会训练太久。唯一的预处理是zero-centering和image variation generator。
from keras.datasets import cifar100 from keras.utils import np_utils (x_train, y_train), (x_test, y_test) = cifar100.load_data(label_mode='fine') #scale and regularize the dataset x_train = (x_train-np.mean(x_train)) x_test = (x_test - x_test.mean()) x_train = x_train.astype('float32') x_test = x_test.astype('float32') #onehot encode the target classes y_train = np_utils.to_categorical(y_train) y_test = np_utils.to_categorical(y_test) train_datagen = ImageDataGenerator( shear_range=0.2, zoom_range=0.2, horizontal_flip=True) train_datagen.fit(x_train) train_generator = train_datagen.flow(x_train, y = y_train, batch_size=80,)
在Keras中构建模型
我们的架构将包括堆叠的3x3卷积。每个网络中有5个卷积块。最后一层是一个完全连接的层,有100个节点与softmax激活。
我们将构建4个不同的卷积网络,每个网络都具有sigmoid或ReLU激活以及批量标准化或不标准化。我们将比较每个网络的验证损失。
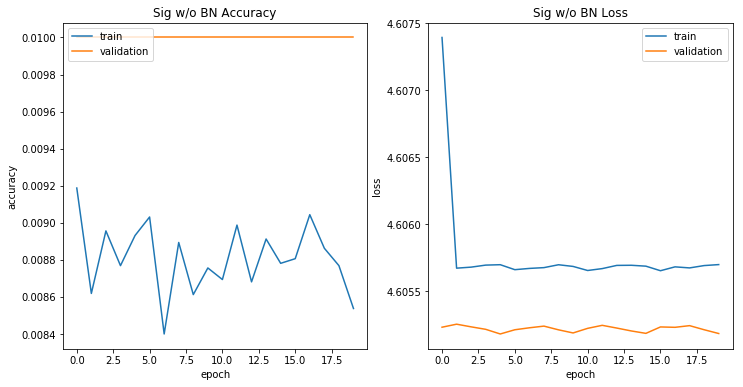
def conv_block_first(model, bn=True, activation="sigmoid"): """ The first convolutional block in each architecture. Only separate so we can specify the input shape. """ #First Stacked Convolution model.add(Conv2D(60,3, padding = "same", input_shape = x_train.shape[1:])) if bn: model.add(BatchNormalization()) model.add(Activation(activation)) #Second Stacked Convolution model.add(Conv2D(60,3, padding = "same")) if bn: model.add(BatchNormalization()) model.add(Activation(activation)) model.add(MaxPooling2D()) model.add(Dropout(0.15)) return model def conv_block(model, bn=True, activation = "sigmoid"): """ Generic convolutional block with 2 stacked 3x3 convolutions, max pooling, dropout, and an optional Batch Normalization. """ model.add(Conv2D(60,3, padding = "same")) if bn: model.add(BatchNormalization()) model.add(Activation(activation)) model.add(Conv2D(60,3, padding = "same")) if bn: model.add(BatchNormalization()) model.add(Activation(activation)) model.add(MaxPooling2D()) model.add(Dropout(0.15)) return model def conv_block_final(model, bn=True, activation = "sigmoid"): """ I bumped up the number of filters in the final block. I made this separate so that I might be able to integrate Global Average Pooling later on. """ model.add(Conv2D(100,3, padding = "same")) if bn: model.add(BatchNormalization()) model.add(Activation(activation)) model.add(Conv2D(100,3, padding = "same")) if bn: model.add(BatchNormalization()) model.add(Activation(activation)) model.add(Flatten()) return model def fn_block(model): model.add(Dense(100, activation = "softmax")) return model def build_model(blocks=3, bn=True, activation = "sigmoid"): """ Builds a sequential network based on the specified parameters. blocks: number of convolutional blocks in the network, must be greater than 2. bn: whether to include batch normalization or not. activation: activation function to use throughout the network. """ model = Sequential() model = conv_block_first(model, bn=bn, activation=activation) for block in range(1,blocks-1): model = conv_block(model, bn=bn, activation = activation) model = conv_block_final(model, bn=bn, activation=activation) model = fn_block(model) return model def compile_model(model, optimizer = "rmsprop", loss = "categorical_crossentropy", metrics = ["accuracy"]): """ Compiles a neural network. model: the network to be compiled. optimizer: the optimizer to use. loss: the loss to use. metrics: a list of keras metrics. """ model.compile(optimizer = optimizer, loss = loss, metrics = metrics) return model #COMPILING THE 4 MODELS sigmoid_without_bn = build_model(blocks = 5, bn=False, activation = "sigmoid") sigmoid_without_bn = compile_model(sigmoid_without_bn) sigmoid_with_bn = build_model(blocks = 5, bn=True, activation = "sigmoid") sigmoid_with_bn = compile_model(sigmoid_with_bn) relu_without_bn = build_model(blocks = 5, bn=False, activation = "relu") relu_without_bn = compile_model(relu_without_bn) relu_with_bn = build_model(blocks = 5, bn=True, activation = "relu") relu_with_bn = compile_model(relu_with_bn)模型训练没有BN的Sigmoid
可以看到训练无法收敛。有100个类,这个模型永远不会比随机猜测(10%准确率)获得更好的性能。
history1 = sigmoid_without_bn.fit_generator( train_generator, steps_per_epoch=2000, epochs=20, verbose=0, validation_data=(x_test, y_test), callbacks = [model_checkpoint])
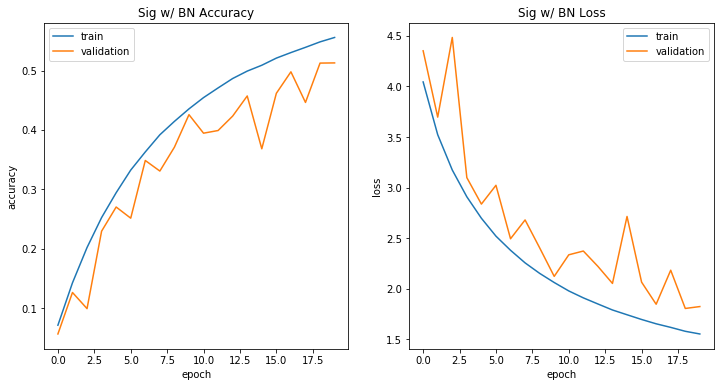
具有BN的Sigmoid
与没有批量标准化不同,该模型在培训期间开始实施。这可能是批量标准化减轻消失梯度的结果。
history2 = sigmoid_with_bn.fit_generator( train_generator, steps_per_epoch=2000, verbose=0, epochs=20, validation_data=(x_test, y_test), callbacks = [model_checkpoint])
没有BN的ReLU
在没有批量规范的情况下实施ReLU使得训练初始效果不错,然后模型收敛到非最优的局部最小值。
history3 = relu_without_bn.fit_generator( train_generator, steps_per_epoch=2000, epochs=20, verbose=0, validation_data=(x_test, y_test), callbacks = [model_checkpoint])
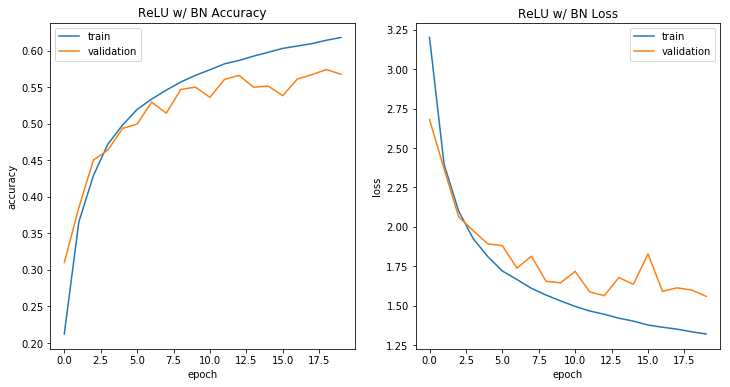
具有BN的ReLU
与sigmoid模型一样,批量标准化提高了该网络的训练能力。
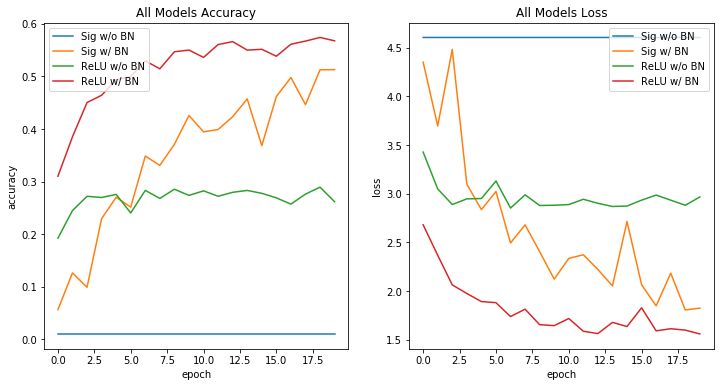
history4 = relu_with_bn.fit_generator( train_generator, steps_per_epoch=2000, verbose=0, epochs=20, validation_data=(x_test, y_test), callbacks = [model_checkpoint])架构比较
我们清楚地看到了批量标准化的优势。没有批量标准化的ReLU和Sigmoid模型都无法保持训练性能提升。这可能是渐变消失的结果。具有批量标准化的体系结构训练得更快,并且比没有批量标准化的体系结构表现更好。
结论
批量标准化减少了训练时间并提高了神经网络的稳定性。此效果适用于sigmoid和ReLU激活功能。
参考资料&延伸阅读
代码:https://github.com/harrisonjansma/Research-Computer-Vision/tree/master/07-28-18-Implementing-Batch-Norm[Intuit and Implement: Batch Normalization](https://towardsdatascience.com/intuit-and-implement-batch-normalization-c05480333c5b)
[Batch Normalization: Accelerating Deep Network Training by Reducing Internal Covariate Shift](https://arxiv.org/abs/1502.03167)
[Insert a batch normalization before or after nonlinearities](http://cs231n.stanford.edu/slides/2017/cs231n_2017_lecture6.pdf)
[For an explanation of the math and implementation in TensorFlow]
(https://towardsdatascience.com/pitfalls-of-batch-norm-in-tensorflow-and-sanity-checks-for-training-networks-e86c207548c8)
与我交流github: https://github.com/keloli
blog: https://www.jianshu.com/u/d055ee434e59
往期回顾之作者李中梁
【1】【TPAMI重磅综述】 SIFT与CNN的碰撞:万字长文回顾图像检索任务十年探索历程(上篇)
【2】【TPAMI重磅综述】 SIFT与CNN的碰撞:万字长文回顾图像检索任务十年探索历程(下篇)
【3】超快速!10分钟入门Keras指南
【4】老衲这里有七条炼丹经验传授与你
【5】Dropout VS BN: 别在你的网络中使用Dropout
机器学习算法工程师
一个用心的公众号
长按,识别,加关注
进群,学习,得帮助
你的关注,我们的热度,
我们一定给你学习最大的帮助
作者:l7H9JA4