pytest接口自动化测试框架搭建的全过程
一. 背景
二. 基础环境
三. 项目结构
四、框架解析
4.1 接口数据文件处理
4.2 封装测试工具类
4.3 测试用例代码编写
4.4 测试用例运行生成报告
总结
一. 背景Pytest目前已经成为Python系自动化测试必学必备的一个框架,网上也有很多的文章讲述相关的知识。最近自己也抽时间梳理了一份pytest接口自动化测试框架,因此准备写文章记录一下,做到尽量简单通俗易懂,当然前提是基本的python基础已经掌握了。如果能够对新学习这个框架的同学起到一些帮助,那就更好了~
二. 基础环境语言:python 3.8
编译器:pycharm
基础:具备python编程基础
框架:pytest+requests+allure
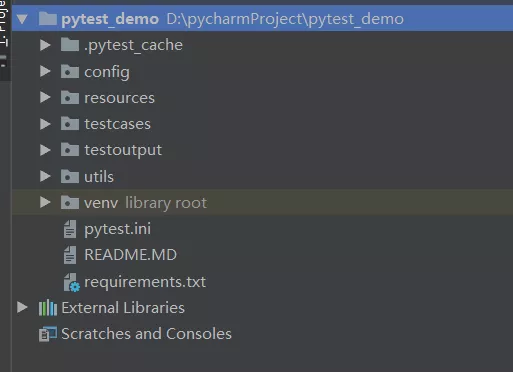
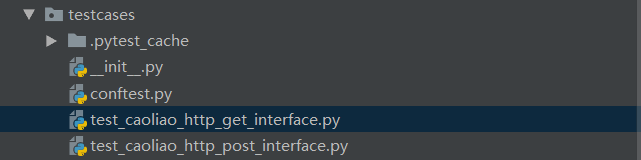
三. 项目结构项目结构图如下:
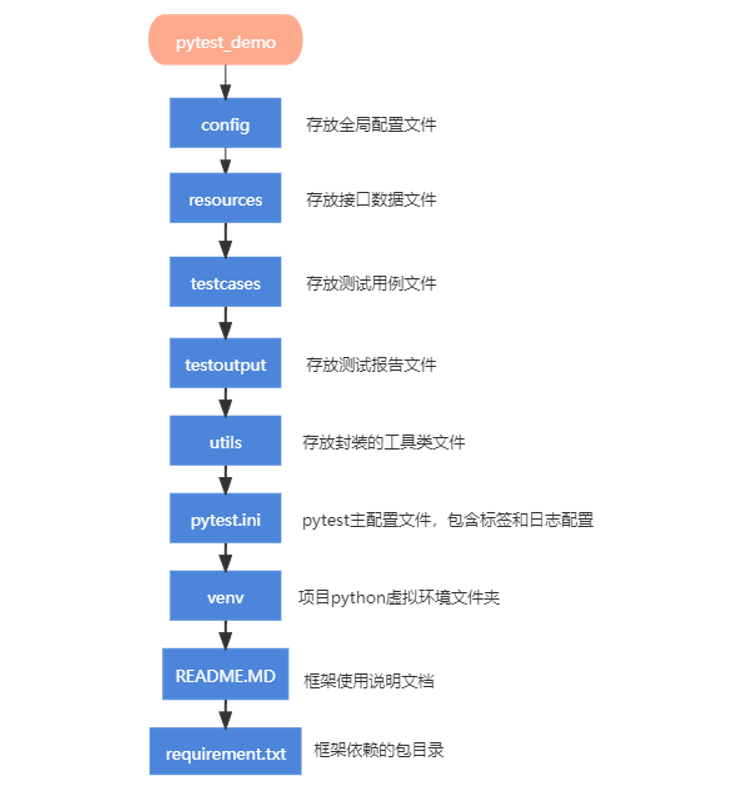
每一层具体的含义如下图:
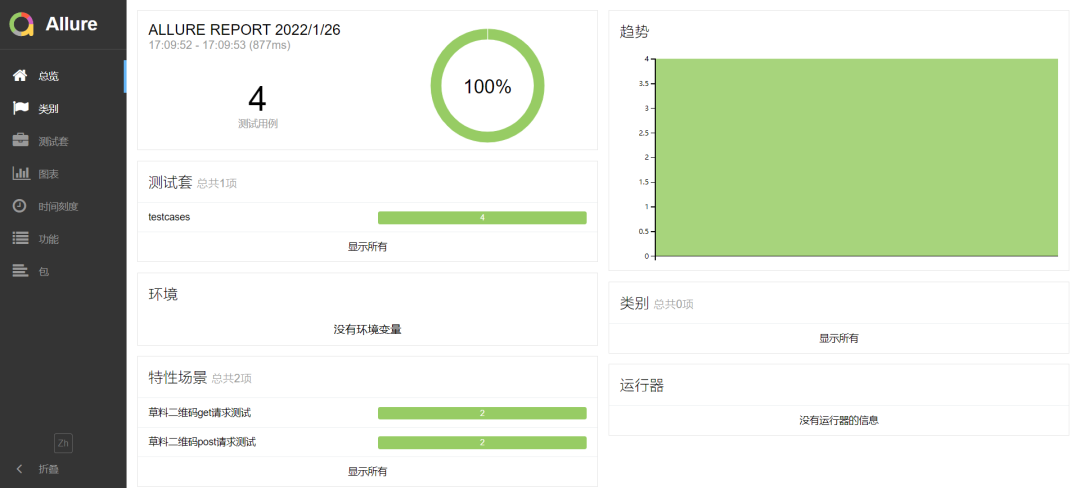
测试报告如下图:

框架中使用草料二维码的get和post接口用于demo测试,比如:
get接口:https://cli.im/qrcode/getDefaultComponentMsg
返回值:{“code”:1,“msg”:"",“data”:{xxxxx}}
数据文件这里选择使用Json格式,文件内容格式如下,test_http_get_data.json:
{
  "dataItem": [
    {
      "id": "testget-1",
      "name": "草料二维码get接口1",
      "headers":{
        "Accept-Encoding":"gzip, deflate, br"
      },
      "url":"/qrcode/getDefaultComponentMsg",
      "method":"get",
      "expectdata": {
        "code": "1"
      }
    },
    {
      "id": "testget-2",
      "name": "草料二维码get接口2",
      "headers":{},
      "url":"/qrcode/getDefaultComponentMsg",
      "method":"get",
      "expectdata": {
        "code": "1"
      }
    }
  ]
}
表示dataitem下有两条case,每条case里面声明了id, name, header, url, method, expectdata。如果是post请求的话,case中会多一个parameters表示入参,如下:
{
    "id":"testpost-1",
    "name":"草料二维码post接口1",
    "url":"/Apis/QrCode/saveStatic",
    "headers":{
        "Content-Type":"application/x-www-form-urlencoded",
        "Accept-Encoding":"gzip, deflate, br"
    },
    "parameters":{
        "info":11111,
        "content":11111,
        "level":"H",
        "size":500,
        "fgcolor":"#000000",
        "bggcolor":"#FFFFFF",
        "transparent":"false",
        "type":"text",
        "codeimg":1
    },
    "expectdata":{
        "status":"1",
        "qrtype":"static"
    }
}
为了方便一套脚本用于不同的环境运行,不用换了环境后挨个儿去改数据文件,比如
测试环境URL为:https://testcli.im/qrcode/getDefaultComponentMsg
生产环境URL为:https://cli.im/qrcode/getDefaultComponentMsg
因此数据文件中url只填写后半段,不填域名。然后config》global_config.py下设置全局变量来定义域名:
# 配置HTTP接口的域名,方便一套脚本用于多套环境运行时,只需要改这里的全局配置就OK
CAOLIAO_HTTP_POST_HOST = "https://cli.im"
CAOLIAO_HTTP_GET_HOST = "https://nc.cli.im"
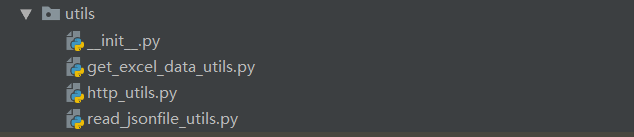
utils文件夹下,创建工具类文件:read_jsonfile_utils.py, 用于读取json文件内容:
import json
import os
class ReadJsonFileUtils:
    def __init__(self, file_name):
        self.file_name = file_name
        self.data = self.get_data()
    def get_data(self):
        fp = open(self.file_name,encoding='utf-8')
        data = json.load(fp)
        fp.close()
        return data
    def get_value(self, id):
        return self.data[id]
    @staticmethod
    def get_data_path(folder, fileName):
        BASE_PATH = os.path.dirname(os.path.dirname(os.path.realpath(__file__)))
        data_file_path = os.path.join(BASE_PATH, folder, fileName)
        return data_file_path
if __name__ == '__main__':
    opers = ReadJsonFileUtils("..\\resources\\test_http_post_data.json")
    #读取文件中的dataItem,是一个list列表,list列表中包含多个字典
    dataitem=opers.get_value('dataItem')
    print(dataitem)
运行结果如下:

utils文件夹下,除了上面提到的读取Json文件工具类:read_jsonfile_utils.py,还有封装request 请求的工具类:http_utils.py
从Excel文件中读取数据的工具类:get_excel_data_utils.py(虽然本次框架中暂时未采用存放接口数据到Excel中,但也写了个工具类,需要的时候可以用)
http_utils.py内容:
import requests
import json
class HttpUtils:
    @staticmethod
    def http_post(headers, url, parameters):
        print("接口请求url:" + url)
        print("接口请求headers:" + json.dumps(headers))
        print("接口请求parameters:" + json.dumps(parameters))
        res = requests.post(url, data=parameters, headers=headers)
        print("接口返回结果:"+res.text)
        if res.status_code != 200:
            raise Exception(u"请求异常")
        result = json.loads(res.text)
        return result
    @staticmethod
    def http_get(headers, url):
        req_headers = json.dumps(headers)
        print("接口请求url:" + url)
        print("接口请求headers:" + req_headers)
        res = requests.get(url, headers=headers)
        print("接口返回结果:" + res.text)
        if res.status_code != 200:
            raise Exception(u"请求异常")
        result = json.loads(res.text)
        return result
get_excel_data_utils.py内容:
import xlrd
from xlrd import xldate_as_tuple
import datetime
class ExcelData(object):
    '''
    xlrd中单元格的数据类型
    数字一律按浮点型输出,日期输出成一串小数,布尔型输出0或1,所以我们必须在程序中做判断处理转换
    成我们想要的数据类型
    0 empty,1 string, 2 number, 3 date, 4 boolean, 5 error
    '''
    def __init__(self, data_path, sheetname="Sheet1"):
        #定义一个属性接收文件路径
        self.data_path = data_path
        # 定义一个属性接收工作表名称
        self.sheetname = sheetname
        # 使用xlrd模块打开excel表读取数据
        self.data = xlrd.open_workbook(self.data_path)
        # 根据工作表的名称获取工作表中的内容
        self.table = self.data.sheet_by_name(self.sheetname)
        # 根据工作表的索引获取工作表的内容
        # self.table = self.data.sheet_by_name(0)
        # 获取第一行所有内容,如果括号中1就是第二行,这点跟列表索引类似
        self.keys = self.table.row_values(0)
        # 获取工作表的有效行数
        self.rowNum = self.table.nrows
        # 获取工作表的有效列数
        self.colNum = self.table.ncols
    # 定义一个读取excel表的方法
    def readExcel(self):
        # 定义一个空列表
        datas = []
        for i in range(1, self.rowNum):
            # 定义一个空字典
            sheet_data = {}
            for j in range(self.colNum):
                # 获取单元格数据类型
                c_type = self.table.cell(i,j).ctype
                # 获取单元格数据
                c_cell = self.table.cell_value(i, j)
                if c_type == 2 and c_cell % 1 == 0:  # 如果是整形
                    c_cell = int(c_cell)
                elif c_type == 3:
                    # 转成datetime对象
                    date = datetime.datetime(*xldate_as_tuple(c_cell, 0))
                    c_cell = date.strftime('%Y/%d/%m %H:%M:%S')
                elif c_type == 4:
                    c_cell = True if c_cell == 1 else False
                sheet_data[self.keys[j]] = c_cell
                # 循环每一个有效的单元格,将字段与值对应存储到字典中
                # 字典的key就是excel表中每列第一行的字段
                # sheet_data[self.keys[j]] = self.table.row_values(i)[j]
            # 再将字典追加到列表中
            datas.append(sheet_data)
        # 返回从excel中获取到的数据:以列表存字典的形式返回
        return datas
if __name__ == "__main__":
    data_path = "..\\resources\\test_http_data.xls"
    sheetname = "Sheet1"
    get_data = ExcelData(data_path, sheetname)
    datas = get_data.readExcel()
    print(datas)
4.3 测试用例代码编写
testcases文件夹下编写测试用例:
test_caoliao_http_get_interface.py内容:
import logging
import allure
import pytest
from utils.http_utils import HttpUtils
from utils.read_jsonfile_utils import ReadJsonFileUtils
from config.global_config import CAOLIAO_HTTP_GET_HOST
@pytest.mark.httptest
@allure.feature("草料二维码get请求测试")
class TestHttpInterface:
    # 获取文件相对路径
    data_file_path = ReadJsonFileUtils.get_data_path("resources", "test_http_get_data.json")
    # 读取测试数据文件
    param_data = ReadJsonFileUtils(data_file_path)
    data_item = param_data.get_value('dataItem')  # 是一个list列表,list列表中包含多个字典
    """
    @pytest.mark.parametrize是数据驱动;
    data_item列表中有几个字典,就运行几次case
    ids是用于自定义用例的名称
    """
    @pytest.mark.parametrize("args", data_item, ids=['测试草料二维码get接口1', '测试草料二维码get接口2'])
    def test_caoliao_get_demo(self, args, login_test):
        # 打印用例ID和名称到报告中显示
        print("用例ID:{}".format(args['id']))
        print("用例名称:{}".format(args['name']))
        print("测试conftest传值:{}".format(login_test))
        logging.info("测试开始啦~~~~~~~")
        res = HttpUtils.http_get(args['headers'], CAOLIAO_HTTP_GET_HOST+args['url'])
        # assert断言,判断接口是否返回期望的结果数据
        assert str(res.get('code')) == str(args['expectdata']['code']), "接口返回status值不等于预期"
test_caoliao_http_post_interface.py内容:
import pytest
import logging
import allure
from utils.http_utils import HttpUtils
from utils.read_jsonfile_utils import ReadJsonFileUtils
from config.global_config import CAOLIAO_HTTP_POST_HOST
# pytest.ini文件中要添加markers = httptest,不然会有warning,说这个Mark有问题
@pytest.mark.httptest
@allure.feature("草料二维码post请求测试")
class TestHttpInterface:
    # 获取文件相对路径
    data_file_path = ReadJsonFileUtils.get_data_path("resources", "test_http_post_data.json")
    # 读取测试数据文件
    param_data = ReadJsonFileUtils(data_file_path)
    data_item = param_data.get_value('dataItem') #是一个list列表,list列表中包含多个字典
    """
    @pytest.mark.parametrize是数据驱动;
    data_item列表中有几个字典,就运行几次case
    ids是用于自定义用例的名称
    """
    @pytest.mark.parametrize("args", data_item, ids=['测试草料二维码post接口1','测试草料二维码post接口2'])
    def test_caoliao_post_demo(self, args):
        # 打印用例ID和名称到报告中显示
        print("用例ID:{}".format(args['id']))
        print("用例名称:{}".format(args['name']))
        logging.info("测试开始啦~~~~~~~")
        res = HttpUtils.http_post(args['headers'], CAOLIAO_HTTP_POST_HOST+args['url'], args['parameters'])
        # assert断言,判断接口是否返回期望的结果数据
        assert str(res.get('status')) == str(args['expectdata']['status']), "接口返回status值不等于预期"
        assert str(res.get('data').get('qrtype')) == str(args['expectdata']['qrtype']), "接口返回qrtype值不等于预期"
企业中的系统接口,通常都有认证,需要先登录获取token,后续接口调用时都需要认证token。因此框架需要能处理在运行用例前置和后置做一些动作,所以这里用到了conftest.py文件,内容如下:
import logging
import traceback
import pytest
import requests
"""
如果用例执行前需要先登录获取token值,就要用到conftest.py文件了
作用:conftest.py 配置里可以实现数据共享,不需要import导入 conftest.py,pytest用例会自动查找
scope参数为session,那么所有的测试文件执行前执行一次
scope参数为module,那么每一个测试文件执行前都会执行一次conftest文件中的fixture
scope参数为class,那么每一个测试文件中的测试类执行前都会执行一次conftest文件中的fixture
scope参数为function,那么所有文件的测试用例执行前都会执行一次conftest文件中的fixture
"""
# 获取到登录请求返回的ticket值,@pytest.fixture装饰后,testcase文件中直接使用函数名"login_ticket"即可得到ticket值
@pytest.fixture(scope="session")
def login_ticket():
    header = {
        'Content-Type': 'application/x-www-form-urlencoded; charset=UTF-8'
    }
    params = {
        "loginId": "username",
        "pwd": "password",
    }
    url = 'http://testxxxxx.xx.com/doLogin'
    logging.info('开始调用登录接口:{}'.format(url))
    res = requests.post(url, data=params, headers=header, verify=False)  # verify:忽略https的认证
    try:
        ticket = res.headers['Set-Cookie']
    except Exception as ex:
        logging.error('登录失败!接口返回:{}'.format(res.text))
        traceback.print_tb(ex)
    logging.info('登录成功,ticket值为:{}'.format(ticket))
    return ticket
#测试一下conftest.py文件和fixture的作用
@pytest.fixture(scope="session")
def login_test():
    print("运行用例前先登录!")
    # 使用yield关键字实现后置操作,如果上面的前置操作要返回值,在yield后面加上要返回的值
    # 也就是yield既可以实现后置,又可以起到return返回值的作用
    yield "runBeforeTestCase"
    print("运行用例后退出登录!")
由于用例中用到了@pytest.mark.httptest给用例打标,因此需要创建pytest.ini文件,并在里面添加markers = httptest,不然会有warning,说这个Mark有问题。并且用例中用到的日志打印logging模板也需要在pytest.ini文件中增加日志配置。pytest.ini文件内容如下:

[pytest]
markers =
  httptest: run http interface test
  dubbotest: run dubbo interface test
log_cli = true
log_cli_level = INFO
log_cli_format = %(asctime)s - %(pathname)s[line:%(lineno)d] - %(levelname)s: %(message)s
log_cli_date_format=%Y-%m-%d %H:%M:%S
log_format = %(asctime)s - %(pathname)s[line:%(lineno)d] - %(levelname)4s: %(message)s
log_date_format=%Y-%m-%d %H:%M:%S
4.4 测试用例运行生成报告
运行方式:
Terminal窗口,进入到testcases目录下,执行命令:
运行某一条case:pytest test_caoliao_http_post_interface.py
运行所有case: pytest
运行指定标签的case:pytest -m httptest
运行并打印过程中的详细信息:pytest -s test_caoliao_http_post_interface.py
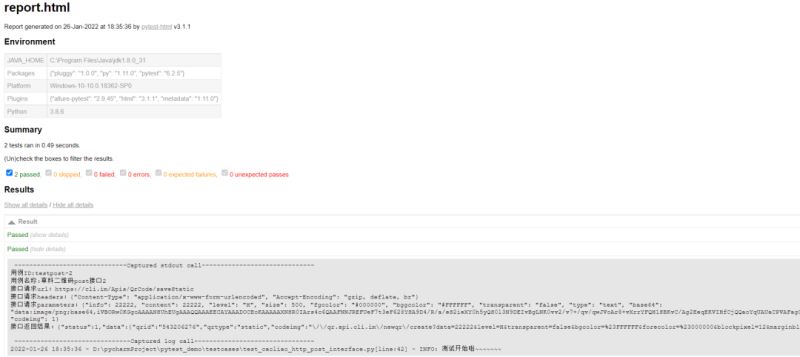
运行并生成pytest-html报告:pytest test_caoliao_http_post_interface.py --html=../testoutput/report.html
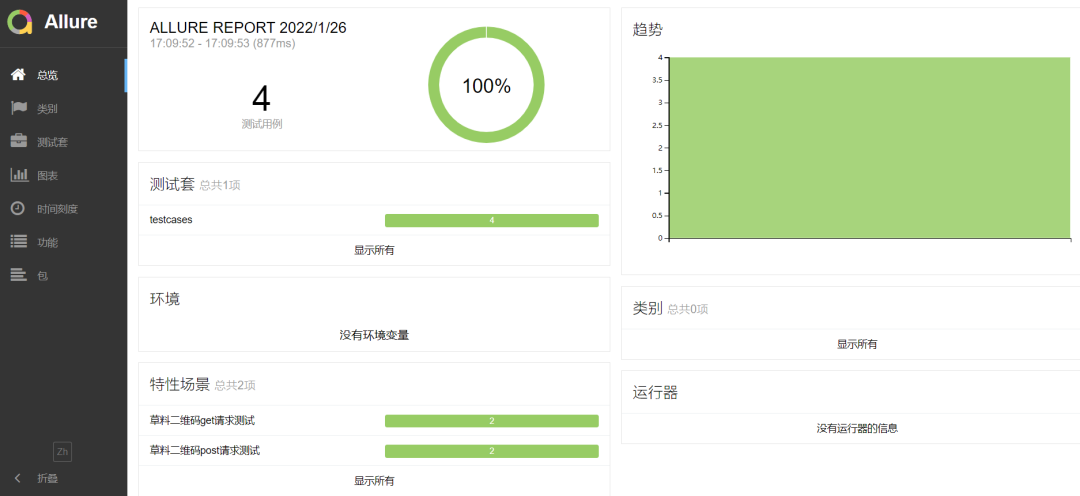
运行并生成allure测试报告:
1. 先清除掉testoutput/result文件夹下的所有文件
2. 运行case,生成allure文件:pytest --alluredir ../testoutput/result
3. 根据文件生成allure报告:allure generate ../testoutput/result/ -o ../testoutput/report/ --clean
4. 如果不是在pycharm中打开,而是直接到report目录下打开index.html文件打开的报告无法展示数据,需要双击generateAllureReport.bat生成allure报告;
pytest-html报告:
generateAllureReport.bat文件位置:
文件内容:
allure open report/
Allure报告:
框架中用到的一些细节知识点和问题,如:
conftest.py和@pytest.fixture()结合使用
pytest中使用logging打印日志
python中获取文件相对路径的方式
python虚拟环境
pytest框架下Allure的使用
我会在后续写文章再介绍。另外框架同样适用于dubbo接口的自动化测试,只需要添加python调用dubbo的工具类即可,后续也会写文章专门介绍。
总结到此这篇关于pytest接口自动化测试框架搭建的文章就介绍到这了,更多相关pytest接口自动化测试内容请搜索软件开发网以前的文章或继续浏览下面的相关文章希望大家以后多多支持软件开发网!