Go设计模式原型模式考查点及使用详解
前言
什么是原型模式
使用原型模式的目的
使用场景
利用原型模式实现文档树
总结
前言如果一个类的有非常多的属性,层级还很深。每次构造起来,不管是直接构造还是用建造者模式,都要对太多属性进行复制,那么有没有一种好的方式让我们创建太的时候使用体验更好一点呢? 今天的文章里就给大家介绍一种设计模式,来解决这个问题。
这篇内容要说的是创造型设计模式里的原型模式,如果写过点 JS 代码的话,大家可能听说过原型链这么个东西,原型模式在 JavaScript 实现里确实广泛应用,它那个面向对象跟 Java、C++ 这些语言的面向对象的实现方式还不太一样,继承其实是通过原型克隆出来,在拷贝出来的原型的基础上再继续添加或者修改来实现的。
什么是原型模式通过复制、拷贝或者叫克隆已有对象的方式来创建新对象的设计模式叫做原型模式,被拷贝的对象也被称作原型对象。
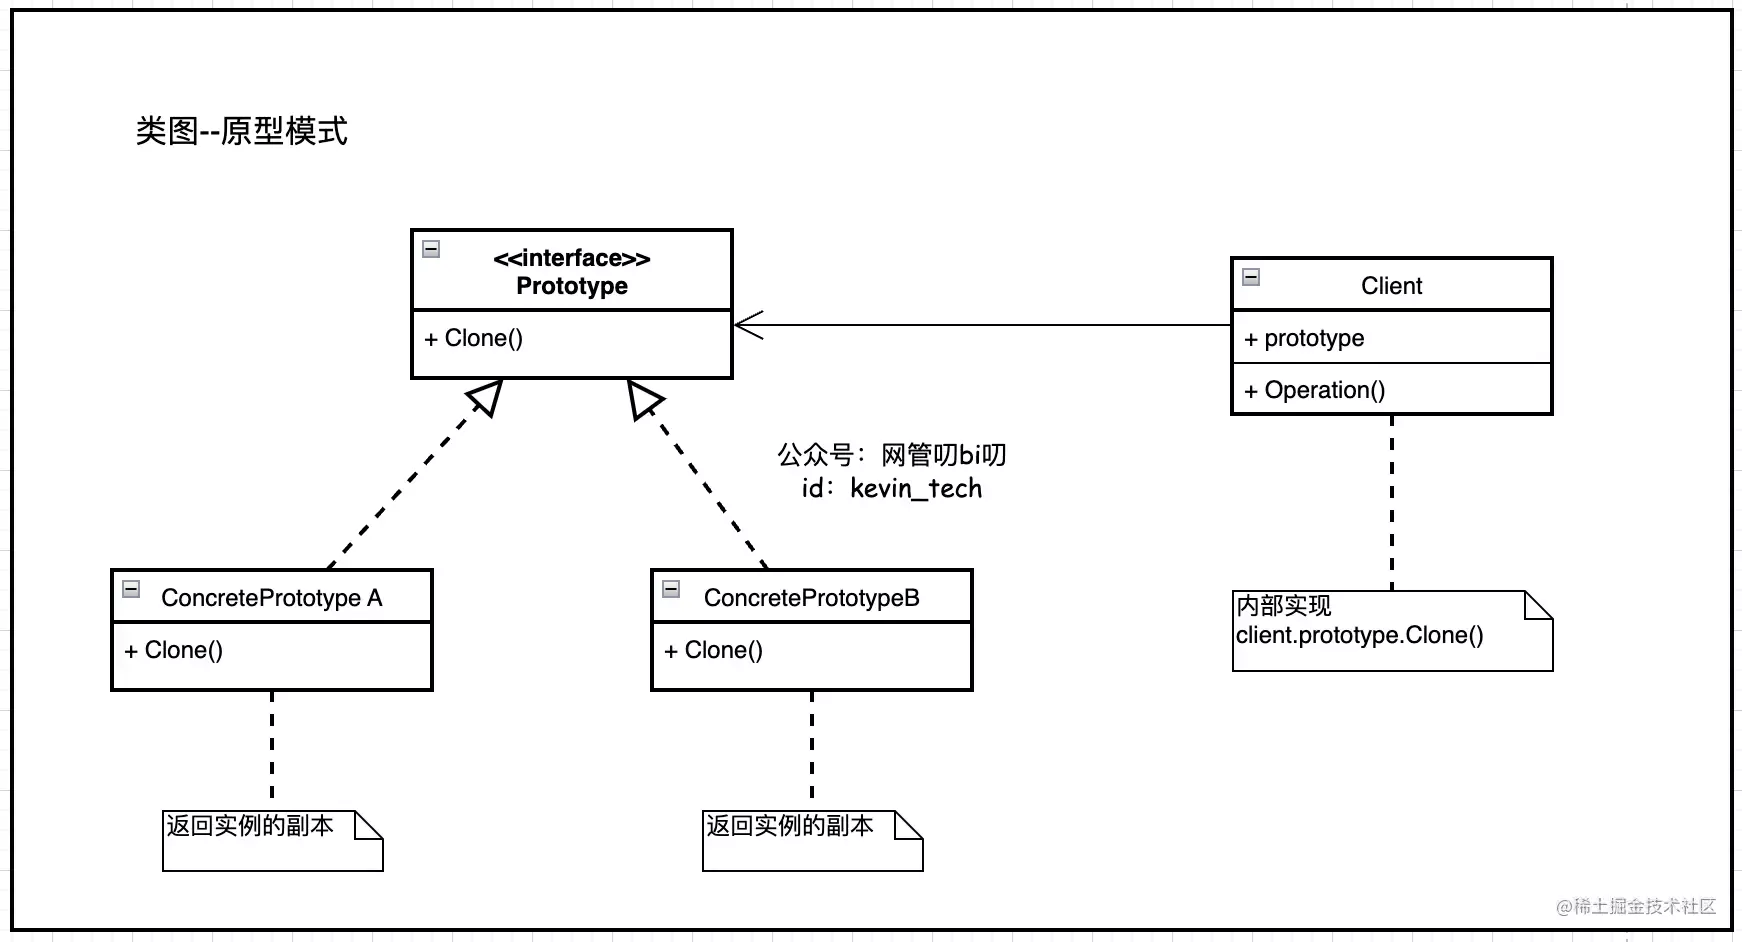
原型对象按照惯例,会暴露出一个 Clone 方法,给外部调用者一个机会来从自己这里“零成本”的克隆出一个新对象。
这里的“零成本”说的是,调用者啥都不用干,干等着,原型对象在 Clone 方法里自己克隆出自己,给到调用者,所以按照这个约定所有原型对象都要实现一个 Clone 方法。
type Prototype interface {
    Clone() SpecificType
}
这里我们用UML类图描述一下原型模式中各角色拥有的行为以及它们之间的关系

至于原型对象克隆自己的时候用的是深拷贝还是浅拷贝?可以先理解成是都用深拷贝,等完全掌握这种思想后,可以再根据实际情况,比如为了节省空间、以及减少编写克隆方法的复杂度时可以两者综合使用。
原型模式更多的是阐述一种编程模式,并没有限制我们用什么方式实现。比如下面这个深拷贝和浅拷贝结合使用的例子。
// 示例代码来自:https://lailin.xyz/post/prototype.html
package prototype
import (
"encoding/json"
"time"
)
// Keyword 搜索关键字
type Keyword struct {
word      string
visit     int
UpdatedAt *time.Time
}
// Clone 这里使用序列化与反序列化的方式深拷贝
func (k *Keyword) Clone() *Keyword {
var newKeyword Keyword
b, _ := json.Marshal(k)
json.Unmarshal(b, &newKeyword)
return &newKeyword
}
// Keywords 关键字 map
type Keywords map[string]*Keyword
// Clone 复制一个新的 keywords
// updatedWords: 需要更新的关键词列表,由于从数据库中获取数据常常是数组的方式
func (words Keywords) Clone(updatedWords []*Keyword) Keywords {
newKeywords := Keywords{}
for k, v := range words {
// 这里是浅拷贝,直接拷贝了地址
newKeywords[k] = v
}
// 替换掉需要更新的字段,这里用的是深拷贝
for _, word := range updatedWords {
newKeywords[word.word] = word.Clone()
}
return newKeywords
}
使用原型模式的目的
使用原型模式的目的主要是为了节省创建对象所花费的时间和资源消耗,提升性能。
还有一点就是,比如全局配置对象这种也可以当成原型对象,如果不想让程序在运行时修改初始化好的原型对象,导致影响其他线程的程序执行的时候,也可以用原型模式快速拷贝出一份,再在副本上做运行时自定义修改。
使用场景当对象的创建成本比较大,并且同一个类的不同对象间差别不大时(大部分属性值相同),如果对象的属性值需要经过复杂的计算、排序,或者需要从网络、DB等这些慢IO中获取、亦或者或者属性值拥有很深的层级,这时就是原型模式发挥作用的地方了。
因为对象在内存中复制自己远比每次创建对象时重走一遍上面说的操作要来高效的多。
下面再来一个例子,让我们更好的理解原型模式的优点。
利用原型模式实现文档树下面是一个类似 DOM 树对象的例子,因为 DOM 对象往往层级会很深,那么要创建类似的DOM树的时候能让我们更好的理解原型模式的优势。
这个示例代码来自:blog.ralch.com/articles/de…
package dom
import (
"bytes"
"fmt"
)
// Node a document object model node
type Node interface {
// Strings returns nodes text representation
String() string
// Parent returns the node parent
Parent() Node
// SetParent sets the node parent
SetParent(node Node)
// Children returns the node children nodes
Children() []Node
// AddChild adds a child node
AddChild(child Node)
// Clone clones a node
Clone() Node
}
// Element represents an element in document object model
type Element struct {
text     string
parent   Node
children []Node
}
// NewElement makes a new element
func NewElement(text string) *Element {
return &Element{
text:     text,
parent:   nil,
children: make([]Node, 0),
}
}
// Parent returns the element parent
func (e *Element) Parent() Node {
return e.parent
}
// SetParent sets the element parent
func (e *Element) SetParent(node Node) {
e.parent = node
}
// Children returns the element children elements
func (e *Element) Children() []Node {
return e.children
}
// AddChild adds a child element
func (e *Element) AddChild(child Node) {
copy := child.Clone()
copy.SetParent(e)
e.children = append(e.children, copy)
}
// Clone makes a copy of particular element. Note that the element becomes a
// root of new orphan tree
func (e *Element) Clone() Node {
copy := &Element{
text:     e.text,
parent:   nil,
children: make([]Node, 0),
}
for _, child := range e.children {
copy.AddChild(child)
}
return copy
}
// String returns string representation of element
func (e *Element) String() string {
buffer := bytes.NewBufferString(e.text)
for _, c := range e.Children() {
text := c.String()
fmt.Fprintf(buffer, "\n %s", text)
}
return buffer.String()
}
上面的DOM对象-- Node、Element 这些都支持原型模式要求的 Clone 方法,那么有了这个原型克隆的能力后,假如我们想根据创建好的 DOM 树上克隆出一个子分支作为一颗独立的 DOM 树对象的时候,就可以像下面这样简单地执行 Node.Clone() 把节点和其下面的子节点全部拷贝出去。比我们使用构造方法再重新构造树形结构要方便许多。
下面的例子是用DOM树结构创建一下公司里的职级关系,然后还可以从任意层级克隆出一颗新的树。
func main() {
  // 职级节点--总监
directorNode := dom.NewElement("Director of Engineering")
  // 职级节点--研发经理
engManagerNode := dom.NewElement("Engineering Manager")
engManagerNode.AddChild(dom.NewElement("Lead Software Engineer"))
  // 研发经理是总监的下级
directorNode.AddChild(engManagerNode)
directorNode.AddChild(engManagerNode)
  // 办公室经理也是总监的下级
officeManagerNode := dom.NewElement("Office Manager")
directorNode.AddChild(officeManagerNode)
fmt.Println("")
fmt.Println("# Company Hierarchy")
fmt.Print(directorNode)
fmt.Println("")
  // 从研发经理节点克隆出一颗新的树
fmt.Println("# Team Hiearachy")
fmt.Print(engManagerNode.Clone())
}
总结
关于原型模式的总结,我们先来说一下原型模式的优缺点。
原型模式的优点
某些时候克隆比直接new一个对象再逐属性赋值的过程更简洁高效,比如创建层级很深的对象的时候,克隆比直接用构造会方便很多。
可以使用深克隆方式保存对象的状态,可辅助实现撤销操作。
原型模式的缺点
clone方法位于类的内部,当对已有类进行改造的时候,需要修改代码,违背了开闭原则。
当实现深克隆时,需要编写较为复杂的代码,尤其当对象之间存在多重嵌套引用时,为了实现深克隆,每一层对象对应的类都必须支持深克隆。因此,深克隆、浅克隆需要运用得当。
在项目中使用原型模式时,可能需要在项目初始化时就把提供克隆能力的原型对象创建好,在多线程环境下,每个线程处理任务的时候,用到了相关对象,可以去原型对象那里拷贝。不过适合当作原型对象的数据并不多,所以原型模式在开发中的使用频率并不高,如果有机会做项目架构,可以适当考虑,确实需要再在项目中引入这种设计模式。
以上就是Go设计模式原型模式考查点及使用详解的详细内容,更多关于Go原型模式考查点的资料请关注软件开发网其它相关文章!