Python+OpenCV实现寻找到圆点标定板的角点
图像大小按原图计算
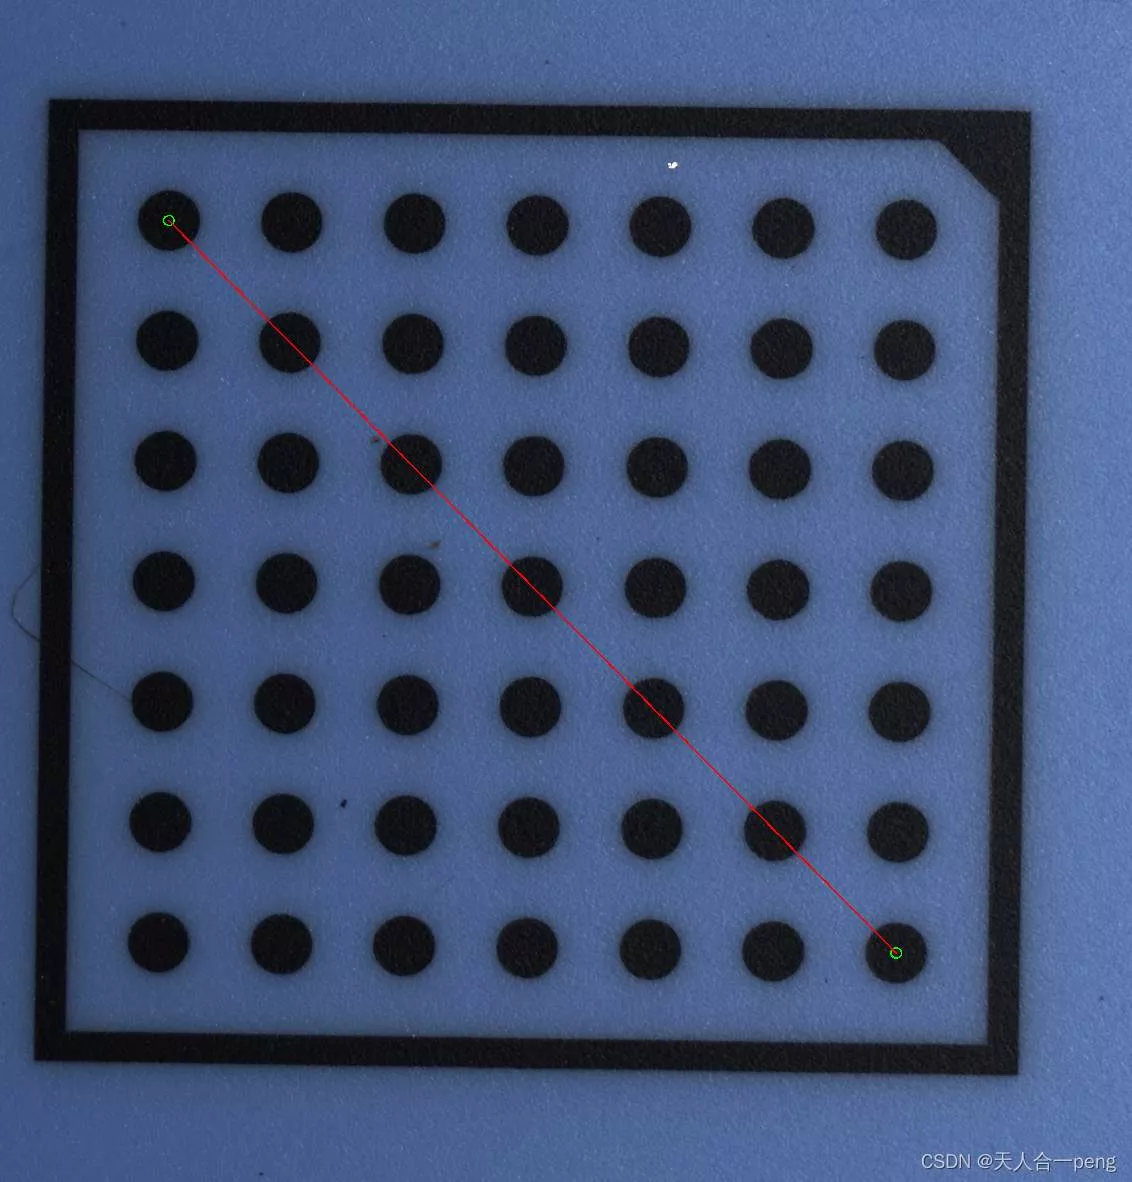
dis_mm是标定板上的实际距离,要根据真实情况计算。
示例代码
# coding:utf-8
import math
import cv2
import numpy as np
import xml.etree.ElementTree as ET
import matplotlib.pyplot as plt
global DPI
DPI =  0.00245
def mainFigure(img):
    w = 20
    h = 5
    params = cv2.SimpleBlobDetector_Params()
    # Setup SimpleBlobDetector parameters.
    # print('params')
    # print(params)
    # print(type(params))
    # Filter by Area.
    params.filterByArea = True
    params.minArea = 10e1
    params.maxArea = 10e4
    # 图大要修改  100
    params.minDistBetweenBlobs = 100
    # params.filterByColor = True
    params.filterByConvexity = False
    # tweak these as you see fit
    # Filter by Circularity
    # params.filterByCircularity = False
    # params.minCircularity = 0.2
    # params.blobColor = 0
    # # # Filter by Convexity
    # params.filterByConvexity = True
    # params.minConvexity = 0.87
    # Filter by Inertia
    # params.filterByInertia = True
    # params.filterByInertia = False
    # params.minInertiaRatio = 0.01
    gray= cv2.cvtColor(img,cv2.COLOR_BGR2GRAY)
    # Detect blobs.
    # image = cv2.resize(gray_img, (int(img.shape[1]/4),int(img.shape[0]/4)), 1, 1, cv2.INTER_LINEAR)
    # image = cv2.resize(gray_img, dsize=None, fx=0.25, fy=0.25, interpolation=cv2.INTER_LINEAR)
    minThreshValue = 60
    _, gray = cv2.threshold(gray, minThreshValue, 255, cv2.THRESH_BINARY)
    # gray = cv2.resize(gray, dsize=None, fx=1, fy=1, interpolation=cv2.INTER_LINEAR)
    # gray = cv2.resize(gray, dsize=None, fx=2, fy=2, interpolation=cv2.INTER_LINEAR)
    # plt.imshow(gray)
    # cv2.imshow("gray",gray)
    # 找到距离原点(0,0)最近和最远的点
    h, w = img.shape[:2]
    detector = cv2.SimpleBlobDetector_create(params)
    keypoints = detector.detect(gray)
    print("检测点为", len(keypoints))
    # opencv
    im_with_keypoints = cv2.drawKeypoints(gray, keypoints, np.array([]), (0, 255, 0), cv2.DRAW_MATCHES_FLAGS_DRAW_RICH_KEYPOINTS)
    # plt
    # fig = plt.figure()
    # im_with_keypoints = cv2.drawKeypoints(gray, keypoints, np.array([]), (0, 0, 255),  cv2.DRAW_MATCHES_FLAGS_DRAW_RICH_KEYPOINTS)
    color_img = cv2.cvtColor(im_with_keypoints, cv2.COLOR_BGR2RGB)
    DPIall = []
    if keypoints is not None:
        # 找到距离(0,0)最近和最远的点
        kpUpLeft = []
        disUpLeft = []
        for i in range(len(keypoints)):
            dis = math.sqrt(math.pow(keypoints[i].pt[0],2) + math.pow(keypoints[i].pt[1],2))
            disUpLeft.append(dis)
            kpUpLeft.append(keypoints[i].pt)
            # cv2.circle(img, (int(keypoints[i].pt[0]), int(keypoints[i].pt[1])), 10, (0, 255, 0), 2)
        # 找到距离(640*2,0)最近和最远的点
        kpUpRight = []
        disUpRight=[]
        for i in range(len(keypoints)):
            # 最大距离坐标
            dis2 = math.sqrt(math.pow(abs(keypoints[i].pt[0]-w),2) + math.pow(abs(keypoints[i].pt[1]),2))
            disUpRight.append(dis2)
            kpUpRight.append(keypoints[i].pt)
        if disUpRight and disUpLeft:
            disDownLeftIndex = disUpRight.index(max(disUpRight))
            pointDL = kpUpRight[disDownLeftIndex]
            disUpRightIndex = disUpRight.index(min(disUpRight))
            pointUR = kpUpLeft[disUpRightIndex]
            disDownRightIndex = disUpLeft.index(max(disUpLeft))
            pointDR = kpUpLeft[disDownRightIndex]
            disUpLeftIndex = disUpLeft.index(min(disUpLeft))
            pointUL = kpUpLeft[disUpLeftIndex]
            if (pointDR is not None) and (pointUL is not None) and (pointDL is not None) and (pointUR is not None):
                # cv2.circle(color_img, (int(pointDR[0]),int(pointDR[1])), 30, (0, 255, 0),2)
                # cv2.circle(color_img, (int(pointUL[0]),int(pointUL[1])), 30, (0, 255, 0),2)
                # cv2.line(color_img,(int(pointDR[0]),int(pointDR[1])), (int(pointDL[0]),int(pointDL[1])),(0, 0, 255),2)
                #
                # cv2.circle(color_img, (int(pointDL[0]),int(pointDL[1])), 30, (0, 255, 0),2)
                # cv2.circle(color_img, (int(pointUR[0]),int(pointUR[1])), 30, (0, 255, 0),2)
                # cv2.line(color_img, (int(pointDL[0]),int(pointDL[1])), (int(pointUR[0]),int(pointUR[1])), (0, 0, 255), 2)
                # cv2.line(color_img, (int(pointUL[0]),int(pointUL[1])), (int(pointUR[0]),int(pointUR[1])), (0, 0, 255), 2)
                # 显示在原图上 原图减半因为之前放大了
                # cv2.circle(img, (int(pointDR[0]/2), int(pointDR[1]/2)), 10, (0, 255, 0), 2)
                # cv2.circle(img, (int(pointUL[0]/2), int(pointUL[1]/2)), 10, (0, 255, 0), 2)
                # cv2.line(img,(int(pointDR[0]/2),int(pointDR[1]/2)), (int(pointUL[0]/2),int(pointUL[1]/2)),(0, 0, 255),2)
                # dis_UR_DL = math.sqrt(math.pow(pointUR[0]-pointDL[0], 2) + math.pow(pointUR[1]-pointDL[1], 2))/2
                cv2.circle(img, (int(pointDR[0] ), int(pointDR[1] )), 10, (0, 255, 0), 2)
                cv2.circle(img, (int(pointUL[0] ), int(pointUL[1] )), 10, (0, 255, 0), 2)
                cv2.line(img, (int(pointDR[0] ), int(pointDR[1] )), (int(pointUL[0] ), int(pointUL[1] )),
                         (0, 0, 255), 2)
                dis_UR_DL = math.sqrt(math.pow(pointUR[0] - pointDL[0], 2) + math.pow(pointUR[1] - pointDL[1], 2))
                DPIall.append(dis_UR_DL)
                global DPI
                # 只计算斜对角线,约束条件简单一些,增加适用性
                # 单边长a = 0.05*19 对角线
                # DPI = (math.sqrt(1.3435)) / sum(DPIall)
                dis_mm = math.sqrt(math.pow(15, 2) + math.pow(15, 2))
                print("两点的像素距离为", dis_UR_DL, "实际距离为", dis_mm)
                DPI = dis_mm / dis_UR_DL
                print("DPI", DPI)
                # configFile_xml = "wellConfig.xml"
                # tree = ET.parse(configFile_xml)
                # root = tree.getroot()
                # secondRoot = root.find("DPI")
                # print(secondRoot.text)
                #
                # secondRoot.text = str(DPI)
                # tree.write("wellConfig.xml")
                # print("DPI", DPI)
            else:
                pass
            print(DPI)
    # plt.imshow(color_img,interpolation='bicubic')
    # fname = "key points"
    # titlestr = '%s found %d keypoints' % (fname, len(keypoints))
    # plt.title(titlestr)
    # # fig.canvas.set_window_title(titlestr)
    # plt.show()
    # cv2.imshow('findCorners', color_img)
    cv2.namedWindow('findCorners',2)
    cv2.imshow('findCorners', img)
    cv2.waitKey()
if __name__ == "__main__":
    # # # 单张图片测试
    # DPI hole
    # 0.01221465904139037
    #
    # DPI needle
    # 0.012229753249515942
    # img = cv2.imread("TwoBiaoDing/ROI_needle.jpg",1)
    img = cv2.imread("TwoBiaoDing/ROI_holes.jpg",1)
    img_roi = img.copy()
    # img_roi = img[640:2000, 1530:2800]
    # cv2.namedWindow("img_roi",2)
    # cv2.imshow("img_roi", img_roi)
    # cv2.waitKey()
    # img = cv2.imread("circles/Snap_0.jpg",1)
    mainFigure(img_roi)
    # # 所有图片测试
    # for i in range(15):
    #     fileName = "Snap_" + str(i) + ".jpg"
    # # img = cv2.imread("circles/Snap_007.jpg",1)
    #     img = cv2.imread("circles/" + fileName,1)
    #     print(fileName)
    #     mainFigure(img)
到此这篇关于Python+OpenCV实现寻找到圆点标定板的角点的文章就介绍到这了,更多相关Python OpenCV寻找角点内容请搜索软件开发网以前的文章或继续浏览下面的相关文章希望大家以后多多支持软件开发网!