利用Python实现绘制3D爱心的代码分享
目录
环境介绍
第一步,绘制一个三维的爱心
亿点点细节
加入时间序列
加入心脏的跳动
一个好的展示
完整代码
环境介绍python3.8
numpy
matplotlib
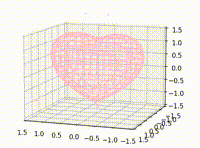
第一步,绘制一个三维的爱心关于这一步,我采用的是大佬博客中的最后一种绘制方法。当然,根据我的代码习惯,我还是稍做了一点点修改的。
class Guess:
    def __init__(self, bbox=(-1.5, 1.5), resolution=50, lines=20) -> None:
        """
        bbox: 控制画格的大小
        resolution: 控制爱心的分辨率
        lines: 控制等高线的数量
        """
        self.xmin, self.xmax, self.ymin, self.ymax, self.zmin, self.zmax = bbox*3
        A = np.linspace(self.xmin, self.xmax, resolution)
        self.B = np.linspace(self.xmin, self.xmax, lines)
        self.A1, self.A2 = np.meshgrid(A, A)
    def coordinate(self, x, y, z):
        """
        生成坐标
        """
        return (x**2+(9/4)*y**2+z**2-1)**3-x**2*z**3-(9/80)*y**2*z**3
    def draw(self, ax):
        """
        绘制坐标
        """
        for z in self.B:
            X, Y = self.A1, self.A2
            Z = self.coordinate(X, Y, z)+z
            cset = ax.contour(X, Y, Z, [z], zdir='z', colors=('pink',))
        for y in self.B:
            X, Z = self.A1, self.A2
            Y = self.coordinate(X, y, Z)+y
            cset = ax.contour(X, Y, Z, [y], zdir='y', colors=('pink',))
        for x in self.B:
            Y, Z = self.A1, self.A2
            X = self.coordinate(x, Y, Z) + x
            cset = ax.contour(X, Y, Z, [x], zdir='x', colors=('pink',))
    def run(self):
        fig = plt.figure()
        ax = fig.add_subplot(projection='3d')
        ax.set_zlim3d(self.zmin, self.zmax)
        ax.set_xlim3d(self.xmin, self.xmax)
        ax.set_ylim3d(self.ymin, self.ymax)
        plt.show()
但是这可以达到我们想要的效果吗?
显然不能!于是我们开始加入亿点点细节!
亿点点细节 加入时间序列想要心脏跳起来,我们就需要有时间维度的变化。那怎么做最合理呢?这里仅展示修改的代码位置。
class Guess:
    def __init__(self, bbox=(-1.5, 1.5), resolution=50, lines=20) -> None:
        plt.ion()                                         # 开启画布的动态图模式
        self.xmin, self.xmax, self.ymin, self.ymax, self.zmin, self.zmax = bbox*3
        self.time = time.time()                           # 这里有一个衡量的时间坐标,很合理吧
        A = np.linspace(self.xmin, self.xmax, resolution)
        self.B = np.linspace(self.xmin, self.xmax, lines)
        self.A1, self.A2 = np.meshgrid(A, A)
    def run(self, count):
        """
        加入count是我们想循环的次数
        """
        fig = plt.figure()
        for i in range(count):
            plt.clf()                               # 每次清除画布
            ax = fig.add_subplot(projection='3d')
            ax.set_zlim3d(self.zmin, self.zmax)
            ax.set_xlim3d(self.xmin, self.xmax)
            ax.set_ylim3d(self.ymin, self.ymax)
            times = time.time()-self.t/ime          # 计算画布的当前时间状态
            self.draw(ax, coef)
            plt.show()
加入心脏的跳动
心脏的跳动当然不会是线性的了,我们需要心脏的跳动是有层次感的,并且还是可以做往返运动的。
emmmmm… 这么说来,cos是不是就是做这个用的?
于是…
    def __init__(self, bbox=(-1.5, 1.5), resolution=50, lines=20, scale=1.2) -> None:
        """
        scale: 心脏缩放的系数
        """
        self.xmin, self.xmax, self.ymin, self.ymax, self.zmin, self.zmax = bbox*3
        plt.ion()
        self.scale = scale   # scale: 心脏缩放的系数 设置为全局变量
        self.time = time.time()
        A = np.linspace(self.xmin, self.xmax, resolution)
        self.B = np.linspace(self.xmin, self.xmax, lines)
        self.A1, self.A2 = np.meshgrid(A, A)
    def draw(self, ax, coef):
        """
        coef: 使得心脏可以按照时间跳动
        """
        for z in self.B:
            X, Y = self.A1, self.A2
            Z = self.coordinate(X, Y, z)+z
            cset = ax.contour(X * coef, Y * coef, Z * coef, [z * coef], zdir='z', colors=('pink',))
        for y in self.B:
            X, Z = self.A1, self.A2
            Y = self.coordinate(X, y, Z)+y
            cset = ax.contour(X * coef, Y * coef, Z * coef, [y * coef], zdir='y', colors=('pink',))
        for x in self.B:
            Y, Z = self.A1, self.A2
            X = self.coordinate(x, Y, Z) + x
            cset = ax.contour(X * coef, Y * coef, Z * coef, [x * coef], zdir='x', colors=('pink',))
    def run(self, count):
        """
        加入count是我们想循环的次数
        """
        fig = plt.figure()
        for i in range(count):
            plt.clf()                               # 每次清除画布
            ax = fig.add_subplot(projection='3d')
            ax.set_zlim3d(self.zmin, self.zmax)
            ax.set_xlim3d(self.xmin, self.xmax)
            ax.set_ylim3d(self.ymin, self.ymax)
            times = time.time()-self.time
            coef = np.cos(times) * (self.scale-1) + 1
            # coef 是用来放缩心脏的大小的,加入cos来使它有节奏的跳动
            self.draw(ax, coef)
            plt.pause(0.01)
            plt.show()
很好,这样我们就有了一个可以跳动的心脏,那么到这结束了嘛?
一个好的展示当然没有!我们希望对象看到的时候他稍微有点东西,所以让它跳动却不能改变方向,岂不是看的不够全面?所以我们在加最后亿点点细节:
    def run(self, count):
        fig = plt.figure()
        for i in range(count):
            plt.clf()
            ax = fig.add_subplot(projection='3d')
            ax.set_title("你对象的名字?")              # 加上你对象的小name
            ax.set_zlim3d(self.zmin, self.zmax)
            ax.set_xlim3d(self.xmin, self.xmax)
            ax.set_ylim3d(self.ymin, self.ymax)
            times = time.time()-self.time
            ax.view_init(10, 100+np.cos(times) * 10)   # 让三维坐标图可以变换坐标展示
            coef = np.cos(times) * (self.scale-1) + 1
            self.draw(ax, coef)
            plt.pause(0.01)  # 让绘制出来的心脏可以显示
            plt.show()
完整代码
代码完整版及效果如下
import time
import numpy as np
import matplotlib.pyplot as plt
class Guess:
    def __init__(self, bbox=(-1.5, 1.5), resolution=50, lines=20, scale=1.2) -> None:
        self.xmin, self.xmax, self.ymin, self.ymax, self.zmin, self.zmax = bbox*3
        plt.ion()
        self.scale = scale
        self.time = time.time()
        A = np.linspace(self.xmin, self.xmax, resolution)
        self.B = np.linspace(self.xmin, self.xmax, lines)
        self.A1, self.A2 = np.meshgrid(A, A)
    def coordinate(self, x, y, z):
        return (x**2+(9/4)*y**2+z**2-1)**3-x**2*z**3-(9/80)*y**2*z**3
    def draw(self, ax, coef):
        for z in self.B:
            X, Y = self.A1, self.A2
            Z = self.coordinate(X, Y, z)+z
            cset = ax.contour(X * coef, Y * coef, Z * coef, [z * coef], zdir='z', colors=('pink',))
        for y in self.B:
            X, Z = self.A1, self.A2
            Y = self.coordinate(X, y, Z)+y
            cset = ax.contour(X * coef, Y * coef, Z * coef, [y * coef], zdir='y', colors=('pink',))
        for x in self.B:
            Y, Z = self.A1, self.A2
            X = self.coordinate(x, Y, Z) + x
            cset = ax.contour(X * coef, Y * coef, Z * coef, [x * coef], zdir='x', colors=('pink',))
    def run(self, count):
        fig = plt.figure()
        for i in range(count):
            plt.clf()
            ax = fig.add_subplot(projection='3d')
            ax.set_title("2LiuYu")
            ax.set_zlim3d(self.zmin, self.zmax)
            ax.set_xlim3d(self.xmin, self.xmax)
            ax.set_ylim3d(self.ymin, self.ymax)
            times = time.time()-self.time
            ax.view_init(10, 100+np.cos(times) * 10)
            coef = np.cos(times) * (self.scale-1) + 1
            self.draw(ax, coef)
            plt.pause(0.01)
            plt.show()
if __name__ == '__main__':
    demo = Guess()
    demo.run(1000)
以上就是利用Python实现绘制3D爱心的代码分享的详细内容,更多关于Python绘制3D爱心的资料请关注软件开发网其它相关文章!