使用Python OpenCV为CNN增加图像样本的实现
我们在做深度学习的过程中,经常面临图片样本不足、不平衡的情况,在本文中,作者结合实际工作经验,通过图像的移动、缩放、旋转、增加噪声等图像变换技术,能快速、简便的增加样本数量。
本文所有案例,使用OpenCV跨平台计算机视觉库,在Python3.6上实现,关于Python及OpenCV安装使用,请参照本人早先资料,详见参考内容。
1. 图片拼接及平移
1.1. 图像移动
图像平移是将图像的所有像素坐标进行水平或垂直方向移动,也就是所有像素按照给定的偏移量在水平方向上沿x轴、垂直方向上沿y轴移动。
#移动图像,让出边缘,大小不变(此方法比较笨了)
def move_img(img_file1,out_file,tunnel,border_position,border_width):
  print('file1=' + img_file1 )
  img1 = cv2.imread(img_file1, cv2.IMREAD_GRAYSCALE)
  hight,width = img1.shape
  # 初始化空图
  final_matrix = np.zeros((hight,width), np.uint8) #,tunnel), np.uint8) #高*款(y,x)20*20*1
  # change
  x1=0
  y1=hight
  x2=width
  y2=0  #图片高度,坐标起点从上到下
  if border_position =='top':
    final_matrix[y2:y1 - border_width, x1:x2] = img1[y2 + border_width:y1, x1:x2]
  #左侧增加边或空白
  if border_position == 'left':
    final_matrix[y2 :y1, x1:x2 - border_width] = img1[y2:y1, x1 + border_width:x2]
  if border_position == 'right':
    final_matrix[y2 :y1, x1 + border_width:x2] = img1[y2:y1, x1:x2 - border_width]
  #底部增加边或空白
  if border_position =='bottom':
    final_matrix[y2 + border_width :y1, x1:x2] = img1[y2:y1 - border_width , x1:x2]
  if border_position =='copy':
    final_matrix[y2 :y1, x1:x2] = img1[y2:y1 , x1:x2]
  cv2.imwrite(out_file, final_matrix)
  return final_matrix
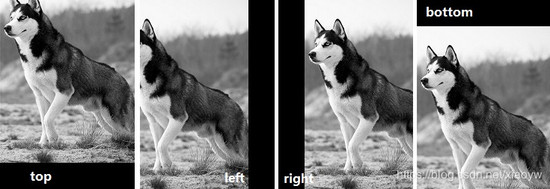
样例代码,详见第5章节。
1.2. 图片拼接
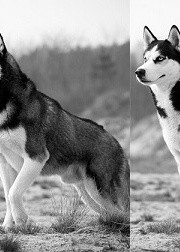
图片拼接是分别读取图片,新建一个目标像素大小的0矩阵,最后将读取的图片替换新建矩阵中目标位置上的元素即可。主要可用于图像切换场景,例如常见的齿轮式数字仪表盘,数字进位时出现的半个数字。
#图像四周拼接边缘,大小不变
def splicing_img(img_file1,img_file2,out_file,tunnel,border_position,border_width):
  print('file1=' + img_file1 + ', file2=' + img_file2)
  img1 = cv2.imread(img_file1, cv2.IMREAD_GRAYSCALE)
  img2 = cv2.imread(img_file2, cv2.IMREAD_GRAYSCALE)
  #第二个参数为如何读取图片,包括cv2.IMREAD_COLOR:读入一副彩色图片;cv2.IMREAD_GRAYSCALE:以灰度模式读入图片;cv2.IMREAD_UNCHANGED:读入一幅图片,并包括其alpha通道。
  hight,width = img1.shape
  final_matrix = np.zeros((hight,width), np.uint8) #,tunnel), np.uint8) #高*款(y,x)20*20*1
  # change
  x1=0
  y1=hight
  x2=width
  y2=0  #图片高度,坐标起点从上到下
  if border_position =='top':
    final_matrix[y2 + border_width:y1, x1:x2] = img1[y2:y1 - border_width, x1:x2]
    final_matrix[y2:border_width, x1:x2] = img2[y2:border_width, x1:x2]
  #左侧增加边或空白
  if border_position == 'left':
    final_matrix[y2 :y1, x1+ border_width:x2] = img1[y2:y1, x1:x2 - border_width]
    final_matrix[y2:y1, x1:border_width] = img2[y2:y1, x1:border_width]
  if border_position == 'right':
    final_matrix[y2 :y1, x1:x2 - border_width] = img1[y2:y1, x1 + border_width:x2]
    final_matrix[y2:y1, x2-border_width:x2] = img2[y2:y1, x1:border_width]
  #底部增加边或空白
  if border_position =='bottom':
    final_matrix[y2 :y1 - border_width, x1:x2] = img1[y2+ border_width:y1 , x1:x2]
    final_matrix[y1 - border_width:y1, x1:x2] = img2[y2:border_width, x1:x2]
  if border_position =='copy':
    final_matrix[y2 :y1, x1:x2] = img1[y2:y1 , x1:x2]
  cv2.imwrite(out_file, final_matrix)
  return final_matrix
2. 图片仿射变换之平移、旋转
2.1. 关于仿射变换
仿射变换,又称仿射映射,是指在几何中,一个向量空间进行一次线性变换并接上一个平移,变换为另一个向量空间。
仿射变换是在几何上定义为两个向量空间之间的一个仿射变换或者仿射映射(来自拉丁语,affine,“和…相关”)由一个非奇异的线性变换(运用一次函数进行的变换)接上一个平移变换组成。仿射变换可以通过一系列的原子变换的复合来实现,包括:平移(Translation)、缩放(Scale)、翻转(Flip)、旋转(Rotation)和剪切(Shear)。
2.2. Python上的OpenCV实现 2.2.1. 旋转
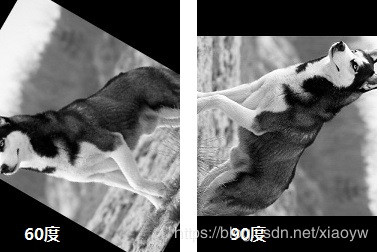
旋转是通过仿射变换实现的,首先,旋转需要先定义一个旋转矩阵,使用cv2.getRotationMatrix2D()函数。
参数1:需要旋转的中心点;
参数2:需要旋转的角度;
参数3:需要缩放的比例。
#旋转图像,输入文件名、输出文件名,旋转角度
def rotationImg(img_file1,out_file,ra):
  # 获取图片尺寸并计算图片中心点
  img = cv2.imread(img_file1, cv2.IMREAD_GRAYSCALE)
  (h, w) = img.shape[:2]
  center = (w/2, h/2)
  M = cv2.getRotationMatrix2D(center, ra, 1.0)
  rotated = cv2.warpAffine(img, M, (w, h))
  #cv2.imshow("rotated", rotated)
  #cv2.waitKey(0)
  cv2.imwrite(out_file, rotated)
  return rotated
2.2.2. 平移
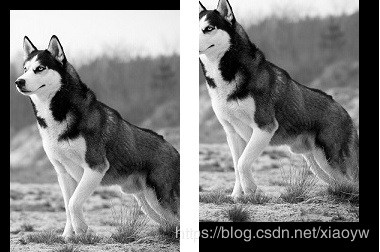
使用仿射变换平移图像,首先使用已经给出的平移矩阵M:[[1,0,x],[0,1,y]],x、y分别是x与y在横向、纵向移动像数。

#仿射变换技术,平移图片,x_off:x方向平移像数;y_off:y方向平移像数,正数是右、下方移动,负数为左、上方移动
def translation_img(img_file1,out_file,x_off,y_off):
  img = cv2.imread(img_file1, cv2.IMREAD_GRAYSCALE)
  rows,cols = img.shape
  # 定义平移矩阵,需要是numpy的float32类型
  # x轴平移x_off,y轴平移y_off, 2*3矩阵
  M = np.float32([[1,0,x_off],[0,1,y_off]])
  dst = cv2.warpAffine(img,M,(cols,rows))
  cv2.imwrite(out_file, dst)
3. 图片缩放及剪裁
3.1. 图片缩放
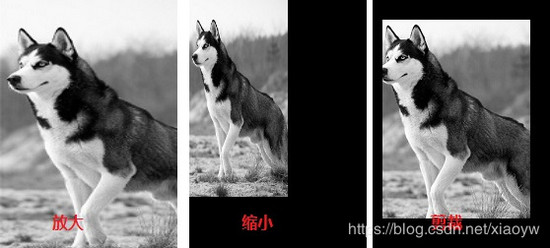
图片缩放使用CV2的cv2.resize()函数,函数语法如下:cv2.resize(img, (dstWeight,dstHeight)),第一个参数是源图像数据,第二个参数(目标宽度,目标高度)。
在实际应用中,输入图像大小是固定不变,这样在缩放图片后,如果是放大,则需要剪裁,如果缩写,则出现空余区域。(注:本案例中参数deviation,用于取放大图像的起点位置,参照位置为左上角)
#缩放,输入文件名,输出文件名,放大高与宽,偏离度
def resizeImg(img_file1,out_file,dstWeight,dstHeight,deviation):
  img1 = cv2.imread(img_file1, cv2.IMREAD_GRAYSCALE)
  imgshape = img1.shape
  h = imgshape[0]
  w = imgshape[1]
  final_matrix = np.zeros((h,w), np.uint8)
  x1=0
  y1=h
  x2=w
  y2=0  #图片高度,坐标起点从上到下
  dst = cv2.resize(img1, (dstWeight,dstHeight))
  if h<dstHeight:
    final_matrix[y2 :y1, x1:x2] = dst[y2+deviation:y1+deviation , x1+deviation:x2+deviation]
  else:
    if deviation == 0:
      final_matrix[y2 :dstHeight, x1:dstWeight] = dst[y2 :dstHeight,x1 :dstWeight]
    else:
      final_matrix[y2 + deviation:dstHeight + deviation, x1 + deviation:dstWeight + deviation] = dst[y2 :dstHeight,x1 :dstWeight]
  cv2.imwrite(out_file, final_matrix)
  return final_matrix
3.2. 图片剪裁
在做图像处理时,一般是图像大小保持一致,因此,图片剪裁时,图片大小不变,去掉不需要的部分。
#剪切图片
def cut_img(img_file1,out_file,top_off,left_off,right_off,bottom_off):
  img1 = cv2.imread(img_file1, cv2.IMREAD_GRAYSCALE)
  hight,width = img1.shape
  x1=0
  y1=hight
  x2=width
  y2=0  #图片高度,坐标起点从上到下hight,width = img1.shape
  #灰度图像,不使用通道tunnel
  final_matrix = np.zeros((hight,width), np.uint8) #,tunnel), np.uint8) #高*款(y,x)20*20*1
  final_matrix[y2 + top_off:y1 - bottom_off, x1 + left_off:x2 - right_off] = img1[y2 + top_off:y1 - bottom_off, x1 + left_off:x2 - right_off]
  cv2.imwrite(out_file, final_matrix)
  return final_matrix
4. 图片增加高斯噪声/椒盐噪声
在matlab中,存在执行直接得函数来添加高斯噪声和椒盐噪声。Python-OpenCV中虽然不存在直接得函数,但是很容易使用相关的函数来实现。
4.1. 添加盐椒噪声
# 添加椒盐噪声,prob:噪声比例
def sp_noiseImg(img_file1,prob):
  image = cv2.imread(img_file1, cv2.IMREAD_GRAYSCALE)
  output = np.zeros(image.shape,np.uint8)
  thres = 1 - prob
  for i in range(image.shape[0]):
    for j in range(image.shape[1]):
      rdn = random.random()
      if rdn < prob:
        output[i][j] = 0
      elif rdn > thres:
        output[i][j] = 255
      else:
        output[i][j] = image[i][j]
  return output
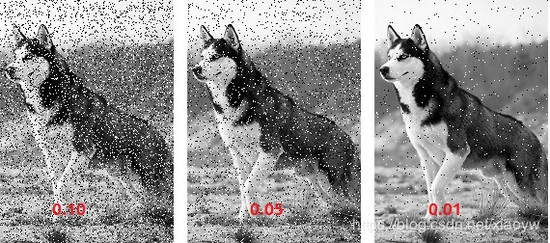
噪声比依次是:0.1、0.05、0.01。
4.2. 添加高斯噪声
# 添加高斯噪声
# mean : 均值
# var : 方差
def gasuss_noiseImg(img_file1, out_file, mean=0, var=0.001):
  image = cv2.imread(img_file1, cv2.IMREAD_GRAYSCALE)
  image = np.array(image/255, dtype=float)
  noise = np.random.normal(mean, var ** 0.5, image.shape)
  out = image + noise
  if out.min() < 0:
    low_clip = -1.
  else:
    low_clip = 0.
  out = np.clip(out, low_clip, 1.0)
  out = np.uint8(out*255)
  cv2.imwrite(out_file, out)
  return out
5. 代码测试
'''
Created on 2019年5月20日
@author: xiaoyw
'''
#coding: utf-8
import numpy as np
import cv2
import os
import random
#函数部分略过,见上文
if __name__ == '__main__':
  file1 = 'dog.jpg'
  move_img(file1,'timg11.jpg',1,'top',35)
  move_img(file1,'timg12.jpg',1,'left',35)
  move_img(file1,'timg13.jpg',1,'right',35)
  move_img(file1,'timg14.jpg',1,'bottom',35)
  cut_img(file1,'dog_cut.jpg',20,10,20,30)
  rotationImg(file1,'dog_ra1.jpg',30)
  rotationImg(file1,'dog_ra1.jpg',60)
  rotationImg(file1,'dog_ra2.jpg',-90)
  sp_noiseImg(file1,'dog_sp_01.jpg',0.01)
  sp_noiseImg(file1,'dog_sp_05.jpg',0.05)
  sp_noiseImg(file1,'dog_sp_10.jpg',0.1)
  resizeImg(file1,'dog_big.jpg',250,280,0)
  resizeImg(file1,'dog_small.jpg',100,200,0)
  splicing_img(file1,file1,'dog2.jpg',1,'right',50)
  translation_img(file1,'timg15.jpg',10,10)
  translation_img(file1,'timg16.jpg',-20,-30)
  pass
您可能感兴趣的文章:python-opencv在有噪音的情况下提取图像的轮廓实例在Python下利用OpenCV来旋转图像的教程opencv python 图像去噪的实现方法使用opencv拉伸图像扩大分辨率示例python opencv 图像尺寸变换方法实现opencv图像裁剪分屏显示示例Python OpenCV处理图像之图像像素点操作Python基于opencv的图像压缩算法实例分析Opencv使用Stitcher类图像拼接生成全景图像Python OpenCV读取png图像转成jpg图像存储的方法python opencv旋转图像(保持图像不被裁减)