Python+Pytest实现压力测试详解
1.程序说明
1.1 设置测试参数
1.2 初始化测试结果
1.3 定义测试函数
1.4 创建线程、执行线程、等待
1.5 计算测试结果
1.6 将测试结果写入文件
2.程序执行
2.1 直接执行
2.2 加个装饰器然后出报告
3.案例缺陷
4 完整源码
在现代Web应用程序中,性能是至关重要的。为了确保应用程序能够在高负载下正常运行,我们需要进行性能测试。 今天,应小伙伴的提问, 田辛老师来写一个Pytest进行压力测试的简单案例。 这个案例的测试网站我们就隐藏了,不过网站的基本情况是:
阿里
框架:FastAdmin.net
1.程序说明 1.1 设置测试参数首先,田辛老师做的第一件事情就是设置测试参数。代码如下
# 定义测试用例
def test_performance():
    # 设置测试参数
    url = 'http://www.a.com/'
    num_threads = 20
    num_requests = 200
    timeout = 5
这里面,田老师设置了网站的URL, 线程数, 每个线程的请求次数,以及超时时间。 可以看到, 这里面田老师一共会做4000次请求。
1.2 初始化测试结果这段代码我想不需要田老师多讲, 这里做一个提示:注意缩进, 这段代码仍然在测试用例test_performance内。
    # 初始化测试结果
    response_times = []
    errors = 0
    successes = 0
1.3 定义测试函数
接下来, 田老师定义了一个内部函数。这个函数就是在某一线程内完成设定次数的请求。
    # 定义测试函数
    def test_func():
        nonlocal errors, successes
        for _ in range(num_requests):
            try:
                start_time = time.time()
                requests.get(url, timeout=timeout)
                end_time = time.time()
                response_time = end_time - start_time
                response_times.append(response_time)
                successes += 1
            except requests.exceptions.RequestException:
                errors += 1
1.4 创建线程、执行线程、等待
    # 创建测试线程
    threads = []
    for _ in range(num_threads):
        t = threading.Thread(target=test_func)
        threads.append(t)
    # 启动测试线程
    for t in threads:
        t.start()
    # 等待测试线程结束
    for t in threads:
        t.join()
1.5 计算测试结果
    # 计算测试结果
    total_requests = num_threads * num_requests
    throughput = successes / (sum(response_times) or 1)
    concurrency = num_threads
    error_rate = errors / (total_requests or 1)
    cpu_usage = psutil.cpu_percent()
    memory_usage = psutil.virtual_memory().percent
1.6 将测试结果写入文件
    # 将测试结果写入文件
    with open('performance_test_result.txt', 'w') as f:
        f.write(f'总请求数:{total_requests}\n')
        f.write(f'总时间:{sum(response_times):.2f}s\n')
        f.write(f'吞吐量:{throughput:.2f} requests/s\n')
        f.write(f'并发数:{concurrency}\n')
        f.write(f'错误率:{error_rate:.2%}\n')
        f.write(f'CPU利用率:{cpu_usage:.2f}%\n')
        f.write(f'内存利用率:{memory_usage:.2f}%\n')
2.程序执行
2.1 直接执行
在PyCharm里面直接执行这段代码, 得出的结果是:
2.2 加个装饰器然后出报告总请求数:4000
总时间:1837.65s
吞吐量:2.17 requests/s
并发数:20
错误率:0.12%
CPU利用率:4.10%
内存利用率:88.60%
如果在PyCharm里面直接执行上面的代码, 虽然我们把结果写在文件中,但是, 不好看呀。
所以呢,田老师再额外介绍一个方法,这个方法能够生成一个相对美观的测试报告出来。
2.2.1 声明压力测试
首先在定义用例的时候通过装饰器声明这是一个压力测试:
# 定义测试用例
@pytest.mark.performance
def test_performance():
    # 设置测试参数
    url = 'http://www.a.biz/'
    num_threads = 20
2.2.2 在命令行中通过pytest命令执行测试
第二步, 在命令行中执行测试
-v 用于显示详细的测试结果
--html 用于指定输出报告的位置。 这个参数需要依赖包:pytest-html
$ pytest -v --html=report.html test_a.py
输出执行结果是:
======================== test session starts =================================
platform win32 -- Python 3.10.9, pytest-7.2.1, pluggy-1.0.0 -- D:\python-grp\miniconda_env\py3.10_playwright\python.exe
cachedir: .pytest_cache
metadata: {'Python': '3.10.9', 'Platform': 'Windows-10-10.0.22624-SP0', 'Packages': {'pytest': '7.2.1', 'pluggy': '1.0.0'}, 'Plugins': {'allure-pytest': '2.12.0', 'base-url': '2.0.0', 'html': '3.2.0', 'metadata': '2.0.4', 'ordering': '0.6', 'playwright': '0.3.0'}, 'JAVA_HOME': 'D:\\java-grp\\jdk\\', 'Base URL': ''}
rootdir: E:\develop\python\pytest-training\test
plugins: allure-pytest-2.12.0, base-url-2.0.0, html-3.2.0, metadata-2.0.4, ordering-0.6, playwright-0.3.0
collected 1 item
test_a.py::test_performance PASSED [100%]
========================== warnings summary =================================
test_a.py:25
E:\develop\python\pytest-training\test\test_a.py:25: PytestUnknownMarkWarning: Unknown pytest.mark.performance - is this a typo? You can register custom marks to avoid this warning - for details, see https://docs.pytest.org/en/stable/how-to/mark.html
@pytest.mark.performance
-- Docs: https://docs.pytest.org/en/stable/how-to/capture-warnings.html
-- generated html file: file:///E:/develop/python/pytest-training/test/report.html --
================= 1 passed, 1 warning in 99.09s (0:01:39) ===================
(D:\python-grp\miniconda_env\py3.10_playwright) E:\develop\python\pytest-training\test>
最终生成的报告是:(有点长, 截取了关键部分)
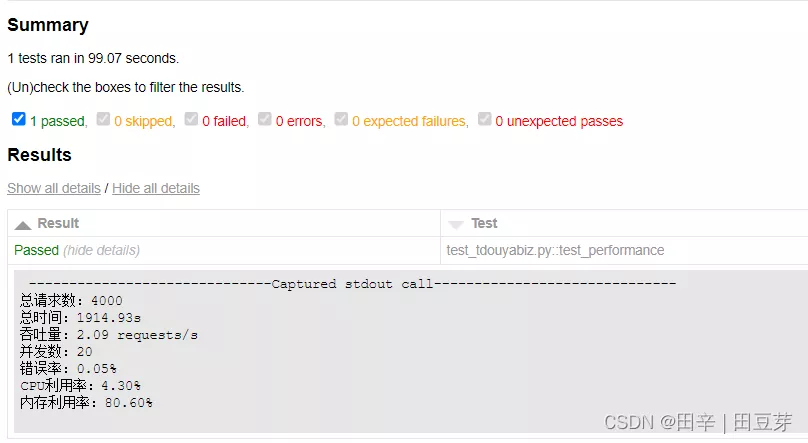
因为时间关系, 本案例今天没有时间在服务器端执行, 所以通过psutil库所取得CPU利用率和内存利用率时间并不对。 如果是在服务器端执行, 这两个数字才是对的。
如果要在本地获取服务器的CPU,内存,IO等情况,有一个监控神器:Prometheus。不过这东西配置起来又是另一个话题, 且听后话~哈哈(55555, 好像,又刨了一个坑)
4 完整源码#!/usr/bin/env python
# -*- coding:utf-8 -*-
"""
#-----------------------------------------------------------------------------
# --- TDOUYA STUDIOS ---
#-----------------------------------------------------------------------------
#
# @Project : pytest-training
# @File : test_a.py
# @Author : tianxin.xp@gmail.com
# @Date : 2023/3/10 14:39
#
# 压力测试案例
#
#--------------------------------------------------------------------------"""
import threading
import time
import psutil
import pytest
import requests
# 定义测试用例
@pytest.mark.performance
def test_performance():
# 设置测试参数
url = 'http://www.tdouya.biz/'
num_threads = 20
num_requests = 200
timeout = 5
# 初始化测试结果
response_times = []
errors = 0
successes = 0
# 定义测试函数
def test_func():
nonlocal errors, successes
for _ in range(num_requests):
try:
start_time = time.time()
requests.get(url, timeout=timeout)
end_time = time.time()
response_time = end_time - start_time
response_times.append(response_time)
successes += 1
except requests.exceptions.RequestException:
errors += 1
# 创建测试线程
threads = []
for _ in range(num_threads):
t = threading.Thread(target=test_func)
threads.append(t)
# 启动测试线程
for t in threads:
t.start()
# 等待测试线程结束
for t in threads:
t.join()
# 计算测试结果
total_requests = num_threads * num_requests
throughput = successes / (sum(response_times) or 1)
concurrency = num_threads
error_rate = errors / (total_requests or 1)
cpu_usage = psutil.cpu_percent()
memory_usage = psutil.virtual_memory().percent
# 输出测试结果
print(f'总请求数:{total_requests}')
print(f'总时间:{sum(response_times):.2f}s')
print(f'吞吐量:{throughput:.2f} requests/s')
print(f'并发数:{concurrency}')
print(f'错误率:{error_rate:.2%}')
print(f'CPU利用率:{cpu_usage:.2f}%')
print(f'内存利用率:{memory_usage:.2f}%')
# 将测试结果写入文件
with open('performance_test_result.txt', 'w') as f:
f.write(f'总请求数:{total_requests}\n')
f.write(f'总时间:{sum(response_times):.2f}s\n')
f.write(f'吞吐量:{throughput:.2f} requests/s\n')
f.write(f'并发数:{concurrency}\n')
f.write(f'错误率:{error_rate:.2%}\n')
f.write(f'CPU利用率:{cpu_usage:.2f}%\n')
f.write(f'内存利用率:{memory_usage:.2f}%\n')
到此这篇关于Python+Pytest实现压力测试详解的文章就介绍到这了,更多相关Python Pytest压力测试内容请搜索软件开发网以前的文章或继续浏览下面的相关文章希望大家以后多多支持软件开发网!