Swift 中的 JSON 反序列化示例详解
业界常用的几种方案
手动解码方案,如 Unbox(DEPRECATED)
阿里开源的 HandyJSON
基于 Sourcery 的元编程方案
Swift build-in API Codable
属性装饰器,如 BetterCodable
各个方案优缺点对比
Codable 介绍
原理浅析
Decoder、Container 协议
自研方案
功能设计
Decoder、Container 具体实现
再议 PropertyWrapper
应用场景示例
单元测试
性能对比
业界常用的几种方案 手动解码方案,如 Unbox(DEPRECATED)Swift 早期普遍采用的方案,类似的还有 ObjectMapper
该方案需要使用者手动编写解码逻辑,使用成本比较高;目前已被 Swift 官方推出的 Codable 取代
示例:
struct User {
    let name: String
    let age: Int
}
extension User: Unboxable {
    init(unboxer: Unboxer) throws {
        self.name = try unboxer.unbox(key: "name")
        self.age = try unboxer.unbox(key: "age")
    }
}
阿里开源的 HandyJSON
HandyJSON
HandyJSON 目前依赖于从 Swift Runtime 源码中推断的内存规则,直接对内存进行操作。
在使用方面,不需要繁杂的定义,不需要继承自 NSObject,声明实现了协议即可
示例:
class Model: HandyJSON {
    var userId: String = ""
    var nickname: String = ""
    required init() {}
}
let jsonObject: [String: Any] = [
    "userId": "1234",
    "nickname": "lilei",
]
let model = Model.deserialize(from: object)
但是存在兼容和安全方面的问题,由于强依赖内存布局规则,Swift 大版本升级时可能会有稳定性问题。同时由于要在运行时通过反射解析数据结构,会对性能有一定影响
基于 Sourcery 的元编程方案Sourcery是一款 Swift 代码生成器,使用 SourceKitten 解析 Swift 源码,根据 Stencil 模版生成最终代码
可定制能力非常强,基本可以满足我们所有的需求
示例:
定义了 AutoCodable 协议,并且让需要被解析的数据类型遵循该协议
protocol AutoCodable: Codable {}
class Model: AutoCodable {
    // sourcery: key = "userID"
    var userId: String = ""
    var nickname: String = ""
    required init(from decoder: Decoder) throws {
        try autoDecodeModel(from: decoder)
    }
}
之后通过 Sourcery 生成代码,这个过程 Sourcery 会扫描所有代码,对实现了 AutoCodable 协议的类/结构体自动生成解析代码
// AutoCodable.generated.swift
// MARK: - Model Codable
extension Model {
    enum CodingKeys: String, CodingKey {
        case userId = "userID"
        case nickname
    }
    // sourcery:inline:Model.AutoCodable
    public func autoDecodeModel(from decoder: Decoder) throws {
        // ...
    }
}
如上所示,还可以通过代码注释(注解)来实现键值映射等自定义功能,但是需要对使用者有较强的规范要求。其次在组件化过程中需要对每个组件进行侵入/改造,内部团队可以通过工具链解决,作为跨团队通用方案可能不是太合适
Swift build-in API CodableSwift 4.0 之后官方推出的 JSON 序列化方案,可以理解为 Unbox+Sourcery 的组合,编译器会根据数据结构定义,自动生成编解码逻辑,开发者使用特定的 Decoder/Encoder 对数据进行转化处理。
Codable 作为 Swift 官方推出的方案,使用者可以无成本的接入。不过在具体实践过程中,碰到了一些问题
Key 值映射不友好,例如以下情况:
// swift
struct User: Codable {
    var name: String
    var age: Int
    // ...
}
// json1
{
  "name": "lilei"
}
// json2
{
  "nickname": "lilei"
}
// json3
{
  "nickName": "lilei"
}
Swift 编译器会自动帮我们生成完整的 CodingKeys,但是如果需要将 json 中的 nickname 或 nickName 解析为 User.name 时,需要重写整个 CodingKeys,包括其他无关属性如 age
容错处理能力不足、无法提供默认值
Swift 设计初衷之一就是安全性,所以对于一些类型的强校验从设计角度是合理的,不过对于实际使用者来说会增加一些使用成本
举个例子:
enum City: String, Codable {
    case beijing
    case shanghai
    case hangzhou
}
struct User: Codable {
    var name: String
    var city: City?
}
// json1
{
  "name": "lilei",
  "city": "hangzhou"
}
// json2
{
  "name": "lilei"
}
// json3
{
  "name": "lilei",
  "city": "shenzhen"
}
let decoder = JSONDecoder()
try {
  let user = try? decoder.decode(User.self, data: jsonData3)
}
catch {
  // json3 格式会进入该分支
  print("decode user error")
}
上述代码中,json1 和 json2 可以正确反序列化成 User 结构,json3 由于 “shenzhen” 无法转化成 City,导致整个 User 结构解析失败,而不是 name 解析成功,city 失败后变成 nil
嵌套结构解析繁琐
JSONDecoder 只接受 data,不支持 dict,特殊场景使用时的类型转化存在性能损耗
属性装饰器,如 BetterCodableBetterCodable
Swift 5.0 新增的语言特性,通过该方案可以补足原生 Codable 方案一些补足之处,比如支持默认值、自定义解析兜底策略等,具体原理也比较简单,有兴趣的可自行了解
示例:
struct UserPrivilege: Codable {
    @DefaultFalse var isAdmin: Bool
}
let json = #"{ "isAdmin": null }"#.data(using: .utf8)!
let result = try JSONDecoder().decode(Response.self, from: json)
print(result) // UserPrivilege(isAdmin: false)
不过在实际编码中,需要对数据结构的属性显式描述,增加了使用成本
各个方案优缺点对比| 类型兼容 | ❌ | ✅ | ✅ | ✅ |
| 支持默认值 | ❌ | ✅ | ✅ | ✅ |
| 键值映射 | ❌ | ✅ | ❌ | ✅ |
| 接入/使用成本 | ✅ | ✅ | ❌ | ❌ |
| 安全性 | ✅ | ❌ | ✅ | ✅ |
| 性能 | ✅ | ❌ | ✅ | ✅ |
上述方案都有各自的优缺点,基于此我们希望找到更适合云音乐的方案。从使用接入和使用成本上来说,Codable 无疑是最佳选择,关键点在于如何解决存在的问题
Codable 介绍 原理浅析先看一组数据结构定义,该数据结构遵循 Codable 协议
enum Gender: Int, Codable {
    case unknown
    case male
    case female
}
struct User: Codable {
    var name: String
    var age: Int
    var gender: Gender
}
使用命令 swiftc main.swift -emit-sil | xcrun swift-demangle > main.sil 生成 SIL(Swift Intermediate Language),分析一下编译器具体做了哪些事情
可以看到编译器会自动帮我们生成 CodingKeys 枚举和 init(from decoder: Decoder) throws 方法
enum Gender : Int, Decodable & Encodable {
  case unknown
  case male
  case female
  init?(rawValue: Int)
  typealias RawValue = Int
  var rawValue: Int { get }
}
struct User : Decodable & Encodable {
  @_hasStorage var name: String { get set }
  @_hasStorage var age: Int { get set }
  @_hasStorage var gender: Gender { get set }
  enum CodingKeys : CodingKey {
    case name
    case age
    case gender
    @_implements(Equatable, ==(_:_:)) static func __derived_enum_equals(_ a: User.CodingKeys, _ b: User.CodingKeys) -> Bool
    func hash(into hasher: inout Hasher)
    init?(stringValue: String)
    init?(intValue: Int)
    var hashValue: Int { get }
    var intValue: Int? { get }
    var stringValue: String { get }
  }
  func encode(to encoder: Encoder) throws
  init(from decoder: Decoder) throws
  init(name: String, age: Int, gender: Gender)
}
下面摘录了部分用于解码的 SIL 片段,不熟悉的读者可以跳过该部分,直接看后面转译过的伪代码
// User.init(from:)
sil hidden [ossa] @$s6source4UserV4fromACs7Decoder_p_tKcfC : $@convention(method) (@in Decoder, @thin User.Type) -> (@owned User, @error Error) {
// %0 "decoder"                                   // users: %83, %60, %8, %5
// %1 "$metatype"
bb0(%0 : $*Decoder, %1 : $@thin User.Type):
  %2 = alloc_box ${ var User }, var, name "self"  // user: %3
  %3 = mark_uninitialized [rootself] %2 : ${ var User } // users: %84, %61, %4
  %4 = project_box %3 : ${ var User }, 0          // users: %59, %52, %36, %23
  debug_value %0 : $*Decoder, let, name "decoder", argno 1, implicit, expr op_deref // id: %5
  debug_value undef : $Error, var, name "$error", argno 2 // id: %6
  %7 = alloc_stack [lexical] $KeyedDecodingContainer<User.CodingKeys>, let, name "container", implicit // users: %58, %57, %48, %80, %79, %33, %74, %73, %20, %69, %68, %12, %64
  %8 = open_existential_addr immutable_access %0 : $*Decoder to $*@opened("6CB1A110-E4DA-11EC-8A4C-8A05F3D75FB2") Decoder // users: %12, %12, %11
  %9 = metatype $@thin User.CodingKeys.Type
  %10 = metatype $@thick User.CodingKeys.Type     // user: %12
  %11 = witness_method $@opened("6CB1A110-E4DA-11EC-8A4C-8A05F3D75FB2") Decoder, #Decoder.container : <Self where Self : Decoder><Key where Key : CodingKey> (Self) -> (Key.Type) throws -> KeyedDecodingContainer<Key>, %8 : $*@opened("6CB1A110-E4DA-11EC-8A4C-8A05F3D75FB2") Decoder : $@convention(witness_method: Decoder) <τ_0_0 where τ_0_0 : Decoder><τ_1_0 where τ_1_0 : CodingKey> (@thick τ_1_0.Type, @in_guaranteed τ_0_0) -> (@out KeyedDecodingContainer<τ_1_0>, @error Error) // type-defs: %8; user: %12
  try_apply %11<@opened("6CB1A110-E4DA-11EC-8A4C-8A05F3D75FB2") Decoder, User.CodingKeys>(%7, %10, %8) : $@convention(witness_method: Decoder) <τ_0_0 where τ_0_0 : Decoder><τ_1_0 where τ_1_0 : CodingKey> (@thick τ_1_0.Type, @in_guaranteed τ_0_0) -> (@out KeyedDecodingContainer<τ_1_0>, @error Error), normal bb1, error bb5 // type-defs: %8; id: %12
bb1(%13 : $()):                                   // Preds: bb0
  %14 = metatype $@thin String.Type               // user: %20
  %15 = metatype $@thin User.CodingKeys.Type
  %16 = enum $User.CodingKeys, #User.CodingKeys.name!enumelt // user: %18
  %17 = alloc_stack $User.CodingKeys              // users: %22, %20, %67, %18
  store %16 to [trivial] %17 : $*User.CodingKeys  // id: %18
  // function_ref KeyedDecodingContainer.decode(_:forKey:)
  %19 = function_ref @$ss22KeyedDecodingContainerV6decode_6forKeyS2Sm_xtKF : $@convention(method) <τ_0_0 where τ_0_0 : CodingKey> (@thin String.Type, @in_guaranteed τ_0_0, @in_guaranteed KeyedDecodingContainer<τ_0_0>) -> (@owned String, @error Error) // user: %20
  try_apply %19<User.CodingKeys>(%14, %17, %7) : $@convention(method) <τ_0_0 where τ_0_0 : CodingKey> (@thin String.Type, @in_guaranteed τ_0_0, @in_guaranteed KeyedDecodingContainer<τ_0_0>) -> (@owned String, @error Error), normal bb2, error bb6 // id: %20
// %21                                            // user: %25
bb2(%21 : @owned $String):                        // Preds: bb1
  dealloc_stack %17 : $*User.CodingKeys           // id: %22
  %23 = begin_access [modify] [unknown] %4 : $*User // users: %26, %24
  %24 = struct_element_addr %23 : $*User, #User.name // user: %25
  assign %21 to %24 : $*String                    // id: %25
  end_access %23 : $*User                         // id: %26
  ...
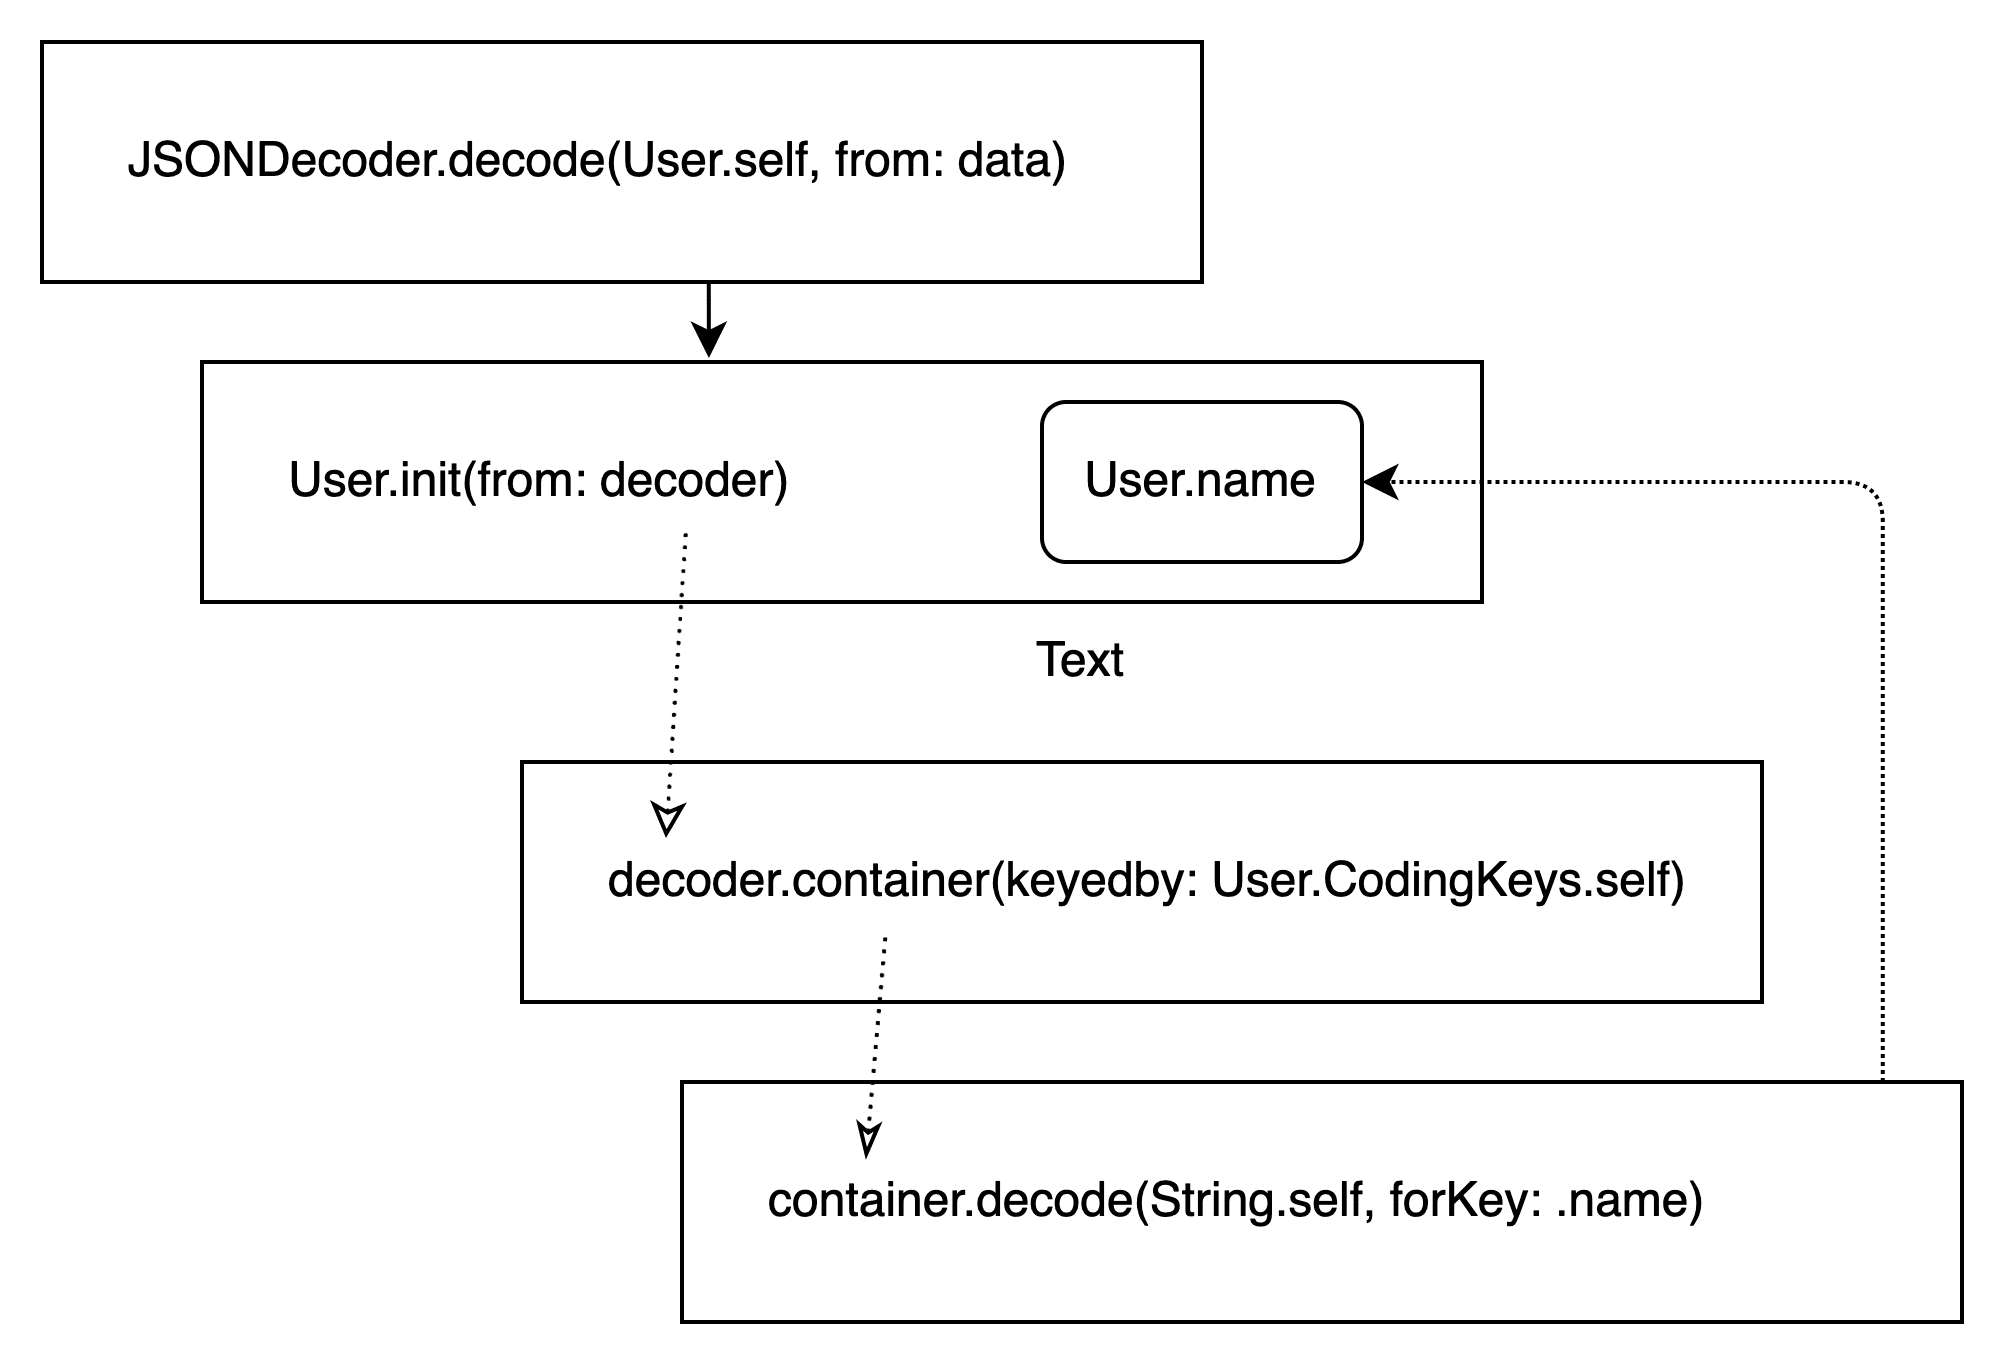
大致上就是从 decoder 中获取 container,在通过 decode 方法解析出具体的值,翻译成对应的 Swift 代码如下:
init(from decoder: Decoder) throws {
    let container = try decoder.container(keyedBy: User.CodingKeys.Type)
    self.name = try container.decode(String.self, forKey: .name)
    self.age = try container.decode(Int.self, forKey: .age)
    self.gender = try container.decode(Gender.self, forKey: .gender)
}
由此可见反序列化中关键部分就在 Decoder 上,平常使用较多的 JSONDecoder 就是对 Decoder 协议的一种实现
编译器自动生成的代码我们无法人工干预,如果想要让反序列化结果达到我们的预期,需要定制化实现一个 Decoder
Swift 标准库部分是开源的,有兴趣的同学可移步 JSONDecoder.swift
Decoder、Container 协议public protocol Decoder {
var codingPath: [CodingKey] { get }
var userInfo: [CodingUserInfoKey : Any] { get }
func container<Key>(keyedBy type: Key.Type) throws -> KeyedDecodingContainer<Key> where Key : CodingKey
func unkeyedContainer() throws -> UnkeyedDecodingContainer
func singleValueContainer() throws -> SingleValueDecodingContainer
}
Decoder 包含了 3 种类型的容器,具体关系如下

容器需要实现各自的 decode 方法,进行具体的解析工作
KeyedDecodingContainerProtocol - 键值对字典容器协议(KeyedDecodingContainer 用于类型擦除)
func decodeNil(forKey key: Self.Key) throws -> Bool
func decode(_ type: Bool.Type, forKey key: Self.Key) throws -> Bool
func decode(_ type: String.Type, forKey key: Self.Key) throws -> String
...
func decodeIfPresent(_ type: Bool.Type, forKey key: Self.Key) throws -> Bool?
func decodeIfPresent(_ type: String.Type, forKey key: Self.Key) throws -> String?
...
SingleValueDecodingContainer - 单值容器协议
func decode(_ type: UInt8.Type) throws -> UInt8
...
func decode<T>(_ type: T.Type) throws -> T where T : Decodable
UnkeyedDecodingContainer - 数组容器协议
mutating func decodeNil() throws -> Bool
mutating func decode(_ type: Int64.Type) throws -> Int64
mutating func decode(_ type: String.Type) throws -> String
...
mutating func decodeIfPresent(_ type: Bool.Type) throws -> Bool?
mutating func decodeIfPresent(_ type: String.Type) throws -> String?
典型的 JSONDecoder 使用姿势
let data = ...
let decoder = JSONDecoder()
let user = try? decoder.decode(User.self, from: data)
解析流程如下:
Decoder 的核心解析逻辑都在 Container 内部,下面会根据我们的需求,对该部分逻辑进行设计与实现
自研方案 功能设计首先需要明确我们最终需要的效果
支持默认值
类型互相兼容,如 JSON 中的 int 类型可以被正确的解析为 Model 中的 String 类型
解码失败允许返回 nil ,而不是直接判定解码过程失败
支持 key 映射
支持自定义解码逻辑
这里定义以下几个协议
默认值协议,默认实现了常见类型的缺省值,自定义类型也可以按需实现
public protocol NECodableDefaultValue {
    static func codableDefaultValue() -> Self
}
extension Bool: NECodableDefaultValue {
    public static func codableDefaultValue() -> Self { false }
}
extension Int: NECodableDefaultValue {
    public static func codableDefaultValue() -> Self { 0 }
}
...
key 值映射协议
public protocol NECodableMapperValue {
    var mappingKeys: [String] { get }
}
extension String: NECodableMapperValue {
    public var mappingKeys: [String] {
        return [self]
    }
}
extension Array: NECodableMapperValue where Element == String {
    public var mappingKeys: [String] {
        return self
    }
}
Codable 协议扩展
public protocol NECodable: Codable {
    // key 值映射关系定义,类似 YYModel 功能
    static var modelCustomPropertyMapper: [String: NECodableMapperValue]? { get }
    // 除了 NECodableDefaultValue 返回的默认值,还可以在该函数中定义默认值
    static func decodingDefaultValue<CodingKeys: CodingKey>(for key: CodingKeys) -> Any?
    // 在解析完数据结构之后,提供二次修改的机会
    mutating func decodingCustomTransform(from jsonObject: Any, decoder: Decoder) throws -> Bool
}
最终的使用姿势
struct Model: NECodable {
    var nickName: String
    var age: Int
    static var modelCustomPropertyMapper: [String : NECodableMapperValue]? = [
        "nickName": ["nickname", "nickName"],
        "age": "userInfo.age"
    ]
    static func decodingDefaultValue<CodingKeys>(for key: CodingKeys) -> Any? where CodingKeys : CodingKey {
        guard let key = key as? Self.CodingKeys else { return nil }
        switch key {
        case .age:
            // 提供默认年龄
            return 18
        default:
            return nil
        }
    }
}
let jsonObject: [String: Any] = [
    "nickname": "lilei",
    "userInfo": [
        "age": 123
    ],
]
let model = try NEJSONDecoder().decode(Model.self, jsonObject: jsonObject)
XCTAssert(model.nickName == "lilei")
XCTAssert(model.age == 123)
Decoder、Container 具体实现
定义类 NEJSONDecoder 作为 Decoder 协议的具体实现,同时还要实现三个容器协议
在容器内部需要实现大量的 decode 方法用于解析具体值,我们可以抽象一个工具类,进行相应的类型解析、转换、提供默认值等功能
下面给出一部分 keyedContainer 实现,大致流程如下:
先调用的 entry 方法,该方法根据 key、keyMapping 从 JSON 中获取原始值
通过 unbox 方法,将原始值(可能是 String、Int 类型)转化成预期类型(比如 Bool)
如果上述过程失败,则进入默认值处理流程
首先通过模型定义的 decodingDefaultValue 方法获取默认值,如果未获取到进行步骤 b
通过 NECodableDefaultValue 协议获取类型的默认值
解析完成
class NEJSONKeyedDecodingContainer<K : CodingKey> : KeyedDecodingContainerProtocol {
public func decode(_ type: Bool.Type, forKey key: Key) throws -> Bool {
        do {
            return try _decode(type, forKey: key)
        }
        catch {
            if let value = self.defaultValue(for: key),
               let unbox = try? decoder.unbox(value, as: Bool.self) { return unbox }
            if self.provideDefaultValue {
                return Bool.codableDefaultValue()
            }
            throw error
        }
    }
public func _decode(_ type: Bool.Type, forKey key: Key) throws -> Bool {
        guard let entry = self.entry(for: key) else {
            throw ...
        }
        self.decoder.codingPath.append(key)
        defer { self.decoder.codingPath.removeLast() }
        guard let value = try self.decoder.unbox(entry, as: Bool.self) else {
            throw ...
        }
        return value
    }
}
再议 PropertyWrapper
在 NECodable 协议中,保留了 YYModel 的使用习惯,key 映射以及默认值提供需要单独实现 NECodable 协议的两个方法
而利用 Swift 的属性装饰器,可以让开发者更加便捷的实现上述功能:
@propertyWrapper
class NECodingValue<Value: Codable>: Codable {
    public convenience init(wrappedValue: Value) {
        self.init(storageValue: wrappedValue, keys: nil)
    }
    public convenience init(wrappedValue: Value, keys: String...) {
        self.init(storageValue: wrappedValue, keys: keys)
    }
    public convenience init<T>(wrappedValue: Optional<T> = .none, keys: String...) where Value == Optional<T> {
        self.init(storageValue: wrappedValue, keys: [])
    }
    public convenience init(keys: String...) {
        self.init(keys: keys)
    }
    // ....
}
struct Model: NECodable {
    @NECodingValue(keys: "nickname")
    var name: String
    // JSON 中不存在时,默认为 hangzhou
    @NECodingValue
    var city: String = "hangzhou"
    // JSON 中不存在时,默认为 false
    var enable: Bool
}
实现方式比较取巧:
通过属性修饰器包装实例变量,NECodingValue(keys: "nickname") 实例最先被初始化,其中包含我们定义的 keys、wrapperValue,而后的 init(from decoder: Decoder) 过程又通过 decoder 生成 NECodingValue(from: decoder) 变量并赋值给 _name 属性,此时第一个 NECodingValue 变量就会被释放,从而获得了一个代码执行时机,用来进行定制的解码流程(将 defaultValue 复制过来,使用自定义的 key 进行解码等等…)
应用场景示例反序列化通常用于处理服务端返回的数据,基于 Swift 的语法特性,我们可以非常简单的定义一个网络请求协议,举个例子:
网络请求协议
protocol APIRequest {
    associatedtype Model
    var path: String { get }
    var parameters: [String: Any]? { get }
    static func parse(_ data: Any) throws -> Model
}
// 缺省实现
extension APIRequest {
    var parameters: [String: Any]? { nil }
    static func parse(_ data: Any) throws -> Model {
        throw APIError.dataExceptionError()
    }
}
扩展 APIRequest 协议,通过 Swift 的类型匹配模式,自动进行反序列化
extension APIRequest where Model: NECodable {
    static func parse(_ data: Any) throws -> Model {
        let decoder = NEJSONDecoder()
        return try decoder.decode(Model.self, jsonObject: data)
    }
}
扩展 APIRequest 协议,增加网络请求方法
extension APIRequest {
    @discardableResult
    func start(completion: @escaping (Result<Model, APIError>) -> Void) -> APIToken<Self> {
        // 具体的网络请求流程,基于底层网络库实现
    }
}
最终业务侧可以非常简单的定义一个网络接口,并发起请求
// 网络接口定义
struct MainRequest: APIRequest {
    struct Model: NECodable {
        struct Item: NECodable {
            var title: String
        }
        var items: [Item]
        var page: Int
    }
    let path = "/api/main"
}
// 业务侧发起网络请求
func doRequest() {
    MainRequest().start { result in
        switch result {
            case .success(let model):
                // to do something
                print("page index: (model.page)")
            case .failure(let error):
                HUD.show(error: error)
        }
    }
}
单元测试
序列化/反序列化过程会存在很多边界情况,需要针对各场景构造单元测试,确保所有行为符合预期
性能对比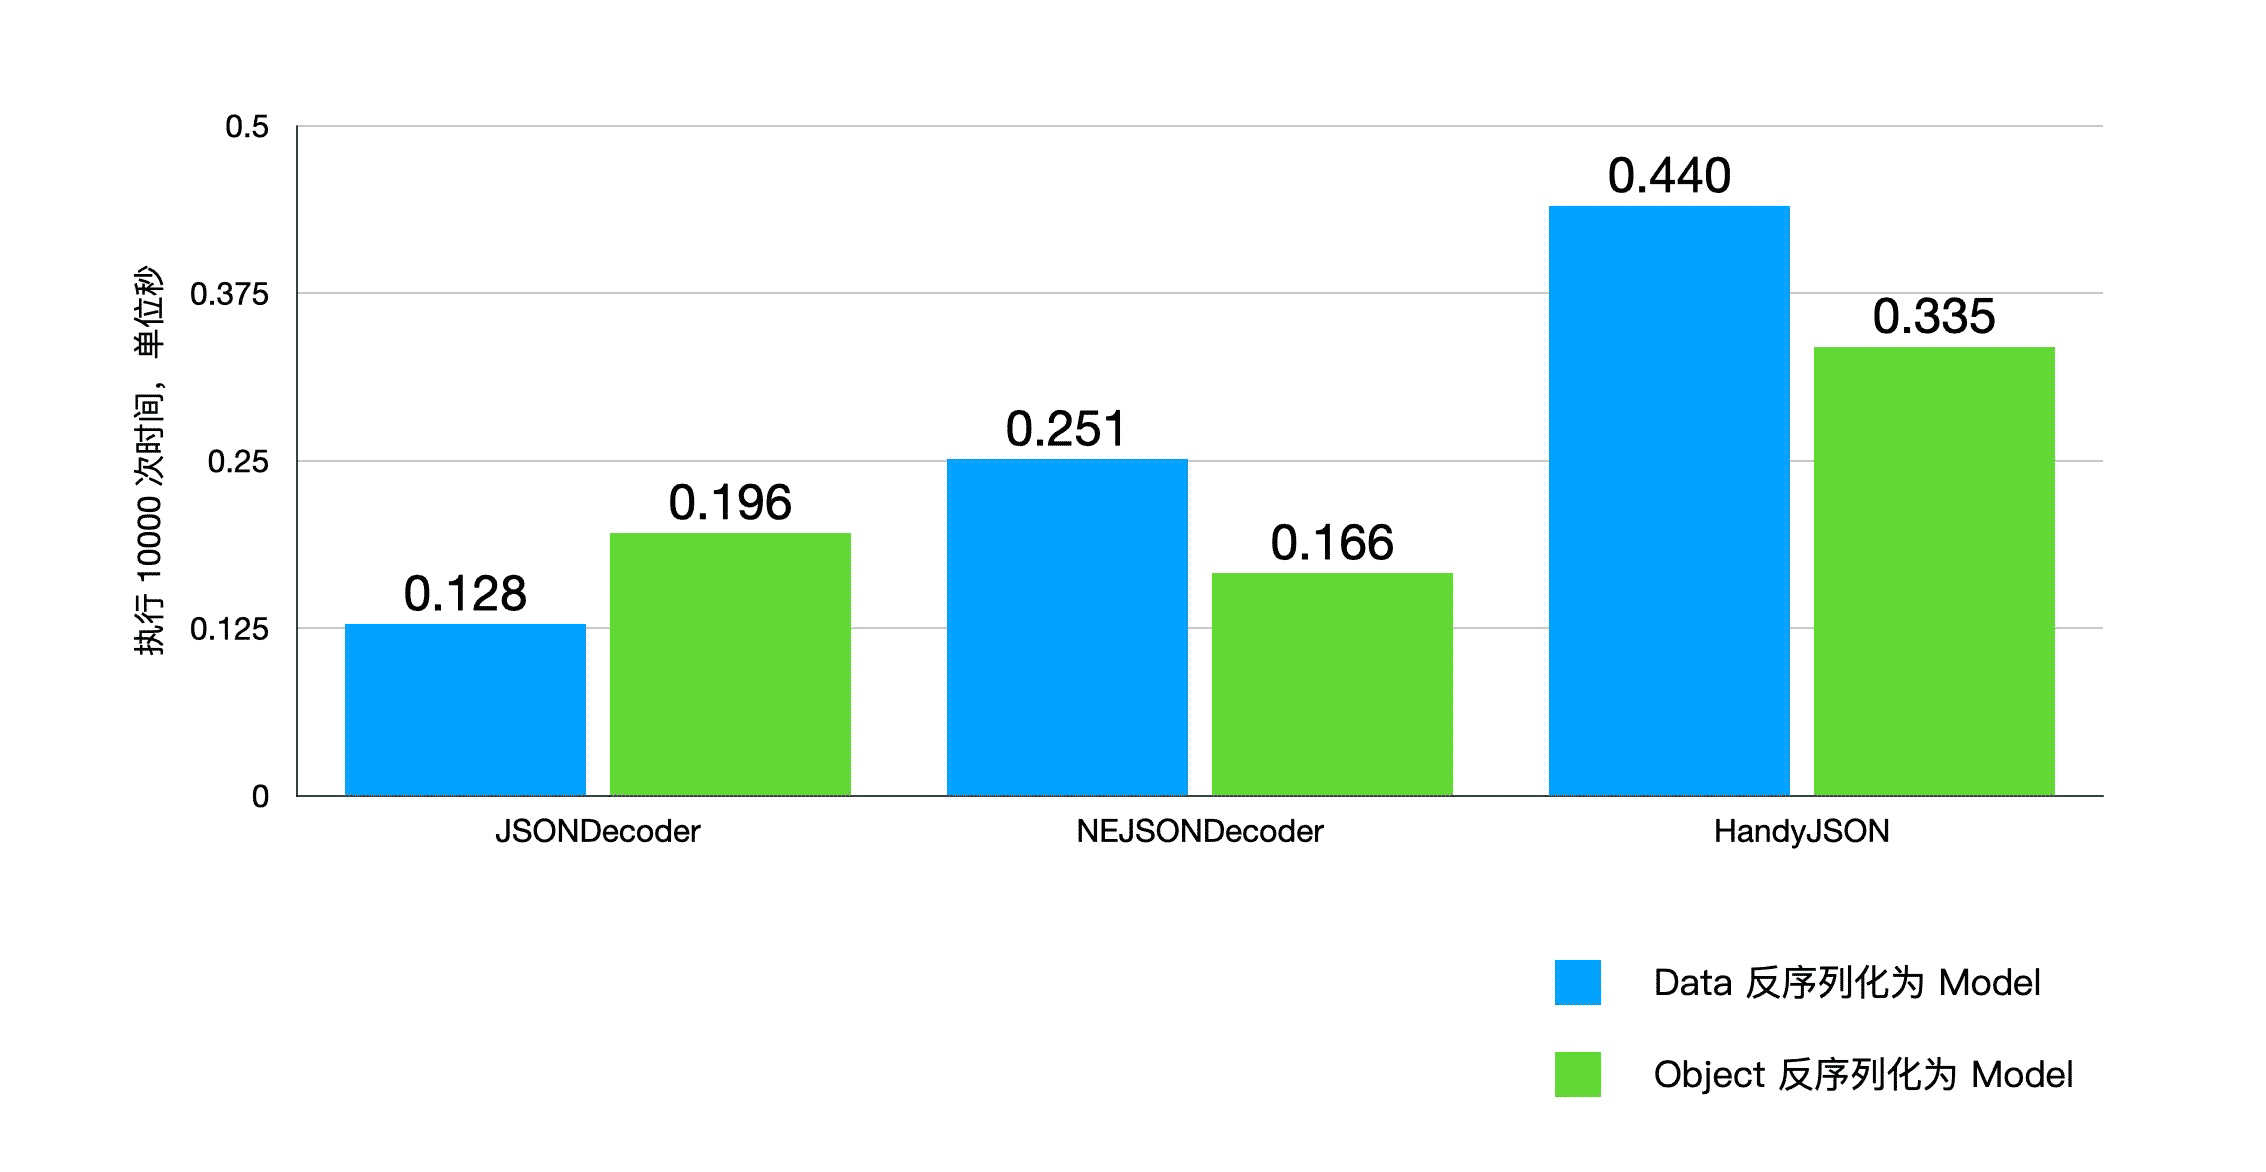
上图是各反序列化库执行 10000 次后得到的结果,可能看到从 Data 数据转换为 Model 时 JSONDecoder 性能最佳,从 JSON Object 传换为 Model 时 NEJSONDecoder 性能最佳,HandyJSON 耗时均最长
测试代码:
import XCTest
@testable import JSONPerformance
import NEAutoCodable
import HandyJSON
class JSONPerformanceTests: XCTestCase {
    override func setUpWithError() throws {
        // Put setup code here. This method is called before the invocation of each test method in the class.
    }
    override func tearDownWithError() throws {
        // Put teardown code here. This method is called after the invocation of each test method in the class.
    }
    func jsonObject() -> [String: Any] {
        let object: [String: Any] = [
            "userId": "12345",
            "nickname": "用户1",
            "avatarImgUrl": "http://baidu.com/avatarImageUrl.jpg",
            "signature": "qqq",
            "age": 19,
            "birthday": 1052209042000,
            "gender": 2,
            "constellation": "金牛座",
            "imAccId": "abcdefgzzzzzzzzz",
            "realMan": 1,
            "realPersonGender": 0,
            "registerTime": 1620289047216,
            "language": "en-US",
        ]
        return object
    }
    func jsonData() -> Data {
        return try! JSONSerialization.data(withJSONObject: jsonObject())
    }
    class Codable_Model: NECodable {
        var userId: String
        var nickname: String
        var avatarImgNosKey: String?
        var avatarImgUrl: String
        var signature: String
        var age: Int
        var birthday: Int
        var gender: Int
        var constellation: String
        var imAccId: String
        var realMan: Int
        var realPersonGender: Int
        var registerTime: Int
        var language: String
    }
    class NECodable_Model: NECodable {
        var userId: String
        var nickname: String
        var avatarImgNosKey: String?
        var avatarImgUrl: String
        var signature: String
        var age: Int
        var birthday: Int
        var gender: Int
        var constellation: String
        var imAccId: String
        var realMan: Int
        var realPersonGender: Int
        var registerTime: Int
        var language: String
    }
    class HandyJSON_Model: HandyJSON {
        var userId: String = ""
        var nickname: String = ""
        var avatarImgNosKey: String?
        var avatarImgUrl: String = ""
        var signature: String = ""
        var age: Int = 0
        var birthday: Int = 0
        var gender: Int = 0
        var constellation: String = ""
        var imAccId: String = ""
        var realMan: Int = 0
        var realPersonGender: Int = 0
        var registerTime: Int = 0
        var language: String = ""
        required init() {}
    }
    let loopCount = 10000
    // 0.128
    func testDataJSONDecoder() throws {
        self.measure {
            let decoder = JSONDecoder()
            let data = jsonData()
            for _ in 0..<loopCount {
                let model = try! decoder.decode(Codable_Model.self, from: data)
            }
        }
    }
    // 0.196
    func testObjectJSONDecoder() throws {
        // This is an example of a performance test case.
        self.measure {
            let decoder = JSONDecoder()
            let object = jsonObject()
            for _ in 0..<loopCount {
                let data = try! JSONSerialization.data(withJSONObject: object)
                let model = try! decoder.decode(Codable_Model.self, from: data)
            }
        }
    }
    // 0.251
    func testDataNEJSONDecoder() throws {
        self.measure {
            let decoder = NEJSONDecoder()
            let data = jsonData()
            for _ in 0..<loopCount {
                let model = try! decoder.decode(NECodable_Model.self, data: data)
            }
        }
    }
    // 0.166
    func testObjectNEJSONDecoder() throws {
        self.measure {
            let decoder = NEJSONDecoder()
            let object = jsonObject()
            for _ in 0..<loopCount {
                let model = try! decoder.decode(NECodable_Model.self, jsonObject: object)
            }
        }
    }
    // 0.440
    func testDataHandyJSON() throws {
        self.measure {
            let data = jsonData()
            for _ in 0..<loopCount {
                let object = try! JSONSerialization.jsonObject(with: data) as! [String: Any]
                let model = HandyJSON_Model.deserialize(from: object)!
            }
        }
    }
    // 0.335
    func testObjectHandyJSON() throws {
        self.measure {
            let object = jsonObject()
            for _ in 0..<loopCount {
                let model = HandyJSON_Model.deserialize(from: object)
            }
        }
    }
}
以上就是Swift 中的 JSON 反序列化示例详解的详细内容,更多关于Swift JSON反序列的资料请关注软件开发网其它相关文章!