详解Vue后台管理系统开发日常总结(组件PageHeader)
在后台管理系统的日常开发过程中发现对于同一个业务下面的版块不同的开发同事每次都会重复写页面标题的样式,而且不同的页面标题还不太一样。虽然有的页面标题栏承载的元素不一样,但是也有通用的部分,经过多个项目的迭代慢慢地总结与积累完善出了一个通用的页面标题组件<PageHeader/>。
下面是一个最常见的标题设计原型:

下面是同事给出的封装方案:
使用方式
<router-back class="router-back" text="详情" />
组件封装代码片段
<template>
 <div>
  <a
   href="javascript:void(0)" rel="external nofollow"
   :title="title"
   size="15px"
   class="font-icon arrow-left"
   @click="back"
   v-if="!disableRoute"
  ></a>
  <span
   v-show="text.length > 0 && !disableRoute"
   class="vertical-line"
  ></span>
  <span class="text">{{ text }}</span>
 </div>
</template>
<script>
export default {
 name: 'router-back',
 props: {
  text: {
   type: String,
   default: _ => ''
  },
  url: {
   type: [String, Number],
   default: _ => -1
  },
  title: {
   type: String,
   default: _ => '返回'
  },
  disableRoute: {
   type: Boolean,
   default: _ => false
  }
 },
 methods: {
  back () {
   if (typeof this.url === 'number') return this.$router.go(this.url)
   return this.$router.push(this.url)
  }
 }
}
</script>
无对比就没有伤害,这个封装只是争对了单一的情况,并没有任何扩展性和灵性性,而且在组件方法名称和接收的属性上有待考究。所以我果断弃用这个组件,而选择自己的解决方案,虽然也不是很完美,代码质量上相比也没有什么大的改进,但是自我认为还是可以分享一下。
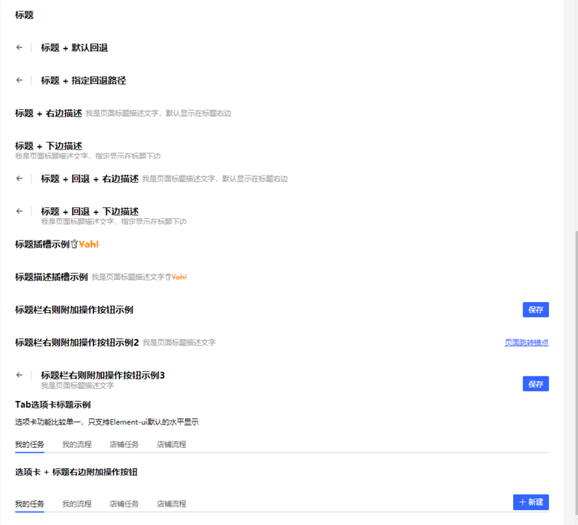
不多废话,先看实际效果图:

注意:截图是在Chrome中缩小后截下的,并不是默认大小。
整个组件是通过Vue组件JSX方式写法来实现的,我的代码质量一般,实现上不一定是最佳的,但是我有点纳闷我一个同事总是说我的多套了一些标签,说:pageHeader还需要优化,减少标签嵌套。下面是实现代码:
import './pageHeader.scss'
const PageHeader = {
 name: 'PageHeader',
 props: {
  // 标题
  title: String,
  // 子标题
  subTitle: String,
  // 返回路径,不适用于带选项卡标题
  path: {
   type: [String, Number],
   default: -1
  },
  // 是否显示回退按钮
  withPath: {
   type: Boolean,
   default: false
  },
  // 子标题显示位置 'right' | 'bottom', 不适用于带选项卡标题
  position: {
   type: String,
   default: 'right'
  },
  // 带选项卡标题开关
  withTab: {
   type: Boolean,
   default: false
  },
  // 选项卡是否引起路由改变
  isRoute: {
   type: Boolean,
   default: false
  },
  // 当前激活选项卡
  activeTab: {
   type: String,
   default: ''
  },
  // 选项卡数据
  options: {
   type: Array,
   default() {
    return [
     {
      title: '',
      field: '',
      path: ''
     }
    ]
   }
  }
 },
 computed: {
  isBottom() {
   return this.position === 'bottom'
  },
  curTab: {
   get: function() {
    return this.activeTab
   },
   set: function(val) {
    if (this.activeTab !== val) {
     if (this.isRoute) {
      this.options.forEach(option => {
       if (option.field === tab) {
        this.$router.push(option.path)
        this.$emit('tabChange', val)
       }
      })
     } else {
      this.$emit('tabChange', val)
     }
    }
   }
  }
 },
 methods: {
  goBack() {
   typeof this.path === 'string'
    ? this.$router.push(this.path)
    : this.$router.go(this.path)
  }
 },
 render(h) {
  const Back = (
   <div class="page-header__back">
    <el-button
     type="text"
     class="page-header__action"
     icon="el-icon-back"
     onClick={this.goBack}
    />
    <span class="page-header__separator mx__m" />
   </div>
  )
  const Header = (
   <div class="page-header-wrap">
    <div class="page-header__main">
     {this.withPath && Back}
     <div class="page-header__title">
      {(this.title || this.$slots.title) && (
       <div
        class={`page-header-title__main ${this.isBottom ? '' : 'fl'}`}
       >
        {this.$slots.title ? this.$slots.title : this.title}
       </div>
      )}
      {(this.subTitle || this.$slots.subTitle) && (
       <div
        class={`page-header-title__sub ${
         this.isBottom ? 'lh__14' : 'fl ml__s'
        }`}
       >
        {this.$slots.subTitle ? this.$slots.subTitle : this.subTitle}
       </div>
      )}
     </div>
    </div>
    {this.$slots.action && (
     <div class={`page-header__aside ${this.isBottom ? 'lh__72' : ''}`}>
      {this.$slots.action}
     </div>
    )}
   </div>
  )
  const TabHeader = (
   <div class="page-header-wrap--tab">
    <div class="page-header-tab__main">
     <el-tabs v-model={this.curTab}>
      {this.options.map(option => (
       <el-tab-pane label={option.title} name={option.field} />
      ))}
     </el-tabs>
    </div>
    {this.$slots.extra && (
     <div class="page-header-tab__extra">{this.$slots.extra}</div>
    )}
   </div>
  )
  return (
   <div class={`page-header ${this.isBottom ? 'pt__20' : 'py__20'}`}>
    {this.withTab ? TabHeader : Header}
   </div>
  )
 }
}
export default PageHeader
上面的代码在实现上之前没见有考虑到通过this.$router.go(-1)回到上一个页面,而是直接采用this.$router.push(path),这种需要传path的方式,后来看了最前面同事写的方案后借鉴过来,改进了一下。这个代码实现很简单没有什么需要讲的,下面是组件使用的实际例子,当然如果能写个单元测试文件来测试组件更好,但是我Jest只停留在入门水平,平时也就写些最简单的assert,然后过代码覆盖率。
由于代码在处理选项卡时,并没有对额外的插槽extra作处理,所以在使用时需要在对应的标签上模拟一下<el-tabs/>下面的线。这里直接使用了Css-in-js的一种实现styled-components的Vue版vue-styled-components,来实现在JSX中实现类似.vue中样式的scoped功能。但是并不建议用,因为Vue版的没有更新,使用的人也不多,不像React社区那么活跃。
import styled from 'vue-styled-components'
import PageHeader from '~/components/pageHeader'
const PageHeaderAction = styled.div`
 border-bottom: 2px solid #e4e7ed;
 padding-bottom: 6px;
`
const UiPageHeader = {
 name: 'UiPageHeader',
 components: {
  PageHeader
 },
 data() {
  return {
   tabActive: '01',
   tabOptions: [
    {
     title: '我的任务',
     field: '01'
    },
    {
     title: '我的流程',
     field: '02'
    },
    {
     title: '店铺任务',
     field: '03'
    },
    {
     title: '店铺流程',
     field: '04'
    }
   ]
  }
 },
 methods: {
  onTabChange(tab) {
   console.log(tab)
  }
 },
 render(h) {
  return (
   <div>
    <el-row>
     <PageHeader title="标题"/>
    </el-row>
    <el-row>
     <PageHeader title="标题 + 默认回退" withPath={true}/>
     <PageHeader title="标题 + 指定回退路径" withPath={true} path="/4/dashboard"/>
    </el-row>
    <el-row>
     <PageHeader title="标题 + 右边描述" subTitle="我是页面标题描述文字,默认显示在标题右边"/>
     <PageHeader title="标题 + 下边描述" subTitle="我是页面标题描述文字,指定显示在标题下边" position="bottom"/>
     <PageHeader
      title="标题 + 回退 + 右边描述"
      withPath={true}
      subTitle="我是页面标题描述文字,默认显示在标题右边"
     />
     <PageHeader
      title="标题 + 回退 + 下边描述"
      withPath={true}
      subTitle="我是页面标题描述文字,指定显示在标题下边"
      position="bottom"
     />
    </el-row>
    <el-row>
     <PageHeader>
      <template slot="title">
       标题插槽示例
       <i class="el-icon-milk-tea"/>
       <strike style="color: #ff8e00">Yah!</strike>
      </template>
     </PageHeader>
     <PageHeader title="标题描述插槽示例">
      <template slot="subTitle">
       我是页面标题描述文字
       <i class="el-icon-milk-tea"/>
       <strike style="color: #ff8e00">Yah!</strike>
      </template>
     </PageHeader>
     <PageHeader title="标题栏右则附加操作按钮示例">
      <template slot="action">
       <el-button type="primary">保存</el-button>
      </template>
     </PageHeader>
     <PageHeader title="标题栏右则附加操作按钮示例2" subTitle="我是页面标题描述文字">
      <template slot="action">
       <el-button class="btn-link" type="text">页面跳转锚点</el-button>
      </template>
     </PageHeader>
     <PageHeader
      withPath={true}
      title="标题栏右则附加操作按钮示例3"
      subTitle="我是页面标题描述文字"
      position="bottom">
      <template slot="action">
       <el-button type="primary">保存</el-button>
      </template>
     </PageHeader>
    </el-row>
    <el-row>
     <h3>Tab选项卡标题示例</h3>
     <div>选项卡功能比较单一,只支持Element-ui默认的水平显示</div>
     <PageHeader
      withTab={true}
      activeTab={this.tabActive}
      options={this.tabOptions}
      onTabChange={this.onTabChange}
     />
    </el-row>
    <el-row>
     <h3>选项卡 + 标题右边附加操作按钮</h3>
     <PageHeader
      withTab={true}
      activeTab={this.tabActive}
      options={this.tabOptions}
      onTabChange={this.onTabChange}
     >
      <template slot="extra">
       <PageHeaderAction>
        <el-button
         type="primary"
         size="small"
         icon="el-icon-plus"
         onClick={this.onCreate}
        >
         新建
        </el-button>
       </PageHeaderAction>
      </template>
     </PageHeader>
    </el-row>
   </div>
  )
 }
}
export default UiPageHeader
注意:在上面的代码中render()方法中传了个h参考是因为我们的脚手架是公司架构师自己Webpack搞的,如果是用@vue/cli生成的项目是不需要这个参数的。
最后:写这个的目的是为了在工作中有所积累,写了几年业务系统,发现并没有留下什么,以文章的方式记录是一种不错的方式,希望能养成好习惯,坚持写作,在写的时候思考提升自我。