HTML5 和小程序实现拍照图片旋转、压缩和上传功能
原文地址: github.com/whinc/blog/…
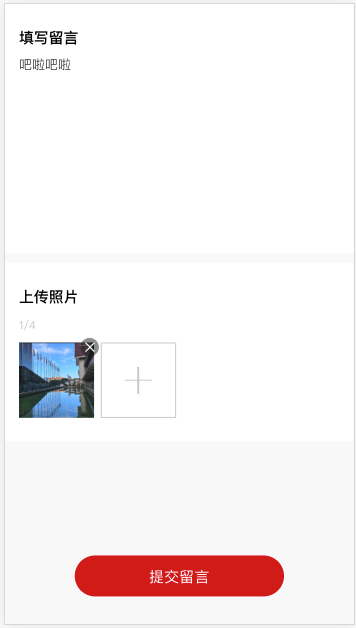
最近接到一个“发表评论”的需求:用户输入评论并且可以拍照或从相册选择图片上传,即支持图文评论。需要同时在 H5 和小程序两端实现,该需求处理图片的地方较多,本文对 H5 端的图片处理实践做一个小结。项目代码基于 Vue 框架,为了避免受框架影响,我将代码全部改为原生 API 的实现方式进行说明,同时项目代码中有很多其他额外的细节和功能(预览、裁剪、上传进度等)在这里都省去,只介绍与图片处理相关的关键思路和代码。小程序的实现方式与 H5 类似,不再重述,在文末附上小程序端的实现代码。
拍照
使用 <input> 标签, type 设为 "file" 选择文件, accept 设为 "image/*" 选择文件为图片类型和相机拍摄,设置 multiple 支持多选。监听 change 事件拿到选中的文件列表,每个文件都是一个 Blob 类型。
<input type="file" accept="image/*" multiple />
  <img class="preivew" />
  <script type="text/javascript">
    function onFileChange (event) {
      const files = Array.prototype.slice.call(event.target.files)
      files.forEach(file => console.log('file name:', file.name))
    }
    document.querySelector('input').addEventListener('change', onFileChange)
  </script>
图片预览
URL.createObjectURL 方法可创建一个本地的 URL 路径指向本地资源对象,下面使用该接口创建所选图片的地址并展示。
function onFileChange (event) {
      const files = Array.prototype.slice.call(event.target.files)
      const file = files[0]
      document.querySelector('img').src = window.URL.createObjectURL(file)
    }
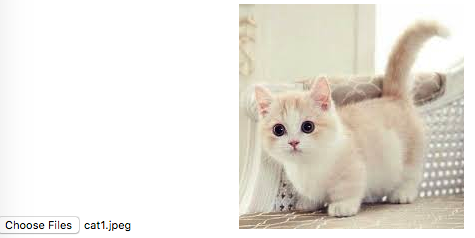
图片旋转
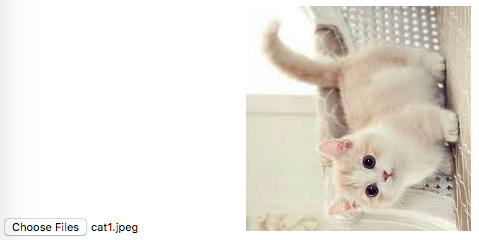
通过相机拍摄的图片,由于拍摄时手持相机的方向问题,导致拍摄的图片可能存在旋转,需要进行纠正。纠正旋转需要知道图片的旋转信息,这里借助了一个叫 exif-js 的库,该库可以读取图片的 EXIF 元数据,其中包括拍摄时相机的方向,根据这个方向可以推算出图片的旋转信息。
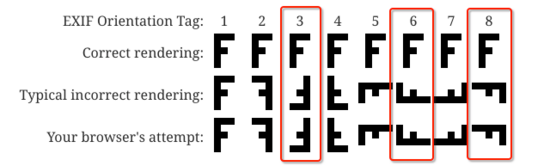
下面是 EXIF 旋转标志位,总共有 8 种,但是通过相机拍摄时只能产生1、3、6、8 四种,分别对应相机正常、顺时针旋转180°、逆时针旋转90°、顺时针旋转90°时所拍摄的照片。
所以纠正图片旋转角度,只要读取图片的 EXIF 旋转标志位,判断旋转角度,在画布上对图片进行旋转后,重新导出新的图片即可。其中关于画布的旋转操作可以参考 canvas 图像旋转与翻转姿势解锁 这篇文章。下面函数实现了对图片文件进行旋转角度纠正,接收一个图片文件,返回纠正后的新图片文件。
/**
 * 修正图片旋转角度问题
 * @param {file} 原图片
 * @return {Promise} resolved promise 返回纠正后的新图片
 */
function fixImageOrientation (file) {
  return new Promise((resolve, reject) => {
    // 获取图片
    const img = new Image();
    img.src = window.URL.createObjectURL(file);
    img.onerror = () => resolve(file);
    img.onload = () => {
      // 获取图片元数据(EXIF 变量是引入的 exif-js 库暴露的全局变量)
      EXIF.getData(img, function() {
        // 获取图片旋转标志位
        var orientation = EXIF.getTag(this, "Orientation");
        // 根据旋转角度,在画布上对图片进行旋转
        if (orientation === 3 || orientation === 6 || orientation === 8) {
          const canvas = document.createElement("canvas");
          const ctx = canvas.getContext("2d");
          switch (orientation) {
            case 3: // 旋转180°
              canvas.width = img.width;
              canvas.height = img.height;
              ctx.rotate((180 * Math.PI) / 180);
              ctx.drawImage(img, -img.width, -img.height, img.width, img.height);
              break;
            case 6: // 旋转90°
              canvas.width = img.height;
              canvas.height = img.width;
              ctx.rotate((90 * Math.PI) / 180);
              ctx.drawImage(img, 0, -img.height, img.width, img.height);
              break;
            case 8: // 旋转-90°
              canvas.width = img.height;
              canvas.height = img.width;
              ctx.rotate((-90 * Math.PI) / 180);
              ctx.drawImage(img, -img.width, 0, img.width, img.height);
              break;
          }
          // 返回新图片
          canvas.toBlob(file => resolve(file), 'image/jpeg', 0.92)
        } else {
          return resolve(file);
        }
      });
    };
  });
}
图片压缩
现在的手机拍照效果越来越好,随之而来的是图片大小的上升,动不动就几MB甚至十几MB,直接上传原图,速度慢容易上传失败,而且后台对请求体的大小也有限制,后续加载图片展示也会比较慢。如果前端对图片进行压缩后上传,可以解决这些问题。
下面函数实现了对图片的压缩,原理是在画布上绘制缩放后的图片,最终从画布导出压缩后的图片。方法中有两处可以对图片进行压缩控制:一处是控制图片的缩放比;另一处是控制导出图片的质量。
/**
 * 压缩图片
 * @param {file} 输入图片
 * @returns {Promise} resolved promise 返回压缩后的新图片
 */
function compressImage(file) {
  return new Promise((resolve, reject) => {
    // 获取图片(加载图片是为了获取图片的宽高)
    const img = new Image();
    img.src = window.URL.createObjectURL(file);
    img.onerror = error => reject(error);
    img.onload = () => {
      // 画布宽高
      const canvasWidth = document.documentElement.clientWidth * window.devicePixelRatio;
      const canvasHeight = document.documentElement.clientHeight * window.devicePixelRatio;
      // 计算缩放因子
      // 这里我取水平和垂直方向缩放因子较大的作为缩放因子,这样可以保证图片内容全部可见
      const scaleX = canvasWidth / img.width;
      const scaleY = canvasHeight / img.height;
      const scale = Math.min(scaleX, scaleY);
      // 将原始图片按缩放因子缩放后,绘制到画布上
      const canvas = document.createElement('canvas');
      const ctx = canvas.getContext("2d");
      canvas.width = canvasWidth;
      canvas.height = canvasHeight;
      const imageWidth = img.width * scale;
      const imageHeight = img.height * scale;
      const dx = (canvasWidth - imageWidth) / 2;
      const dy = (canvasHeight - imageHeight) / 2;
      ctx.drawImage(img, dx, dy, imageWidth, imageHeight);
      // 导出新图片
      // 指定图片 MIME 类型为 'image/jpeg', 通过 quality 控制导出的图片质量,进行实现图片的压缩
      const quality = 0.92
      canvas.toBlob(file => resolve(tempFile), "image/jpeg", quality);
    };
  });
},
图片上传
通过 FormData 创建表单数据,发起 ajax POST 请求即可,下面函数实现了上传文件。
注意:发送 FormData 数据时,浏览器会自动设置 Content-Type 为合适的值,无需再设置 Content-Type ,否则反而会报错,因为 HTTP 请求体分隔符 boundary 是浏览器生成的,无法手动设置。
/**
 * 上传文件
 * @param {File} file 待上传文件
 * @returns {Promise} 上传成功返回 resolved promise,否则返回 rejected promise
 */
function uploadFile (file) {
  return new Promise((resolve, reject) => {
    // 准备表单数据
    const formData = new FormData()
    formData.append('file', file)
    // 提交请求
    const xhr = new XMLHttpRequest()
    xhr.open('POST', uploadUrl)
    xhr.onreadystatechange = function () {
      if (this.readyState === XMLHttpRequest.DONE && this.status === 200) {
        resolve(JSON.parse(this.responseText))
      } else {
        reject(this.responseText)
      }
    }
    xhr.send(formData)
  })
}
小结
有了上面这些辅助函数,处理起来就简单多了,最终调用代码如下:
function onFileChange (event) {
  const files = Array.prototype.slice.call(event.target.files)
  const file = files[0]
  // 修正图片旋转
  fixImageOrientation(file).then(file2 => {
    // 创建预览图片
    document.querySelector('img').src = window.URL.createObjectURL(file2)
    // 压缩
    return compressImage(file2)
  }).then(file3 => {
    // 更新预览图片
    document.querySelector('img').src = window.URL.createObjectURL(file3)
    // 上传
    return uploadFile(file3)
  }).then(data => {
    console.log('上传成功')
  }).catch(error => {
    console.error('上传失败')
  })
}
H5 提供了处理文件的接口,借助画布可以在浏览器中实现复杂的图片处理,本文总结了移动端 H5 上传图片这个场景下的一些图片处理实践,以后遇到类似的需求可作为部分参考。
附小程序实现参考
// 拍照
wx.chooseImage({
  sourceType: ["camera"],
  success: ({ tempFiles }) => {
    const file = tempFiles[0]
    // 处理图片
  }
});
/**
 * 压缩图片
 * @param {Object} params
 * filePath: String 输入的图片路径
 * success: Function 压缩成功时回调,并返回压缩后的新图片路径
 * fail: Function 压缩失败时回调
 */
compressImage({ filePath, success, fail }) {
  // 获取图片宽高
  wx.getImageInfo({
    src: filePath,
    success: ({ width, height }) => {
      const systemInfo = wx.getSystemInfoSync();
      const canvasWidth = systemInfo.screenWidth;
      const canvasHeight = systemInfo.screenHeight;
      // 更新画布尺寸
      this.setData({ canvasWidth, canvasHeight })
      // 计算缩放比例
      const scaleX = canvasWidth / width;
      const scaleY = canvasHeight / height;
      const scale = Math.min(scaleX, scaleY);
      const imageWidth = width * scale;
      const imageHeight = height * scale;
      // 将缩放后的图片绘制到画布
      const ctx = wx.createCanvasContext("hidden-canvas");
      let dx = (canvasWidth - imageWidth) / 2;
      let dy = (canvasHeight - imageHeight) / 2;
      ctx.drawImage(filePath, dx, dy, imageWidth, imageHeight);
      ctx.draw(false, () => {
        // 导出压缩后的图片到临时文件
        wx.canvasToTempFilePath({
          canvasId: "hidden-canvas",
          width: canvasWidth,
          height: canvasHeight,
          destWidth: canvasWidth,
          destHeight: canvasHeight,
          fileType: "jpg",
          quality: 0.92,
          success: ({ tempFilePath }) => {
            // 隐藏画布
            this.setData({ canvasWidth: 0, canvasHeight: 0 })
            // 压缩完成
            success({ tempFilePath });
          },
          fail: error => {
            // 隐藏画布
            this.setData({ canvasWidth: 0, canvasHeight: 0 })
            fail(error);
          }
        });
      });
    },
    fail: error => {
      fail(error);
    }
  });
}
/**
 * 上传文件
 */
uploadFile({ uploadUrl, filePath, onData, onError }) {
  wx.uploadFile({
    url: uploadUrl
    filePath: filePath,
    name: "file",
    header: {
      Cookie: cookie
    },
    success: res => {
      if (res.statusCode === 200) {
        onData(res.data)
      } else {
        onError(res);
      }
    },
    fail: error => {
      onError(error);
    }
  });
}
总结
以上所述是小编给大家介绍的HTML5 和小程序实现拍照图片旋转、压缩和上传功能,希望对大家有所帮助,如果大家有任何疑问请给我留言,小编会及时回复大家的。在此也非常感谢大家对软件开发网网站的支持!