小程序瀑布流组件实现翻页与图片懒加载
电商小程序中,用到瀑布流的地方非常多,每次都写一个瀑布流,重复一次逻辑,作为程序员,肯定是非常不愿意的。
瀑布流的形式都是大同小异,不同的是瀑布流中每个模块的内容,随业务而变化。
所以,我们把瀑布流框架抽象成组件,瀑布流的内容由业务确定。这样即可实现组件化和自定义的最大平衡,微信小程序组件源码。
首先,我们来看一下瀑布流组件在实际项目中的实际效果。
1 实际效果
瀑布流组件实际效果如下图所示,左侧为用户交互效果,右侧为图片懒加载实际效果。

2 什么是瀑布流?
瀑布流,又称瀑布流式布局。是比较流行的一种网站页面布局,waterfall-item宽度固定,高度不定,视觉表现为参差不齐的多栏布局,随着页面滚动条向下滚动,这种布局还会不断加载数据块并附加至当前尾部。如下图所示:

3 实现功能
该瀑布流组件实现了以下几个功能:
支持图片懒加载 支持上拉数据翻页 支持自定义样式 支持瀑布流Item间隔底层自动计算 原生组件模式:即类swiper和swiper-item 组件用法 组件与数据完全解耦4 实现原理
4.1 waterfall 和waterfall-item实现原理
第一步:在 waterfall-layout 目录下创建 waterfall 和 waterfall-item 组件,目录结构如下:
.
├── query-node.js
├── waterfall-item.js
├── waterfall-item.json
├── waterfall-item.wxml
├── waterfall-item.wxss
├── waterfall.js
├── waterfall.json
├── waterfall.wxml
└── waterfall.wxss
第二步:分别在waterfall.js 和 waterfall-item.js的relations选项中指定组件父、子级关系:
// waterfall.js
Component({
 // ... other code
 relations: {
 './waterfall-item': {
  type: 'child',
 },
 // ... other code
 }
})
// waterfall-item.js
Component({
 // ... other code
 relations: {
 '././waterfall': {
  type: 'parent',
 },
 // ... other code
 }
})
指定彼此的父、子组件的关系后,即可通过 this.getRelationNodes 原生 API,就能访问彼此实例对象及其属性和方法。
第三步:实现waterfall.wxml 和 waterfall-item.wxml代码:
waterfall.wxml代码实现非常简单,只有5行代码:
<view class="waterfall custom-class">
 <view class="waterfall-inner">
 <slot ></slot>
 </view>
</view>
同样,waterfall-item.wxml代码实现也非常简单,只有5行代码:
<view
 class="waterfall-item custom-class"
 style="{{position}}:0;top:{{(top >= 0 ? top + 'px' : 0 + 'rpx')}};"
>
 <slot ></slot>
</view>
不知道slot用法的童鞋,请参考微信小程序自定义组件模板和样式文档。
4.2 瀑布流原理
其实,不管是微信小程序、web、还是原生APP,瀑布流的实现原理都是一样的。都可以绝对定位和位置计算来实现。
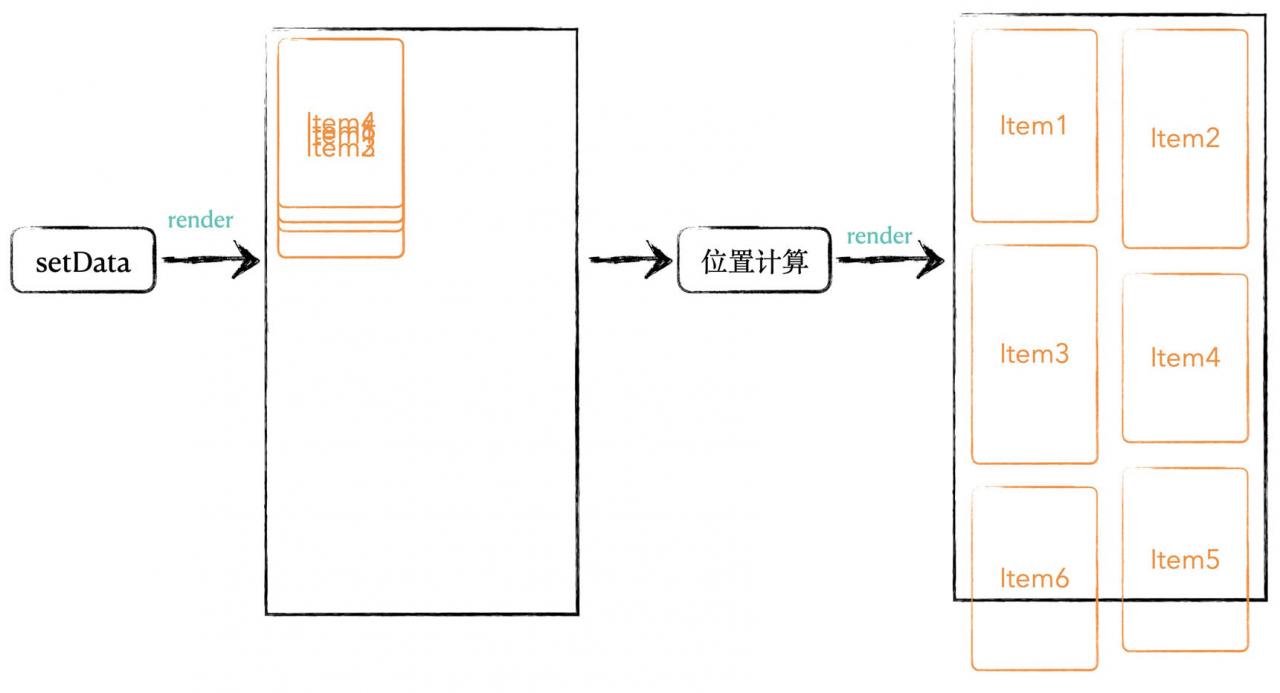
瀑布流的大体过程如下图所示:
第一步:数据通过this.setData从逻辑层传输到视图层,进行第一渲染,由于每个waterfall-item 的top:0; 和 position:left;,所以都重叠了在一起。
第二步:通过节点查询API获取每个waterfall-item元素信息,并且计算出正确的top和position值。
第三步:setData每个waterfall-item的top和position,实现重排。
具体逻辑实现如下:
首先,我们来实现一个节点查询API querySelector,之后会用到:
// query-node.js
/**
 * 获取当前页面中,选择器为 selector 的第一个node节点
 * @param {String} selector 符合微信小程序规范的选择器
 * @param {Object} context 调用环境,普通页面中为wx,自定义组件中为this;默认值为wx.
 * @return {Array} 返回一个数组,第一个元素为 node 节点
 */
export const querySelector = function (selector, context = wx) {
 return new Promise((resolve, reject) => {
 context.createSelectorQuery()
 .select(selector)
 .boundingClientRect((res) => {
  if (res) {
  resolve(res);
  } else {
  reject(`不存在选择器为 ${selector} 的节点`);
  }
 })
 .exec();
 })
};
接着,看一下组件waterfall 和waterfall-item在实际项目中的用法:
 <waterfall
  loading="{{loadMorePending}}"
  isAllLoaded="{{isAllLoaded}}"
 >
  <block wx:for="{{data.sections}}" wx:key="id" wx:for-item="product">
  <waterfall-item
   index="{{index}}"
   custom-class="flow-item-wrapper"
  >
   <view class="product-item">
   业务代码
   </view>
  </waterfall-item>
  </block>
 </waterfall>
当第一个waterfall-item组件,在视图层布局完成后会执行ready生命周期钩子。
在 ready 生命周期钩子中,我们需要做两件事:
waterfall的实例对象,并挂载在waterfall-item组件的 this实例对象上。因为之后我们需要在waterfall-item组件中修改waterfall上的数据。
获取waterfall-item组件的高度,计算waterfall-item组件的位置信息top和position。
// waterfall-item.js
import { querySelector } from './query-node';
Component({
 // ... other code
 lifetimes: {
 ready() {
  const [waterfall] = this.getRelationNodes('./waterfall');
  this.parent = waterfall;
  this.setWaterfallItemPosition();
 },
 }
 methods:{
 async setWaterfallItemPosition() {
  querySelector('.waterfall-item', this)
  .then(async (node) => {
   const { top, position } = await this.parent.getWaterfallItemPostionInfo(node);
   this.setData({
   top,
   position
   })
  })
 },
 }
 // ... other code
})
在setWaterfallItemPosition方法中,我们调用了父组件上的方法this.parent.getWaterfallItemPostionInfo,获取当前waterfall-item组件的top和position信息。并把已经渲染好的waterfall-item组件的累计高度缓存在waterfall的leftHeights和rightHeights属性上,用于计算下一个waterfall-item组件位置,主要逻辑如下:
// waterfall.js
const POSITION_LEFT = 'left';
const POSITION_RIGHT = 'right';
Component({
 // ... other code
 /**
 * 组件的方法列表
 */
 methods: {
 lifetimes: {
  ready() {
  this.initParams();
  }
  },
 initParams() {
  this.leftHeights = 0;
  this.rightHeights = 0;
 },
 /**
  * 设置 waterfall-item 的高度值
  * @param {Object} node waterfall-item 组件位置尺寸数据
  */
 async getWaterfallItemPostionInfo(node) {
  let top = 0;
  let position = POSITION_LEFT;
  const { height } = node;
  const { itemGap } = this;
  if (this.leftHeights <= this.rightHeights) {
  top = this.leftHeights;
  if(this.leftHeights === 0) {
   this.leftHeights += height;
  } else {
   top += itemGap;
   this.leftHeights += (height + itemGap);
  }
  } else {
  position = POSITION_RIGHT;
  top = this.rightHeights;
  if(this.rightHeights === 0) {
   this.rightHeights += height;
  } else {
   top += itemGap;
   this.rightHeights += (height + itemGap);
  }
  }
  return {
  top,
  position,
  }
 }
 // ... other code
 }
})
当所有的waterfall-item重排结束后,瀑布流渲染完成。
4.3 图片懒加载原理
微信小程序中,<image>标签本身是支持懒加载的,当lazy-load={{true}},且在即将进入一定范围(上下三屏)时才开始加载。
也就是说,当lazy-load={{true}},<image>标签初次渲染在视口上下三屏之外时,是不会请求图片资源的,当<image>即将进入三屏之内时,才会加载。
在4.2小节的图3中,<waterfall-item>的初始化位置设置成了top:0; 和 position:left;,所以,都在视口中。如果将top的值成三屏之外的数值,例如,400vh或者更大,则<waterfall-item>重排之后,任然在三屏之外的图片即会自动懒加载。
<view
 class="waterfall-item custom-class"
 style="{{position}}:0;top:{{(top >= 0 ? top + 'px' : itemCount * 100 + 'vh')}};"
>
 <slot ></slot>
</view>
Component({
 // waterfall-item.js
 // ... other code
 lifetimes: {
 ready() {
  const { itemCount } = this.data;
  const [waterfall] = this.getRelationNodes('./waterfall');
  waterfall.childCount += 1;
  this.parent = waterfall;
  this.setData({
  itemCount: itemCount + waterfall.childCount,
  })
 },
 },
 // ... other code
})
4.4 数据翻页
因为实现了wx:for <waterfall-item>功能,和<swiper-item>组件一样,因此翻页逻辑完全由用户自己定制,<waterfall>和<waterfall-item>只给你提供翻页的功能,组件就可以和瀑布流数据结构完全解耦。
4.5 瀑布流Item间隔底层自动计算
将列和行中,两个<waterfall-item>组件之间的距离定义为itemGap,则:
itemGap = waterfall宽度 - (waterfall-item宽度 * 2)
在<waterfall> 的ready钩子中,可以获取到<waterfall>组件的宽度;同理,在<waterfall-item>的ready钩子中,可以获取到<waterfall-item>组件的宽度。
在调用getWaterfallItemPostionInfo之前,获取到itemGap的值即可。这样,在计算<waterfall-item>的top值时,除了第一行的<waterfall-item>的top值等于0之外,其他所有<waterfall-item>的top值等于:
// this.leftHeights += height + itemGap;
// or
// this.rightHeights += height + itemGap;
具体代码实现请查看源码
5 总结
通过瀑布流框架抽象,使<waterfall>和<waterfall-item>接近原生组件使用体验,同时使组件与数据完全解耦。通过巧妙的初始化位置top设置,使瀑布流具图片有懒加载的功能。
到此这篇关于小程序瀑布流组件实现翻页与图片懒加载的文章就介绍到这了,更多相关小程序瀑布流内容请搜索软件开发网以前的文章或继续浏览下面的相关文章希望大家以后多多支持软件开发网!