尤雨溪开发vue dev server理解vite原理
1.引言
2. vue-dev-server 它的原理是什么
3. 准备工作
3.1 克隆项目
3.2 test 文件夹
3.3 vue-dev-server.js
3.4 用 VSCode 调试项目
4. vueMiddleware 源码
4.1 有无 vueMiddleware 中间件对比
4.2 vueMiddleware 中间件概览
4.3 对 .vue 结尾的文件进行处理
4.3.1 bundleSFC 编译单文件组件
4.3.2 readSource 读取文件资源
4.4 对 .js 结尾的文件进行处理
4.4.1 transformModuleImports 转换 import 引入
4.5 对 /__modules/ 开头的文件进行处理
4.5.1 loadPkg 加载包(这里只支持Vue文件)
5. 总结
5.1 import Vue from 'vue' 转换
5.2 import App from './test.vue' 转换
5.3 后续还能做什么?
1.引言在 vuejs组织 下,找到了尤雨溪几年前写的“玩具 vite” vue-dev-server,发现100来行代码,很值得学习。于是有了这篇文章。
阅读本文,你将学到:
1. 学会 vite 简单原理
2. 学会使用 VSCode 调试源码
3. 学会如何编译 Vue 单文件组件
4. 学会如何使用 recast 生成 ast 转换文件
5. 如何加载包文件
2. vue-dev-server 它的原理是什么vue-dev-server#how-it-works README 文档上有四句英文介绍。
发现谷歌翻译的还比较准确,我就原封不动的搬运过来。
浏览器请求导入作为原生 ES 模块导入 - 没有捆绑。
服务器拦截对 *.vue 文件的请求,即时编译它们,然后将它们作为 JavaScript 发回。
对于提供在浏览器中工作的 ES 模块构建的库,只需直接从 CDN 导入它们。
导入到 .js 文件中的 npm 包(仅包名称)会即时重写以指向本地安装的文件。 目前,仅支持 vue 作为特例。 其他包可能需要进行转换才能作为本地浏览器目标 ES 模块公开。
也可以看看vitejs 文档,了解下原理,文档中图画得非常好。

看完本文后,我相信你会有一个比较深刻的理解。
3. 准备工作 3.1 克隆项目本文仓库 vue-dev-server-analysis
# 推荐克隆我的仓库
git clone https://github.com/lxchuan12/vue-dev-server-analysis.git
cd vue-dev-server-analysis/vue-dev-server
# npm i -g yarn
# 安装依赖
yarn
# 或者克隆官方仓库
git clone https://github.com/vuejs/vue-dev-server.git
cd vue-dev-server
# npm i -g yarn
# 安装依赖
yarn
一般来说,我们看源码先从package.json文件开始:
// vue-dev-server/package.json
{
  "name": "@vue/dev-server",
  "version": "0.1.1",
  "description": "Instant dev server for Vue single file components",
  "main": "middleware.js",
  // 指定可执行的命令
  "bin": {
    "vue-dev-server": "./bin/vue-dev-server.js"
  },
  "scripts": {
    // 先跳转到 test 文件夹,再用 Node 执行 vue-dev-server 文件
    "test": "cd test && node ../bin/vue-dev-server.js"
  }
}
根据 scripts test 命令。我们来看 test 文件夹。
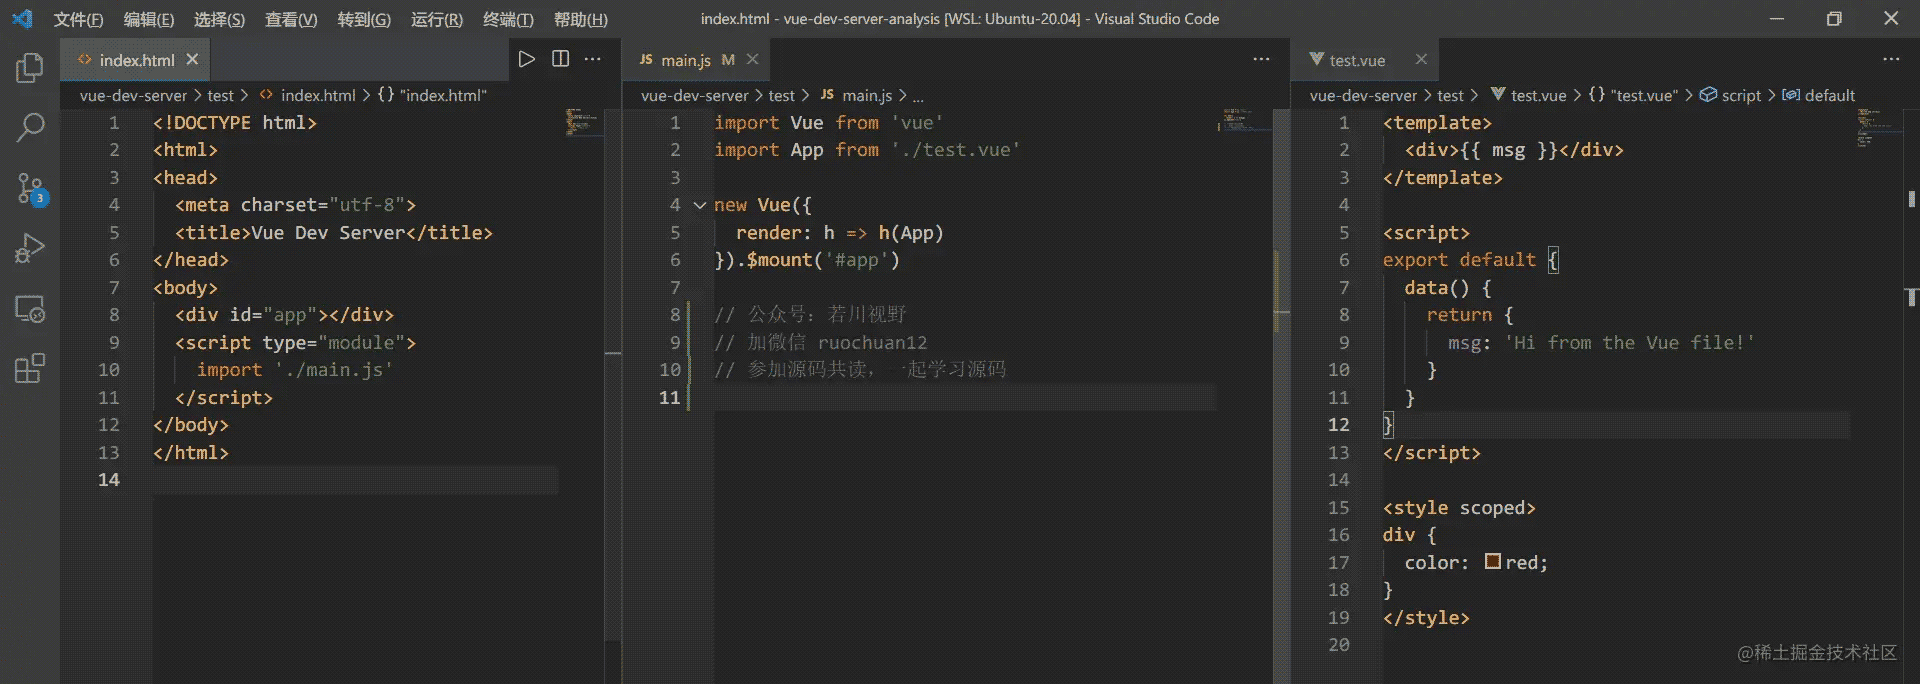
vue-dev-server/test 文件夹下有三个文件,代码不长。
index.html
main.js
text.vue
如图下图所示。
接着我们找到 vue-dev-server/bin/vue-dev-server.js 文件,代码也不长。
// vue-dev-server/bin/vue-dev-server.js
#!/usr/bin/env node
const express = require('express')
const { vueMiddleware } = require('../middleware')
const app = express()
const root = process.cwd();
app.use(vueMiddleware())
app.use(express.static(root))
app.listen(3000, () => {
  console.log('server running at http://localhost:3000')
})
原来就是express启动了端口3000的服务。重点在 vueMiddleware 中间件。接着我们来调试这个中间件。
鉴于估计很多小伙伴没有用过VSCode调试,这里详细叙述下如何调试源码。学会调试源码后,源码并没有想象中的那么难。
vue-dev-server/bin/vue-dev-server.js 文件中这行 app.use(vueMiddleware()) 打上断点。
找到 vue-dev-server/package.json 的 scripts,把鼠标移动到 test 命令上,会出现运行脚本和调试脚本命令。如下图所示,选择调试脚本。
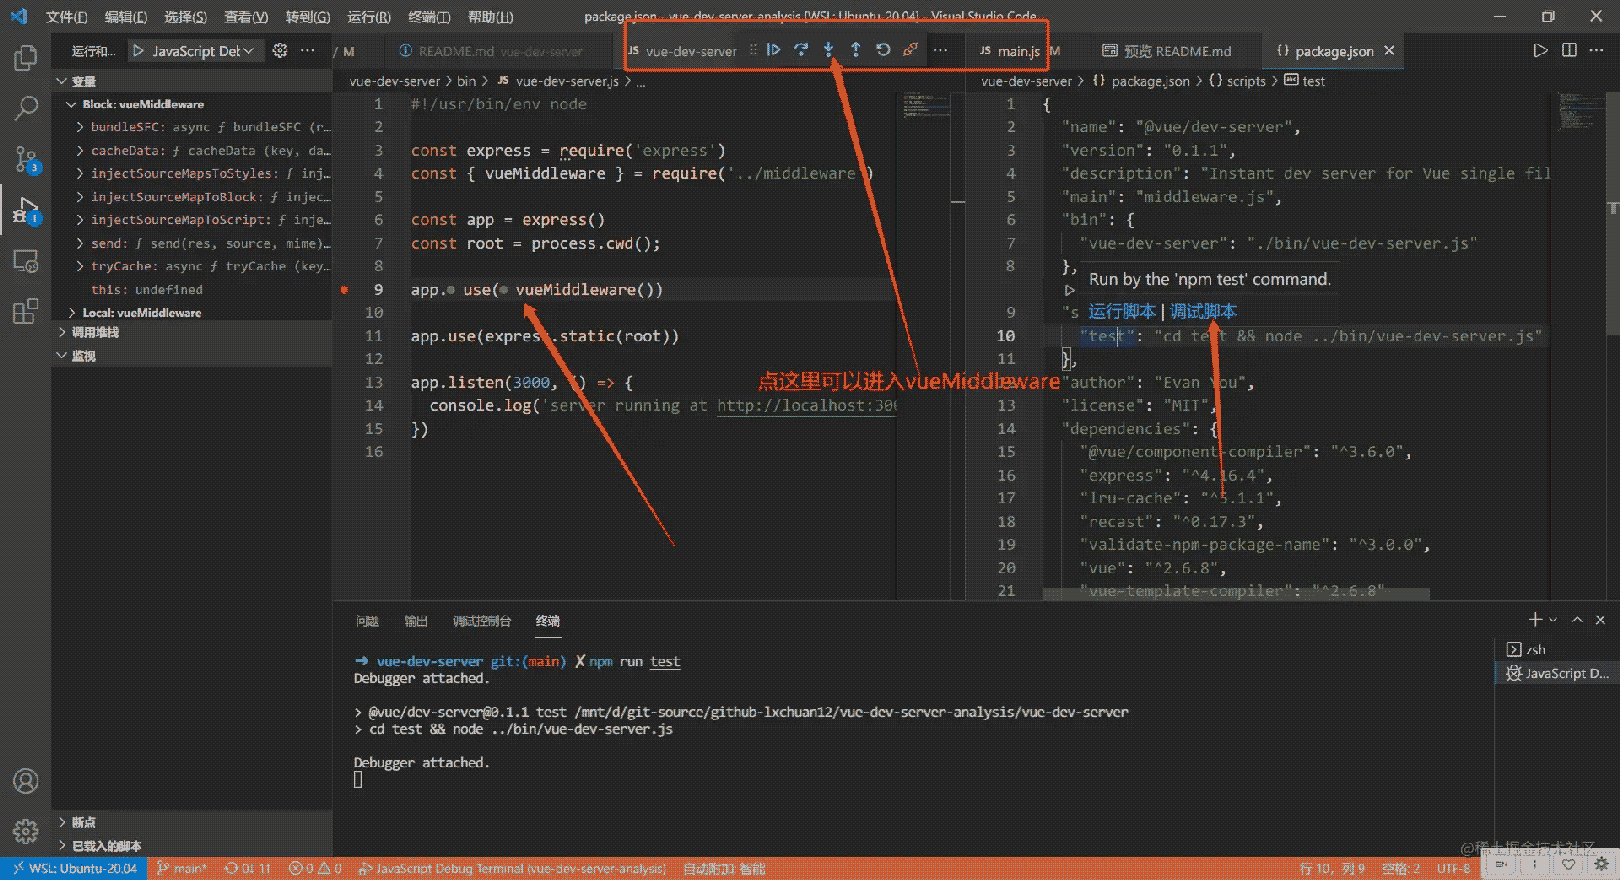

点击进入函数(F11)按钮可以进入 vueMiddleware 函数。如果发现断点走到不是本项目的文件中,不想看,看不懂的情况,可以退出或者重新来过。可以用浏览器无痕(隐私)模式(快捷键Ctrl + Shift + N,防止插件干扰)打开 http://localhost:3000,可以继续调试 vueMiddleware 函数返回的函数。
如果你的VSCode不是中文(不习惯英文),可以安装简体中文插件。
如果 VSCode 没有这个调试功能。建议更新到最新版的 VSCode(目前最新版本 v1.61.2)。
接着我们来跟着调试学习 vueMiddleware 源码。可以先看主线,在你觉得重要的地方继续断点调试。
不在调试情况状态下,我们可以在 vue-dev-server/bin/vue-dev-server.js 文件中注释 app.use(vueMiddleware()),执行 npm run test 打开 http://localhost:3000。

再启用中间件后,如下图。
看图我们大概知道了有哪些区别。
4.2 vueMiddleware 中间件概览我们可以找到vue-dev-server/middleware.js,查看这个中间件函数的概览。
// vue-dev-server/middleware.js
const vueMiddleware = (options = defaultOptions) => {
  // 省略
  return async (req, res, next) => {
    // 省略
    // 对 .vue 结尾的文件进行处理
    if (req.path.endsWith('.vue')) {
    // 对 .js 结尾的文件进行处理
    } else if (req.path.endsWith('.js')) {
    // 对 /__modules/ 开头的文件进行处理
    } else if (req.path.startsWith('/__modules/')) {
    } else {
      next()
    }
  }
}
exports.vueMiddleware = vueMiddleware
vueMiddleware 最终返回一个函数。这个函数里主要做了四件事:
对 .vue 结尾的文件进行处理
对 .js 结尾的文件进行处理
对 /__modules/ 开头的文件进行处理
如果不是以上三种情况,执行 next 方法,把控制权交给下一个中间件
接着我们来看下具体是怎么处理的。
我们也可以断点这些重要的地方来查看实现。比如:
if (req.path.endsWith('.vue')) {
const key = parseUrl(req).pathname
let out = await tryCache(key)
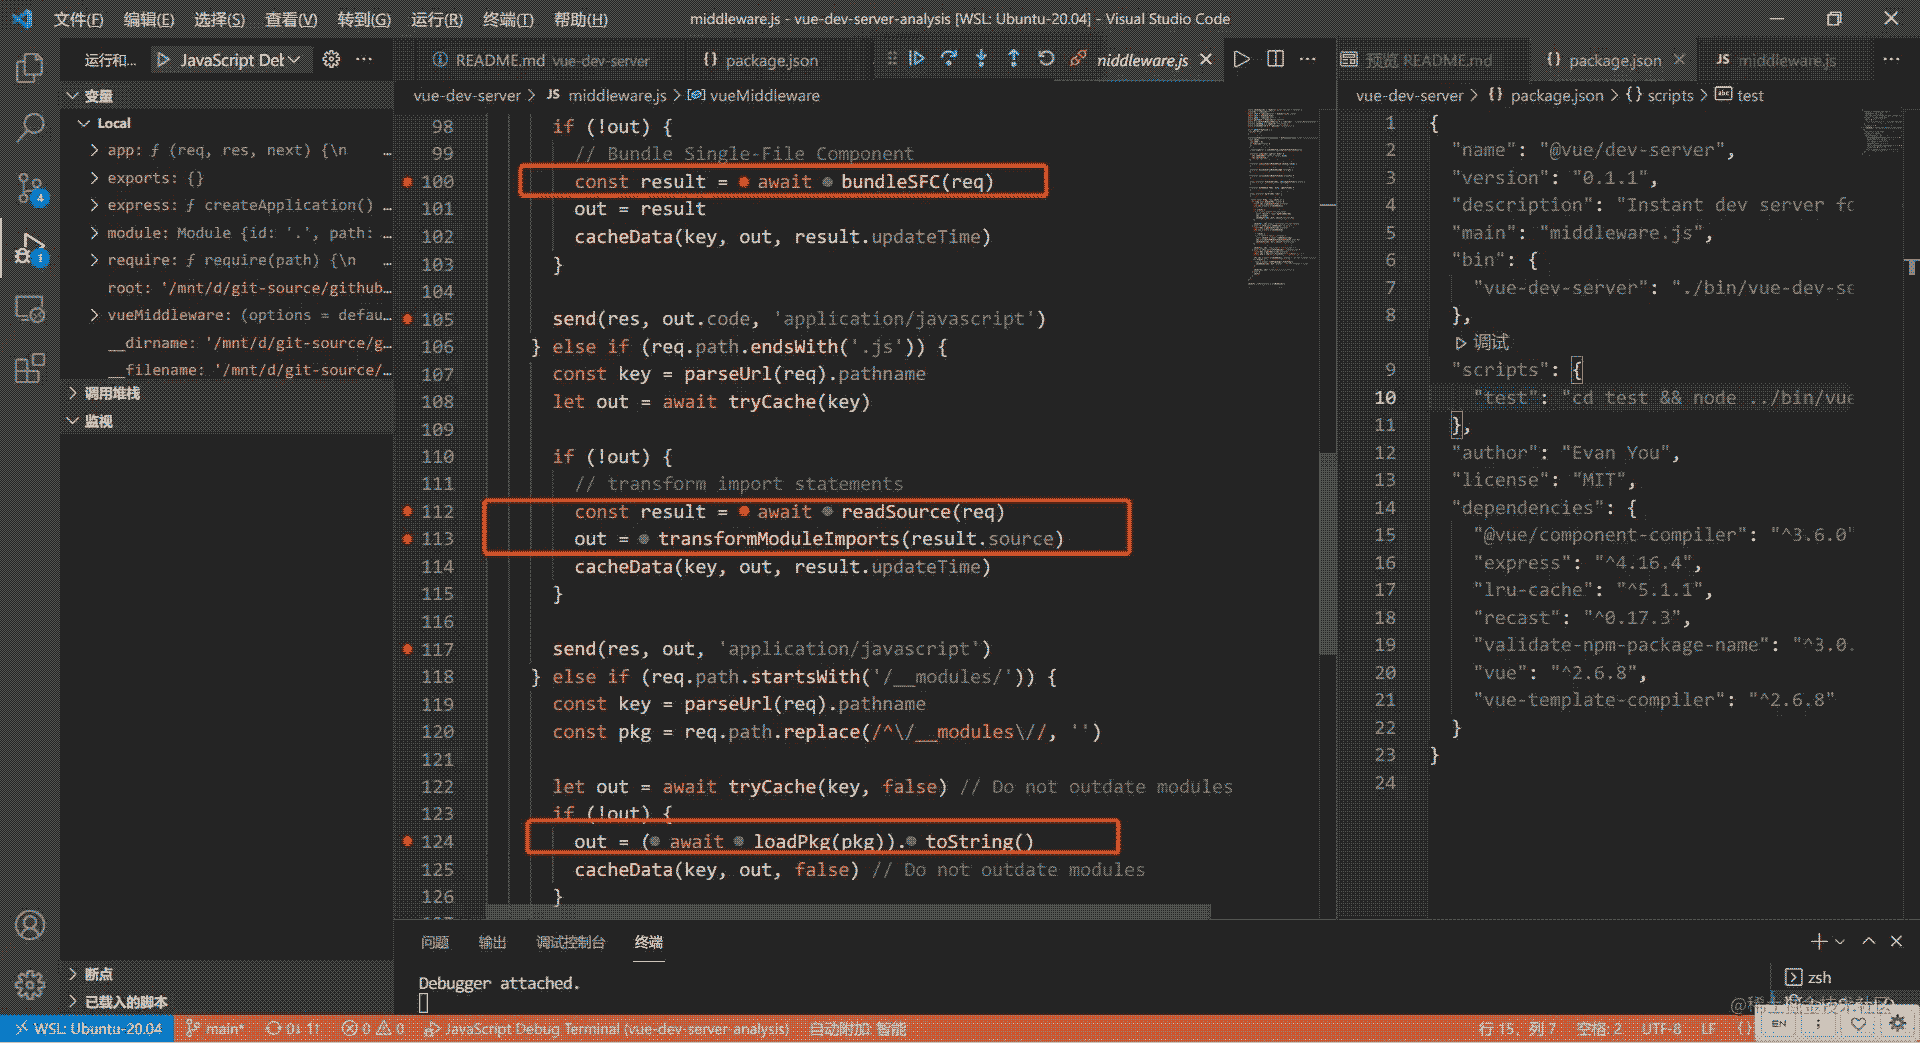
if (!out) {
// Bundle Single-File Component
const result = await bundleSFC(req)
out = result
cacheData(key, out, result.updateTime)
}
send(res, out.code, 'application/javascript')
}
4.3.1 bundleSFC 编译单文件组件
这个函数,根据 @vue/component-compiler 转换单文件组件,最终返回浏览器能够识别的文件。
const vueCompiler = require('@vue/component-compiler')
async function bundleSFC (req) {
  const { filepath, source, updateTime } = await readSource(req)
  const descriptorResult = compiler.compileToDescriptor(filepath, source)
  const assembledResult = vueCompiler.assemble(compiler, filepath, {
    ...descriptorResult,
    script: injectSourceMapToScript(descriptorResult.script),
    styles: injectSourceMapsToStyles(descriptorResult.styles)
  })
  return { ...assembledResult, updateTime }
}
接着我们来看 readSource 函数实现。
这个函数主要作用:根据请求获取文件资源。返回文件路径 filepath、资源 source、和更新时间 updateTime。
const path = require('path')
const fs = require('fs')
const readFile = require('util').promisify(fs.readFile)
const stat = require('util').promisify(fs.stat)
const parseUrl = require('parseurl')
const root = process.cwd()
async function readSource(req) {
  const { pathname } = parseUrl(req)
  const filepath = path.resolve(root, pathname.replace(/^\//, ''))
  return {
    filepath,
    source: await readFile(filepath, 'utf-8'),
    updateTime: (await stat(filepath)).mtime.getTime()
  }
}
exports.readSource = readSource
接着我们来看对 .js 文件的处理
4.4 对 .js 结尾的文件进行处理if (req.path.endsWith('.js')) {
const key = parseUrl(req).pathname
let out = await tryCache(key)
if (!out) {
// transform import statements
// 转换 import 语句
// import Vue from 'vue'
// => import Vue from "/__modules/vue"
const result = await readSource(req)
out = transformModuleImports(result.source)
cacheData(key, out, result.updateTime)
}
send(res, out, 'application/javascript')
}
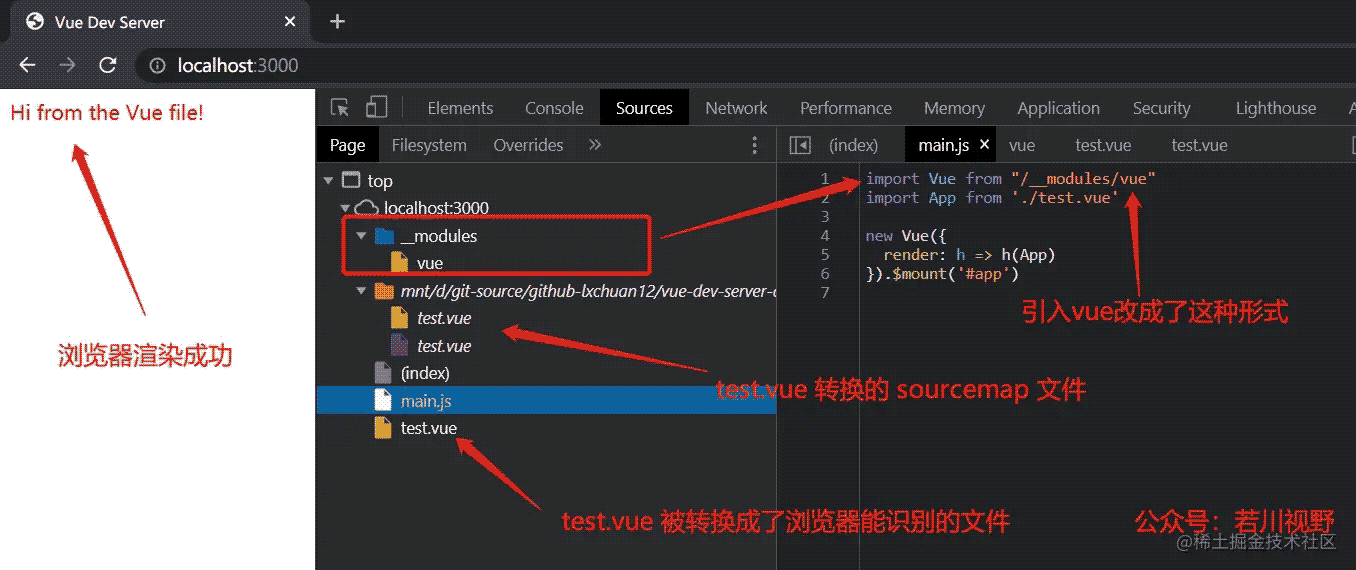
针对 vue-dev-server/test/main.js 转换
import Vue from 'vue'
import App from './test.vue'
new Vue({
  render: h => h(App)
}).$mount('#app')
import Vue from "/__modules/vue"
import App from './test.vue'
new Vue({
  render: h => h(App)
}).$mount('#app')
4.4.1 transformModuleImports 转换 import 引入
recast
validate-npm-package-name
也就是针对 npm 包转换。 这里就是 "/__modules/vue"
import Vue from 'vue' => import Vue from "/__modules/vue"
4.5 对 /__modules/ 开头的文件进行处理
import Vue from "/__modules/vue"
这段代码最终返回的是读取路径 vue-dev-server/node_modules/vue/dist/vue.esm.browser.js 下的文件。
if (req.path.startsWith('/__modules/')) {
  //
  const key = parseUrl(req).pathname
  const pkg = req.path.replace(/^\/__modules\//, '')
  let out = await tryCache(key, false) // Do not outdate modules
  if (!out) {
    out = (await loadPkg(pkg)).toString()
    cacheData(key, out, false) // Do not outdate modules
  }
  send(res, out, 'application/javascript')
}
4.5.1 loadPkg 加载包(这里只支持Vue文件)
目前只支持 Vue 文件,也就是读取路径 vue-dev-server/node_modules/vue/dist/vue.esm.browser.js 下的文件返回。
// vue-dev-server/loadPkg.js
const fs = require('fs')
const path = require('path')
const readFile = require('util').promisify(fs.readFile)
async function loadPkg(pkg) {
  if (pkg === 'vue') {
    // 路径
    // vue-dev-server/node_modules/vue/dist
    const dir = path.dirname(require.resolve('vue'))
    const filepath = path.join(dir, 'vue.esm.browser.js')
    return readFile(filepath)
  }
  else {
    // TODO
    // check if the package has a browser es module that can be used
    // otherwise bundle it with rollup on the fly?
    throw new Error('npm imports support are not ready yet.')
  }
}
exports.loadPkg = loadPkg
至此,我们就基本分析完毕了主文件和一些引入的文件。对主流程有个了解。
5. 总结最后我们来看上文中有无 vueMiddleware 中间件的两张图总结一下:

启用中间件后,如下图。
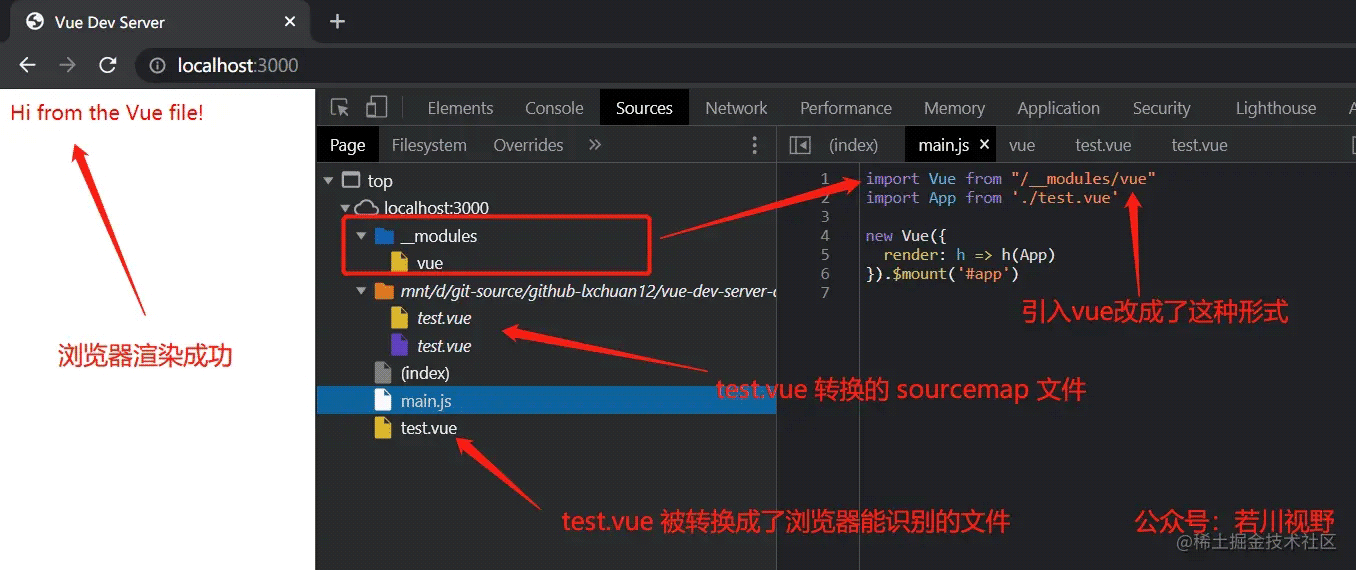
浏览器支持原生 type=module 模块请求加载。vue-dev-server 对其拦截处理,返回浏览器支持内容,因为无需打包构建,所以速度很快。
<script type="module">
    import './main.js'
</script>
5.1 import Vue from 'vue' 转换
// vue-dev-server/test/main.js
import Vue from 'vue'
import App from './test.vue'
new Vue({
  render: h => h(App)
}).$mount('#app')
main.js 中的 import 语句 import Vue from 'vue' 通过 recast 生成 ast 转换成 import Vue from "/__modules/vue" 而最终返回给浏览器的是 vue-dev-server/node_modules/vue/dist/vue.esm.browser.js
main.js 中的引入 .vue 的文件,import App from './test.vue' 则用 @vue/component-compiler 转换成浏览器支持的文件。
鉴于文章篇幅有限,缓存 tryCache 部分目前没有分析。简单说就是使用了 node-lru-cache 最近最少使用 来做缓存的(这个算法常考)。后续应该会分析这个仓库的源码,欢迎持续关注我@若川。
非常建议读者朋友按照文中方法使用VSCode调试 vue-dev-server 源码。源码中还有很多细节文中由于篇幅有限,未全面展开讲述。
值得一提的是这个仓库的 master 分支,是尤雨溪两年前写的,相对本文会比较复杂,有余力的读者可以学习。
也可以直接去看 vite 源码。
看完本文,也许你就能发现其实前端能做的事情越来越多,不由感慨:前端水深不可测,唯有持续学习,更多关于vue dev server理解vite原理的资料请关注软件开发网其它相关文章!