UICollectionView实现图片浏览效果
一、效果展示
二、实现思路
三、代码整理
1、PhotoBrowseViewLayout
2、PhotoBrowseCollectionViewCell
3、CollectPhotoBrowseView
四、总结与思考
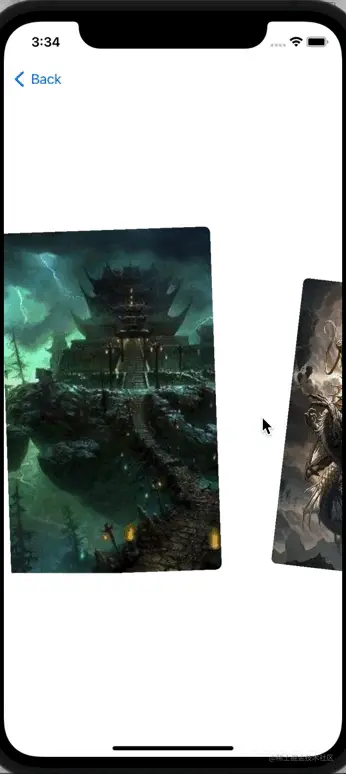
一、效果展示废话开篇:利用 UICollectionView 简单实现一个图片浏览效果。

1.封装 UICollectionViewLayout ,实现内部 UICollectionViewCell 的布局。
UICollectionViewLayout 在封装瀑布流的时候会用到,而且担负着核心功能的实现。其实从另一个角度也可以把 UICollectionViewLayout 理解成“数据源”,这个数据不是 UI 的展示项,而是 UI 的尺寸项。在内部进行预计算 UICollectionViewCell 的 frame。
UICollectionView 是 UIScrollView的子类,只不过,它里面子控件通过“重用”机制实现了优化,一些复用的复杂逻辑还是扔给了系统处理。开发过程中只负责对 UICollectionViewLayout 什么时候需要干什么进行自定义即可。
2.获取 UICollectionView 目前可见的 cells,通过进行缩放、旋转变换实现一些简单的效果。
3、自定义 cell ,修改锚点属性。
三、代码整理 1、PhotoBrowseViewLayout这里有一点需要注意的,在 UICollectionViewLayout 内部会进行计算每一个 cell 的 frame,在计算过程中,为了更好的展示旋转变换,cell 的锚点会修改到 (0.5,1),那么,为了保证 UI 展示不变,那么,就需要将 y 增加 cell 高度的一半。
#import "PhotoBrowseViewLayout.h"
@interface PhotoBrowseViewLayout()
@property(nonatomic,strong) NSMutableArray * attributeArray;
@property(nonatomic,assign) CGFloat cellWidth;
@property(nonatomic,assign) CGFloat cellHeight;
@property(nonatomic,assign) CGFloat sep;
@property(nonatomic,assign) int showCellNum;
@end
@implementation PhotoBrowseViewLayout
- (instancetype)init
{
    if (self = [super init]) {
        self.sep = 20;
        self.showCellNum = 2;
    }
    return self;
}
//计算cell的frame
- (UICollectionViewLayoutAttributes *)layoutAttributesForItemAtIndexPath:(NSIndexPath *)indexPath
{
    if (self.cellWidth == 0) {
        self.cellWidth = **self**.collectionView.frame.size.width * 2 / 3.0;
    }
    if (self.cellHeight == 0) {
        self.cellHeight = self.collectionView.frame.size.height;
    }
    CGFloat x = (self.cellWidth + self.sep) * indexPath.item;
    //这里y值需要进行如此设置,以抵抗cell修改锚点导致的UI错乱
    CGFloat y = self.collectionView.frame.size.height / 2.0;
    UICollectionViewLayoutAttributes *attrs = [UICollectionViewLayoutAttributes layoutAttributesForCellWithIndexPath:indexPath];
    attrs.frame = CGRectMake(x, y, self.cellWidth, self.cellHeight);
    return attrs;
}
//准备布局
- (void)prepareLayout
{
    [super prepareLayout];
    NSInteger count = [self.collectionView numberOfItemsInSection:0];
    for (int i = 0; i <count; i++) {
        UICollectionViewLayoutAttributes *attris = [self layoutAttributesForItemAtIndexPath:[NSIndexPath indexPathForRow:i inSection:0]];
        [self.attributeArray addObject:attris];
    }
}
//返回全部cell的布局集合
- (NSArray *)layoutAttributesForElementsInRect:(CGRect)rect
{
    return self.attributeArray;
}
//一次性提供UICollectionView 的 contentSize
- (CGSize)collectionViewContentSize
{
    NSInteger count = [self.collectionView numberOfItemsInSection:0];
    CGFloat maxWidth = count * self.cellWidth + (count - 1) * self.sep;
    return CGSizeMake(maxWidth, 0);
}
- (NSMutableArray *)attributeArray
{
    if (!_attributeArray) {
        _attributeArray = [[NSMutableArray alloc] init];
    }
    return _attributeArray;
}
@end
2、PhotoBrowseCollectionViewCell
这里主要是进行了锚点修改(0.5,1),代码很简单。
#import "PhotoBrowseCollectionViewCell.h"
@interface PhotoBrowseCollectionViewCell()
@property(nonatomic,strong) UIImageView * imageView;
@end
@implementation PhotoBrowseCollectionViewCell
- (instancetype)initWithFrame:(CGRect)frame
{
    if (self = [super initWithFrame:frame]) {
        //设置(0.5,1)锚点,以底部中点为轴旋转
        self.layer.anchorPoint = CGPointMake(0.5, 1);
        self.layer.masksToBounds = YES;
        self.layer.cornerRadius = 8;
    }
    return self;
}
- (void)setImage:(UIImage *)image
{
    self.imageView.image = image;
}
- (UIImageView *)imageView
{
    if (!_imageView) {
        _imageView = [[UIImageView alloc] init];
        _imageView.contentMode = UIViewContentModeScaleAspectFill;
        _imageView.backgroundColor = [UIColor groupTableViewBackgroundColor];
        [self.contentView addSubview:_imageView];
    }
    return _imageView;
}
- (void)layoutSubviews
{
    [super layoutSubviews];
    self.imageView.frame = **self**.contentView.bounds;
}
@end
3、CollectPhotoBrowseView
CollectPhotoBrowseView 负责进行一些 cell 的图形变换。
#import "CollectPhotoBrowseView.h"
#import "PhotoBrowseCollectionViewCell.h"
#import "PhotoBrowseViewLayout.h"
@interface CollectPhotoBrowseView()<UICollectionViewDelegate,UICollectionViewDataSource>
@property(nonatomic,strong) UICollectionView * photoCollectView;
@end
@implementation CollectPhotoBrowseView
- (instancetype)initWithFrame:(CGRect)frame
{
    if (self = [super initWithFrame:frame]) {
        [self makeUI];
    }
    return self;
}
- (void)makeUI{
    //设置自定义 UICollectionViewLayout
    PhotoBrowseViewLayout * photoBrowseViewLayout = [[PhotoBrowseViewLayout alloc] init];
    self.photoCollectView = [[UICollectionView alloc] initWithFrame:self.bounds collectionViewLayout:photoBrowseViewLayout];
    self.photoCollectView.delegate = self;
    self.photoCollectView.dataSource = self;
    [self.photoCollectView registerClass:[PhotoBrowseCollectionViewCell class] forCellWithReuseIdentifier:@"CELL"];
    self.photoCollectView.showsHorizontalScrollIndicator = NO;
    [self addSubview:self.photoCollectView];
    //执行一次可见cell的图形变换
    dispatch_after(dispatch_time(DISPATCH_TIME_NOW, (int64_t)(0.0 * NSEC_PER_SEC)), dispatch_get_main_queue(), ^{
        [self visibleCellTransform];
    });
}
- (NSInteger)collectionView:(UICollectionView *)collectionView numberOfItemsInSection:(NSInteger)section
{
    return 20;
}
- (UICollectionViewCell *)collectionView:(UICollectionView *)collectionView cellForItemAtIndexPath:(NSIndexPath *)indexPath
{
    PhotoBrowseCollectionViewCell * cell = [collectionView dequeueReusableCellWithReuseIdentifier:@"CELL" forIndexPath:indexPath];
    [cell setImage: [UIImage imageNamed:[NSString stringWithFormat:@"fd%ld",indexPath.item % 3 + 1]]];
    return cell;
}
#pragma mark - 滚动进行图形变换
- (void)scrollViewDidScroll:(UIScrollView *)scrollView
{
    //滑动的时候,动态进行cell图形变换
    [self visibleCellTransform];
}
#pragma mark - 图形变化
- (void)visibleCellTransform
{
    //获取当前可见cell的indexPath集合
    NSArray * visibleItems =  [self.photoCollectView indexPathsForVisibleItems];
    //遍历动态进行图形变换
    for (NSIndexPath * visibleIndexPath in visibleItems) {
        UICollectionViewCell * visibleCell = [self.photoCollectView cellForItemAtIndexPath:visibleIndexPath];
        [self transformRotateWithView:visibleCell];
    }
}
//进行图形转换
- (void)transformRotateWithView:(UICollectionViewCell *)cell
{
    //获取cell在当前视图的位置
    CGRect rect = [cell convertRect:cell.bounds toView:self];
    //计算当前cell中轴线与中轴线的距离的比值
    float present = ((CGRectGetMidX(rect) - self.center.x) / (self.frame.size.width / 2.0));
    //根据位置设置选择角度
    CGFloat radian = (M_PI_2 / 15) * present;
    //图形角度变换
    CGAffineTransform transformRotate = CGAffineTransformIdentity;
    transformRotate = CGAffineTransformRotate(transformRotate, radian);
    //图形缩放变换
    CGAffineTransform transformScale = CGAffineTransformIdentity
    transformScale = CGAffineTransformScale(transformScale,1 -  0.2 *  fabs(present),1 - 0.2 * fabsf(present));
    //合并变换
    cell.transform = CGAffineTransformConcat(transformRotate,transformScale);
}
@end
四、总结与思考
UICollectionView 也是 View,只不过系统为了更好的服务于开发者,快速高效的实现某些开发场景,进行了封装与优化,将复杂的逻辑单独的封装成一个管理类,这里就是 UICollectionViewLayout,交给它去做一些固定且复杂的逻辑。所以,自定义复杂UI的时候,就需要将功能模块足够细化,以实现更好的代码衔接。
以上就是UICollectionView 实现图片浏览效果的详细内容,更多关于UICollectionView 图片浏览的资料请关注软件开发网其它相关文章!