树莓派4b 4G版本 安装32位Ubuntu Server18.04并安装图形界面
相关的镜像文件可以直接前往Ubuntu官网下载,下载路径:
https://ubuntu.com/download/raspberry-pi
下载完成后,可用Win32DiskImager将img烧录到SD卡中,下载路径:https://sourceforge.net/projects/win32diskimager
根据树莓派版本和自身需要选择镜像文件,由于之前用官方64位的镜像进行安装时出现了问题,系统烧录到SD卡以后树莓派不能正常启动,于是这里先用32位镜像进行配置。
顺便提一下怎么通过树莓派绿灯的闪烁情况进行简单的debug
树莓派绿灯3闪:start.elf未找到
树莓派绿灯4闪:start.elf未启动
树莓派绿灯7闪:kernel.img未找到
理论上来说,将镜像烧录到SD卡后,直接插卡启动树莓派就完事了(毕竟官方也是这么说的)

但是,,,,
不知道其他人能不能正常启动操作系统,反正我是不行。
Q1:插卡启动后出现的第一种情况,显示器完全没反应啊他不会亮%……&%¥%
A1:把SD卡插回电脑上,改一下config.txt中的内容(比如改成下面这样)
hdmi_ignore_edid=0xa5000080
hdmi_force_hotplug=1
hdmi_group=2
hdmi_mode=82
hdmi_drive=2
config_hdmi_boost=4
sdtv_mode=2
arm_freq=800
上面配置的显示器分辨率是1920*1080,其他分辨率也有对应的mode自行百度就行,如果这样不能解决问题的话,4B有两个HDMI接口,检查一下自己有没有插错地方
Q2:OK显示屏亮起来了,然而绿灯7闪,显示屏一直卡在树莓派刚亮起来的界面如下图

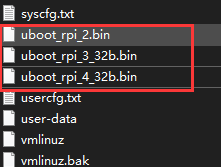
A2:由官方文档给的说法可以知道,树莓派绿灯7闪表示kernel.img未找到,那么再把SD卡插回电脑上,依旧打开config.txt文件,加入如下内容:
kernel=uboot_rpi_4_32b.bin
max_framebuffers=3
上面kernel = xxxxx.bin这一行里,bin文件要根据自己SD卡中实际的文件名和自己树莓派的型号进行相应更改

做完这些事以后基本上系统就能够正常启动了,系统第一次启动时用户名密码都是ubuntu,记住自己改完以后的密码。
如果不需要使用图形界面的话,到这里Ubuntu server 18.04就基本装完了。
使用图形界面:sudo apt-get install ubuntu-desktop
内容大小在2G左右,如果自家网不好,没有提前换国内apt源并且自己也没有梯子的话,输入这条指令以后就可以洗洗睡了。
换源的时候稍微注意两点:
1、配置时注意使用ARM版本
x64/x86版本如下
deb http://mirrors.aliyun.com/ubuntu/ bionic main restricted universe multiverse
ARM版本如下
deb http://mirrors.aliyun.com/ubuntu-ports/ bionic main restricted universe multiverse
2、配置时注意源版本和Ubuntu版本之间是否有区别
ubuntu 12.04 代号为precise
ubuntu 14.04 代号为trusty
ubuntu 15.04 代号为vivid
ubuntu 15.10 代号为wily
ubuntu 16.04 代号为xenial
ubuntu18.04 代号为bionic
完整sources.list文件:
deb http://mirrors.aliyun.com/ubuntu-ports/ bionic main restricted universe multiverse
deb http://mirrors.aliyun.com/ubuntu-ports/ bionic-security main restricted universe multiverse
deb http://mirrors.aliyun.com/ubuntu-ports/ bionic-updates main restricted universe multiverse
deb http://mirrors.aliyun.com/ubuntu-ports/ bionic-proposed main restricted universe multiverse
deb http://mirrors.aliyun.com/ubuntu-ports/ bionic-backports main restricted universe multiverse
deb-src http://mirrors.aliyun.com/ubuntu-ports/ bionic main restricted universe multiverse
deb-src http://mirrors.aliyun.com/ubuntu-ports/ bionic-security main restricted universe multiverse
deb-src http://mirrors.aliyun.com/ubuntu-ports/ bionic-updates main restricted universe multiverse
deb-src http://mirrors.aliyun.com/ubuntu-ports/ bionic-proposed main restricted universe multiverse
deb-src http://mirrors.aliyun.com/ubuntu-ports/ bionic-backports main restricted universe multiverse
换源完成后:
sudo apt-get update
sudo apt-get upgrade
先写到这里记录一下今天的操作
作者:zhang402116