ToolBar使用方法详解
ToolBar的出现是为了替换之前的ActionBar的各种不灵活使用方式,相反,ToolBar的使用变得非常灵活,因为它可以让我们自由往里面添加子控件.低版本要使用的话,可以添加support-v7包.
今天要实现的效果如下:
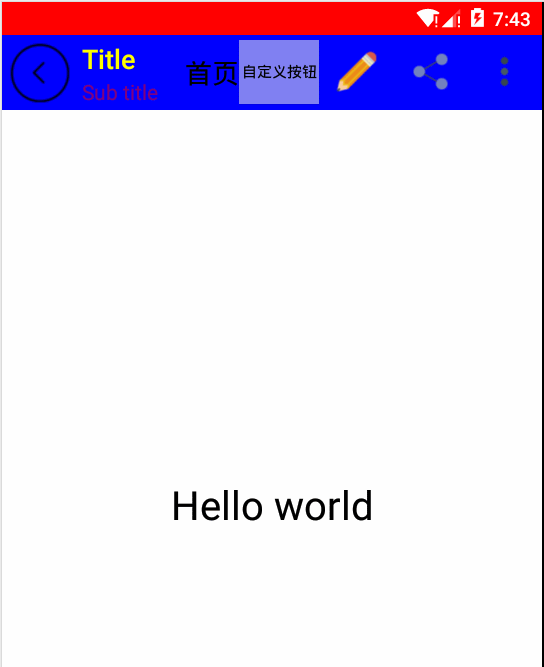
由上图可以看到,toolBar的布局还是相对丰富的.要使用toolBar,首先为了兼容低版本,需要在gradle中引入支持库
compile 'com.android.support:appcompat-v7:23.4.0'
其次,我们还需要隐藏默认的ActionBar,否则会报如下错误:
Caused by: java.lang.IllegalStateException: This Activity already has an action bar
supplied by the window decor. Do not request Window.FEATURE_SUPPORT_ACTION_BAR and set
windowActionBar to false in your theme to use a Toolbar instead.
可以在res/value/style.xml中设置:
<resources>
  <!-- Base application theme. -->
  <style name="AppTheme" parent="AppTheme.Base"></style>
  <style name="AppTheme.Base" parent="Theme.AppCompat">
    <!--将ActionBar隐藏,这里使用ToolBar-->
    <item name="windowActionBar">false</item>
    <!-- 使用 API Level 22以上编译的话,要拿掉前綴字 -->
    <item name="windowNoTitle">true</item>
    <!--colorPrimaryDark对应状态栏的颜色-->
    <item name="colorPrimaryDark">@color/statusColor</item>
    <!--colorPrimary 对应ToolBar的颜色-->
    <item name="colorPrimary">@color/toolBarColor</item>
    <!--colorAccent 对应EditText编辑时、RadioButton选中、CheckBox等选中时的颜色。-->
    <item name="colorAccent">@color/editColor</item>
    <!--窗口的颜色-->
    <item name="android:windowBackground">@color/widowColor</item>
  </style>
  <!--Status bar color-->
  <color name="statusColor">#ff0000</color>
  <!-- toolBar color -->
  <color name="toolBarColor">#0000ff</color>
  <!--EditText,RadioButton,CheckBox color-->
  <color name="editColor">#FD87A9</color>
  <!--Window color-->
  <color name="widowColor">#ffffff</color>
</resources>
从上面的style文件中,可以知道,手机状态栏的颜色和ToolBar的颜色也是可以在style中配置的.然后在清单文件的application节点下需要确认使用的style是Android:theme=”@style/AppTheme”
ok,样式配置完后,接着在res/layout/activity_main.xml中加入Toolbar控件.
<LinearLayout xmlns:android="http://schemas.android.com/apk/res/android"
  xmlns:tools="http://schemas.android.com/tools"
  android:layout_width="match_parent"
  android:layout_height="match_parent"
  android:orientation="vertical"
  tools:context=".MainActivity">
  <!--
  ?attr/actionBarSize:表示根据屏幕的分辨率采用系统默认的高度
  如果低版本也要使用的话,则需要使用v7包的,否则只有api21上才能有效
  -->
  <android.support.v7.widget.Toolbar
    android:id="@+id/toolbar"
    android:layout_width="match_parent"
    android:layout_height="?attr/actionBarSize"
    android:background="?attr/colorPrimary">
    <!--添加Toolbar的子控件-->
    <Button
      android:id="@+id/btn_diy"
      android:layout_width="60dp"
      android:layout_height="wrap_content"
      android:layout_gravity="right"
      android:background="#80ffffff"
      android:text="自定义按钮"
      android:textColor="#000000"
      android:textSize="11sp" />
    <TextView
      android:id="@+id/tv_title"
      android:layout_width="wrap_content"
      android:layout_height="match_parent"
      android:layout_gravity="center"
      android:gravity="center"
      android:text="首页"
      android:textColor="@android:color/black"
      android:textSize="20sp" />
  </android.support.v7.widget.Toolbar>
  <TextView
    android:layout_width="match_parent"
    android:layout_height="match_parent"
    android:gravity="center"
    android:text="@string/hello_world"
    android:textColor="@android:color/black"
    android:textSize="30sp" />
</LinearLayout>
再来看看MainActivity的代码:
package blog.csdn.net.mchenys.toolbardemo;
import android.graphics.Color;
import android.graphics.Rect;
import android.graphics.drawable.ColorDrawable;
import android.os.Bundle;
import android.support.v7.app.AppCompatActivity;
import android.support.v7.widget.Toolbar;
import android.view.Gravity;
import android.view.Menu;
import android.view.MenuItem;
import android.view.View;
import android.view.ViewGroup;
import android.widget.PopupWindow;
import android.widget.Toast;
/**
 * Created by mChenys on 2016/5/29.
 */
public class MainActivity extends AppCompatActivity implements View.OnClickListener {
  Toolbar mToolbar;
  Toast mToast;
  PopupWindow mPopupWindow;
  @Override
  protected void onCreate(Bundle savedInstanceState) {
    super.onCreate(savedInstanceState);
    setContentView(R.layout.activity_main);
    mToast = Toast.makeText(this, "", Toast.LENGTH_SHORT);
    mToast.setGravity(Gravity.CENTER, 0, 0);
    mToolbar = (Toolbar) findViewById(R.id.toolbar);
    // App Logo
//    mToolbar.setLogo(R.drawable.app_icon);
    // 主标题,默认为app_label的名字
    mToolbar.setTitle("Title");
    mToolbar.setTitleTextColor(Color.YELLOW);
    // 副标题
    mToolbar.setSubtitle("Sub title");
    mToolbar.setSubtitleTextColor(Color.parseColor("#80ff0000"));
    //侧边栏的按钮
    mToolbar.setNavigationIcon(R.drawable.back);
    //取代原本的actionbar
    setSupportActionBar(mToolbar);
    //设置NavigationIcon的点击事件,需要放在setSupportActionBar之后设置才会生效,
    //因为setSupportActionBar里面也会setNavigationOnClickListener
    mToolbar.setNavigationOnClickListener(new View.OnClickListener() {
      @Override
      public void onClick(View v) {
        mToast.setText("click NavigationIcon");
        mToast.show();
      }
    });
    //设置toolBar上的MenuItem点击事件
    mToolbar.setOnMenuItemClickListener(new Toolbar.OnMenuItemClickListener() {
      @Override
      public boolean onMenuItemClick(MenuItem item) {
        switch (item.getItemId()) {
          case R.id.action_edit:
            mToast.setText("click edit");
            break;
          case R.id.action_share:
            mToast.setText("click share");
            break;
          case R.id.action_overflow:
            //弹出自定义overflow
            popUpMyOverflow();
            return true;
        }
        mToast.show();
        return true;
      }
    });
    //ToolBar里面还可以包含子控件
    mToolbar.findViewById(R.id.btn_diy).setOnClickListener(new View.OnClickListener() {
      @Override
      public void onClick(View v) {
        mToast.setText("点击自定义按钮");
        mToast.show();
      }
    });
    mToolbar.findViewById(R.id.tv_title).setOnClickListener(new View.OnClickListener() {
      @Override
      public void onClick(View v) {
        mToast.setText("点击自定义标题");
        mToast.show();
      }
    });
  }
  //如果有Menu,创建完后,系统会自动添加到ToolBar上
  @Override
  public boolean onCreateOptionsMenu(Menu menu) {
    super.onCreateOptionsMenu(menu);
    getMenuInflater().inflate(R.menu.menu_main, menu);
    return true;
  }
  /**
   * 弹出自定义的popWindow
   */
  public void popUpMyOverflow() {
    //获取状态栏高度
    Rect frame = new Rect();
    getWindow().getDecorView().getWindowVisibleDisplayFrame(frame);
    //状态栏高度+toolbar的高度
    int yOffset = frame.top + mToolbar.getHeight();
    if (null == mPopupWindow) {
      //初始化PopupWindow的布局
      View popView = getLayoutInflater().inflate(R.layout.action_overflow_popwindow, null);
      //popView即popupWindow的布局,ture设置focusAble.
      mPopupWindow = new PopupWindow(popView,
          ViewGroup.LayoutParams.WRAP_CONTENT,
          ViewGroup.LayoutParams.WRAP_CONTENT, true);
      //必须设置BackgroundDrawable后setOutsideTouchable(true)才会有效
      mPopupWindow.setBackgroundDrawable(new ColorDrawable());
      //点击外部关闭。
      mPopupWindow.setOutsideTouchable(true);
      //设置一个动画。
      mPopupWindow.setAnimationStyle(android.R.style.Animation_Dialog);
      //设置Gravity,让它显示在右上角。
      mPopupWindow.showAtLocation(mToolbar, Gravity.RIGHT | Gravity.TOP, 0, yOffset);
      //设置item的点击监听
      popView.findViewById(R.id.ll_item1).setOnClickListener(this);
      popView.findViewById(R.id.ll_item2).setOnClickListener(this);
      popView.findViewById(R.id.ll_item3).setOnClickListener(this);
    } else {
      mPopupWindow.showAtLocation(mToolbar, Gravity.RIGHT | Gravity.TOP, 0, yOffset);
    }
  }
  @Override
  public void onClick(View v) {
    switch (v.getId()) {
      case R.id.ll_item1:
        mToast.setText("哈哈");
        break;
      case R.id.ll_item2:
        mToast.setText("呵呵");
        break;
      case R.id.ll_item3:
        mToast.setText("嘻嘻");
        break;
    }
    //点击PopWindow的item后,关闭此PopWindow
    if (null != mPopupWindow && mPopupWindow.isShowing()) {
      mPopupWindow.dismiss();
    }
    mToast.show();
  }
}
另外,我们的ToolBar控件还用到了menu item,下面是/res/menu/menu_main.xml的内容:
<?xml version="1.0" encoding="utf-8"?>
<menu xmlns:android="http://schemas.android.com/apk/res/android"
  xmlns:app="http://schemas.android.com/apk/res-auto"
  xmlns:tools="http://schemas.android.com/tools"
  tools:context=".MainActivity">
  <item
    android:id="@+id/action_edit"
    android:icon="@drawable/edit"
    android:orderInCategory="80"
    android:title="@string/action_edit"
    app:showAsAction="ifRoom" />
  <item
    android:id="@+id/action_share"
    android:icon="@drawable/share"
    android:orderInCategory="90"
    android:title="@string/action_share"
    app:showAsAction="ifRoom" />
  <item
    android:id="@+id/action_overflow"
    android:orderInCategory="100"
    android:title="@string/action_more"
    android:icon="@drawable/more"
    app:showAsAction="always" />
</menu>
还有PopWindow的布局,在/res/layout/action_overflow_popwindow.xml,内容如下:
<?xml version="1.0" encoding="utf-8"?>
<LinearLayout xmlns:android="http://schemas.android.com/apk/res/android"
  android:layout_width="wrap_content"
  android:layout_height="wrap_content"
  android:background="#274B5E"
  android:orientation="vertical"
  android:padding="10dp">
  <LinearLayout
    android:id="@+id/ll_item1"
    android:layout_width="match_parent"
    android:layout_height="wrap_content"
    android:gravity="center">
    <ImageView
      android:layout_width="wrap_content"
      android:layout_height="wrap_content"
      android:src="@drawable/app_icon" />
    <TextView
      android:layout_width="wrap_content"
      android:layout_height="wrap_content"
      android:layout_marginLeft="10dp"
      android:text="哈哈"
      android:textColor="#ffffff"
      android:textSize="20sp" />
  </LinearLayout>
  <LinearLayout
    android:id="@+id/ll_item2"
    android:layout_width="match_parent"
    android:layout_height="wrap_content"
    android:gravity="center">
    <ImageView
      android:layout_width="wrap_content"
      android:layout_height="wrap_content"
      android:src="@drawable/app_icon" />
    <TextView
      android:layout_width="wrap_content"
      android:layout_height="wrap_content"
      android:layout_marginLeft="10dp"
      android:text="呵呵"
      android:textColor="#ffffff"
      android:textSize="20sp" />
  </LinearLayout>
  <LinearLayout
    android:id="@+id/ll_item3"
    android:layout_width="match_parent"
    android:layout_height="wrap_content"
    android:gravity="center">
    <ImageView
      android:layout_width="wrap_content"
      android:layout_height="wrap_content"
      android:src="@drawable/app_icon" />
    <TextView
      android:layout_width="wrap_content"
      android:layout_height="wrap_content"
      android:layout_marginLeft="10dp"
      android:text="嘻嘻"
      android:textColor="#ffffff"
      android:textSize="20sp" />
  </LinearLayout>
</LinearLayout>
您可能感兴趣的文章:Android ToolBar控件详解及实例Android Support Library 标题栏(Toolbar)滚动效果实现方法Android动态修改ToolBar的Menu菜单示例Android折叠式Toolbar使用完全解析(CollapsingToolbarLayout)Android ToolBar整合实例使用方法详解深入理解Android 5.0中的ToolbarAndroid中Toolbar随着ScrollView滑动透明度渐变效果实现Android自定义Toolbar使用方法详解Android自定义ActionProvider ToolBar实现Menu小红点Android5.0+ CollapsingToolbarLayout使用详解