SpringBoot中ApplicationEvent和ApplicationListener用法小结
一、开发ApplicationEvent事件
二、 开发监听器
三、推送事件
四、注解方式实现监听器
对不起大家,昨天文章里的告别说早了,这个系列还不能就这么结束。
我们前面的文章中讲解过RabbitMQ的用法,所谓MQ就是一种发布订阅模式的消息模型。在Spring中其实本身也为我们提供了一种发布订阅模式的事件处理方式,就是ApplicationEvent和 ApplicationListener,这是一种基于观察者模式实现事件监听功能。也已帮助我们完成业务逻辑的解耦,提高程序的扩展性和可维护性。
但是这里要注意ApplicationEvent和 MQ队列虽然实现的功能相似,但是MQ还是有其不可替代性的,最本质的区别就是MQ可以用于不同系统之间的消息发布,而SpringEvent这种模式只能在一个系统中,也就是要求必须是同一个Spring容器。
好了接下来我们就来演练一番。
在这个模型中,有两个重要的类,一个是事件,一个是监听。事件要继承ApplicationEvent类,监听要实现ApplicationListener接口。
一、开发ApplicationEvent事件事件其实就是我们要发送的消息体,这个一般要根据我们的实际业务进行封装,需要什么类型的数据,就是用什么类型,需要哪些字段就添加哪些字段。我们来给一个案例。
package com.lsqingfeng.springboot.applicationEvent;
import lombok.Getter;
import lombok.Setter;
import org.springframework.context.ApplicationEvent;
/**
 * @className: MyApplicationEvent
 * @description: 事件封装
 * @author: sh.Liu
 * @date: 2022-03-23 14:41
 */
@Getter
@Setter
@ToString
public class MyApplicationEvent extends ApplicationEvent {
    private Integer age;
    private String name;
    /**
     * 需要重写构造方法
     * @param source
     * @param name
     * @param age
     */
    public MyApplicationEvent(Object source, String name, Integer age) {
        super(source);
        this.name = name;
        this.age = age;
    }
}
二、 开发监听器
监听器就相当于我们的MQ的消费者,当有时间推送过来的时候,监听器的代码就可以执行。这里通过泛型来设置好我们的事件类型。
package com.lsqingfeng.springboot.applicationEvent;
import org.springframework.context.ApplicationListener;
import org.springframework.stereotype.Component;
/**
 * @className: MyApplicationEventListener
 * @description:事件监听器
 * @author: sh.Liu
 * @date: 2022-03-23 14:50
 */
@Component
public class MyApplicationEventListener implements ApplicationListener<MyApplicationEvent> {
    @Override
    public void onApplicationEvent(MyApplicationEvent event) {
        System.out.println("收到消息:" + event);
    }
}
三、推送事件
推送事件需要使用ApplicationEventPublisher。这个对象在Spring容器加载的时候就已经在容器中了。所以我们可以直接注入使用,也可以使用ApplicationContext,因为ApplicationContext本身就继承了ApplicationEventPublisher。 我们通过一个Controller来验证一下。
package com.lsqingfeng.springboot.controller;
import com.lsqingfeng.springboot.applicationEvent.MyApplicationEvent;
import com.lsqingfeng.springboot.base.Result;
import org.springframework.beans.factory.annotation.Autowired;
import org.springframework.context.ApplicationContext;
import org.springframework.web.bind.annotation.RequestMapping;
import org.springframework.web.bind.annotation.RestController;
/**
 * @className: ApplicationEventController
 * @description:
 * @author: sh.Liu
 * @date: 2022-03-23 15:21
 */
@RestController
@RequestMapping("event")
public class ApplicationEventController {
    @Autowired
    private ApplicationContext applicationContext;
    @RequestMapping("/push")
    public Result pushEvent(){
        MyApplicationEvent myApplicationEvent = new MyApplicationEvent(this,"zhangsan", 10);
        applicationContext.publishEvent(myApplicationEvent);
        return Result.success();
    }
    @RequestMapping("/push2")
    public Result pushEvent2(){
        applicationContext.publishEvent("大家好");
        return Result.success();
    }
}
我们定义两个推送的方法。一个推送我们的MyApplicationEvent类型,还有一个方法推送一个字符串。
当我们调用第一个方法的时候,控制台可以打印出我们推送的数据信息。

调用推送字符串的时候,我们的监听器不会执行,原因是我们的拦截器里已经加了泛型MyApplicationEvent,也就是只会监听MyApplicationEvent类型的消息。其他类型的消息不会被监听到。
那如果我们把泛型去掉会有什么效果呢,我们来试试。

每次推送都会发送两条(可能有什么内部机制,不管了),但是两个都打印了,说明如果不加泛型,不管谁推,这边都能收到消息。
四、注解方式实现监听器除了上面的通过实现接口的方式开发监听器,我们还可以通过注解的方式来实现,具体代码如下。
package com.lsqingfeng.springboot.applicationEvent;
import org.springframework.context.event.EventListener;
import org.springframework.stereotype.Component;
/**
 * @className: MyApplicationEventListener2
 * @description: 注解实现监听器
 * @author: sh.Liu
 * @date: 2022-03-23 15:56
 */
@Component
public class MyApplicationEventListener2 {
    @EventListener
    public void onEvent(MyApplicationEvent event){
        System.out.println("收到消息2:" + event);
    }
}
这里加入了@EventListener 注解代表了这是一个监听器。方法名随意,方法里的参数代表监听的事件类型。
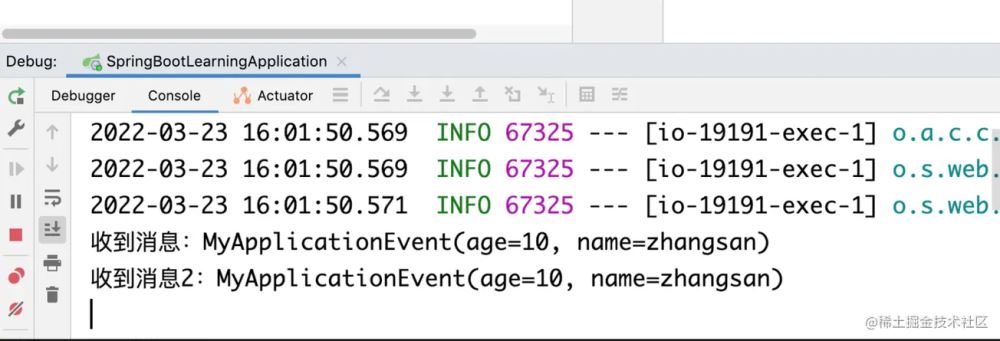
再次调用push方法:

发现两个监听器的数据都会打印。这一特点大家要注意一下。
好了,关于Spring中的ApplicationEvent和ApplicationListener我们就介绍这么多。
到此这篇关于SpringBoot中ApplicationEvent用法的文章就介绍到这了,更多相关Spring Boot ApplicationEvent用法内容请搜索软件开发网以前的文章或继续浏览下面的相关文章希望大家以后多多支持软件开发网!