【深度学习系列(六)】:RNN系列(3):基于Tensorflow的RNN的实战之英文名字生成
了解RNN的基本单元及其改进之后,接下来我们使用RNN进行一个简单的名字生成实战来了解实际使用中需要注意的地方及要点,废话不多说。。。
目录
一、数据预处理及加载
1、数据预处理
2、数据加载
二、RNN模型搭建
三、在动态图中训练模型
四、模型预测
五、RNN模型的优化技巧
一、数据预处理及加载这里使用的数据为一系列的英文人名,具体链接: https://pan.baidu.com/s/1pPCw_dRUXQnwH1YOsKqxXQ, 提取码: cx5w。
1、数据预处理文本是一类序列数据,一篇文章可以看作是字符或单词的序列,本节将介绍文本数据的常见预处理步骤,预处理通常包括四个步骤:
读入文本 分词 建立字典,将每个词映射到一个唯一的索引(index) 将文本从词的序列转换为索引的序列,方便输入模型1.1、读入文本
DATA_DIR ='./女孩名字.txt' #定义载入的样本路径
input_text=[]
f = open(DATA_DIR,encoding='gbk')
import re
reforname=re.compile(r'[a-z]+', re.I)#用正则化,忽略大小写提取字母
for i in f:
t = re.match(reforname,i)
if t:
t=t.group()
input_text.append(t)
print(t)
这里我们通过正则化表达式来匹配英文字符串忽略其他字符串,并将每行提取到的英文单词放入list中。分词工具在自然语言模型中是经常用到的。本篇中相对英文的简单分词工具,对于中文的分词工具目前大多数使用的是jieba。目前常用的分词工具有:
Spacy
NLTK
有兴趣的可以自己了解相关工具。
1.2、分词
我们需要每个句子进行分词,也就是将一个句子划分成若干个词(token),转换为一个词的序列。这里因为直接读取的是一个单词所以这一步可以忽略。
1.3、建立字典
为了方便模型处理,我们需要将字符串转换为数字。因此我们需要先构建一个字典(vocabulary),将每个词映射到一个唯一的索引编号。这里因为每个单词是由字母组成的,所以我们直接可以根据26个单词建立一个字典映射。具体代码实现如下:
def make_dictionary():
words_dic = [chr(i) for i in range(32,127)]
words_dic.insert(0,'None')#补0用的
words_dic.append("unknown")
words_redic = dict(zip(words_dic, range(len(words_dic)))) #反向字典
print('字表大小:', len(words_dic))
return words_dic,words_redic
inv_charmap,charmap = make_dictionary()
vocab_size = len(charmap)#字典大小
注意这里我们分别向字典里加入了'None'和'unknown'两个特殊字符,其中'None'主要用于将不定长的单词通过补零操作来变为定长的单词,'unknown'主要用于定义未知字符。
另外,一般在创建字典时我们需要两种字典:词到索引(token_to_index)和索引到词(index_to_token)。
1.4、将词转为索引
#字符到向量
def ch_to_v(datalist,words_redic,normal = 1):
to_num = lambda word: words_redic[word] if word in words_redic else len(words_redic)-1# 字典里没有的就是None
data_vector =[]
for ii in datalist:
data_vector.append(list(map(to_num, list(ii))))
#归一化
if normal == 1:
return np.asarray(data_vector)/ (len(words_redic)/2) - 1
return np.array(data_vector)
#对向量进行对齐操作
def pad_sequences(sequences, maxlen=None, dtype=np.float32,
padding='post', truncating='post', value=0.):
lengths = np.asarray([len(s) for s in sequences], dtype=np.int64)
nb_samples = len(sequences)
if maxlen is None:
maxlen = np.max(lengths)
sample_shape = tuple()
for s in sequences:
if len(s) > 0:
sample_shape = np.asarray(s).shape[1:]
break
x = (np.ones((nb_samples, maxlen) + sample_shape) * value).astype(dtype)
for idx, s in enumerate(sequences):
if len(s) == 0:
continue # empty list was found
if truncating == 'pre':
trunc = s[-maxlen:]
elif truncating == 'post':
trunc = s[:maxlen]
else:
raise ValueError('Truncating type "%s" not understood' % truncating)
# check `trunc` has expected shape
trunc = np.asarray(trunc, dtype=dtype)
if trunc.shape[1:] != sample_shape:
raise ValueError('Shape of sample %s of sequence at position %s is different from expected shape %s' %
(trunc.shape[1:], idx, sample_shape))
if padding == 'post':
x[idx, :len(trunc)] = trunc
elif padding == 'pre':
x[idx, -len(trunc):] = trunc
else:
raise ValueError('Padding type "%s" not understood' % padding)
return x, lengths
#样本数据预处理(用于训练)
def getbacthdata(batchx,charmap):
batchx = ch_to_v( batchx,charmap,0)
sampletpad ,sampletlengths =pad_sequences(batchx)#充为最大长度
zero = np.zeros([len(batchx),1])
tarsentence =np.concatenate((sampletpad[:,1:],zero),axis = 1)
return np.asarray(sampletpad,np.int32),np.asarray(tarsentence,np.int32),sampletlengths
注意这里我们将原始单词作为输入,将[1:]之后在补零生成的单词作为预测标签。
2、数据加载
这里我们采用tf.data.Dataset来加载数据,具体实现如下:
input_text,target_text,sampletlengths = getbacthdata(input_text,charmap)
BATCH_SIZE = 6#批次
#定义数据集
dataset = tf.data.Dataset.from_tensor_slices((input_text, target_text)).shuffle(1000)
dataset = dataset.batch(BATCH_SIZE, drop_remainder=True)
二、RNN模型搭建
构建RNN模型的具体步骤如下:
将词向量转化为词嵌入
将词嵌入输入RNN单元,这里使用的是GRU单元
将GRU的输出结果输入全链接层
通过全链接层,将最终的结果收敛到字典相同的维度特征
对与tensorflow的模型搭建一般有两种方法,一种是通过tf.keras.Model直接搭建;一种是通过sequence来搭建,这里采用第一种,并通过class继承的方式进行。具体实现如下:
class Model(tf.keras.models.Model):
def __init__(self,vocab_size,embeding_dim,units,batch_size):
super(Model,self).__init__()
self.units=units
self.batch_size=batch_size
#定义嵌入层
self.embeding=tf.keras.layers.Embedding(vocab_size,embedding_dim)
#定义GRU
if tf.test.is_gpu_available():
self.gru=tf.keras.layers.CuDNNGRU(self.units,return_sequence=True,
return_state=True,
recurrent_initializer='glorot_uniform')
else:
self.gru=tf.keras.layers.GRU(self.units,
return_sequences=True,
return_state=True,
recurrent_activation='sigmoid',
recurrent_initializer='glorot_uniform')
self.fc=tf.keras.layers.Dense(vocab_size)
def __call__(self,x,hidden):
x=self.embeding(x)
# 使用gru网络进行计算,output的形状为(batch_size, max_length, hidden_size)
# states的形状为(batch_size, hidden_size)
output, states = self.gru(x, initial_state=hidden)
# 变换维度,用于后面的全连接,输出形状为 (batch_size * max_length, hidden_size)
output = tf.reshape(output, (-1, output.shape[2]))
# 得到每个词的多项式分布
# 输出形状为(max_length * batch_size, vocab_size)
x = self.fc(output)
return x, states
One hot方式处理的数据缺点:
会产生大量冗余的稀疏矩阵
维度(单词)间的关系,没有得到体现
为什么要使用嵌入层 Embedding呢? 主要有这两大原因:
使用One-hot 方法编码的向量会很高维也很稀疏。假设我们在做自然语言处理(NLP)中遇到了一个包含2000个词的字典,当时用One-hot编码时,每一个词会被一个包含2000个整数的向量来表示,其中1999个数字是0,要是我的字典再大一点的话这种方法的计算效率岂不是大打折扣?
训练神经网络的过程中,每个嵌入的向量都会得到更新。如果你看到了博客上面的图片你就会发现在多维空间中词与词之间有多少相似性,这使我们能可视化的了解词语之间的关系,不仅仅是词语,任何能通过嵌入层 Embedding 转换成向量的内容都可以这样做。
参考连接:
深度学习中Embedding层有什么用?
深度学习中 Embedding层两大作用的个人理解
讲清楚embedding到底在干什么
三、在动态图中训练模型
max_length = len(input_text[0])
learning_rate = 0.001
embedding_dim = 256#词向量
units = 1024#GRU单元个数
model=Model(vocab_size,embedding_dim,units,BATCH_SIZE)
optimier=tf.keras.optimizers.Adam()
def loss_function(real,preds):
return tf.compat.v1.losses.sparse_softmax_cross_entropy(labels=real, logits=preds)
checkpoint_dir = './training_checkpoints'
checkpoint_prefix = os.path.join(checkpoint_dir, "ckpt")
checkpoint = tf.train.Checkpoint(optimizer=optimier, model=model)
latest_cpkt = tf.train.latest_checkpoint(checkpoint_dir)
if latest_cpkt:
print('Using latest checkpoint at ' + latest_cpkt)
checkpoint.restore(latest_cpkt)
else:
os.makedirs(checkpoint_dir, exist_ok=True)
EPOCH=20
for epoch in range(EPOCH):
hidden=model.reset_states()
total_loss=[]
for (batch,(inp,target)) in enumerate(dataset):
hidden=model.reset_states()
with tf.GradientTape() as tape:
predictions,hidden=model(inp,hidden)
target=tf.reshape(target,(-1,))
loss=loss_function(target,predictions)
total_loss.append(loss)
grads=tape.gradient(loss,model.variables)
optimier.apply_gradients(zip(grads,model.variables))
if batch%100==0:
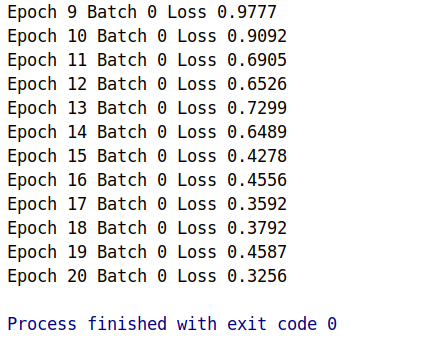
print('Epoch {} Batch {} Loss {:.4f}'.format(epoch+1,batch,loss))
# saving (checkpoint) the model every 5 epochs
if (epoch + 1) % 2 == 0:
checkpoint.save(file_prefix = checkpoint_prefix)
运行结果如下:
四、模型预测
在i使用模型时需要对输出结果采用多项式采样,并将采样后的结果当作真正的结果,具体实现步骤如下:
随机选择一个名字的首字母作为输入
将首字母的输入到模型,对输出结果采用多项式采样得到下一个字母
将步骤(2)的结果作为输入来预测下一个字符。以此类推,直到遇到输出为0,则结束。
如果一直循环没有遇到0,则执行maxLength之后,结束循环。
具体实现如下:
# restoring the latest checkpoint in checkpoint_dir
checkpoint.restore(tf.train.latest_checkpoint(checkpoint_dir))
# Evaluation step(generating text using the model learned)
for iii in range(20):
input_eval = input_text[np.random.randint(len(input_text))][0]
start_string = inv_charmap[input_eval]
input_eval = tf.expand_dims([input_eval], 0)
# empty string to store our results
text_generated = ''
# hidden state shape == (batch_size, number of rnn units); here batch size == 1
hidden = [tf.zeros((1, units))]
#hidden = model.reset_states()
for i in range(max_length):
predictions, hidden = model(input_eval, hidden)
predicted_id = tf.compat.v1.multinomial(predictions, num_samples=1)[0][0].numpy()
if predicted_id==0:
break
# We pass the predicted word as the next input to the model
# along with the previous hidden state
input_eval = tf.expand_dims([predicted_id], 0)
text_generated += inv_charmap[predicted_id]
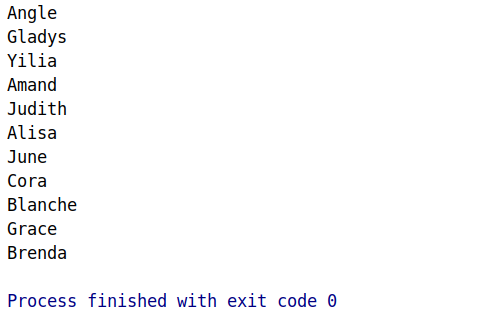
print (start_string + text_generated)
总共生成了20个人名,运行部分结果如下:
五、RNN模型的优化技巧
在优化RNN模型中常用到如:批量正则化、droupout方法提升模型效果。由于RNN的特殊结构,所以优化技巧也不同。其中具体优化,后续会详细讲到。这里主要讲一下基于多项式分布的优化技巧,当然你也可以发现在第四节中我们已经使用了这一优化技巧,其实非常简单,这里主要讲一下为什么之一技巧有用的原因,以及如何使用。
我们知道自然语言中的某一个词是不唯一固定的,如:“中国真棒”,他一可以换成“中国真好”,这不会影响整个句的语义。在RNN模型预测中,我们常用的方法是每次取出当前模型预测概率的最大值作为预测结果,而这种生成方法自然失去了语言的多样性。为了解决这个问题,将RNN模型的输出结果作为一个多项式分布,以分布取样的方法来预测下一个序列的词向量,这种方法更符合语言的特性。
Bernoulli分布 (两点分布)
Bernoulli分布是单个二值随机变量的分布
作者:wxplol