RT-Thread Studio片上Flash 实现Flash抽象层FAL笔记
使用ATK-NANO STM32F411的开发板, 实现Flash抽象层FAL。
先添加fal的软件包,并复制fal_cfg.h到drivers目录下:
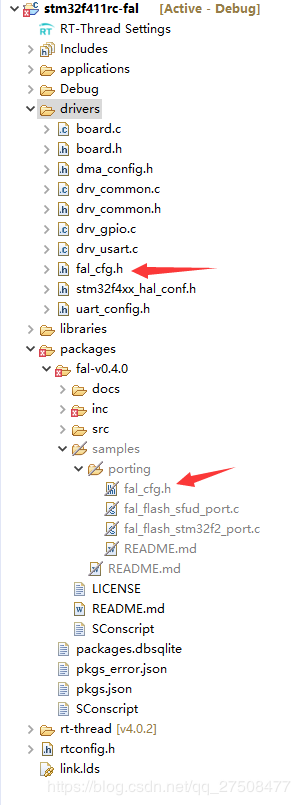
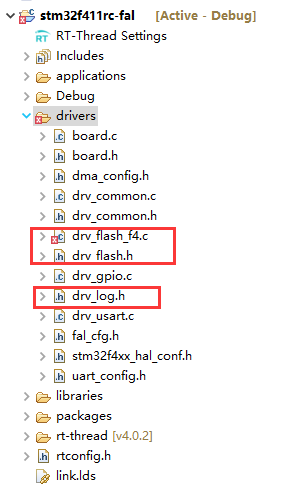
复制C:\RT-ThreadStudio\download\rt-thread-sdk\rt-thread-src\v4.0.2\bsp\stm32\libraries\HAL_Drivers\drv_flash目录下的drv_flash.h文件和对应的flash驱动文件如drv_flash_f4.c到drivers目录下,复制上一级目录的drv_log.h到drivers目录下,并注释drv_flash_f4.c文件中的#include "drv_config.h"。
修改fal_cfg.h为以下内容:
/*
 * File      : fal_cfg.h
 * This file is part of FAL (Flash Abstraction Layer) package
 * COPYRIGHT (C) 2006 - 2018, RT-Thread Development Team
 *
 *  This program is free software; you can redistribute it and/or modify
 *  it under the terms of the GNU General Public License as published by
 *  the Free Software Foundation; either version 2 of the License, or
 *  (at your option) any later version.
 *
 *  This program is distributed in the hope that it will be useful,
 *  but WITHOUT ANY WARRANTY; without even the implied warranty of
 *  MERCHANTABILITY or FITNESS FOR A PARTICULAR PURPOSE.  See the
 *  GNU General Public License for more details.
 *
 *  You should have received a copy of the GNU General Public License along
 *  with this program; if not, write to the Free Software Foundation, Inc.,
 *  51 Franklin Street, Fifth Floor, Boston, MA 02110-1301 USA.
 *
 * Change Logs:
 * Date           Author       Notes
 * 2018-05-17     armink       the first version
 * 2020-03-20     ShineRoyal   change for stm32f411rc
 */
#ifndef _FAL_CFG_H_
#define _FAL_CFG_H_
#include
#include
#define FLASH_SIZE_GRANULARITY_16K   (4 * 16 * 1024)
#define FLASH_SIZE_GRANULARITY_64K   (1 * 64 * 1024)
#define FLASH_SIZE_GRANULARITY_128K  (1 * 128 * 1024)
#define STM32_FLASH_START_ADRESS_16K  STM32_FLASH_START_ADRESS
#define STM32_FLASH_START_ADRESS_64K  (STM32_FLASH_START_ADRESS_16K + FLASH_SIZE_GRANULARITY_16K)
#define STM32_FLASH_START_ADRESS_128K (STM32_FLASH_START_ADRESS_64K + FLASH_SIZE_GRANULARITY_64K)
/* ===================== Flash device Configuration ========================= */
extern const struct fal_flash_dev stm32_onchip_flash_16k;
extern const struct fal_flash_dev stm32_onchip_flash_64k;
extern const struct fal_flash_dev stm32_onchip_flash_128k;
/* flash device table */
#define FAL_FLASH_DEV_TABLE                                          \
{                                                                    \
    &stm32_onchip_flash_16k,                                         \
    &stm32_onchip_flash_64k,                                         \
    &stm32_onchip_flash_128k,                                        \
}
/* ====================== Partition Configuration ========================== */
#ifdef FAL_PART_HAS_TABLE_CFG
/* partition table */
/* partition table */
#define FAL_PART_TABLE                                                                                                     \
{                                                                                                                          \
    {FAL_PART_MAGIC_WROD, "bootloader", "onchip_flash_16k",  0 , FLASH_SIZE_GRANULARITY_16K , 0}, \
    {FAL_PART_MAGIC_WROD, "param",      "onchip_flash_64k",  0 , FLASH_SIZE_GRANULARITY_64K , 0}, \
    {FAL_PART_MAGIC_WROD, "app",        "onchip_flash_128k", 0 , FLASH_SIZE_GRANULARITY_128K, 0}, \
}
#endif /* FAL_PART_HAS_TABLE_CFG */
#endif /* _FAL_CFG_H_ */
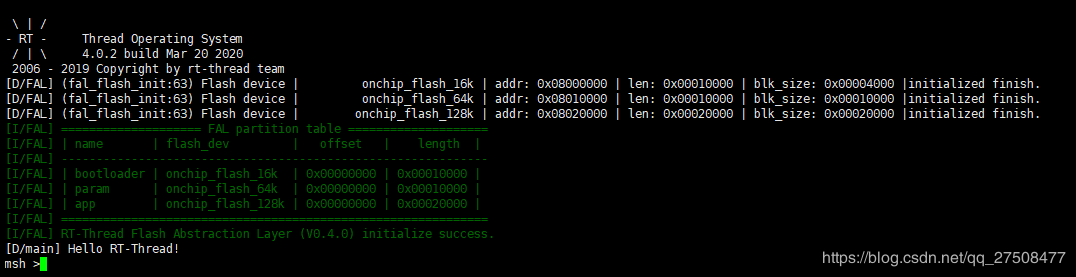
因为前128K的大小不同,所以这里的建议是他们根据最小擦除粒度分为3个区域。
main.c中添加头文件引入和函数调用:
#include
int main(void)
{
    int count = 1;
    fal_init();
    LOG_D("Hello RT-Thread!");
    while (count++)
    {
        rt_thread_mdelay(1000);
    }
    return RT_EOK;
}
下载验证:
如果需要对flash进行读写功能测试,可以添加测试函数:
#define BUF_SIZE 1024
static int fal_test(const char *partiton_name)
{
    int ret;
    int i, j, len;
    uint8_t buf[BUF_SIZE];
    const struct fal_flash_dev *flash_dev = RT_NULL;
    const struct fal_partition *partition = RT_NULL;
    if (!partiton_name)
    {
        rt_kprintf("Input param partition name is null!\n");
        return -1;
    }
    partition = fal_partition_find(partiton_name);
    if (partition == RT_NULL)
    {
        rt_kprintf("Find partition (%s) failed!\n", partiton_name);
        ret = -1;
        return ret;
    }
    flash_dev = fal_flash_device_find(partition->flash_name);
    if (flash_dev == RT_NULL)
    {
        rt_kprintf("Find flash device (%s) failed!\n", partition->flash_name);
        ret = -1;
        return ret;
    }
    rt_kprintf("Flash device : %s   "
               "Flash size : %dK   \n"
               "Partition : %s   "
               "Partition size: %dK\n",
                partition->flash_name,
                flash_dev->len/1024,
                partition->name,
                partition->len/1024);
    /* erase all partition */
    ret = fal_partition_erase_all(partition);
    if (ret name);
        ret = -1;
        return ret;
    }
    rt_kprintf("Erase (%s) partition finish!\n", partiton_name);
    /* read the specified partition and check data */
    for (i = 0; i len;)
    {
        rt_memset(buf, 0x00, BUF_SIZE);
        len = (partition->len - i) > BUF_SIZE ? BUF_SIZE : (partition->len - i);
        ret = fal_partition_read(partition, i, buf, len);
        if (ret name);
            ret = -1;
            return ret;
        }
        for(j = 0; j < len; j++)
        {
            if (buf[j] != 0xFF)
            {
                rt_kprintf("The erase operation did not really succeed!\n");
                ret = -1;
                return ret;
            }
        }
        i += len;
    }
    /* write 0x00 to the specified partition */
    for (i = 0; i len;)
    {
        rt_memset(buf, 0x00, BUF_SIZE);
        len = (partition->len - i) > BUF_SIZE ? BUF_SIZE : (partition->len - i);
        ret = fal_partition_write(partition, i, buf, len);
        if (ret name);
            ret = -1;
            return ret;
        }
        i += len;
    }
    rt_kprintf("Write (%s) partition finish! Write size %d(%dK).\n", partiton_name, i, i/1024);
    /* read the specified partition and check data */
    for (i = 0; i len;)
    {
        rt_memset(buf, 0xFF, BUF_SIZE);
        len = (partition->len - i) > BUF_SIZE ? BUF_SIZE : (partition->len - i);
        ret = fal_partition_read(partition, i, buf, len);
        if (ret name);
            ret = -1;
            return ret;
        }
        for(j = 0; j < len; j++)
        {
            if (buf[j] != 0x00)
            {
                rt_kprintf("The write operation did not really succeed!\n");
                ret = -1;
                return ret;
            }
        }
        i += len;
    }
    ret = 0;
    return ret;
}
并在main函数调用:
int main(void)
{
    int count = 1;
    fal_init();
    LOG_D("Hello RT-Thread!");
    if (fal_test("app") == 0)
    {
        rt_kprintf("Fal partition (%s) test success!\n", "param");
    }
    else
    {
        rt_kprintf("Fal partition (%s) test failed!\n", "param");
    }
    while (count++)
    {
        rt_thread_mdelay(1000);
    }
    return RT_EOK;
}
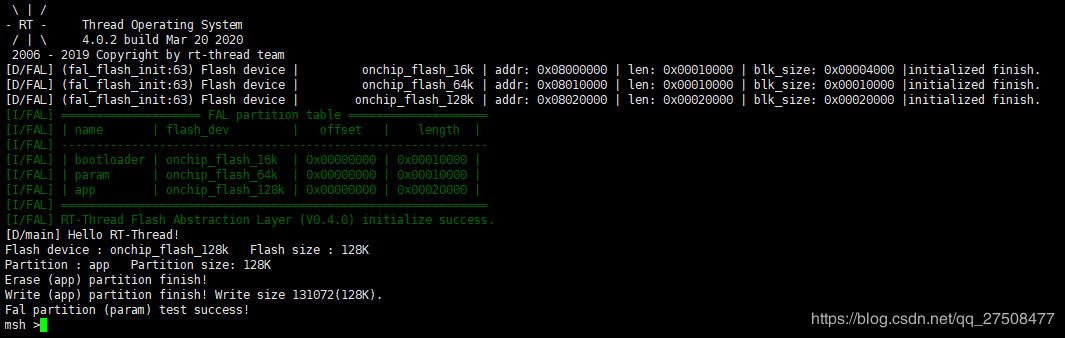
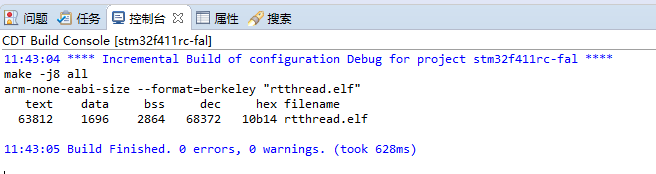
这里注意,前两个分区大小都为64k,编译后的固件有68k,横跨是前两个分区。
在进行读写测试的时候,这里是对第三个分区进行的测试,如果对第一个分区进行测试,擦除了部分固件,程序的运行可能会出现预想不到的结果。
实现片上Flash的fal工程下载
————————————————————————————————————————————
下面开启外部flash的fal功能。
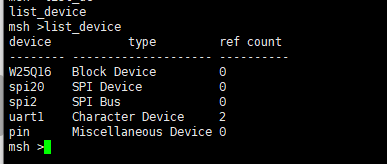
使能sfud,将W25Q16注册为块设备。
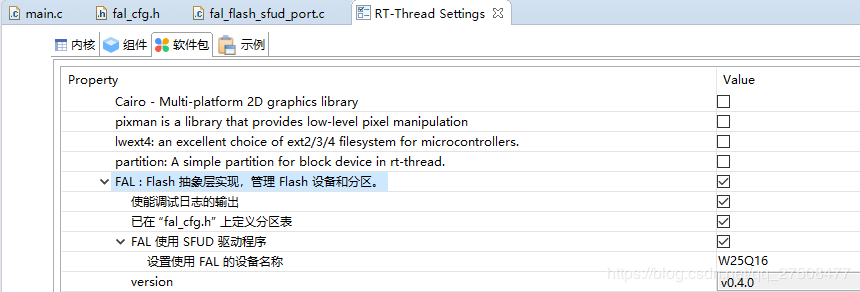
因为packages\fal-v0.4.0\samples\portingfal_flash_sfud_port.c中,有sfud_dev = rt_sfud_flash_find_by_dev_name(FAL_USING_NOR_FLASH_DEV_NAME);,这里可以通过图形化配置界面设置FAL_USING_NOR_FLASH_DEV_NAME。
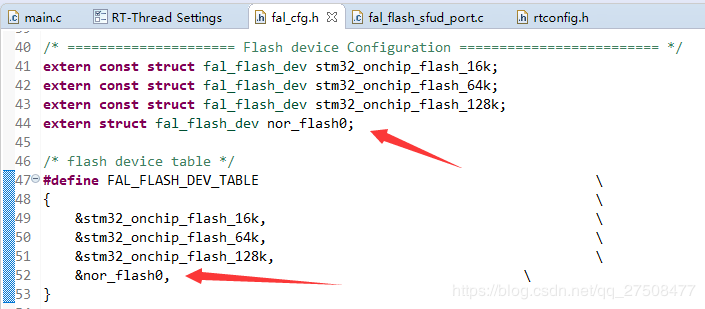
向fal设备表里添加该设备:
添加分区表:
下载运行,分区完成。
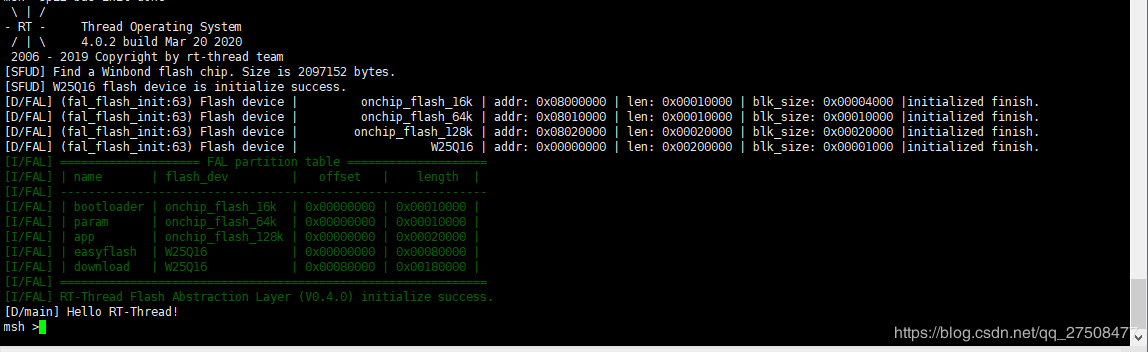
实现片上flash和外部spi flash的fal工程下载
下面在外部spi flash 上使用文件系统。
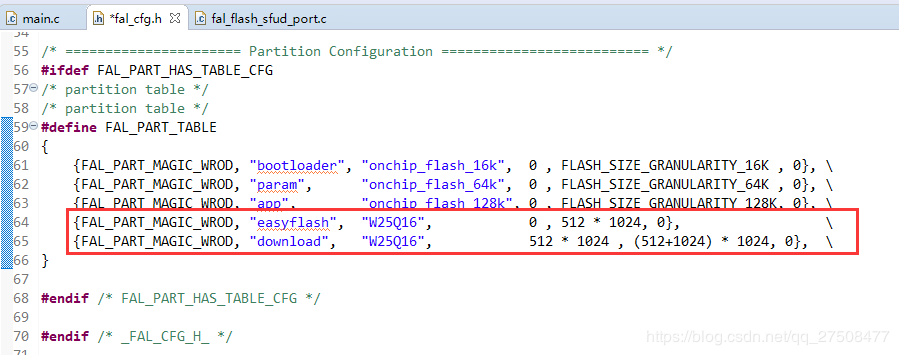
开启fatfs和dfs,设置fatfs最大要处理扇区大小为4096,再稍微修改一下分区表:
#define FAL_PART_TABLE                                                                                                     \
{                                                                                                                          \
    {FAL_PART_MAGIC_WROD, "bootloader", "onchip_flash_16k",  0 , FLASH_SIZE_GRANULARITY_16K , 0}, \
    {FAL_PART_MAGIC_WROD, "param",      "onchip_flash_64k",  0 , FLASH_SIZE_GRANULARITY_64K , 0}, \
    {FAL_PART_MAGIC_WROD, "app",        "onchip_flash_128k", 0 , FLASH_SIZE_GRANULARITY_128K, 0}, \
    {FAL_PART_MAGIC_WROD, "easyflash",  "W25Q16",            0 ,          512 * 1024, 0},                   \
    {FAL_PART_MAGIC_WROD, "download",   "W25Q16",            512 * 1024 , 512 * 1024, 0},                   \
    {FAL_PART_MAGIC_WROD, "filesystem", "W25Q16",            1024 * 1024 , 1024 * 1024, 0},                 \
}
修改主函数:
#define FS_PARTITION_NAME  "filesystem"
int main(void)
{
    LOG_D("Hello RT-Thread!");
    fal_init();
    /* 在 spi flash 中名为 "filesystem" 的分区上创建一个块设备 */
    struct rt_device *flash_dev = fal_blk_device_create(FS_PARTITION_NAME);
    if (flash_dev == NULL)
    {
        LOG_E("Can't create a block device on '%s' partition.", FS_PARTITION_NAME);
    }
    else
    {
        LOG_D("Create a block device on the %s partition of flash successful.", FS_PARTITION_NAME);
    }
    /* 挂载 spi flash 中名为 "filesystem" 的分区上的文件系统 */
    if (dfs_mount(flash_dev->parent.name, "/", "elm", 0, 0) == 0)
    {
        LOG_I("Filesystem initialized!");
    }
    else
    {
        LOG_E("Failed to initialize filesystem!");
        LOG_D("You should create a filesystem on the block device first!");
    }
    return 0;
}
下载运行:
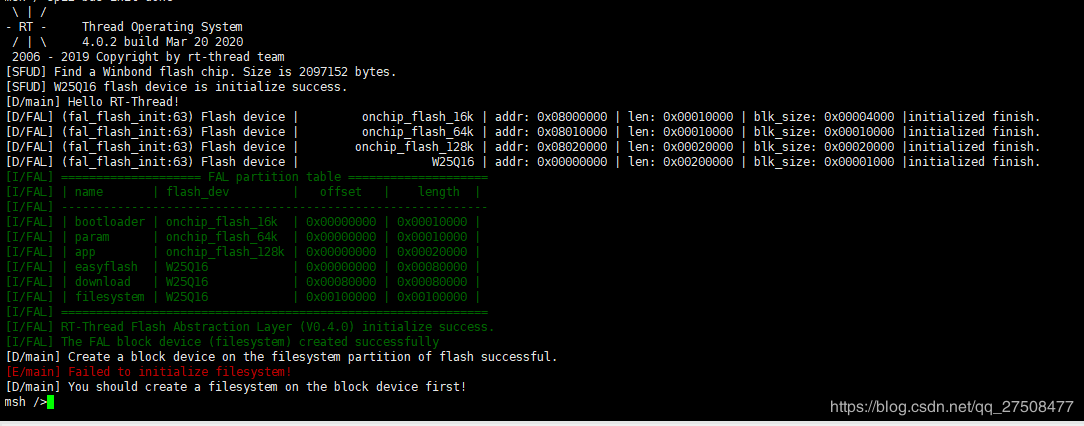
如果出现错误提示:
[E/main] Failed to initialize filesystem!
执行一次mkfs -t elm filesystem,初始化完成。
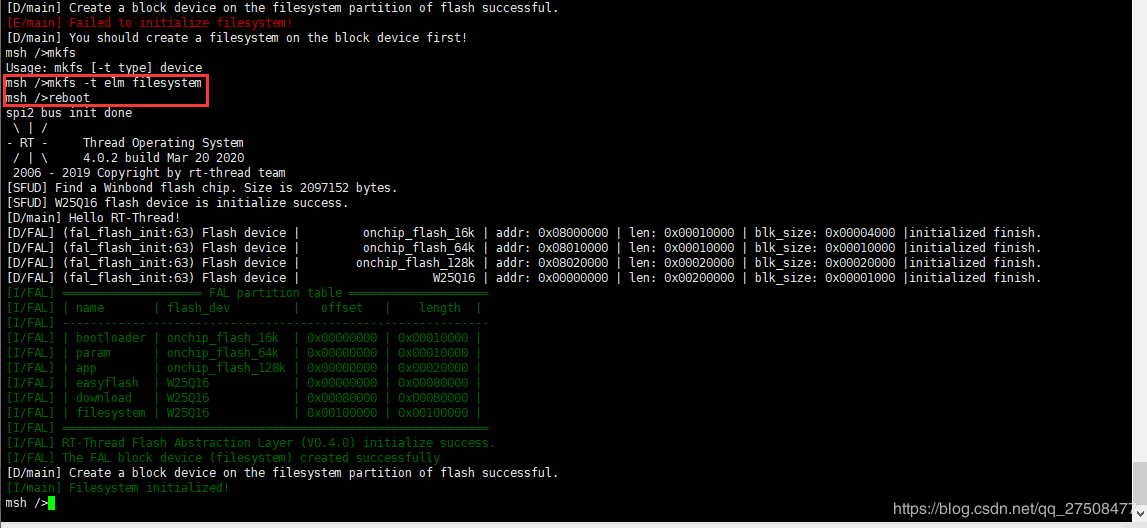
文件系统大小为1M。

作者:小盼你最萌哒