greenDao数据库框架+Retrofit2框架+RxJava
添加所需要的相关依赖
作者:爱喝阔落的猫
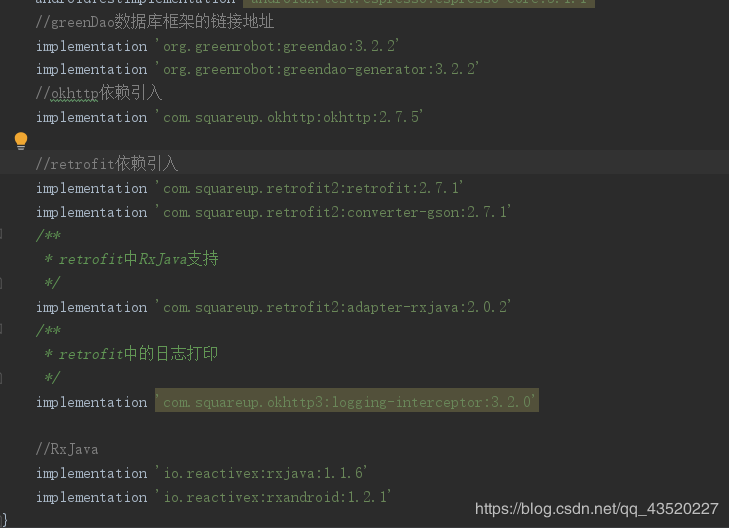
在build.gradle中添加依赖
接着配置greenDao环境:
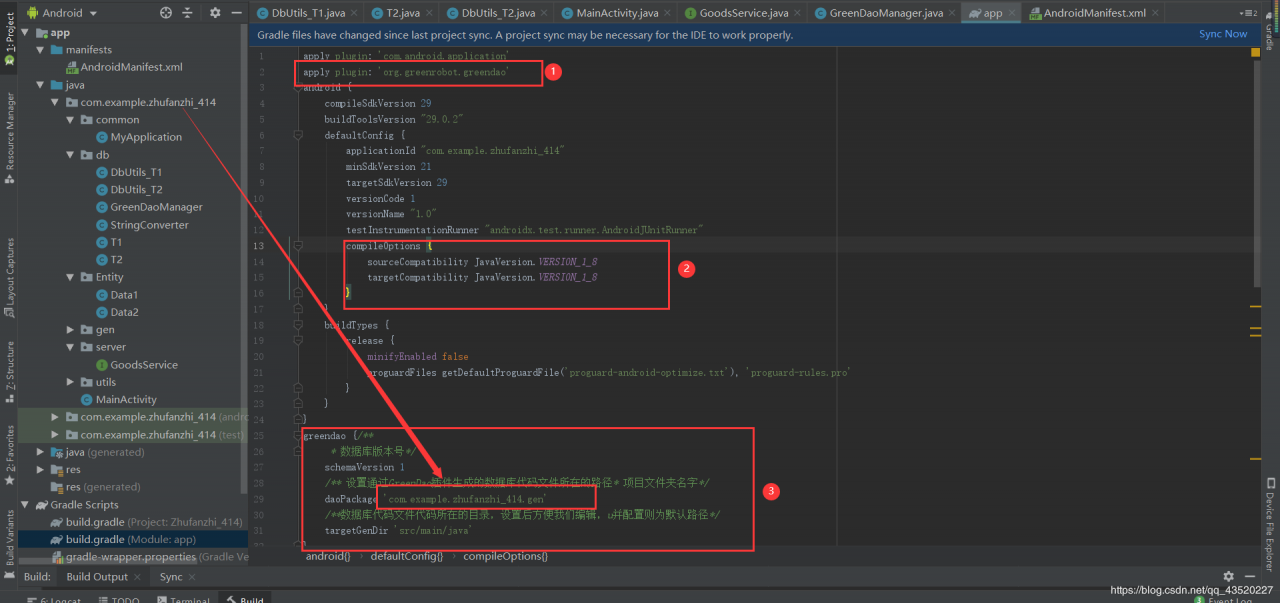
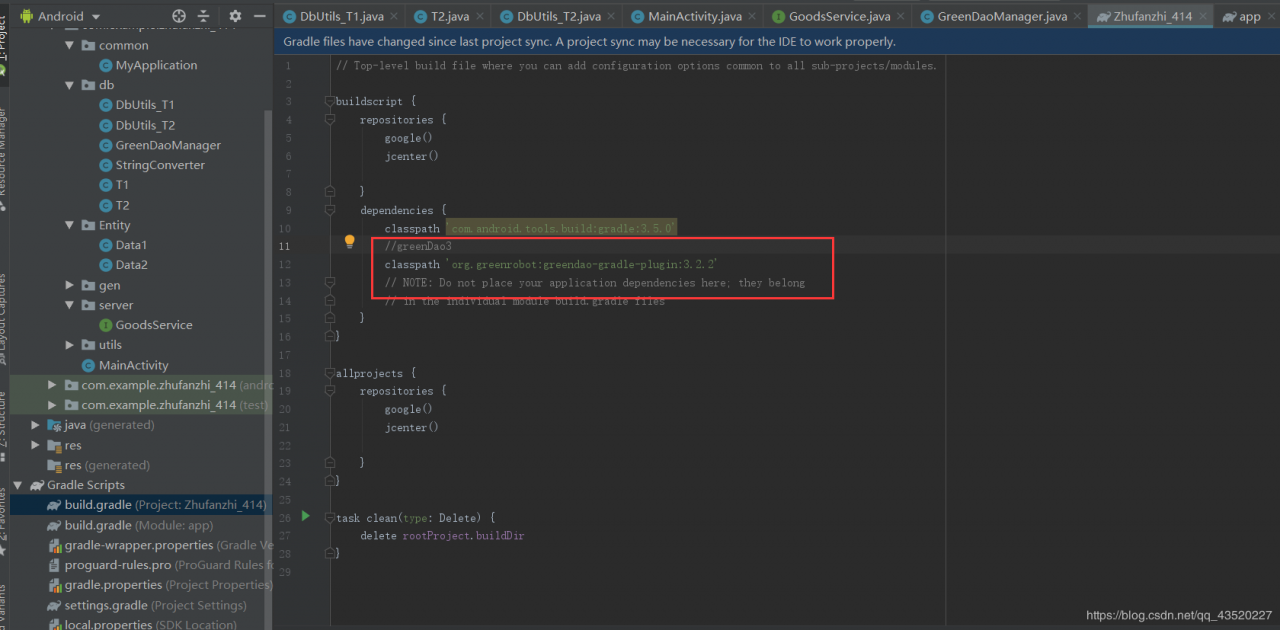
配置完我们就可以上代码了:
package com.example.zhufanzhi_414;
import androidx.appcompat.app.AppCompatActivity;
import retrofit2.Retrofit;
import retrofit2.adapter.rxjava.RxJavaCallAdapterFactory;
import retrofit2.converter.gson.GsonConverterFactory;
import rx.Observable;
import rx.Observer;
import rx.android.schedulers.AndroidSchedulers;
import rx.schedulers.Schedulers;
import android.os.Bundle;
import android.util.Log;
import com.example.zhufanzhi_414.Entity.Data1;
import com.example.zhufanzhi_414.Entity.Data2;
import com.example.zhufanzhi_414.db.DbUtils_T1;
import com.example.zhufanzhi_414.db.DbUtils_T2;
import com.example.zhufanzhi_414.db.T1;
import com.example.zhufanzhi_414.db.T2;
import com.example.zhufanzhi_414.server.GoodsService;
import com.example.zhufanzhi_414.utils.Constants;
import com.example.zhufanzhi_414.utils.Entity;
import java.util.ArrayList;
import java.util.List;
public class MainActivity extends AppCompatActivity {
    @Override
    protected void onCreate(Bundle savedInstanceState) {
        super.onCreate( savedInstanceState );
        setContentView( R.layout.activity_main );
        testGetGoodsDetail();
    }
    private void testGetGoodsDetail() {
        Retrofit retrofit = new Retrofit.Builder()
                .baseUrl( Constants.BASE_URL1 )//设置访问网络地址
                .addConverterFactory( GsonConverterFactory.create() )//设置解析方式为Gson
                .addCallAdapterFactory( RxJavaCallAdapterFactory.create() )
                .build();
        GoodsService services = retrofit.create( GoodsService.class );
        Observable observable = services.getkey( "admin", "123456" );//链接一
        observable.subscribeOn( Schedulers.io() )
                .observeOn( AndroidSchedulers.mainThread() )
                .subscribe( new Observer() {
                    @Override
                    public void onCompleted() {
                    }
                    @Override
                    public void onError(Throwable e) {
                    }
                    @Override
                    public void onNext(Data1 data1) {
//                        Log.i( "获取数据1====>" ,"flag="+data1.isFlag());
//                        Log.i( "获取数据1====>" ,"apiUrl="+data1.getApiUrl());
//                        Log.i( "获取数据1====>" ,"aesKey="+data1.getAesKey());
//                        Log.i( "获取数据1====>" ,"user="+data1.getUser().toString());
//                        Log.i( "获取数据1====>" ,"cust="+data1.getCust());
//                        Log.i( "获取数据1====>" ,"errorMsg="+data1.getErrorMsg());
                        DbUtils_T1 db=new DbUtils_T1(MainActivity.this  );
                        T1 t1=new T1(  );
                        t1.setData1_aesKey(data1.getAesKey()+"");
                        t1.setData1_apiUrl(data1.getApiUrl()+"");
                        t1.setData1_flag(data1.isFlag());
                        t1.setData1_cust(data1.getCust()+"");
                        t1.setData1_errorMsg(data1.getErrorMsg()+"");
                        t1.setData1_user(data1.getUser().toString()+"");
                        db.insert( t1 );
                        db.selectAllDate();
                    }
                } );
        Observable observable1=services.get();//链接二
        observable1.subscribeOn( Schedulers.io() )
                .observeOn( AndroidSchedulers.mainThread() )
                .subscribe( new Observer() {
                    @Override
                    public void onCompleted() {
                    }
                    @Override
                    public void onError(Throwable e) {
                    }
                    @Override
                    public void onNext(Data2 data2) {
//                        Log.i( "获取数据2====>", "flag=" + data2.isFlag() );
//                        Log.i( "获取数据2====>", "errorMsg=" + data2.getErrorMsg() );
////                        Log.i( "获取数据====>" ,"list="+data2.getList().toString());
//                        for (int i = 0; i ", data2.getList().get( i ).getDes() );
////                            Log.i( "获取数据2====>", data2.getList().get( i ).getLink_name() );
//                        }
                        DbUtils_T2 db=new DbUtils_T2(MainActivity.this  );
                        for (int i =0;i<data2.getList().size();i++){
                            T2 t2=new T2(null,
                                    data2.getList().get( i ).getDes()+"",
                                    data2.getList().get( i ).getLink_tel()+"",
                                    data2.getList().get( i ).getType_def()+"",
                                    data2.getList().get( i ).getName()+"",
                                    data2.getList().get( i ).getId(),
                                    data2.getList().get( i ).getLink_name()+"",
                                    data2.getList().get( i ).getNo_prefix()+""
                            );
                            db.insert( t2 );
                        }
                        db.selectAllDate();
                    }
                } );
    }
}
添加权限
所需要的注解以及接口公共类:
package com.example.zhufanzhi_414.server;
import rx.Observable;
import com.example.zhufanzhi_414.Entity.Data1;
import com.example.zhufanzhi_414.Entity.Data2;
import com.example.zhufanzhi_414.utils.Entity;
import java.util.Map;
import retrofit2.Call;
import retrofit2.http.Field;
import retrofit2.http.FieldMap;
import retrofit2.http.FormUrlEncoded;
import retrofit2.http.GET;
import retrofit2.http.POST;
import retrofit2.http.Query;
import retrofit2.http.QueryMap;
public interface GoodsService {
    String getUrl = "filemgt/api/user/checklogin";
    String postUrl = "filemgt/api/user/checklogin";
    //链接一
    @GET(getUrl)
    Observable getkey(
            /**
             *  传递参数的Get请求
             */
            @Query("username") String username,
            @Query("password") String password
    );
    /**
     * 封装好Url的Get的请求
     *
     * @return
     */
    //链接二
//    @GET(getUrl+"?key=488c65f3230c0280757b50686d1f1cd5&&sort=asc&&time=1418816972")
    @GET("filemgt/api/basic/getCorpList")
    Observable get();
    /**
     * 传递Map键值对的Get请求
     **/
    @GET(getUrl)
    Call getmap(@QueryMap Map params);
    /**传递参数的Post请求
     */
    @FormUrlEncoded
    @POST(postUrl)
    Call postkey(@Field("key") String key, @Field("sort") String sort, @Field("time") String time);
    /**
     ** 传递Map键值对的Post请求
     */
    @FormUrlEncoded
    @POST(postUrl)
    Call postmap(@FieldMap Map map);//
}
接口:
package com.example.zhufanzhi_414.utils;
/**
 * 常量数据类一般会放一些项目中公共的经常使用的数据。比如网络接口调用时的公共url;
 */
public class Constants {
    //http://47.102.217.172:8088/filemgt/api/user/checklogin?username=admin&password=123456
    public static  String BASE_URL1="http://47.102.217.172:8088/";
}
接着我们还需要初始化greenDao
package com.example.zhufanzhi_414.common;
import android.app.Application;
import android.content.Context;
import com.example.zhufanzhi_414.db.GreenDaoManager;
public class MyApplication extends Application {
    private  static Context mContext;
    @Override
    public void onCreate() {
        super.onCreate();
        //初始化mContext
        mContext=getApplicationContext();
        //GreenDao全局初始化,只初始化一次防止多次初始化
        GreenDaoManager.getInstance();
        //全局化初始化Retrofit公共类
//        HttpMethods.getInstance();
    }
    public  static  Context getContext(){
        return mContext;
    }
}
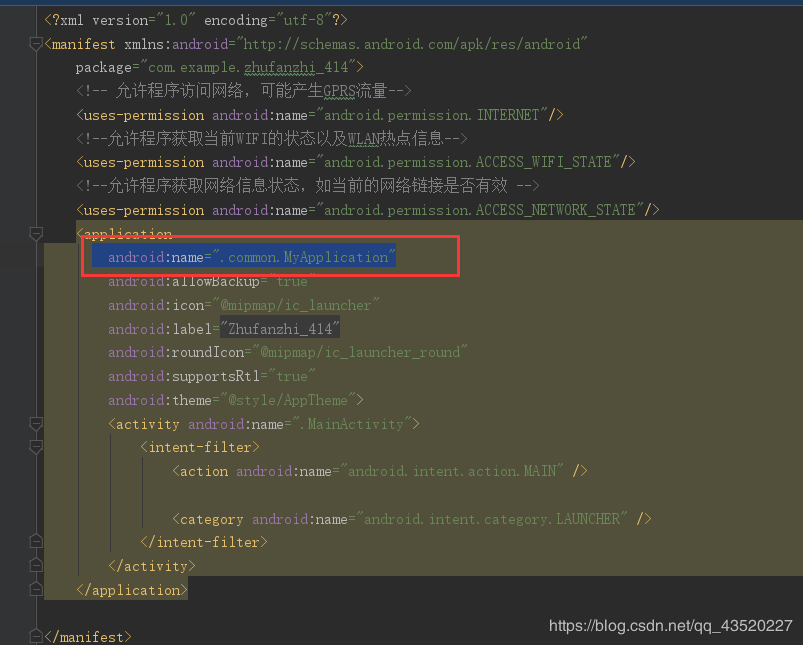
并在manifests中挂载
建立相应的数据表
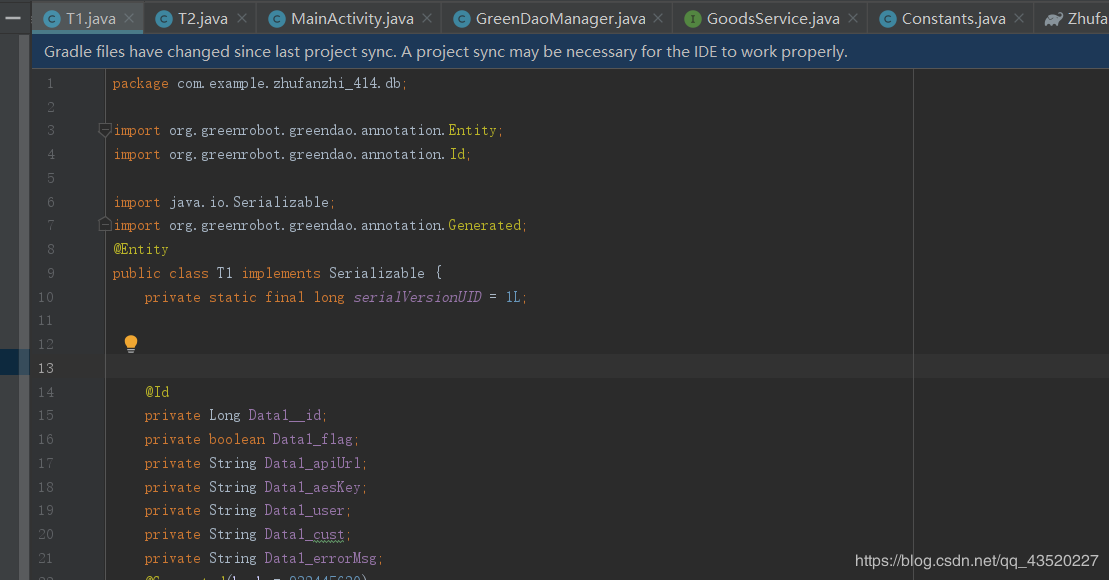
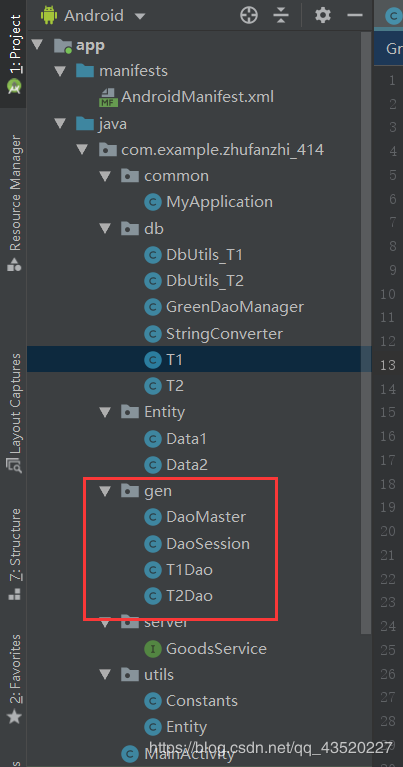
建立完表之后点击

就会生成相应的数据库Dao类文件了:
接着我们还需要数据库管理类
package com.example.zhufanzhi_414.db;
import com.example.zhufanzhi_414.common.MyApplication;
import com.example.zhufanzhi_414.gen.DaoMaster;
import com.example.zhufanzhi_414.gen.DaoSession;
public class GreenDaoManager {
    private  static  GreenDaoManager mInstance;
    private  static DaoMaster mDaoMaster;
    private static DaoSession mDaoSession;
    public GreenDaoManager(){
        if (mInstance==null){
            /**
             * 初始化并设置数据库名 MyApplication 全局类
             */
            DaoMaster.DevOpenHelper devOpenHelper=new DaoMaster.DevOpenHelper( MyApplication.getContext(),"ZhuFanzhidb",null );
            mDaoMaster=new DaoMaster( devOpenHelper.getWritableDatabase() );
            mDaoSession=mDaoMaster.newSession();
        }
    }
    public  static  GreenDaoManager getInstance(){
        if (mInstance==null){
            synchronized (GreenDaoManager.class){
                if (mInstance==null){
                    mInstance=new GreenDaoManager();
                }
            }
        }
        return  mInstance;
    }
    public  static DaoMaster getMaster(){
        return mDaoMaster;
    }
    public  static  DaoSession getSession(){
        return  mDaoSession;
    }
    public  static DaoSession getNewSession(){
        mDaoSession=mDaoMaster.newSession( );
        return  mDaoSession;
    }
}
增加Dao类管理类:
package com.example.zhufanzhi_414.db;
import android.content.Context;
import android.util.Log;
import com.example.zhufanzhi_414.gen.T1Dao;
import java.util.List;
public class DbUtils_T1 {
    private Context context;
    private T1Dao t1Dao;
    public DbUtils_T1(Context context){
        this.context=context;
        t1Dao=GreenDaoManager.getInstance().getSession().getT1Dao();
    }
    /**
     *
     * @param t1
     */
    public void insert(T1 t1) {
        t1Dao.getSession().insertOrReplace(t1);
    }
    /**
     *
     * @return
     * 查询所有数据
     */
    //查询所有数据
    public List selectAllDate(){
        List t1List = t1Dao.loadAll();
        for (T1  t1 : t1List) {
            Log.i("======", "===test1数据查询结果=====" + t1.toString());
        }
        return  t1List;
    }
    //查询两条数据
//    public  List selectTwoDate(){
//
//            //查询构建器
//            QueryBuilder builder = categoryDao.getSession().queryBuilder( Category.class );
//            List list = builder.where( CategoryDao.Properties.Sex.ge(1)).where( CategoryDao.Properties.Username.like("增加商品1")).list();
        /**
         * whereOr语句相当于select *from where name like ? or name = ? or age>?
         * ge是 >= 、like 则是包含的意思
         * whereOr是或的意思,比如下面的whereOr的意思就是age>=22||name 包含 张三
         * where则是age>=22 && name 包含 张三
         *greenDao除了ge和like操作之外还有很多其他方法
         * eq == 、 noteq != 、  gt >  、lt <  、le  <=  、between 俩者之间
         * in  在某个值内   、notIn  不在某个值内
         */
//        List list=builder.where( CategoryDao.Properties.Marjectkey.le( 2 )).list();
//        for (Category cate:list){
//            Log.i( "读出两条数据",cate.toString());
//        }
//            return list;
//
//
//    }
    /**
     * 根据自增id来查询
     * @param id
     * @return
     */
    public  T1 selectByID(Long id){
        return  t1Dao.load( id );
    }
    /**
     * 删除指定ID数据
     * @param id
     */
    public  void  deleteDataByID(Long id){
        t1Dao.deleteByKey( id );
    }
    /**
     * 数据库数据更新
     * 注意:我们以前操作数据库更新时,都是根据SQL语言,指定更新对应字段,这边由于使用GreenDao框架,会
     * 帮我们检索长传的对应类哪些字段的改变进行更新
     * @param t1
     */
    public  void  update(T1 t1){
        t1Dao.update( t1 );
    }
}
完整代码就是以上了。此博客仅用于自己每天学习
最后,感谢阅读,卖个萌o(∩_∩)o 哈哈!
作者:爱喝阔落的猫