Android实现RecyclerView嵌套流式布局的详细过程
目录
前言
实现过程
效果
总结
前言Android开发中,列表页面是常见需求,流式布局的标签效果也是常见需求,那么两者结合的效果啥样呢?这篇文章简单实现一下。
实现过程添加流式布局依赖,在app/build.gradle文件中添加如下代码
implementation 'com.google.android.flexbox:flexbox:3.0.0'
新建Activity文件RecyclerViewActivity.class
package com.example.androidstudy;
import androidx.appcompat.app.AppCompatActivity;
import androidx.recyclerview.widget.LinearLayoutManager;
import androidx.recyclerview.widget.RecyclerView;
import android.os.Bundle;
import android.widget.Toast;
import com.example.androidstudy.adapter.MyRecyclerAdapter;
import com.example.androidstudy.bean.TestData;
import java.util.ArrayList;
import java.util.List;
public class RecyclerViewActivity extends AppCompatActivity {
    private RecyclerView recyclerView;
    private MyRecyclerAdapter adapter;
    @Override
    protected void onCreate(Bundle savedInstanceState) {
        super.onCreate(savedInstanceState);
        setContentView(R.layout.activity_recycler_view);
        initViews();
        initListener();
    }
    private void initListener() {
        adapter.setItemCellClicker(tag -> Toast.makeText(RecyclerViewActivity.this, tag, Toast.LENGTH_SHORT).show());
    }
    private void initViews() {
        recyclerView = findViewById(R.id.recyclerview);
        // 设置布局管理器
        recyclerView.setLayoutManager(new LinearLayoutManager(this, LinearLayoutManager.VERTICAL, false));
        List<String> sss = new ArrayList<>();
        sss.add("重型卡车1");
        sss.add("重车11");
        sss.add("重型卡车3445");
        sss.add("重型卡车6677");
        List<String> sss1 = new ArrayList<>();
        sss1.add("轻型卡车1");
        sss1.add("轻车11");
        sss1.add("轻型卡车3445");
        sss1.add("轻型卡车6677");
        List<String> sss2 = new ArrayList<>();
        sss2.add("其他1");
        sss2.add("其他2");
        List<TestData> list = new ArrayList<>();
        list.add(new TestData("重型",sss));
        list.add(new TestData("轻型", sss1));
        list.add(new TestData("其他", sss2));
        // 实例化Adapter对象
        adapter = new MyRecyclerAdapter(this, list);
        // 设置Adapter
        recyclerView.setAdapter(adapter);
        adapter.notifyDataSetChanged();
    }
}
Activity页面布局activity_recycler_view.xml
<?xml version="1.0" encoding="utf-8"?>
<androidx.constraintlayout.widget.ConstraintLayout xmlns:android="http://schemas.android.com/apk/res/android"
    xmlns:app="http://schemas.android.com/apk/res-auto"
    xmlns:tools="http://schemas.android.com/tools"
    android:layout_width="match_parent"
    android:layout_height="match_parent"
    tools:context=".RecyclerViewActivity">
    <androidx.recyclerview.widget.RecyclerView
        android:id="@+id/recyclerview"
        android:layout_width="match_parent"
        android:layout_height="match_parent"/>
</androidx.constraintlayout.widget.ConstraintLayout>
创建Adapter文件MyRecyclerAdapter.class
package com.example.androidstudy.adapter;
import android.content.Context;
import android.view.LayoutInflater;
import android.view.View;
import android.view.ViewGroup;
import android.widget.TextView;
import androidx.annotation.NonNull;
import androidx.recyclerview.widget.RecyclerView;
import com.example.androidstudy.R;
import com.example.androidstudy.bean.TestData;
import com.google.android.flexbox.FlexboxLayout;
import java.util.List;
public class MyRecyclerAdapter extends RecyclerView.Adapter<MyRecyclerAdapter.MyViewHolder>{
    private List<TestData> data;
    private Context myContext;
    public MyRecyclerAdapter(Context context, List<TestData> data) {
        this.myContext = context;
        this.data = data;
    }
    @NonNull
    @Override
    public MyViewHolder onCreateViewHolder(@NonNull ViewGroup parent, int viewType) {
        View inflate = LayoutInflater.from(parent.getContext()).inflate(R.layout.item_cell, parent, false);
        return new MyViewHolder(inflate);
    }
    public interface ItemCellClicker{
        void onItemClick(String tag);
    }
  // 流式布局标签点击事件
    public ItemCellClicker itemCellClicker;
  // 设置点击事件回调
    public void setItemCellClicker(ItemCellClicker itemCellClicker){
        this.itemCellClicker = itemCellClicker;
    }
    @Override
    public void onBindViewHolder(@NonNull MyViewHolder holder, int position) {
        TextView title = holder.itemView.findViewById(R.id.tv_title);
        FlexboxLayout flexboxLayout = holder.itemView.findViewById(R.id.flexbox_layout);
        TestData data = this.data.get(position);
        List<String> tags = data.getTag();
        flexboxLayout.removeAllViews();
        // flexbox布局动态添加标签
        for (int i = 0; i < tags.size(); i++) {
            String temp = tags.get(i);
            View tagView = LayoutInflater.from(myContext).inflate(R.layout.item_tag_cell, null, false);
            TextView tag = tagView.findViewById(R.id.tv_tag);
            tag.setText(temp);
            // 设置标签点击事件
            tag.setOnClickListener(view -> itemCellClicker.onItemClick(temp));
            flexboxLayout.addView(tagView);
        }
        title.setText(data.getTitle());
    }
    @Override
    public int getItemCount() {
        return data.size();
    }
    public static class MyViewHolder extends RecyclerView.ViewHolder{
        public MyViewHolder(@NonNull View itemView) {
            super(itemView);
        }
    }
}
列表项布局item_cell.xml
<?xml version="1.0" encoding="utf-8"?>
<LinearLayout xmlns:android="http://schemas.android.com/apk/res/android"
    xmlns:app="http://schemas.android.com/apk/res-auto"
    xmlns:tools="http://schemas.android.com/tools"
    android:layout_width="match_parent"
    android:layout_height="wrap_content"
    android:orientation="vertical"
    android:padding="10dp"
    tools:context=".MyActivity">
    <TextView
        app:layout_constraintTop_toTopOf="parent"
        app:layout_constraintLeft_toLeftOf="parent"
        android:id="@+id/tv_title"
        android:text="Hello android"
        android:textSize="20sp"
        android:textColor="@color/black"
        android:layout_width="wrap_content"
        android:layout_height="wrap_content"/>
    <!--流式布局-->
    <com.google.android.flexbox.FlexboxLayout
        android:id="@+id/flexbox_layout"
        android:orientation="horizontal"
        app:flexWrap="wrap"
        android:layout_width="match_parent"
        android:layout_height="wrap_content"/>
</LinearLayout>
列表中标签布局item_tag_cell.xml
<LinearLayout xmlns:android="http://schemas.android.com/apk/res/android"
    xmlns:app="http://schemas.android.com/apk/res-auto"
    xmlns:tools="http://schemas.android.com/tools"
    android:layout_width="match_parent"
    android:layout_height="wrap_content"
    android:padding="10dp"
    tools:context=".MyActivity">
    <TextView
        android:id="@+id/tv_tag"
        android:paddingHorizontal="12dp"
        android:background="@drawable/item_tag_bg"
        android:gravity="center"
        android:text="Hello android"
        android:textSize="20sp"
        android:textColor="@color/black"
        android:layout_width="wrap_content"
        android:layout_height="32dp"/>
</LinearLayout>
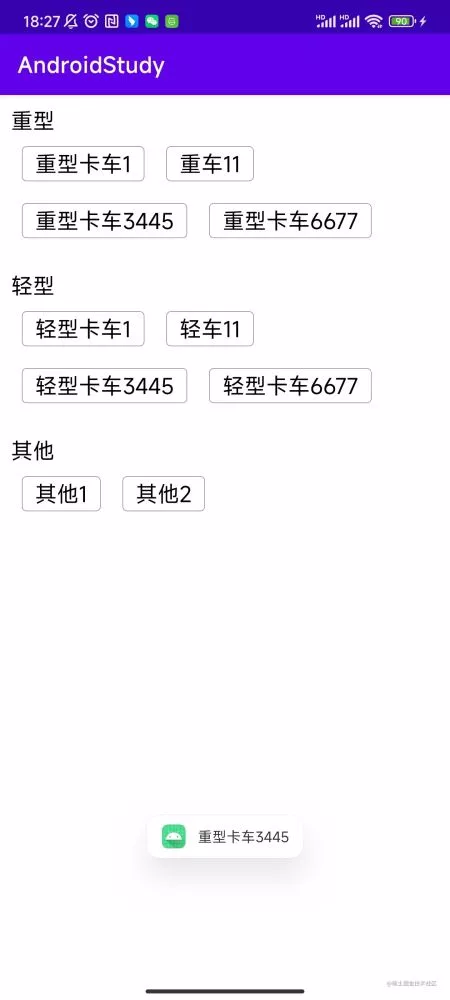
效果
到此这篇关于Android实现RecyclerView嵌套流式布局的文章就介绍到这了,更多相关Android RecyclerView嵌套流式布局内容请搜索软件开发网以前的文章或继续浏览下面的相关文章希望大家以后多多支持软件开发网!