一起写一个即插即用的Vue Loading插件实现
无论最终要实现怎样的网站,Loading状态都是必不可少的一环,给用户一个过渡喘息的机会也给服务器一个递达响应的时间。
从使用方式说起
不管从0开始写起还是直接下载的Loading插件,都会抽象为一个组件,在用到的时候进行加载Loading,或者通过API手动进行show或者hide
<wait>
</wait>
...
this.$wait.show()
await fetch('http://example.org')
this.$wait.hide()
或者通过Loading状态进行组件间的切换
<loader v-if="isLoading">
</loader>
<Main v-else>
</Main>
。要想注册成全局状态,还需要给axios类的网络请求包添加拦截器,然后设置一个全局Loading状态,每次有网络请求或者根据已经设置好的URL将Loading状态设置为加载,请求完成后在设置为完成。
注册axios拦截器:
 let loadingUrls = [
  `${apiUrl}/loading/`,
  `${apiUrl}/index/`,
  `${apiUrl}/comments/`,
  ...
 ]
 axios.interceptors.request.use((config) => {
  let url = config.url
  if (loadingUrls.indexOf('url') !== -1) {
   store.loading.isLoading = true
  }
 })
 axios.interceptors.response.use((response) => {
  let url = response.config.url
  if (loadingUrls.indexOf('url') !== -1) {
   store.loading.isLoading = false
  }
 })
使用时在每个组件下获取出loading状态,然后判断什么时候显示loading,什么时候显示真正的组件。
<template>
 <div>
 <loader v-if="isLoading">
 </loader>
 <Main v-else>
 </Main>
 </div>
 </template>
 <script>
 ...
 components: {
  loader
 },
 computed: {
  isLoading: this.$store.loading.isLoading
 },
 async getMainContent () {
  // 实际情况下State仅能通过mutations改变.
  this.$sotre.loading.isLoading = false
  await axios.get('...')
  this.$sotre.loading.isLoading = false
 },
 async getMain () {
  await getMainContent()
 }
 ...
 </script>
在当前页面下只有一个需要Loading的状态时使用良好,但如果在同一个页面下有多个不同的组件都需要Loading,你还需要根据不同组件进行标记,好让已经加载完的组件不重复进入Loading状态...随着业务不断增加,重复进行的Loading判断足以让人烦躁不已...
整理思路
Loading的核心很简单,就是请求服务器时需要显示Loading,请求完了再还原回来,这个思路实现起来并不费力,只不过使用方式上逃不开上面的显式调用的方式。顺着思路来看,能进行Loading设置的地方有,
设置全局拦截,请求开始前设置状态为加载。 设置全局拦截,请求结束后设置状态为完成。 在触发请求的函数中进行拦截,触发前设置为加载,触发后设置为完成。 判断请求后的数据是否为非空,如果非空则设置为完成最终可以实现的情况上,进行全局拦截设置,然后局部的判断是最容易想到也是最容易实现的方案。给每个触发的函数设置before和after看起来美好,但实现起来简直是灾难,我们并没有before和after这两个函数钩子来告诉我们函数什么时候调用了和调用完了,自己实现吧坑很多,不实现吧又没得用只能去原函数里一个个写上。只判断数据局限性很大,只有一次机会。
既然是即插即用的插件,使用起来就得突出一个简单易用,基本思路上也是使用全局拦截,但局部判断方面与常规略有不同,使用数据绑定(当然也可以再次全局响应拦截),咱们实现起来吧~。
样式
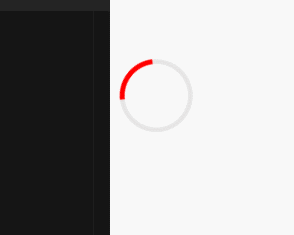
Loading嘛,必须得有一个转圈圈才能叫Loading,样式并不是这个插件的最主要的,这里直接用CSS实现一个容易实现又不显得很糙的:
<template>
 <div class="loading">
 </div>
</template>
...
<style scoped>
.loading {
 width: 50px;
 height: 50px;
 border: 4px solid rgba(0,0,0,0.1);
 border-radius: 50%;
 border-left-color: red;
 animation: loading 1s infinite linear;
}
@keyframes loading {
 0% { transform: rotate(0deg) }
 100% { transform: rotate(360deg) }
}
</style>
固定大小50px的正方形,使用border-radius把它盘得圆润一些,border设置个进度条底座,border-left-color设置为进度条好了。
演示地址

绑定数据与URL
提供外部使用接口
上面思路中提到,这个插件是用全局拦截与数据绑定制作的:
暴露一个 source 属性,从使用的组件中获取出要绑定的数据。 暴露一个 urls 属性,从使用的组件中获取出要拦截的URL。
<template>
  ...
</template>
<script>
export default {
  props: {
    source: {
      require: true
    },
    urls: {
      type: Array,
      default: () => { new Array() }
    }
  },
  data () {
    return { isLoading: true }
  },
  watch: {
    source: function () {
      if (this.source) {
        this.isLoading = false
      }
    }
  }
}
</script>
<style scoped>
....
</style>
不用关心source是什么类型的数据,我们只需要监控它,每次变化时都将Loading状态设置为完成即可,urls我们稍后再来完善它。
设置请求拦截器
拦截器中需要的操作是将请求时的每个URL压入一个容器内,请求完再把它删掉。
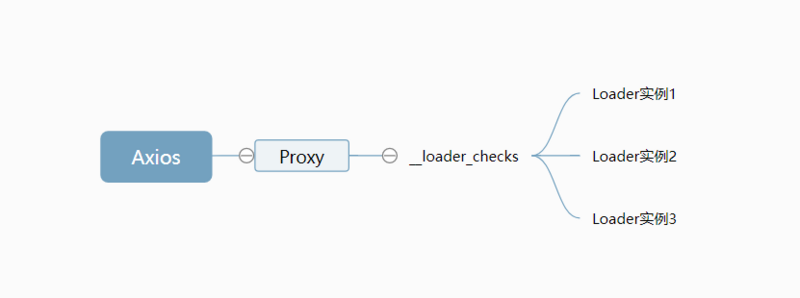
Vue.prototype.__loader_checks = []
Vue.prototype.$__loadingHTTP = new Proxy({}, {
  set: function (target, key, value, receiver) {
    let oldValue = target[key]
    if (!oldValue) {
      Vue.prototype.__loader_checks.forEach((func) => {
        func(key, value)
      })
    }
    return Reflect.set(target, key, value, receiver)
  }
})
axios.interceptors.request.use(config => {
  Vue.prototype.$__loadingHTTP[config.url] = config
  return config
})
axios.interceptors.response.use(response => {
  delete Vue.prototype.$__loadingHTTP[response.config.url]
  return response
})
将其挂载在Vue实例上,方便我们之后进行调用,当然还可以用Vuex,但此次插件要突出一个依赖少,所以Vuex还是不用啦。
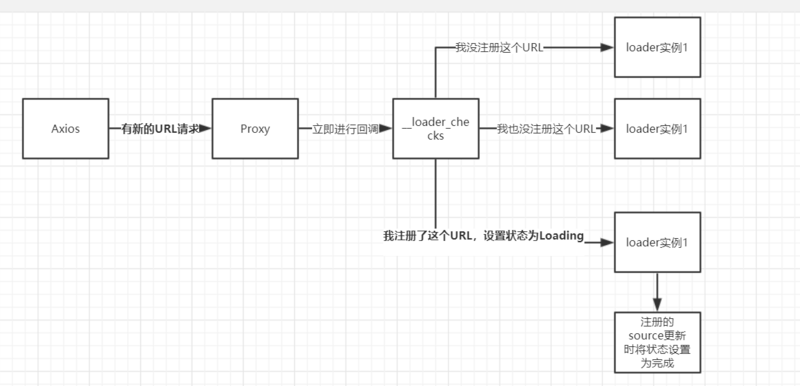
直接挂载在Vue上的数据不能通过computed或者watch来监控数据变化,咱们用Proxy代理拦截set方法,每当有请求URL压入时就做点什么事。Vue.prototype.__loader_checks用来存放哪些实例化出来的组件订阅了请求URL时做加载的事件,这样每次有URL压入时,通过Proxy来分发给订阅过得实例化Loading组件。

订阅URL事件
<template>
  ...
</template>
<script>
export default {
  props: {
    source: {
      require: true
    },
    urls: {
      type: Array,
      default: () => { new Array() }
    }
  },
  data () {
    return { isLoading: true }
  },
  watch: {
    source: function () {
      if (this.source) {
        this.isLoading = false
      }
    }
  },
  mounted: function () {
    if (this.urls) {
      this.__loader_checks.push((url, config) => {
        if (this.urls.indexOf(url) !== -1) {
          this.isLoading = true
        }
      })
    }
  }
}
</script>
<style scoped>
....
</style>
每一个都是一个崭新的实例,所以直接在mounted里订阅URL事件即可,只要有传入urls,就对__loader_checks里每一个订阅的对象进行发布,Loader实例接受到发布后会判断这个URL是否与自己注册的对应,对应的话会将自己的状态设置回加载,URL请求后势必会引起数据的更新,这时我们上面监控的source就会起作用将加载状态设置回完成。

使用槽来适配原来的组件
写完上面这些你可能有些疑问,怎么将Loading时不应该显示的部分隐藏呢?答案是使用槽来适配,
<template>
  <div>
    <div class="loading" v-if="isLoading" :key="'loading'">
    </div>
    <slot v-else>
    </slot>
  </div>
</template>
<script>
export default {
  props: {
    source: {
      require: true
    },
    urls: {
      type: Array,
      default: () => { new Array() }
    }
  },
  data () {
    return { isLoading: true }
  },
  watch: {
    source: function () {
      if (this.source) {
        this.isLoading = false
      }
    }
  },
  mounted: function () {
    if (this.urls) {
      this.__loader_checks.push((url, config) => {
        if (this.urls.indexOf(url) !== -1) {
          this.isLoading = true
        }
      })
    }
  }
}
</script>
<style scoped>
....
</style>
还是通过isLoading判断,如果处于加载那显示转圈圈,否则显示的是父组件里传入的槽,
这里写的要注意,Vue这里有一个奇怪的BUG,
  <div class="loading" v-if="isLoading" :key="'loading'">
  </div>
  <slot v-else>
  </slot>
在有<slot>时,如果同级的标签同时出现v-if与CSS选择器且样式是scoped,那用CSS选择器设置的样式将会丢失,<div v-if="isLoading" :key="'loading'">如果没有设置key那.loading的样式会丢失,除了设置key还可以把它变成嵌套的<div v-if="isLoading"> <div></div> </div>。
注册成插件
Vue中的插件有四种注册方式,这里用mixin来混入到每个实例中,方便使用,同时我们也把上面的axios拦截器也注册在这里。
import axios
import Loader from './loader.vue'
export default {
  install (Vue, options) {
    Vue.prototype.__loader_checks = []
    Vue.prototype.$__loadingHTTP = new Proxy({}, {
      set: function (target, key, value, receiver) {
        let oldValue = target[key]
        if (!oldValue) {
          Vue.prototype.__loader_checks.forEach((func) => {
            func(key, value)
          })
        }
        return Reflect.set(target, key, value, receiver)
      }
    })
    axios.interceptors.request.use(config => {
      Vue.prototype.$__loadingHTTP[config.url] = config
      return config
    })
    axios.interceptors.response.use(response => {
      delete Vue.prototype.$__loadingHTTP[response.config.url]
      return response
    })
    Vue.mixin({
      beforeCreate () {
        Vue.component('v-loader', Loader)
      }
    })
  }
}
使用
在入口文件中使用插件
import Loader from './plugins/loader/index.js'
...
Vue.use(Loader)
...
任意组件中无需导入即可使用
<v-loader :source="msg" :urls="['/']">
 <div @click="getRoot">{{ msg }}</div>
</v-loader>
根据绑定的数据和绑定的URL自动进行Loading的显示与隐藏,无需手动设置isLoading是不是该隐藏,也不用调用show与hide在请求的方法里打补丁。
测试地址
其他
上面的通过绑定数据来判断是否已经响应,如果请求后的数据不会更新,那你也可以直接在axios的response里做拦截进行订阅发布模式的响应。
最后
咳咳,又到了严(hou)肃(yan)认(wu)真(chi)求Star环节了,附上完整的项目地址(我不会告诉你上面的测试地址里的代码也很完整的,绝不会!)。