事务与连接池的基础学习
MySql事务
事务是指逻辑上的一组操作,组成这组操作的各个单元,要么全部成功,要么 全部不成功。就比如:转账,A转账给B100元,A-100,B+100,如果其中一个操作出现错误实现不了,就会形成误差,导致数据不对等。
mysql引擎是支持事务的,mysql默认自动提交事务。每条语句都处在单独的事务中。
手动控制事务
开启事务:start transaction | begin
提交事务:commit
回滚事务:rollback
事务的特性:
原子性:指事务是一个不可分割的工作单位,事务中的操作要么都发生,要么都不发生
一致性:事务必须使数据库从一个一致性状态转换到另外一个一致性状态。
隔离性:事务的隔离性是多用户并发访问数据库时,数据库为每一个用户开启的事务,不能被其他事务的操作数据所干扰,多个并发事务之间要相互隔离。
持久性:指一个事务一旦被提交,它对数据库中数据的改变就是永久性的。
JDBC演示事务:
DBCPUtil.java
作者:程序胖
		Connection conn = null;
		PreparedStatement ps = null;
		try {
			conn = DBUtils.getConnection();
			//事务开启:begin
			conn.setAutoCommit(false);
			//转账100
			ps = conn.prepareStatement("update test set money = money - 100 where name = 'lwb'");
			ps.executeUpdate();
			//收到100
			ps = conn.prepareStatement("update test set money = money + 100 where name = 'lwn'");
			ps.executeUpdate();
			//提交事务commit
			conn.commit();
		} catch (Exception e) {
			if(conn!=null){
				try {
					//回滚事务 rollback
					conn.rollback();
				} catch (SQLException e1) {
					// TODO Auto-generated catch block
					e1.printStackTrace();
				}
			}
			e.printStackTrace();
		}
事务的隔离级别
三种事务可能发生的错误:
赃读:指一个事务读取了另一个事务未提交的数据。 不可重复读:在一个事务内读取表中的某一行数据,多次读取结果不同。一个事务读取到了另一个事务提交后的数据。(update) 虚读(幻读):是指在一个事务内读取到了别的事务插入的数据,导致前后读取不一致。(insert)数据库通过设置事务的隔离级别防止以上情况的发生:
READ UNCOMMITTED: 赃读、不可重复读、虚读都有可能发生。 READ COMMITTED: 避免赃读。不可重复读、虚读都有可能发生。(oracle默认的) REPEATABLE READ:避免赃读、不可重复读。虚读有可能发生。(mysql默认) SERIALIZABLE: 避免赃读、不可重复读、虚读。 级别越高,性能越低,数据越安全(加粗的就是避免的,斜体的就是有可能法发生的)JDBC设置隔离等级:
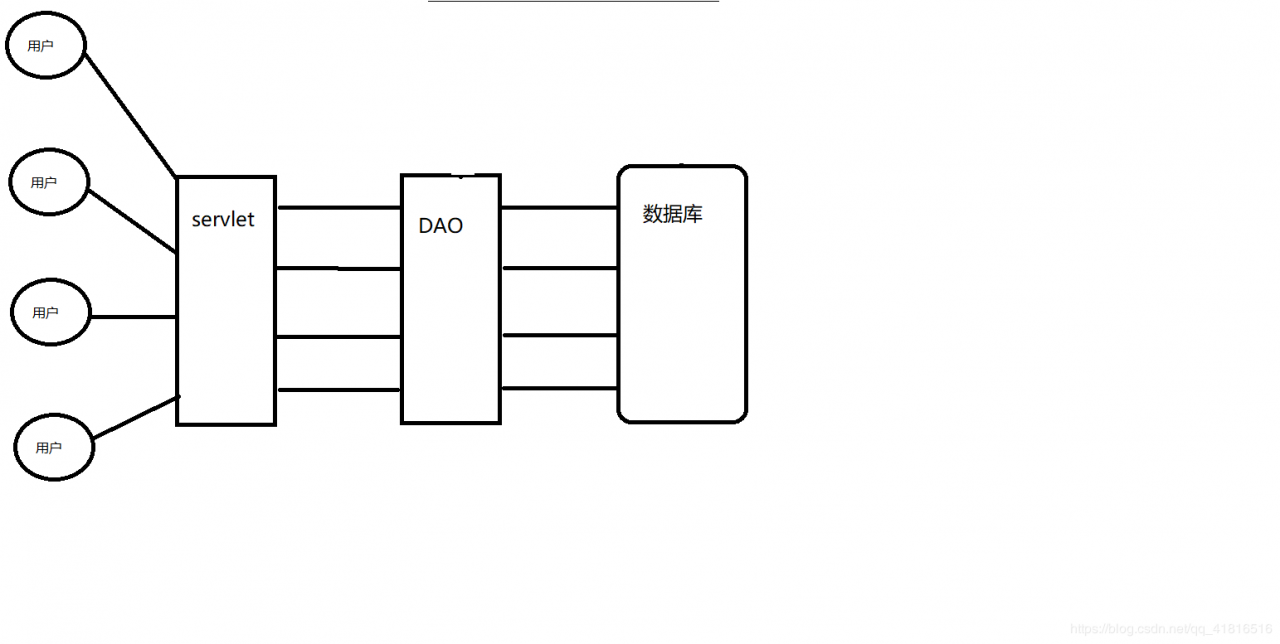
Connection接口 Connection.setTransactionIsolation(int level); level: TRANSACTION_READ_UNCOMMITTED TRANSACTION_READ_COMMITTED TRANSACTION_REPEATABLE_READ TRANSACTION_SERIALIZABLE 连接池一开始没有使用连接池的时候是这样子的:
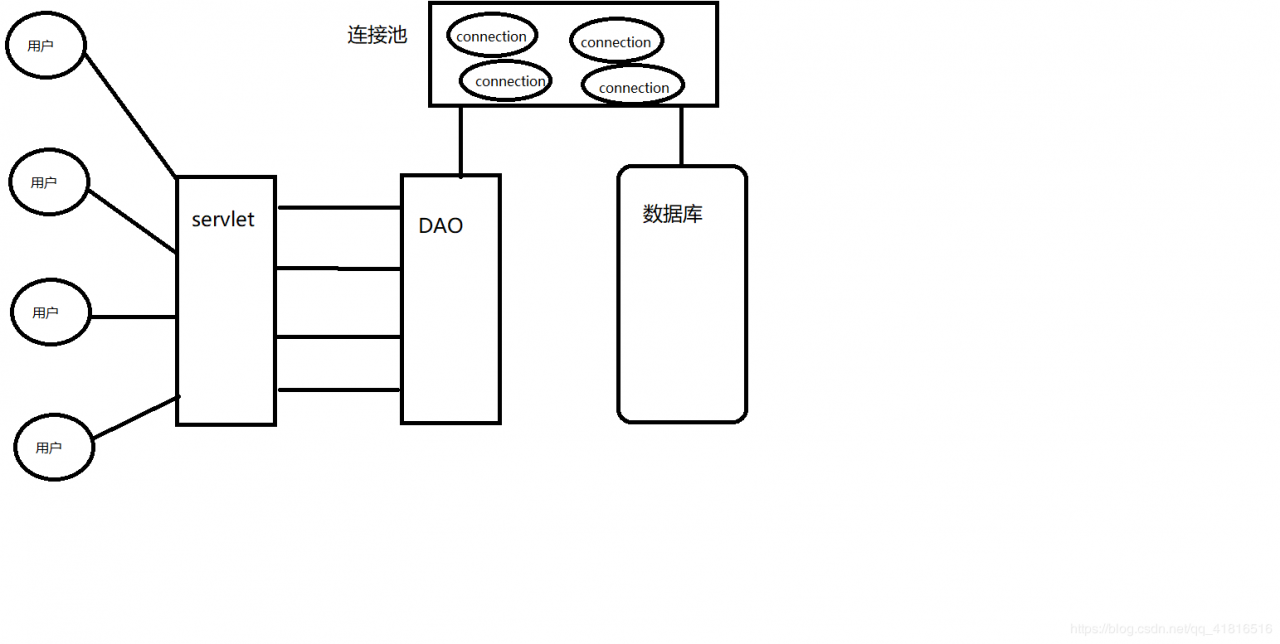
每次访问就要建立一个Connection对象连接,浪费资源
如果有连接池,就可以通过连接池来连接,用完了就可以用连接池回收,不需要老是创建连接

模拟连接池:
自定义数据库连接池要实现javax.sql.DataSource接口,一般这样都叫数据源。
public class MyDataSource implements DataSource{
	 //创建一个存放连接的池子
	private static LinkedList pool = (LinkedList) Collections.synchronizedList(new LinkedList());
	//初始化10个连接
	static{
			try {
				for (int i = 0; i 0){
			conn =  pool.removeFirst();//从池中取出一个连接
			return conn;
		}else{
			//等待
			//新创建一个连接
			throw new RuntimeException("服务器忙。。。");
		}
	}
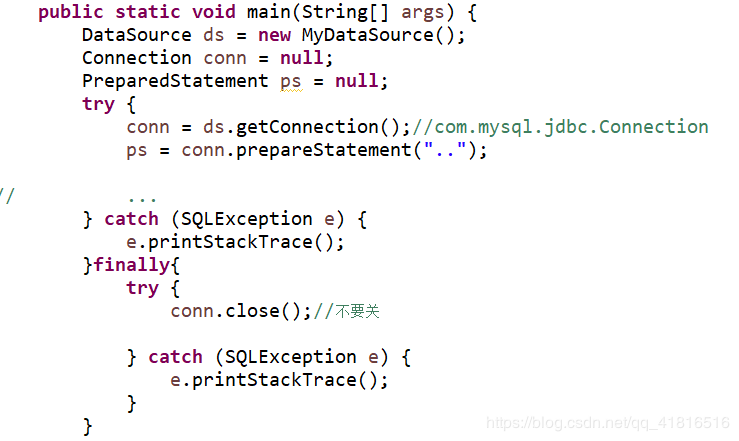
但是在使用的时候就有问题:
在最后的conn是不能被关闭的,是要返回给连接池的,但是ds里面没有这样的方法。

所以就介绍两种模式:
public class MyConnection implements Connection{//实现Connection接口
	private Connection oldConnection;//com.mysql.jdbc.Connection
	private LinkedList pool;//连接池对象
	public MyConnection(Connection oldConnection,LinkedList pool){
		this.oldConnection = oldConnection;//得到com.mysql.jdbc.Connection
		this.pool = pool;//得到连接池对象
	}
	public void close() throws SQLException {
		pool.addLast(oldConnection);//将连接重新放回连接池
	}
	public PreparedStatement prepareStatement(String sql) throws SQLException {
		return oldConnection.prepareStatement(sql);
	}
	//...下面不需要用的代码就按照原有的方法
}
默认适配器模式
还有一种跟上面的模式差不多,不过要更加简洁一点
这个模式的步骤是:
* 1、编写一个类,继承包装类的适配器。(具备相同的行为)
* 2、定义一个被包装类类型的变量。
* 3、定义构造方法,把被包装类的对象注入,给被包装类变量赋值。
* 4、对于不需要改写的方法,调用原有的方法。
public class MyConnection extends MyConnectionWarper {
	private Connection oldConn;
	private LinkedList pool;
	public MyConnection(Connection oldConn,LinkedList pool) {
		super(oldConn);
		this.oldConn = oldConn;
		this.pool = pool;
	}
	@Override
	public void close() throws SQLException {
		pool.addLast(oldConn);
	}
}
public class MyConnectionWarper implements Connection {
	private Connection oldConn;
	public MyConnectionWarper(Connection oldConn){
		this.oldConn = oldConn;
	}
}
DBCP
前面这些介绍就是为了DBCP,前面都是模拟自己写的连接池,只需要了解其工作原理。这个就是包含连接池的技术
使用步骤:
添加jar包 commons-dbcp-1.4.jar commons-pool-1.5.6.jar
添加属性资源文件
编写数据源工具类
例子:DBCPUtil.java
public class DBCPUtil {
	//定义一个DataSource接口
	private static DataSource ds = null;
	static{
		Properties prop = new Properties();
		try {
						prop.load(DBCPUtil.class.getClassLoader().getResourceAsStream("dbcpconfig.properties"));//根据DBCPUtil的classes的路径,加载配置文件
		    ds = BasicDataSourceFactory.createDataSource(prop);//得到一个数据源
		} catch (Exception e) {
			throw new ExceptionInInitializerError("初始化错误,请检查配置文件");
		}
	}
	//获得连接
	public static Connection getConnection(){
		try {
			return ds.getConnection();
		} catch (SQLException e) {
			throw new RuntimeException("服务器忙。。。");
		}
	}
	public static void release(Connection conn,Statement stmt,ResultSet rs){
		//关闭资源
				if(rs!=null){
					try {
						rs.close();
					} catch (Exception e) {
						e.printStackTrace();
					}
					rs = null;
				}
				if(stmt!=null){
					try {
						stmt.close();
					} catch (Exception e) {
						e.printStackTrace();
					}
					stmt = null;
				}
				if(conn!=null){
					try {
						conn.close();//关闭
					} catch (Exception e) {
						e.printStackTrace();
					}
					conn = null;
				}
	}
}
dbcpconfig.properties配置文件
driverClassName=com.mysql.jdbc.Driver
url=jdbc:mysql://localhost:3306/
username=root
password=
initialSize=10
maxActive=50
maxIdle=20
minIdle=5
maxWait=60000
connectionProperties=useUnicode=true;characterEncoding=utf8
defaultAutoCommit=true
defaultReadOnly=
defaultTransactionIsolation=REPEATABLE_READ
C3P0
另一种方式来获取数据源
使用步骤:
1、添加jar包
c3p0-0.9.1.2.jar
2、编写配置文件
c3p0-config.xml,放在classpath中,或classes目录中
	com.mysql.jdbc.Driver
	jdbc:mysql://localhost:3306/day13
	root
	abc
    10
    30
    100
    10
C3P0Util.java
public class C3P0Util {
	//得到一个数据源
	private static DataSource dataSource = new ComboPooledDataSource();
	//从数据源中得到一个连接对象
	public static Connection getConnection(){
		try {
			return dataSource.getConnection();
		} catch (SQLException e) {
			throw new RuntimeException("服务器错误");
		}
	}
	public static void release(Connection conn,Statement stmt,ResultSet rs){
		//关闭资源
				if(rs!=null){
					try {
						rs.close();
					} catch (Exception e) {
						e.printStackTrace();
					}
					rs = null;
				}
				if(stmt!=null){
					try {
						stmt.close();
					} catch (Exception e) {
						e.printStackTrace();
					}
					stmt = null;
				}
				if(conn!=null){
					try {
						conn.close();//关闭
					} catch (Exception e) {
						e.printStackTrace();
					}
					conn = null;
				}
	}
}
总结
事务我不是第一次了解,但是代码我还是第一次看到,因为学过一次在数据库上还是比较好理解,而连接池我就学的有点懵懵的,上午看了模拟之后,中午休息的时候理了一下,现在大致能了解原理,后面就直接使用两个技术,别人直接写好了,所以我还是会使用的,如果有些词说的不准确,评论告诉我。
作者:程序胖