Python K-means实现简单图像聚类的示例代码
这里直接给出第一个版本的直接实现:
import os
import numpy as np
from sklearn.cluster import KMeans
import cv2
from imutils import build_montages
import matplotlib.image as imgplt
image_path = []
all_images = []
images = os.listdir('./images')
for image_name in images:
    image_path.append('./images/' + image_name)
for path in image_path:
    image = imgplt.imread(path)
    image = image.reshape(-1, )
    all_images.append(image)
clt = KMeans(n_clusters=2)
clt.fit(all_images)
labelIDs = np.unique(clt.labels_)
for labelID in labelIDs:
    idxs = np.where(clt.labels_ == labelID)[0]
    idxs = np.random.choice(idxs, size=min(25, len(idxs)),
replace=False)
    show_box = []
    for i in idxs:
        image = cv2.imread(image_path[i])
        image = cv2.resize(image, (96, 96))
        show_box.append(image)
    montage = build_montages(show_box, (96, 96), (5, 5))[0]
    title = "Type {}".format(labelID)
    cv2.imshow(title, montage)
    cv2.waitKey(0)
主要需要注意的问题是对K-Means原理的理解。K-means做的是对向量的聚类,也就是说,假设要处理的是224×224×3的RGB图像,那么就得先将其转为1维的向量。在上面的做法里,我们是直接对其展平:
image = image.reshape(-1, )
那么这么做的缺陷也是十分明显的。例如,对于两张一模一样的图像,我们将前者向左平移一个像素。这么做下来后两张图像在感官上几乎没有任何区别,但由于整体平移会导致两者的图像矩阵逐像素比较的结果差异巨大。以橘子汽车聚类为例,实验结果如下:
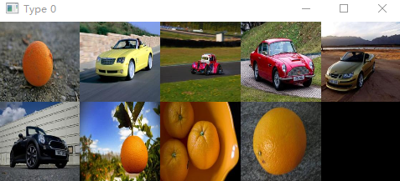
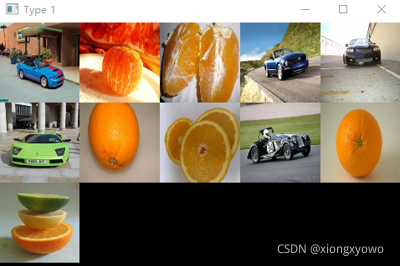
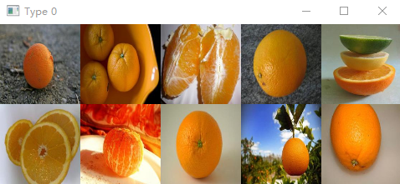
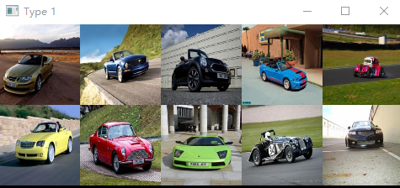
可以看到结果是比较差的。因此,我们进行改进,利用ResNet-50进行图像特征的提取(embedding),在特征的基础上聚类而非直接在像素上聚类,代码如下:
import os
import numpy as np
from sklearn.cluster import KMeans
import cv2
from imutils import build_montages
import torch.nn as nn
import torchvision.models as models
from PIL import Image
from torchvision import transforms
class Net(nn.Module):
    def __init__(self):
        super(Net, self).__init__()
        resnet50 = models.resnet50(pretrained=True)
        self.resnet = nn.Sequential(resnet50.conv1,
                                    resnet50.bn1,
                                    resnet50.relu,
                                    resnet50.maxpool,
                                    resnet50.layer1,
                                    resnet50.layer2,
                                    resnet50.layer3,
                                    resnet50.layer4)
    def forward(self, x):
        x = self.resnet(x)
        return x
net = Net().eval()
image_path = []
all_images = []
images = os.listdir('./images')
for image_name in images:
    image_path.append('./images/' + image_name)
for path in image_path:
    image = Image.open(path).convert('RGB')
    image = transforms.Resize([224,244])(image)
    image = transforms.ToTensor()(image)
    image = image.unsqueeze(0)
    image = net(image)
    image = image.reshape(-1, )
    all_images.append(image.detach().numpy())
clt = KMeans(n_clusters=2)
clt.fit(all_images)
labelIDs = np.unique(clt.labels_)
for labelID in labelIDs:
idxs = np.where(clt.labels_ == labelID)[0]
idxs = np.random.choice(idxs, size=min(25, len(idxs)),
replace=False)
show_box = []
for i in idxs:
image = cv2.imread(image_path[i])
image = cv2.resize(image, (96, 96))
show_box.append(image)
montage = build_montages(show_box, (96, 96), (5, 5))[0]
title = "Type {}".format(labelID)
cv2.imshow(title, montage)
cv2.waitKey(0)
可以发现结果明显改善:
到此这篇关于Python K-means实现简单图像聚类的示例代码的文章就介绍到这了,更多相关Python K-means图像聚类内容请搜索软件开发网以前的文章或继续浏览下面的相关文章希望大家以后多多支持软件开发网!