XGBoost——机器学习(理论+图解+安装方法+python代码)
在竞赛题中经常会用到XGBoost算法,用这个算法通常会使我们模型的准确率有一个较大的提升。既然它效果这么好,那么它从头到尾做了一件什么事呢?以及它是怎么样去做的呢?
我们先来直观的理解一下什么是XGBoost。XGBoost算法是和决策树算法联系到一起的。决策树算法在我的另一篇博客中讲过了.
xgboost 的全称是eXtreme Gradient Boosting,由华盛顿大学的陈天奇博士提出,在Kaggle的希格斯子信号识别竞赛中使用,因其出众的效率与较高的预测准确度而引起了广泛的关注。
与GBDT的区别
GBDT算法只利用了一阶的导数信息,xgboost对损失函数做了二阶的泰勒展开,并在目标函数之外加入了正则项对整体求最优解,用以权衡目标函数的下降和模型的复杂程度,避免过拟合。所以不考虑细节方面,两者最大的不同就是目标函数的定义,接下来就着重从xgboost的目标函数定义上来进行介绍。
xgboost的模型
xgboost对应的模型就是一堆CART树。一堆树如何做预测呢?就是将每棵树的预测值加到一起作为最终的预测值,可谓简单粗暴。
在决策树中,我们知道一个样本往左边分或者往右边分,最终到达叶子结点,这样来进行一个分类任务。 其实也可以做回归任务。
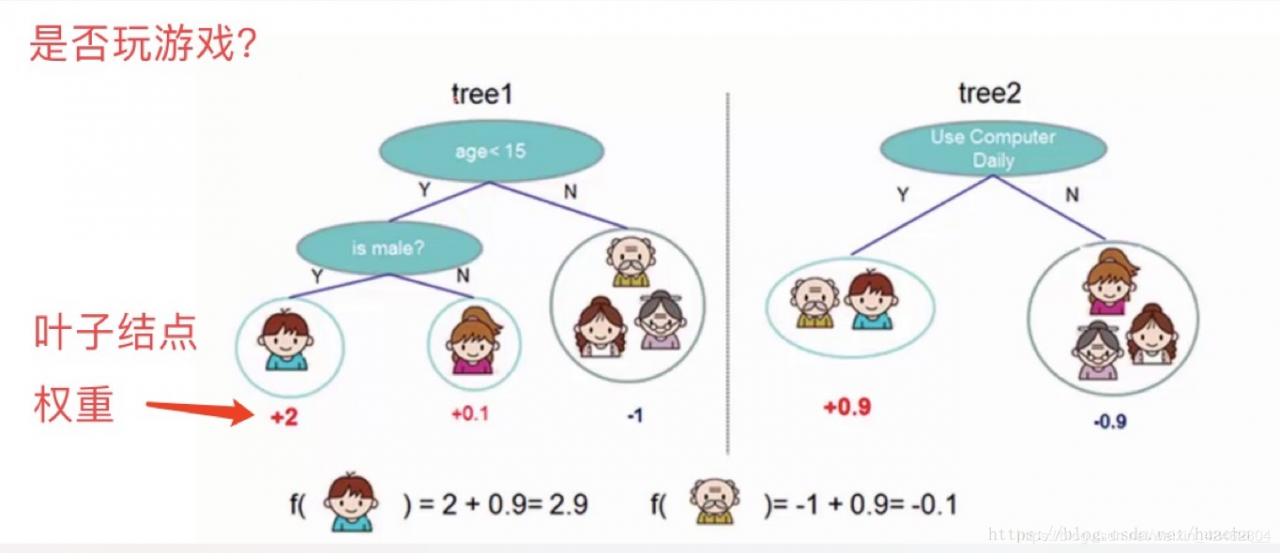
看上面一个图例左边:有5个样本,现在想看下这5个人愿不愿意去玩游戏,这5个人现在都分到了叶子结点里面,对不同的叶子结点分配不同的权重项,正数代表这个人愿意去玩游戏,负数代表这个人不愿意去玩游戏。所以我们可以通过叶子结点和权值的结合,来综合的评判当前这个人到底是愿意还是不愿意去玩游戏。上面「tree1」那个小男孩它所处的叶子结点的权值是+2(可以理解为得分)。
用单个决策树好像效果一般来说不是太好,或者说可能会太绝对。通常我们会用一种集成的方法,
就是一棵树效果可能不太好,用两棵树呢?
看图例右边的「tree2」,它和左边的不同在于它使用了另外的指标,出了年龄和性别,还可以考虑使用电脑频率这个划分属性。通过这两棵树共同帮我们决策当前这个人愿不愿意玩游戏,小男孩在「tree1」的权值是+2,在「tree2」的权值是+0.9, 所以小男孩最终的权值是+2.9(可以理解为得分是+2.9)。老爷爷最终的权值也是通过一样的过程得到的。
所以说,我们通常在做分类或者回归任务的时候,需要想一想一旦选择用一个分类器可能表达效果并不是很好,那么就要考虑用这样一个集成的思想。上面的图例只是举了两个分类器,其实还可以有更多更复杂的
弱分类器,一起组合成一个强分类器。
XGBoost的集成表示是什么?怎么预测?求最优解的目标是什么?看下图的说明你就能一目了然。
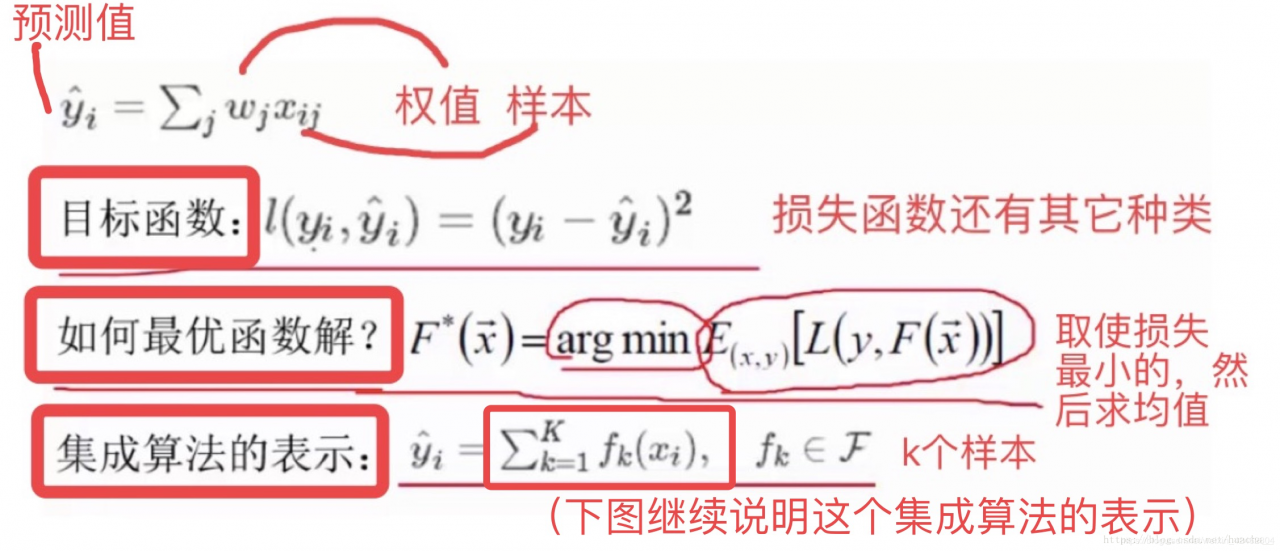
在XGBoost里,每棵树是一个一个往里面加的,每加一个都是希望效果能够提升,下图就是XGBoost这个集成的表示(核心)。
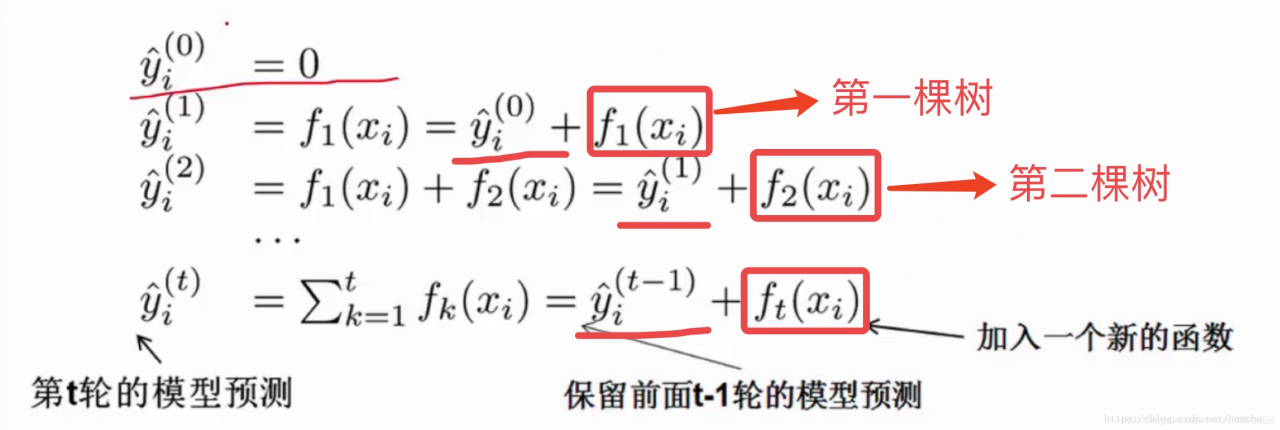
一开始树是0,然后往里面加树,相当于多了一个函数,再加第二棵树,相当于又多了一个函数…等等,这里需要保证加入新的函数能够提升整体对表达效果。提升表达效果的意思就是说加上新的树之后,目标函数(就是损失)的值会下降。
如果叶子结点的个数太多,那么过拟合的风险会越大,所以这里要限制叶子结点的个数,所以在原来目标函数里要加上一个惩罚项「omega(ft)」。

这里举个简单的例子看看惩罚项「omega(ft)」是如何计算的:
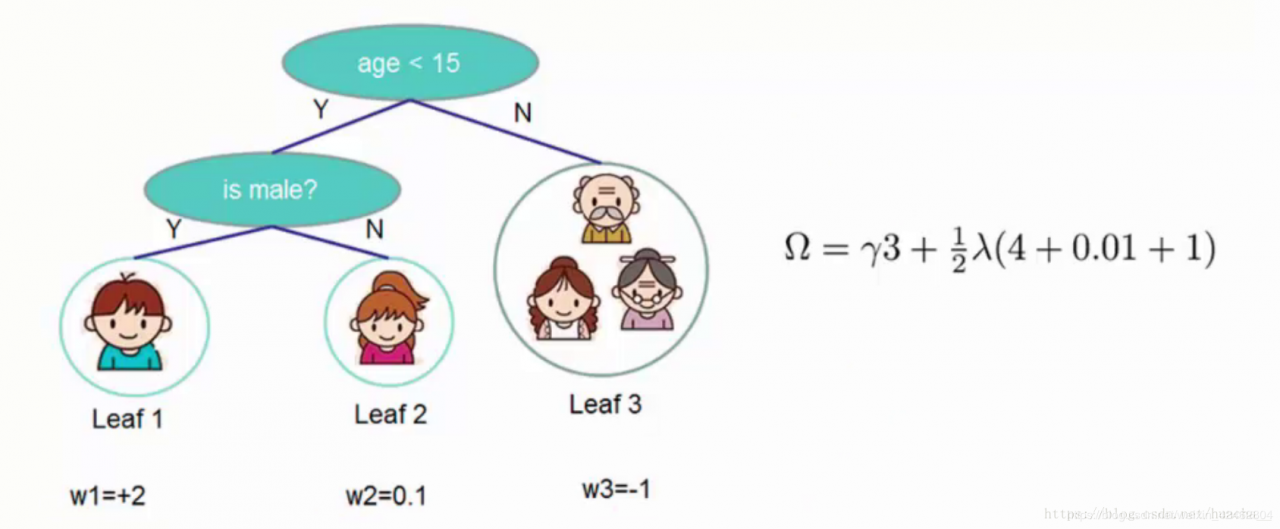
一共3个叶子结点,权重分别是2,0.1,-1,带入「omega(ft)」中就得到上面图例的式子,惩罚力度和「lambda」的值人为给定。
XGBoost算法完整的目标函数 见下面这个公式,它由自身的损失函数和正则化惩罚项「omega(ft)」相加而成。

关于目标函数的推导本文章不作详细介绍。过程就是:给目标函数对权重求偏导,得到一个能够使目标函数最小的权重,把这个权重代回到目标函数中,这个回代结果就是求解后的最小目标函数值,如下:
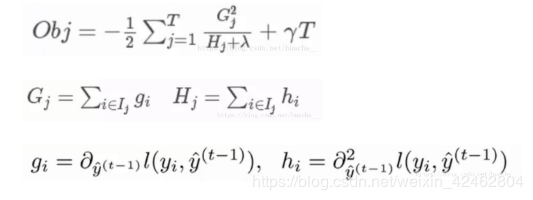
其中第三个式子中的一阶导二阶导的梯度数据都是可以算出来的,只要指定了主函数中的两个参数,这就是一个确定的值。下面给出一个直观的例子来看下这个过程。
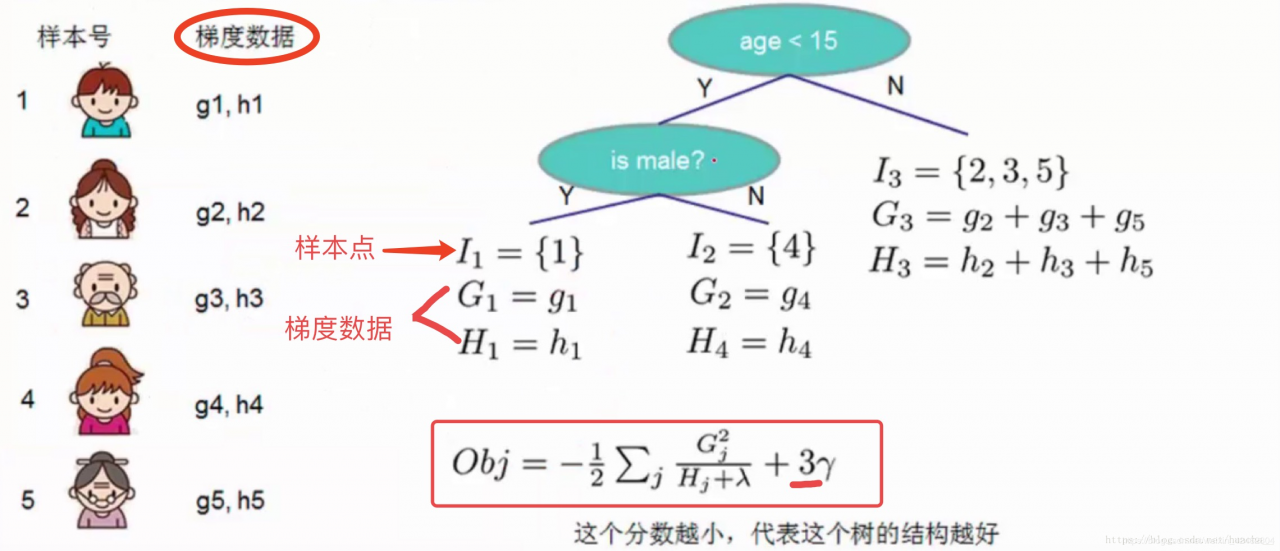
(这里多说一句:Obj代表了当我们指定一个树的结构的时候,在目标上最多会减少多少,我们可以把它叫做结构分数,这个分数越小越好)
对于每次扩展,我们依旧要枚举所有可能的方案。对于某个特定的分割,我们要计算出这个分割的左子树的导数和和右子数导数和之和(就是下图中的第一个红色方框),然后和划分前的进行比较(基于损失,看分割后的损失和分割前的损失有没有发生变化,变化了多少)。遍历所有分割,选择变化最大的作为最合适的分割。

用pip安装XGBoost
第一步, 安装HomeBrew.
/usr/bin/ruby -e “$(curl -fsSL https://raw.githubusercontent.com/Homebrew/install/master/install)”
HomeBrew是Mac的一个包管理软件, 类似于Linux里面的apt-get
第二步, 安装llvm
brew install llvm
第三步,安装clang-omp
brew install clang-omp
有人提到clang-omp已经从HomeBrew移除了, 如果找不到clang-omp可以尝试
brew install --with-clang llvm
第四步,安装XGBoost
pip install xgboost
测试一下,大功告成!

pima-indians-diabetes.csv文件中包括了8列数值型自变量,和第9列0-1的二分类因变量,导入到python中用XGBoost算法做探索性尝试,得到预测数据的准确率为77.95%。
import xgboost
from numpy import loadtxt
from xgboost import XGBClassifier
from sklearn.model_selection import train_test_split
from sklearn.metrics import accuracy_score
# 载入数据集
dataset = loadtxt('pima-indians-diabetes.csv', delimiter=",")
# split data into X and y
X = dataset[:,0:8]
Y = dataset[:,8]
# 把数据集拆分成训练集和测试集
seed = 7
test_size = 0.33
X_train, X_test, y_train, y_test = train_test_split(X, Y, test_size=test_size, random_state=seed)
# 拟合XGBoost模型
model = XGBClassifier()
model.fit(X_train, y_train)
# 对测试集做预测
y_pred = model.predict(X_test)
predictions = [round(value) for value in y_pred]
# 评估预测结果
accuracy = accuracy_score(y_test, predictions)
print("Accuracy: %.2f%%" % (accuracy * 100.0))
结果输出:
Accuracy: 77.95%
在python的XGBoost包中最重要的函数是XGBClassifier(),函数中涉及到多种参数,此外还可以关注plot_importance(),更多的说明我将在以后进行更新。
五、xgboost的优化: 在寻找最佳分割点时,考虑传统的枚举每个特征的所有可能分割点的贪心法效率太低,xgboost实现了一种近似的算法。大致的思想是根据百分位法列举几个可能成为分割点的候选者,然后从候选者中根据上面求分割点的公式计算找出最佳的分割点。 xgboost考虑了训练数据为稀疏值的情况,可以为缺失值或者指定的值指定分支的默认方向,这能大大提升算法的效率,paper提到50倍. 特征列排序后以块的形式存储在内存中,在迭代中可以重复使用;虽然boosting算法迭代必须串行,但是在处理每个特征列时可以做到并行。 按照特征列方式存储能优化寻找最佳的分割点,但是当以行计算梯度数据时会导致内存的不连续访问,严重时会导致cache miss,降低算法效率。paper中提到,可先将数据收集到线程内部的buffer,然后再计算,提高算法的效率。 xgboost 还考虑了当数据量比较大,内存不够时怎么有效的使用磁盘,主要是结合多线程、数据压缩、分片的方法,尽可能的提高算法的效率。 六、xgboost的优势: 1、正则化标准GBM的实现没有像XGBoost这样的正则化步骤。正则化对减少过拟合也是有帮助的。
实际上,XGBoost以“正则化提升(regularized boosting)”技术而闻名。
XGBoost可以实现并行处理,相比GBM有了速度的飞跃,LightGBM也是微软最新推出的一个速度提升的算法。 XGBoost也支持Hadoop实现。
3、高度的灵活性XGBoost 允许用户定义自定义优化目标和评价标准 。
4、缺失值处理XGBoost内置处理缺失值的规则。用户需要提供一个和其它样本不同的值,然后把它作为一个参数传进去,以此来作为缺失值的取值。XGBoost在不同节点遇到缺失值时采用不同的处理方法,并且会学习未来遇到缺失值时的处理方法。
5、剪枝当分裂时遇到一个负损失时,GBM会停止分裂。因此GBM实际上是一个贪心算法。XGBoost会一直分裂到指定的最大深度(max_depth),然后回过头来剪枝。如果某个节点之后不再有正值,它会去除这个分裂。
这种做法的优点,当一个负损失(如-2)后面有个正损失(如+10)的时候,就显现出来了。GBM会在-2处停下来,因为它遇到了一个负值。但是XGBoost会继续分裂,然后发现这两个分裂综合起来会得到+8,因此会保留这两个分裂。
XGBoost允许在每一轮boosting迭代中使用交叉验证。因此,可以方便地获得最优boosting迭代次数。
而GBM使用网格搜索,只能检测有限个值。
XGBoost可以在上一轮的结果上继续训练。
sklearn中的GBM的实现也有这个功能,两种算法在这一点上是一致的。
LibSVM text format file
Comma-separated values (CSV) file
NumPy 2D array
SciPy 2D sparse array
cuDF DataFrame
Pandas data frame, and
XGBoost binary buffer file.
2. 参数设置Setting Parameters官方网站
param = {'max_depth': 2, 'eta': 1, 'objective': 'binary:logistic'}
param['nthread'] = 4
param['eval_metric'] = 'auc'
#You can also specify multiple eval metrics: 指定多个评判标准
param['eval_metric'] = ['auc', 'ams@0']
# alternatively:
plst = param.items()
plst += [('eval_metric', 'ams@0')]
#Specify validations set to watch performance 指定设置为监视性能的验证
evallist = [(dtest, 'eval'), (dtrain, 'train')]
3.开始训练Training 保存模型
Training a model requires a parameter list and data set.
num_round = 10
bst = xgb.train(param, dtrain, num_round, evallist)
#After training, the model can be saved.
bst.save_model('0001.model')
#The model and its feature map can also be dumped to a text file.
# dump model转存储模型
bst.dump_model('dump.raw.txt')
# dump model with feature map
bst.dump_model('dump.raw.txt', 'featmap.txt')
#A saved model can be loaded as follows: 加载模型
bst = xgb.Booster({'nthread': 4})  # init model
bst.load_model('model.bin')  # load data
#Methods including update and boost from xgboost.Booster are designed for internal usage only. The wrapper function xgboost.train does some pre-configuration including setting up caches and some other parameters.
4.提前停止Early Stopping
#如果你有一个验证集,你可以使用提前停止来找到最优的助推轮数。提前停止至少需要一组evals。如果有多个,它将使用最后一个。
train(..., evals=evals, early_stopping_rounds=10)
#模型将进行训练,直到验证分数停止改进。为了继续训练,验证错误至少需要在每一轮停止前减少一次。
#如果提前停止,模型将有三个额外的字段:
bst.best_score, bst.best_iteration bst.best_ntree_limit。
#注意,xgboost.train()将返回最后一次迭代的模型,而不是最好的模型。
This works with both metrics to minimize (RMSE, log loss, etc.) and to maximize (MAP, NDCG, AUC). Note that if you specify more than one evaluation metric the last one in param['eval_metric'] is used for early stopping.
5.预测Prediction 使用早停进行预测
# 7 entities, each contains 10 features
data = np.random.rand(7, 10)
dtest = xgb.DMatrix(data)
ypred = bst.predict(dtest)
#If early stopping is enabled during training, you can get predictions from the best iteration with bst.best_ntree_limit:
ypred = bst.predict(dtest, ntree_limit=bst.best_ntree_limit)
6.绘图Plotting
You can use plotting module to plot importance and output tree.
To plot importance, use xgboost.plot_importance(). This function requires matplotlib to be installed.
xgb.plot_importance(bst)
To plot the output tree via matplotlib, use xgboost.plot_tree(), specifying the ordinal number of the target tree. This function requires graphviz and matplotlib.
xgb.plot_tree(bst, num_trees=2)
When you use IPython, you can use the xgboost.to_graphviz() function, which converts the target tree to a graphviz instance. The graphviz instance is automatically rendered in IPython.
xgb.to_graphviz(bst, num_trees=2)
八、代码实践
#!/usr/bin/python
from __future__ import division
#导入python未来支持的语言特征division(精确除法),当我们没有在程序中导入该特征时,"/"操作符执行的是截断除法(Truncating Division),当我们导入精确除法之后,"/"执行的是精确除法,如下所示:
import numpy as np
import xgboost as xgb
# label need to be 0 to num_class -1
data = np.loadtxt('./dermatology.data', delimiter=',',
        converters={33: lambda x:int(x == '?'), 34: lambda x:int(x) - 1})
sz = data.shape
train = data[:int(sz[0] * 0.7), :]
test = data[int(sz[0] * 0.7):, :]
train_X = train[:, :33]
train_Y = train[:, 34]
test_X = test[:, :33]
test_Y = test[:, 34]
xg_train = xgb.DMatrix(train_X, label=train_Y)
xg_test = xgb.DMatrix(test_X, label=test_Y)
# setup parameters for xgboost
param = {}
# use softmax multi-class classification
param['objective'] = 'multi:softmax'
# scale weight of positive examples
param['eta'] = 0.1
param['max_depth'] = 6
param['silent'] = 1
param['nthread'] = 4
param['num_class'] = 6
watchlist = [(xg_train, 'train'), (xg_test, 'test')]
num_round = 5
bst = xgb.train(param, xg_train, num_round, watchlist)
# get prediction
pred = bst.predict(xg_test)
error_rate = np.sum(pred != test_Y) / test_Y.shape[0]
print('Test error using softmax = {}'.format(error_rate))
# do the same thing again, but output probabilities
param['objective'] = 'multi:softprob'
bst = xgb.train(param, xg_train, num_round, watchlist)
# Note: this convention has been changed since xgboost-unity
# get prediction, this is in 1D array, need reshape to (ndata, nclass)
pred_prob = bst.predict(xg_test).reshape(test_Y.shape[0], 6)
pred_label = np.argmax(pred_prob, axis=1)
error_rate = np.sum(pred_label != test_Y) / test_Y.shape[0]
print('Test error using softprob = {}'.format(error_rate))
结果输出
[0]	train-merror:0.011719	test-merror:0.127273
[1]	train-merror:0.015625	test-merror:0.127273
[2]	train-merror:0.011719	test-merror:0.109091
[3]	train-merror:0.007813	test-merror:0.081818
[4]	train-merror:0.007813	test-merror:0.090909
Test error using softmax = 0.09090909090909091
[0]	train-merror:0.011719	test-merror:0.127273
[1]	train-merror:0.015625	test-merror:0.127273
[2]	train-merror:0.011719	test-merror:0.109091
[3]	train-merror:0.007813	test-merror:0.081818
[4]	train-merror:0.007813	test-merror:0.090909
Test error using softprob = 0.09090909090909091
Reference
[1]http://www.cnblogs.com/willnote/p/6801496.html
[2]https://www.jianshu.com/p/7467e616f227
[3]https://blog.csdn.net/jasonzhangoo/article/details/73061060
作者:和你在一起^_^