使用Docker安装SonarQube的详细教程
1.拉取镜像
1.1拉取相关镜像并运行
1.1.1拉取相关镜像
1.1.2运行镜像
1.2保存并提交已修改的镜像
2.安装成功
3.插件安装
3.1安装Chinese插件
4.docker安装gitlab
4.1.Gitlab镜像拉取
4.2运行gitlab镜像
4.3设置root用户名和密码
4.4保存镜像并推送dockerhub
5.碰到的问题
5.1虚拟内存不够
6.整合Sonar和gitlab
6.1安装Gitlab-runner
6.1.1获取gitlab-Token
6.1.2安装gitlab-runner
6.2设置sonarqube的用户名和密码
6.3进行项目分析(手动添加项目)
6.4进行CI/CD(sonar与gitlab)
6.4.1版本为sonarqube-7.6-community
6.4.2版本为sonarqube-9.1-community
6.5在整合过程中碰到的问题
7.总结
Docker安装SonarQube的教程如下所示:
1.拉取镜像 1.1拉取相关镜像并运行 1.1.1拉取相关镜像
# 拉取sonarqube镜像
$ docker pull sonarqube:9.1.0-community (推荐使用) /  $ docker pull sonarqube:7.6-community
# 拉取postgres镜像
$ docker pull postgres:9.6.23
1.1.2运行镜像
# 运行postgres数据库
$ docker run --name postgresqldb --restart=always -p 5432:5432 \
-e POSTGRES_USER=root \
-e POSTGRES_PASSWORD=123456  \
-d postgres:9.6.23
# 进入postgres容器,创建用户名和密码
$ docker exec -it postgresqldb bash
# 登录数据库
psql -U root -W
# 创建用户名和密码
create user sonar with password 'sonar';
create database sonar owner sonar;
grant all privileges on database sonar to sonar;
# 不连接postgres数据库运行命令(不推荐)
docker run --name sonarqube --restart=always -p 9000:9000 -d naumy/hitrend-sonarqube:v1.0
# 运行sonarqube容器
docker run -d --name sonarqube --restart=always \
-p 9000:9000  \
-e sonar.jdbc.username=sonar \
-e sonar.jdbc.password=sonar \
-e sonar.jdbc.url=jdbc:postgresql://139.198.176.140:5432/sonar \
sonarqube:9.1.0-community
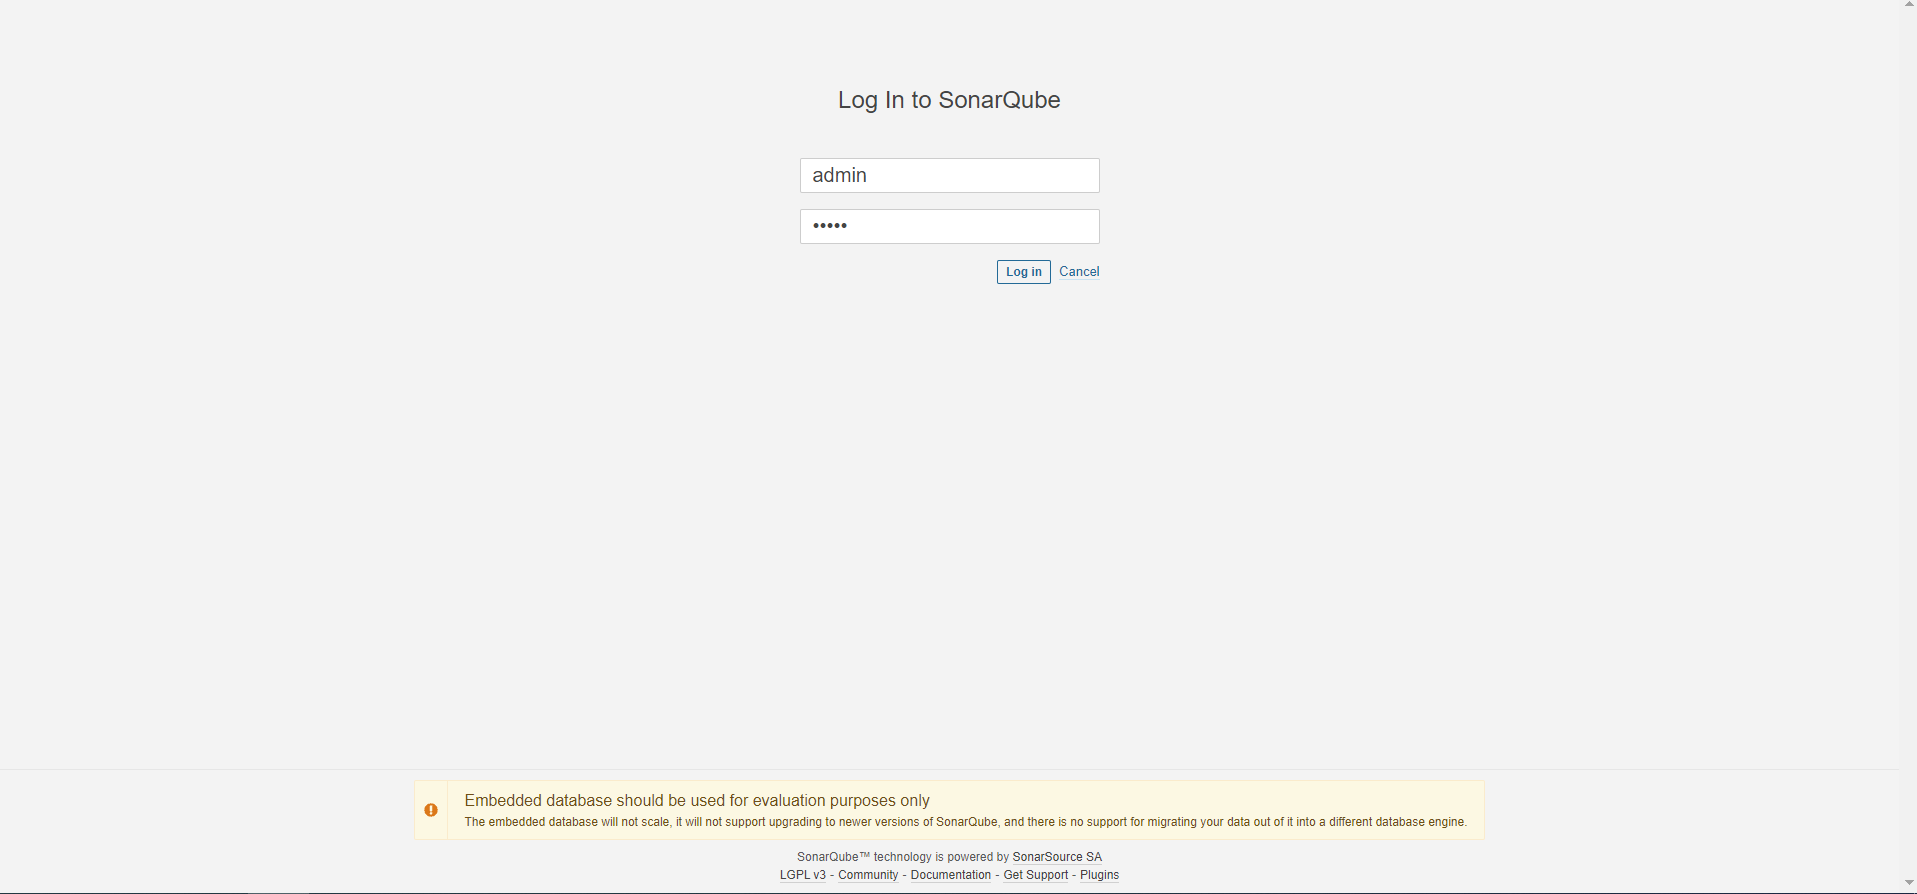
接着访问:http://localhost:9000/ 就可以了,默认管理员用户和密码为:admin/admin。

嵌入式数据库应仅用于评估目的、嵌入式数据库无法扩展,不支持升级到SonarQube的较新版本,也不支持将数据从中迁移到其他数据库引擎。
1.2保存并提交已修改的镜像
# 保存已经修的镜像
docker commit -a "naumy"  -m "安装中文插件" 19f1cc24dc98 hitrend-sonarqube:v1.0
# 把旧镜像的名字,改成仓库要求的新版名字
docker tag hitrend-sonarqube:v1.0 naumy/hitrend-sonarqube:v1.0
# 登录到docker hub
docker login
# 推送
docker push naumy/hitrend-sonarqube:v1.0

SonarQube提供了强大的插件管理功能,以中文语言包为示例,讲解如何安装插件:
登录成功后,选择Administration-Marketplace-Plugins,在搜索框输入Chinese就可以选择安装了。
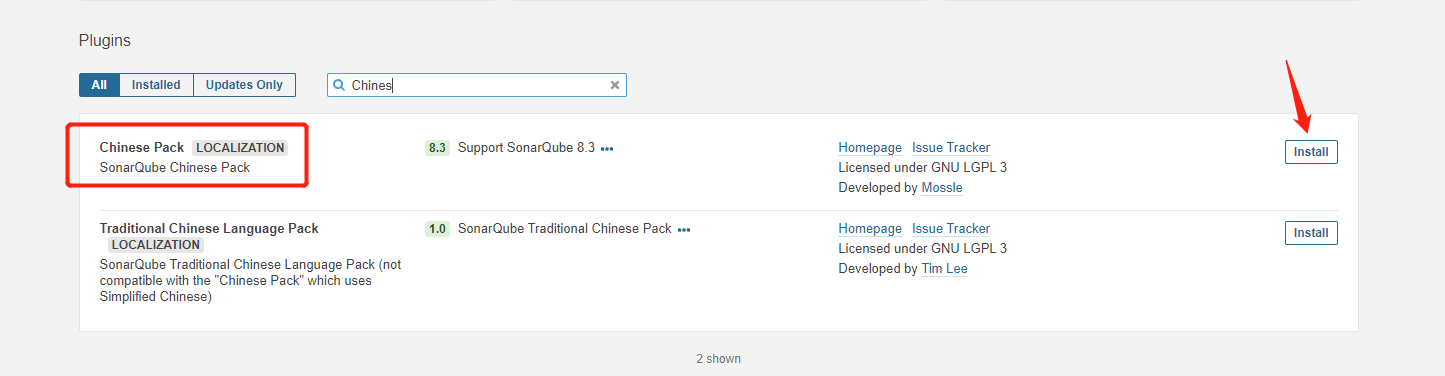
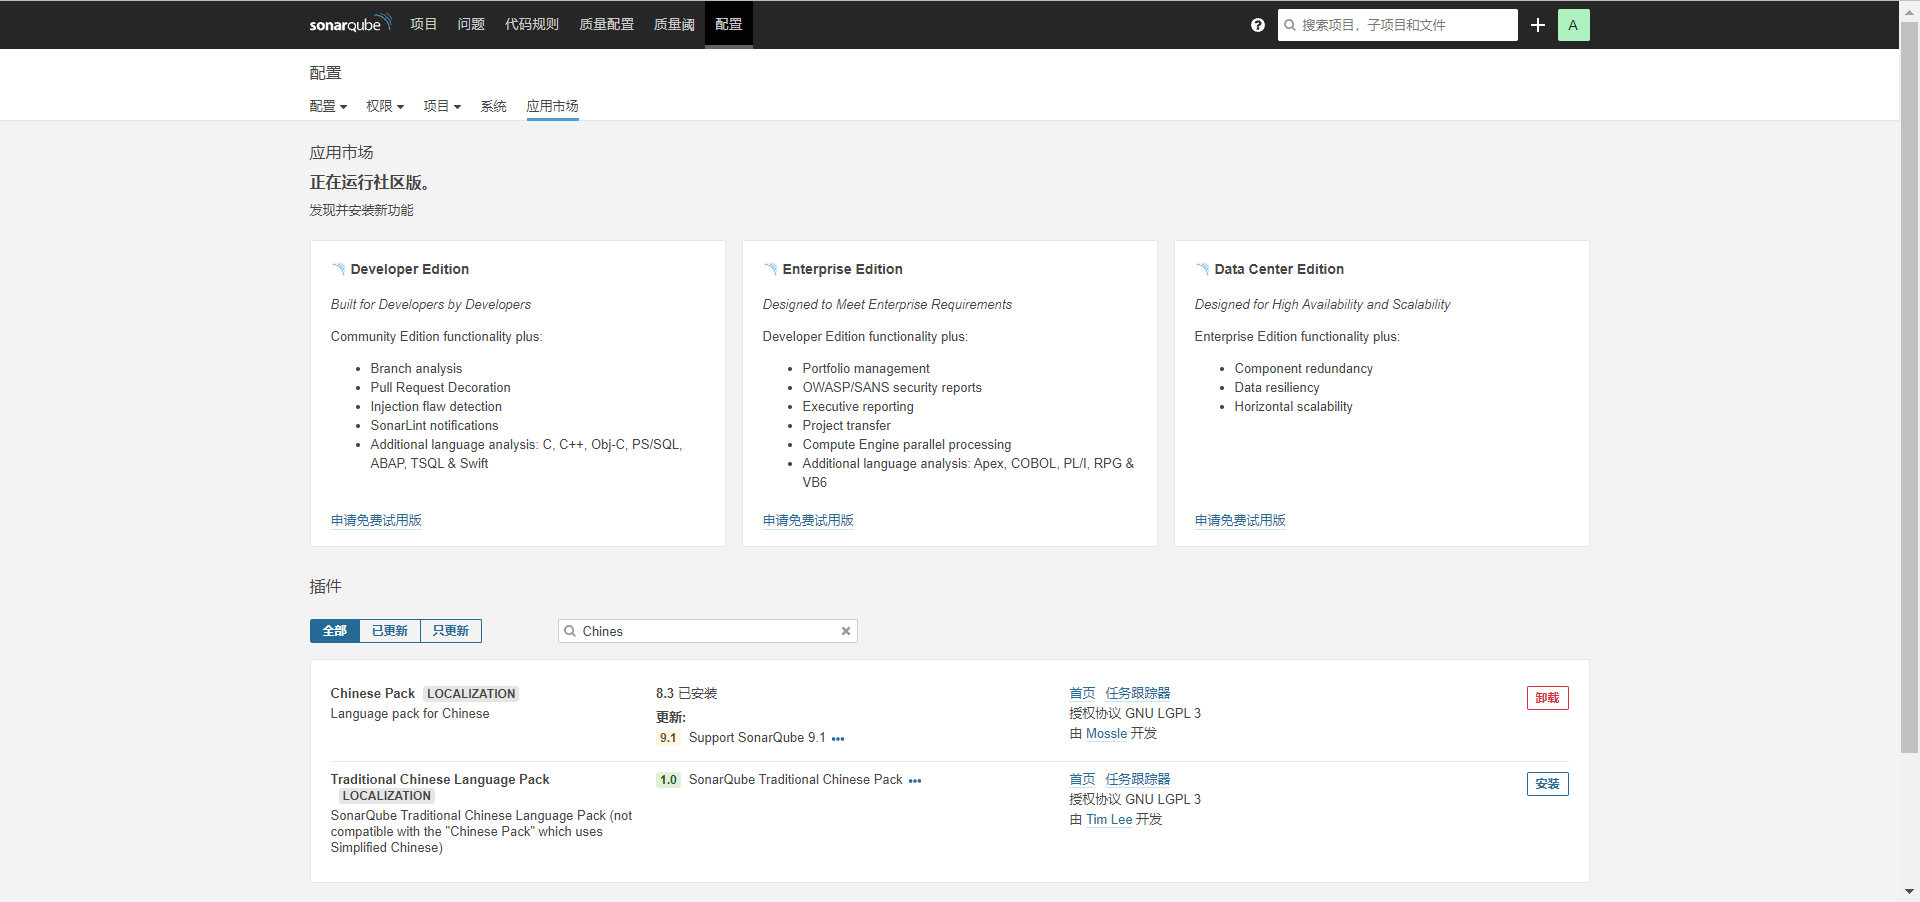
当状态显示为Install Pending时,说明插件安装完成,点击Restart Server即可生效。
之后,就显示为中文了。
同时安装findbug插件
# gitlab-ce为稳定版本,后面不填写版本则默认pull最新latest版本
$ docker pull gitlab/gitlab-ce
4.2运行gitlab镜像
$ docker run -d  -p 443:443 -p 80:80 -p 222:22 --name gitlab --restart always -v /home/gitlab/config:/etc/gitlab -v /home/gitlab/logs:/var/log/gitlab -v /home/gitlab/data:/var/opt/gitlab gitlab/gitlab-ce
# -d:后台运行
# -p:将容器内部端口向外映射
# --name:命名容器名称
# -v:将容器内数据文件夹或者日志、配置等文件夹挂载到宿主机指定目录
按上面的方式,gitlab容器运行没问题,但在gitlab上创建项目的时候,生成项目的URL访问地址是按容器的hostname来生成的,也就是容器的id。
作为gitlab服务器,我们需要一个固定的URL访问地址,于是需要配置gitlab.rb(宿主机路径:/home/gitlab/config/gitlab.rb)。
# gitlab.rb文件内容默认全是注释
$ vim /home/gitlab/config/gitlab.rb
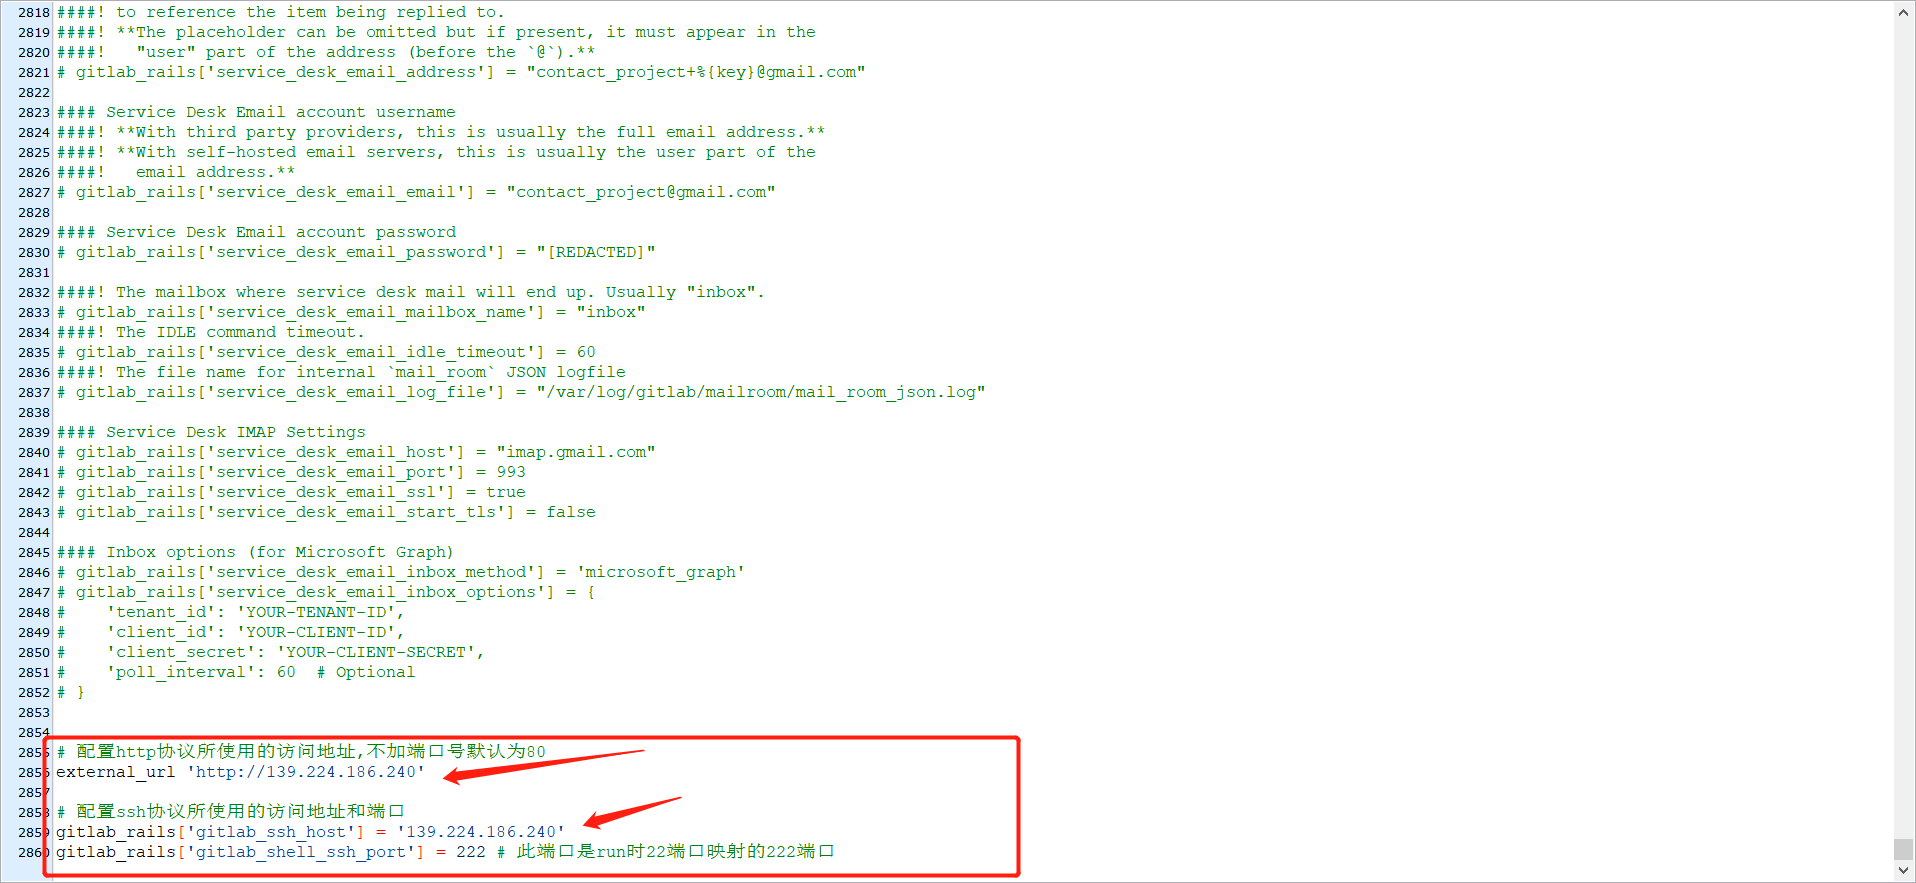
# 配置http协议所使用的访问地址,不加端口号默认为80
external_url 'http://192.168.199.231'
# 配置ssh协议所使用的访问地址和端口
gitlab_rails['gitlab_ssh_host'] = '192.168.199.231'
gitlab_rails['gitlab_shell_ssh_port'] = 222 # 此端口是run时22端口映射的222端口
:wq #保存配置文件并退出
# 重启gitlab容器
$ docker restart gitlab
此时项目的仓库地址就变了。如果ssh端口地址不是默认的22,就会加上ssh:// 协议头
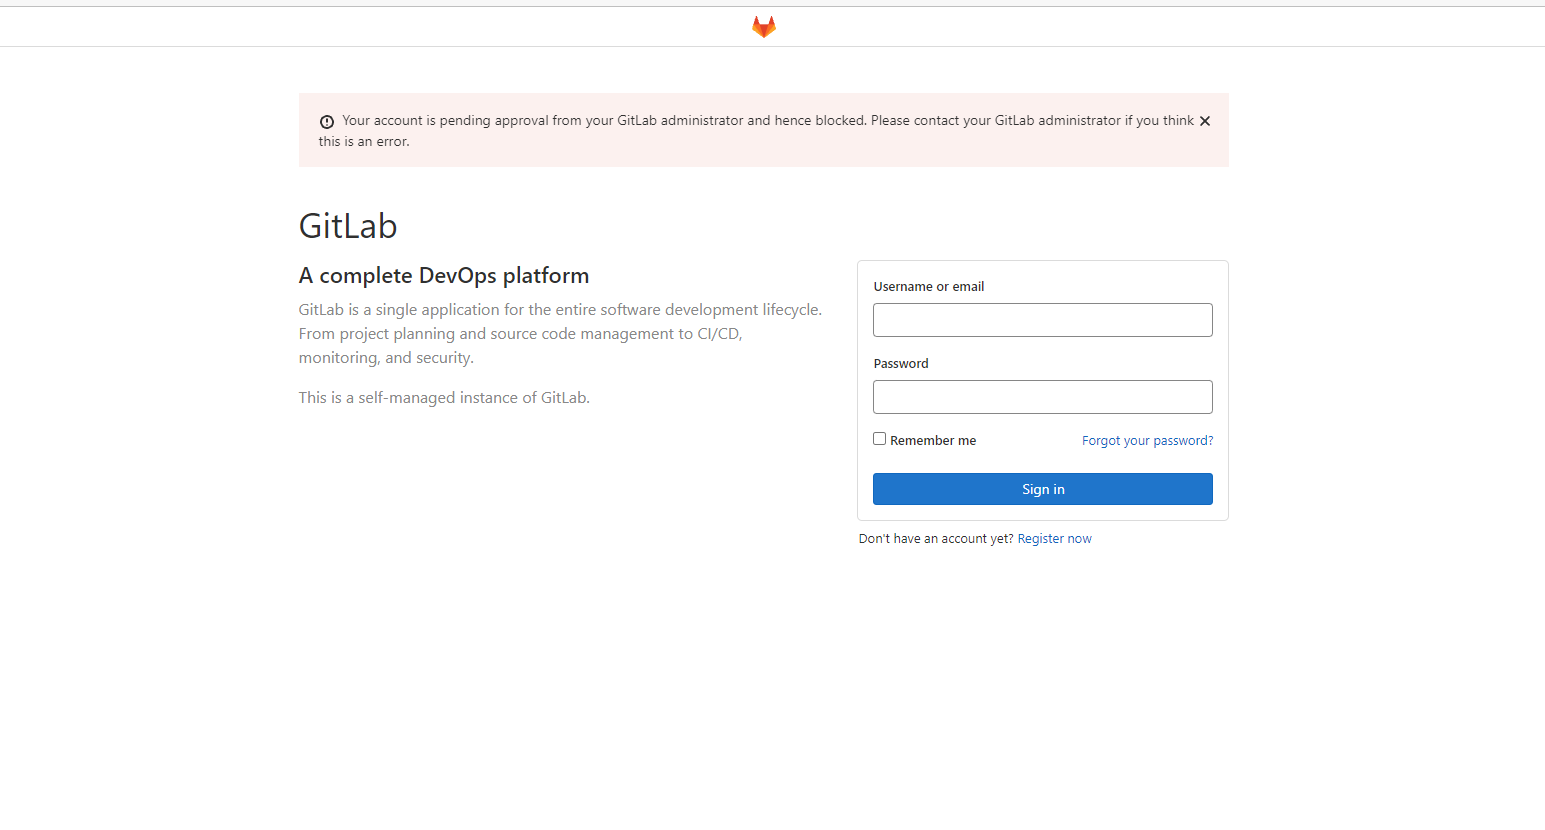
打开浏览器输入ip地址(因为我的gitlab端口为80,所以浏览器url不用输入端口号,如果端口号不是80,则打开为:ip:端口号)
进入目录 /home/gitlab/config/initial_root_password,查看密码
xwCsS7lMYx+8x3o6KIBw+Ia6Lg3VqvtHLzxzYfPNtxk=
或者进入gitlab容器后修改密码。
root@ba96cb6a1f47:/# gitlab-rails console
--------------------------------------------------------------------------------
 Ruby:         ruby 2.7.4p191 (2021-07-07 revision a21a3b7d23) [x86_64-linux]
 GitLab:       14.3.2 (92acfb1b8a9) FOSS
 GitLab Shell: 13.21.1
 PostgreSQL:   12.7
--------------------------------------------------------------------------------
irb(main):005:0> user = User.where(id: 1).first
=> #<User id:1 @root>
irb(main):006:0> user.password=12345678
=> 12345678
irb(main):007:0> user.password_confirmation=12345678
=> 12345678
irb(main):008:0> user.save!
Enqueued ActionMailer::MailDeliveryJob (Job ID: 4fc2d685-2fd6-41d9-893e-2dabc7c3b366) to Sidekiq(mailers) with arguments: "DeviseMailer", "password_change", "deliver_now", {:args=>[#<GlobalID:0x00007fc6c59b5b48 @uri=#<URI::GID gid://gitlab/User/1>>]}
=> true
irb(main):009:0> quit

运行后的效果图
# 保存已经修的镜像
docker commit -a "naumy"  -m "初始化gitlab" ba96cb6a1f47 gitlab:v1.0
docker commit -a "naumy"  -m "sonarqube:7.6-community " e70c6cbe2e0b sonarqube-7.6-community:v1.0
docker tag sonarqube-7.6-community:v1.0 naumy/sonarqube-7.6-community:v1.0
docker push naumy/sonarqube-7.6-community:v1.0
# 把旧镜像的名字,改成仓库要求的新版名字
docker tag gitlab:v1.0 naumy/gitlab:v1.0
# 登录到docker hub
docker login
# 推送
docker push naumy/gitlab:v1.0
5.碰到的问题
5.1虚拟内存不够
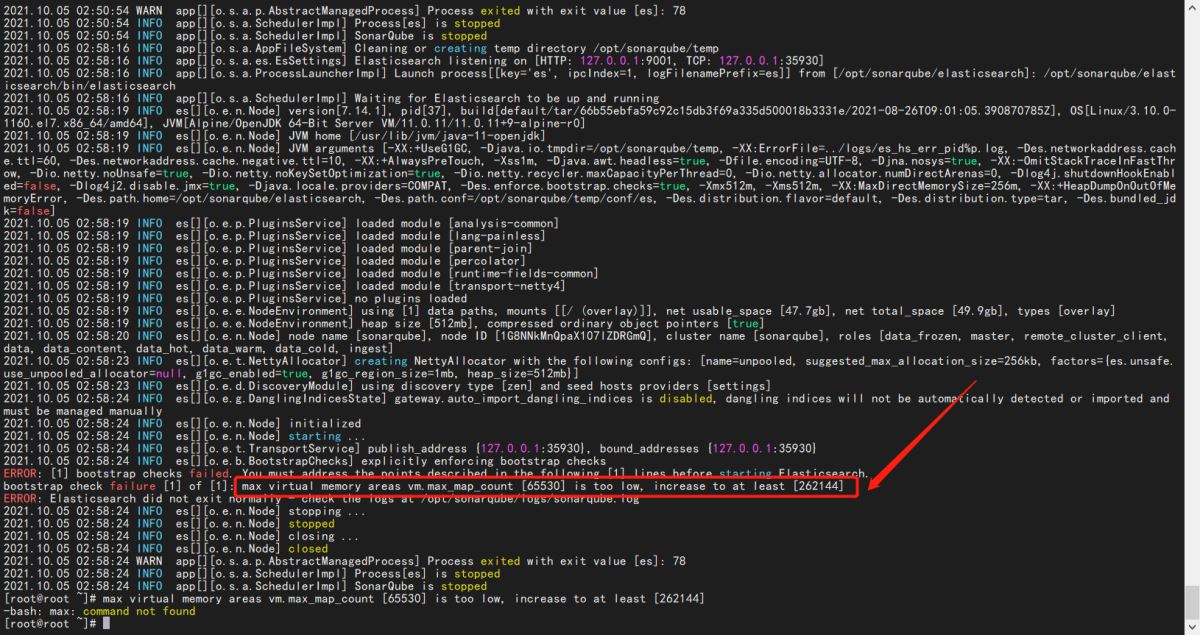
启动容器后过了十几秒。容器自动退出。
Error: max virtual memory areas vm.max_map_count [65530] is too low, increase to at least [262144]
运行容器后,容器马上退出。
# 使用命令查看运行日志
docker logs 容器名称/容器ID
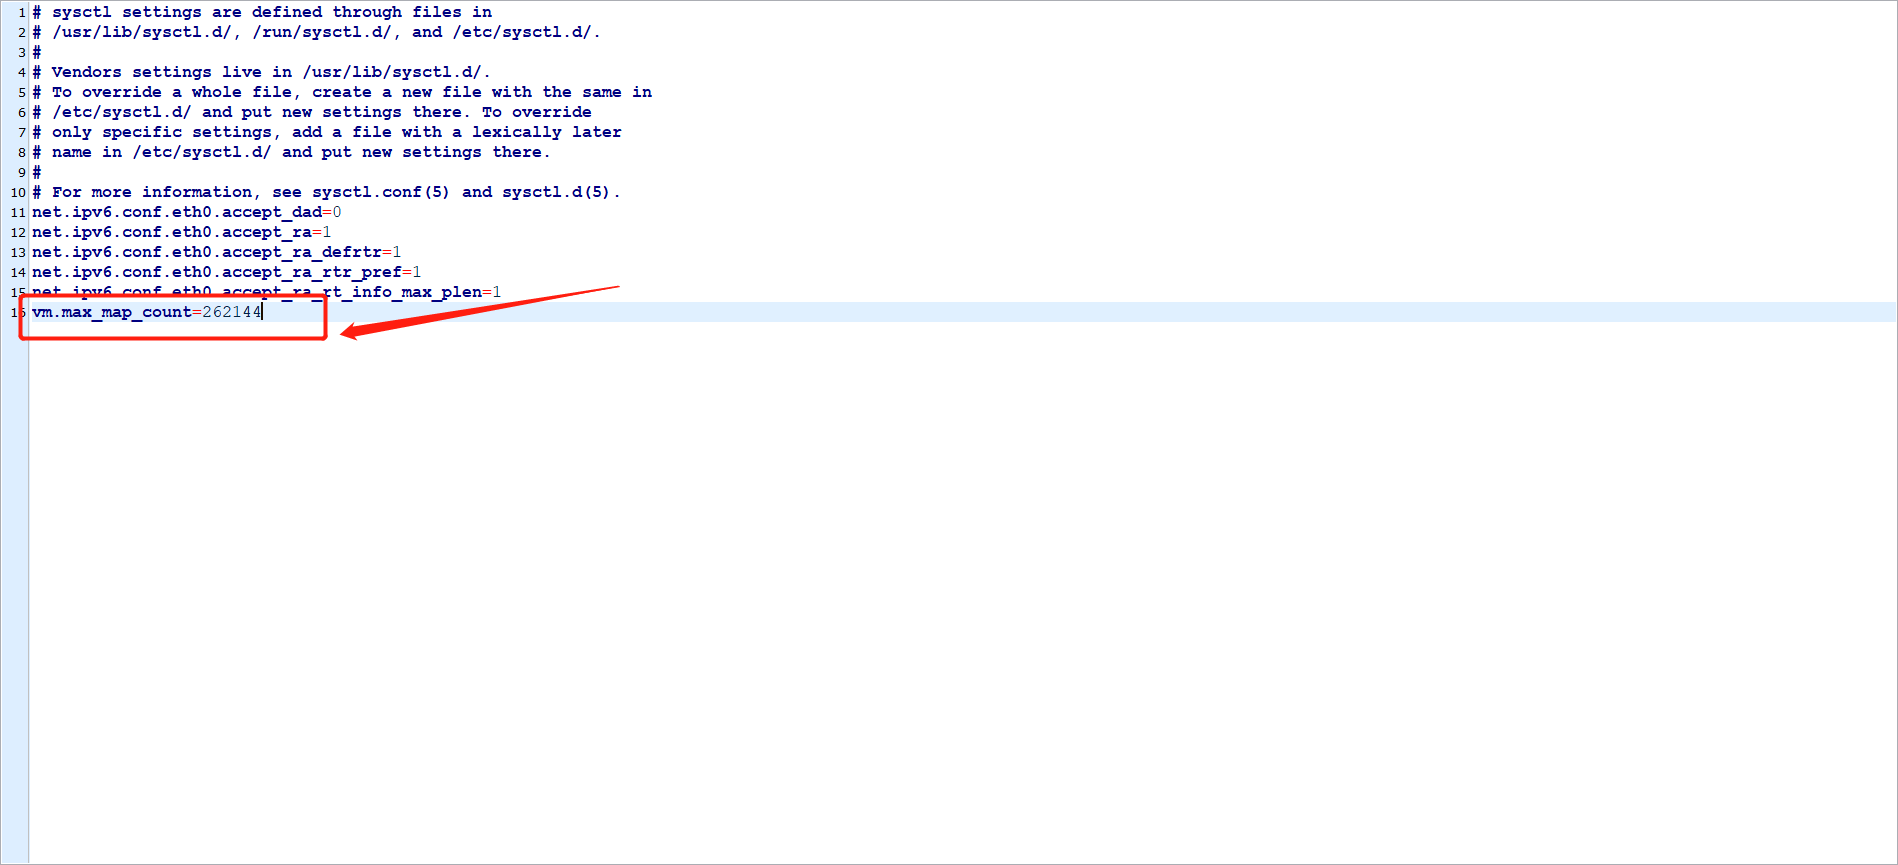
在/etc/sysctl.conf文件最后添加一行
vm.max_map_count=262144
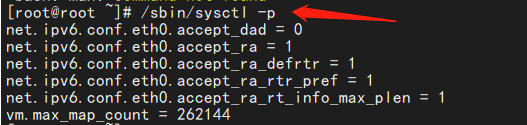
执行/sbin/sysctl -p立即生效
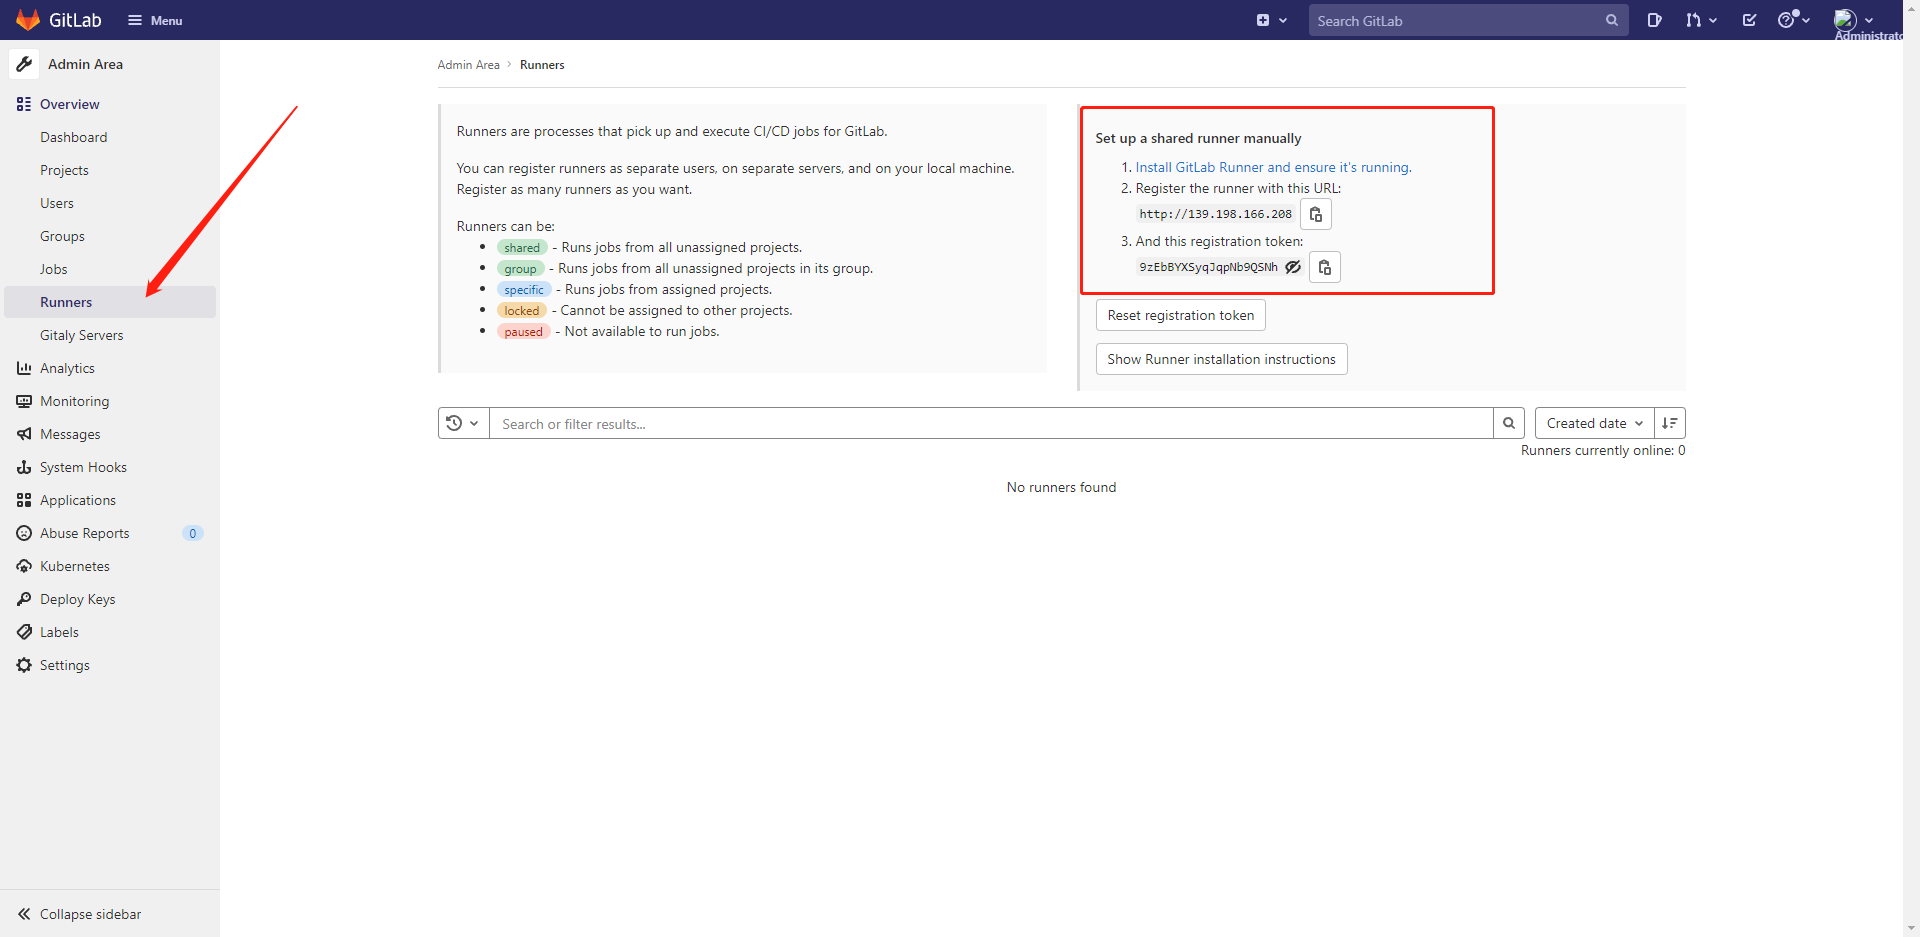
进入gitlab后,选择runner,进行相应的Token获取。
# 拉取镜像
docker pull gitlab/gitlab-runner:v13.2.4
# 创建容器映射目录
mkdir -p /dwz/docker-volume/gitlab-runner/config
# 创建容器并运行
docker run -d --name gitlab-runner \
--restart always \
-v /dwz/docker-volume/gitlab-runner/config:/etc/gitlab-runner \
-v /var/run/docker.sock:/var/run/docker.sock \
gitlab/gitlab-runner:v13.2.4
进入gitlab-runner容器后,配置相应的参数设置:
docker exec -it gitlab-runner gitlab-runner register -n \
--url http://139.198.166.208 \
--registration-token 9zEbBYXSyqJqpNb9QSNh \
--executor docker \
--description "Docker Runner" \
--docker-image "sonarsource/sonar-scanner-cli:latest" \
--docker-volumes /var/run/docker.sock:/var/run/docker.sock
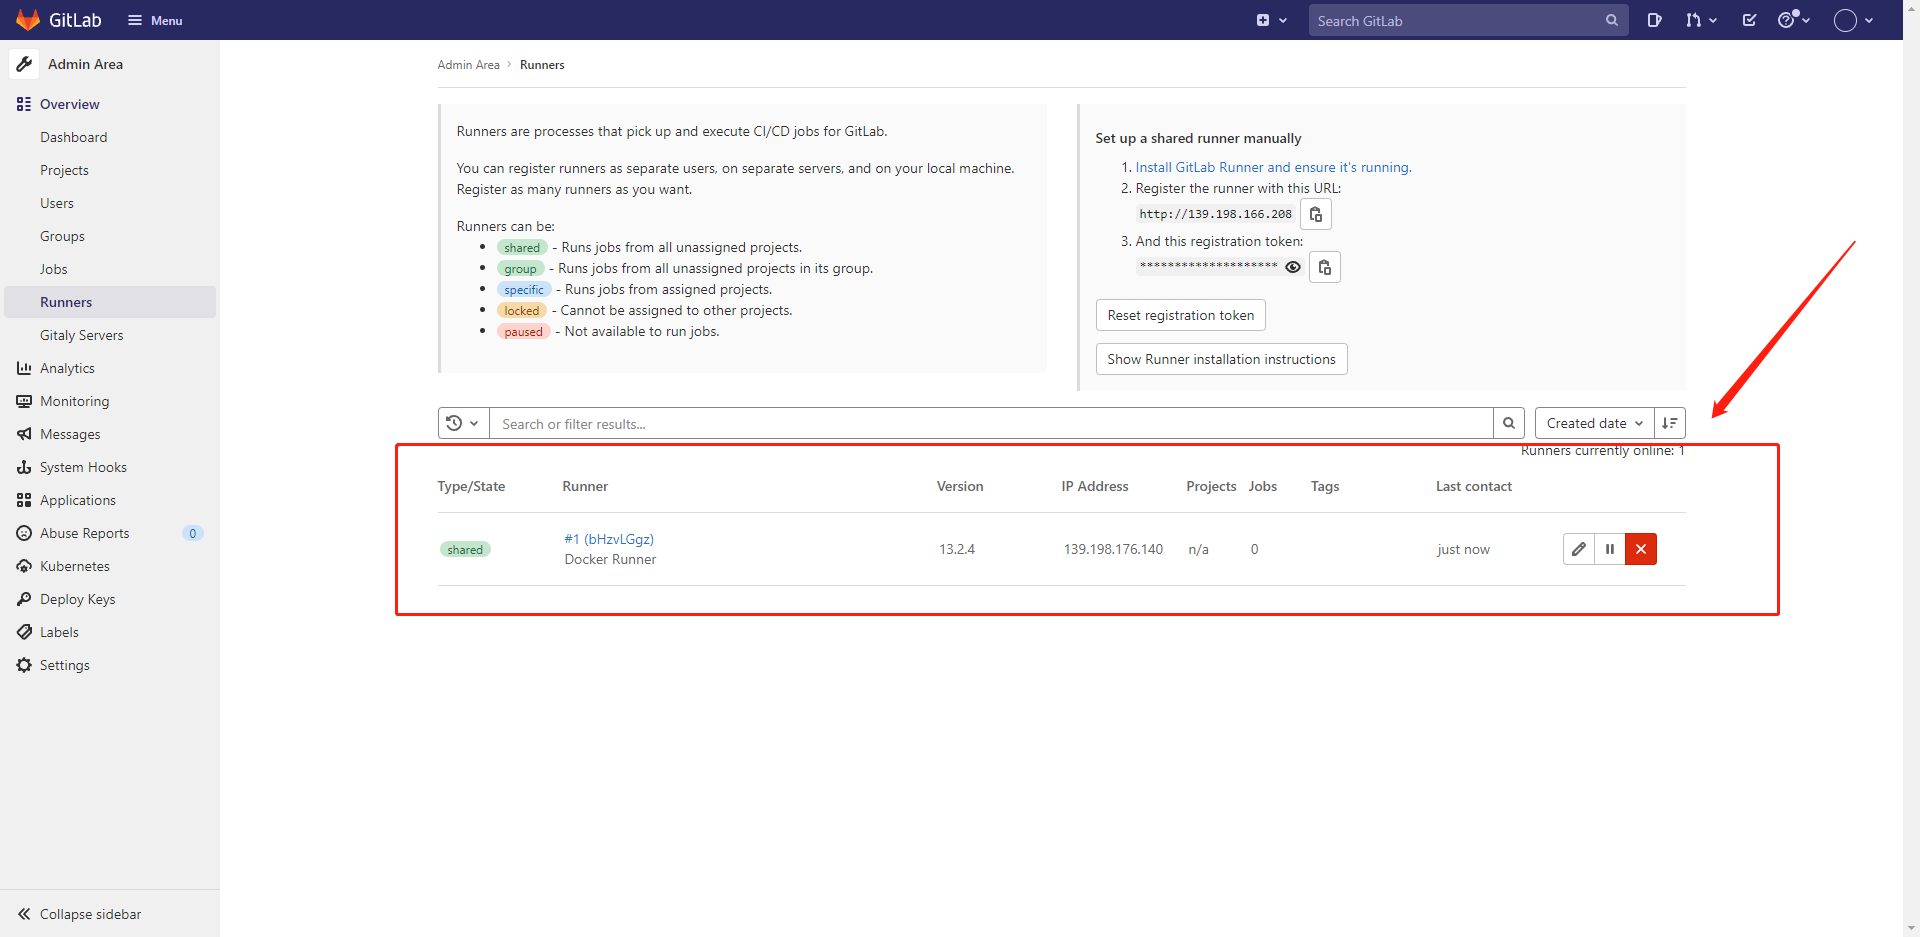
再次加载gitlab页面,出现runner配置项。
6.3进行项目分析(手动添加项目)设置当前的sonarqube的用户面和密码为admin和123456
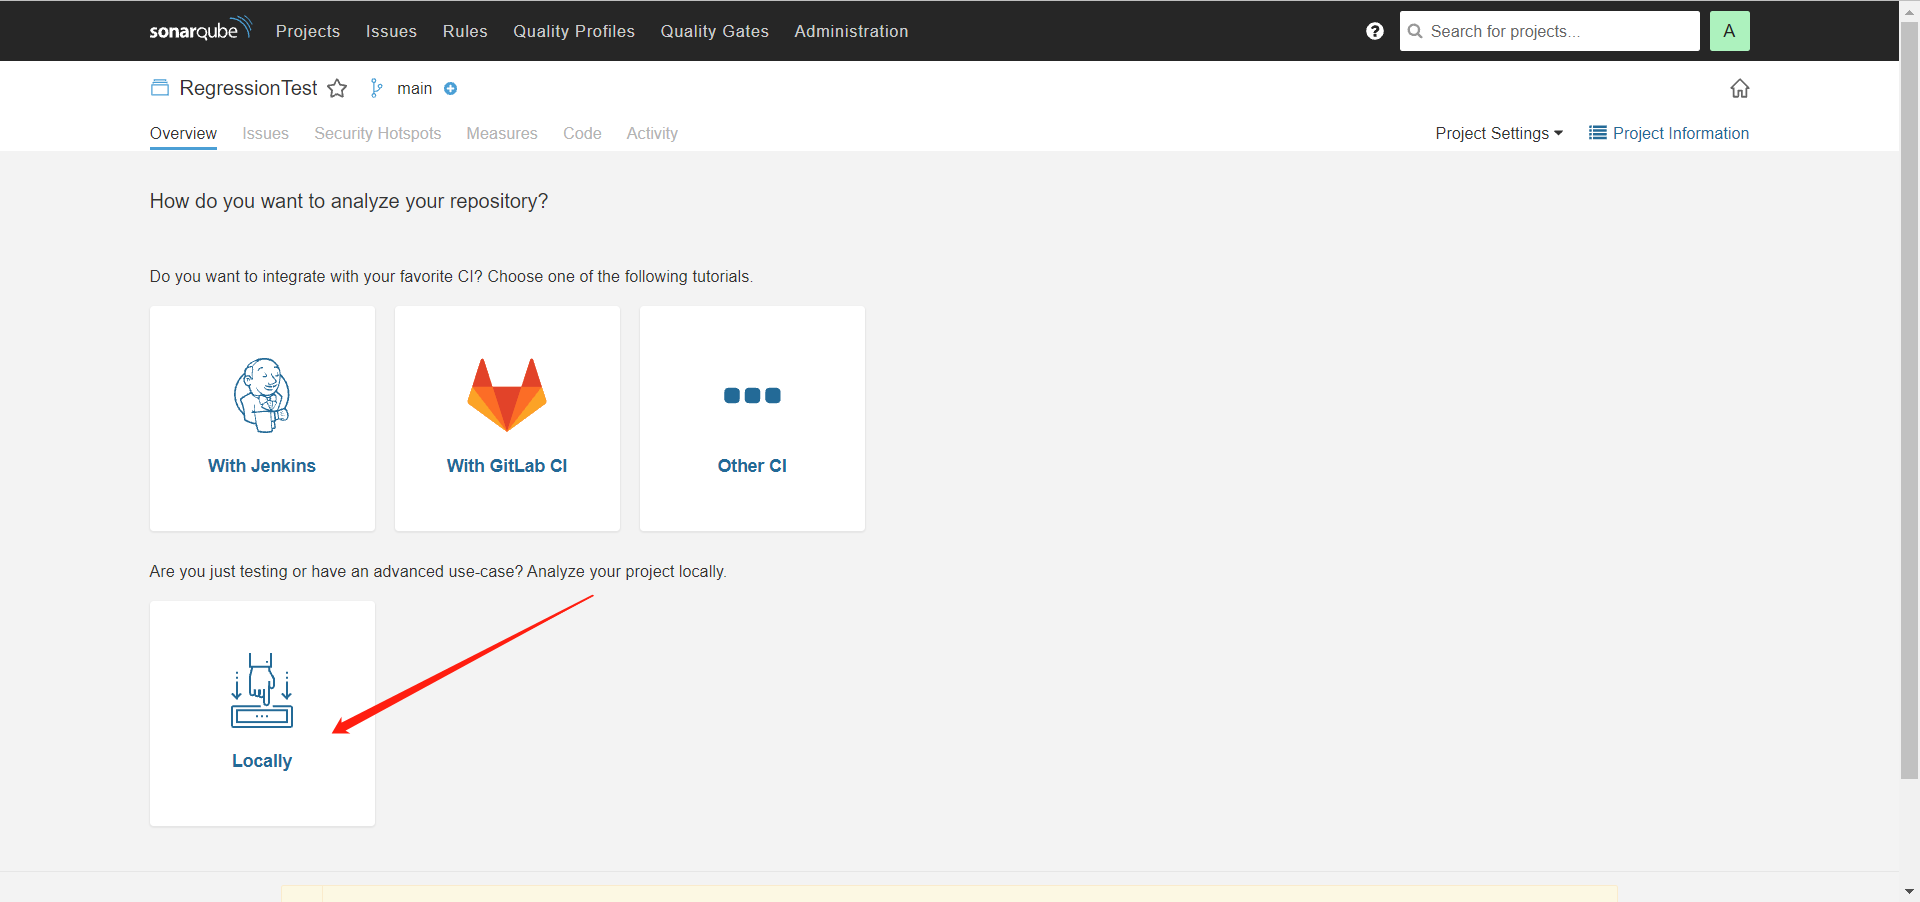
是否需要集成自己喜欢的CI,使用gitlab进行持续集成和持续部署。
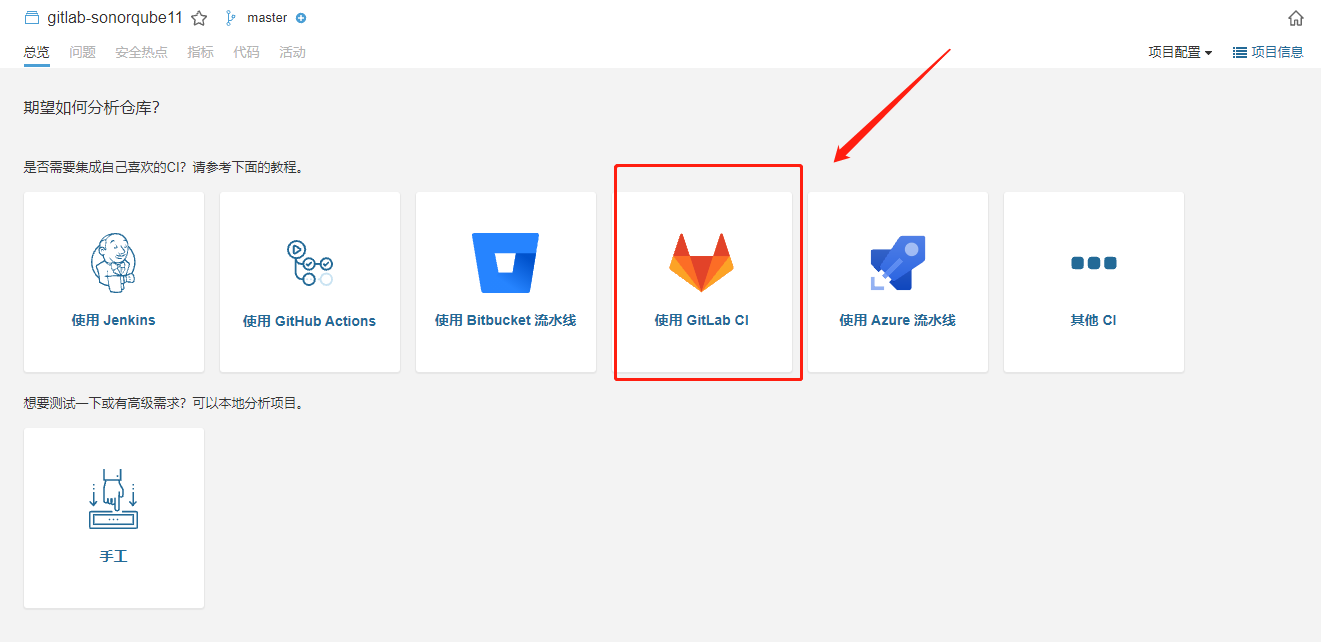
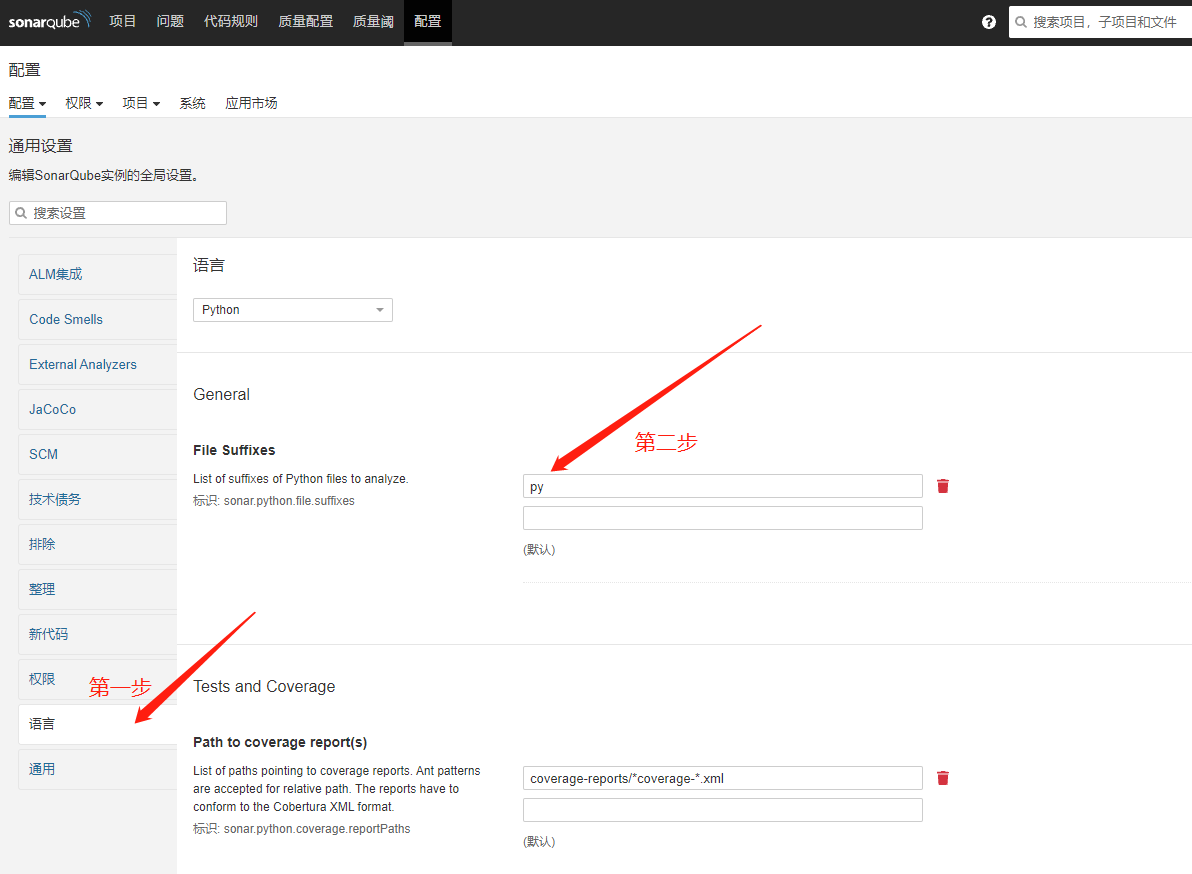
第一步 选择需要检测项目代码类型:
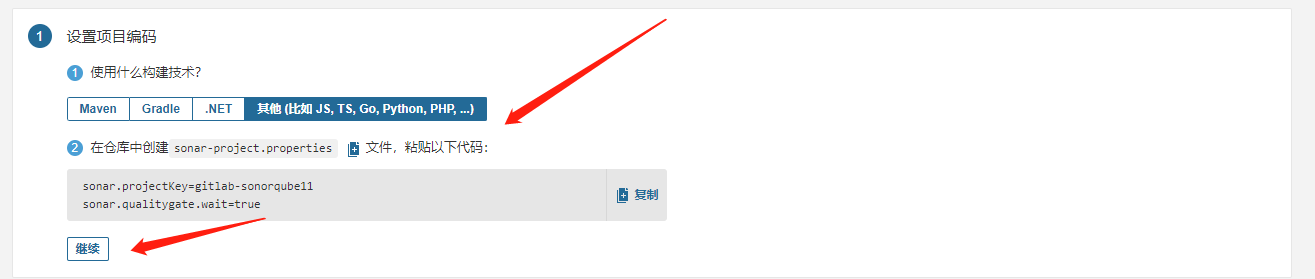
新建配置文件sonar-project.properties:
sonar.projectKey=gitlab-sonorqube
sonar.qualitygate.wait=true
sonar.language=py
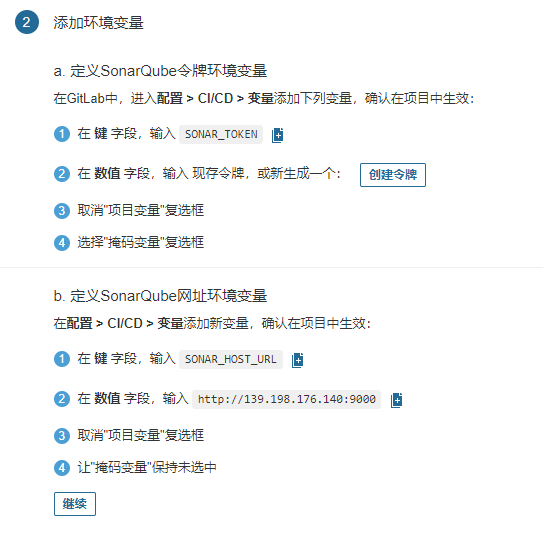
第二步:添加环境变量
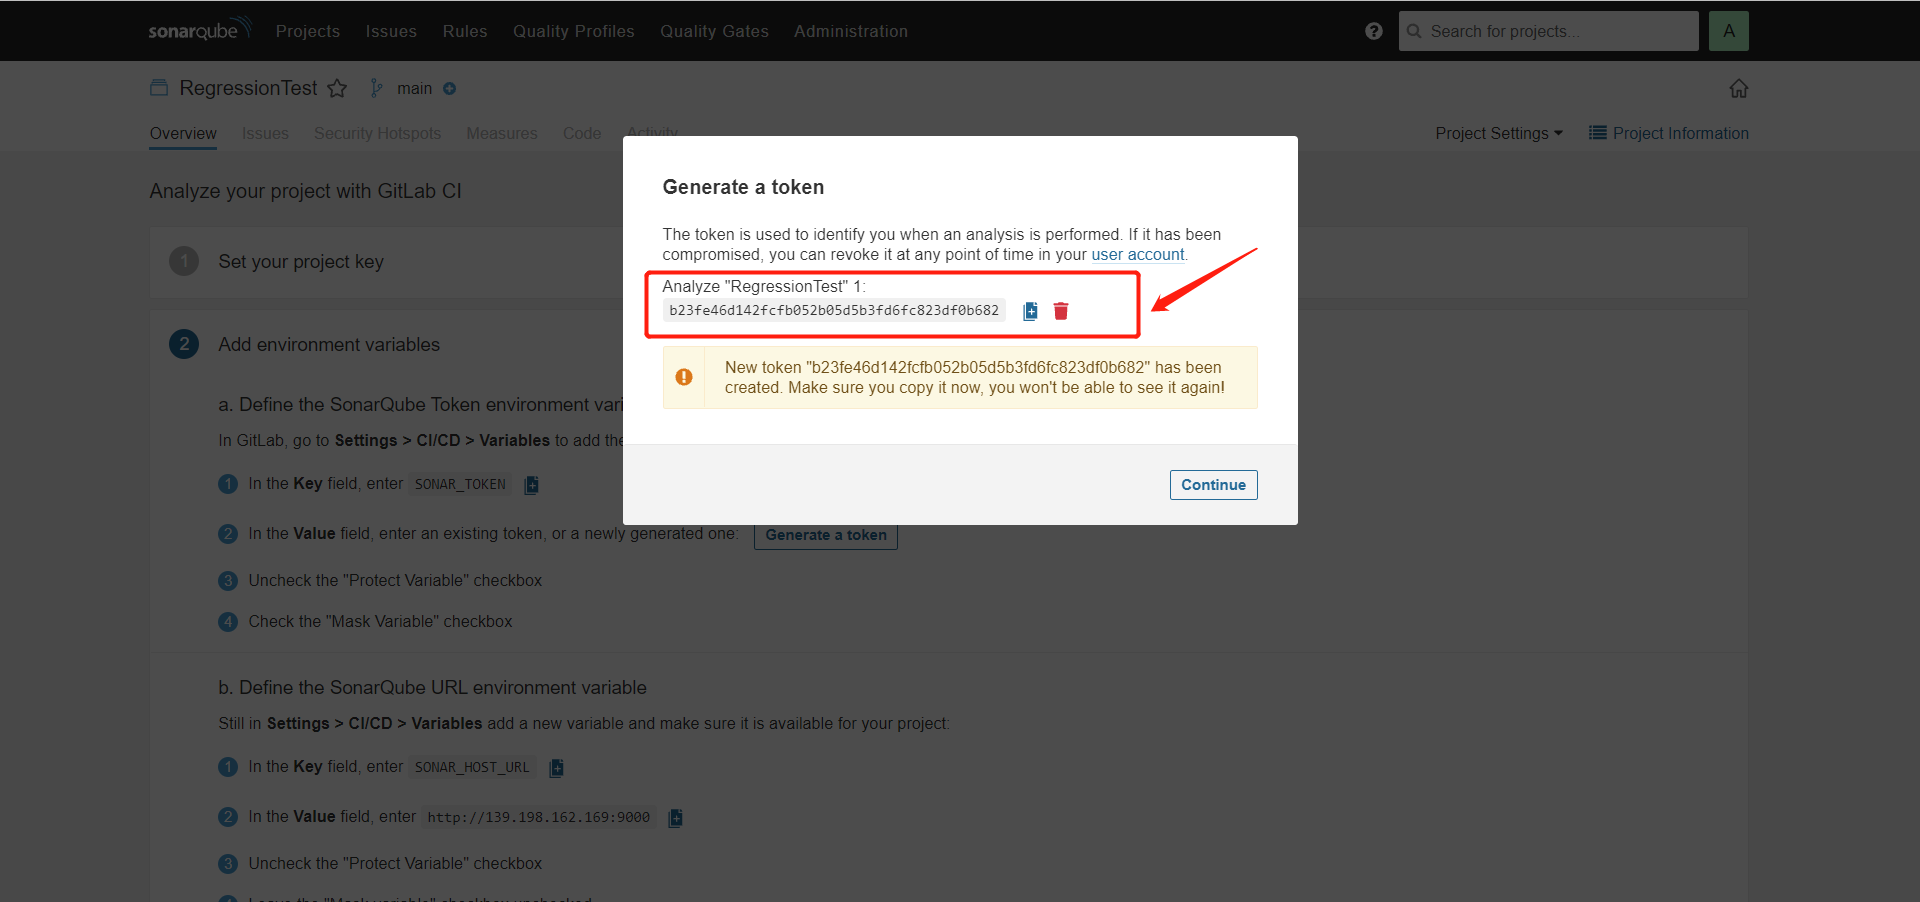
令牌密钥:b23fe46d142fcfb052b05d5b3fd6fc823df0b682
按照要求添加相应的环境变量:

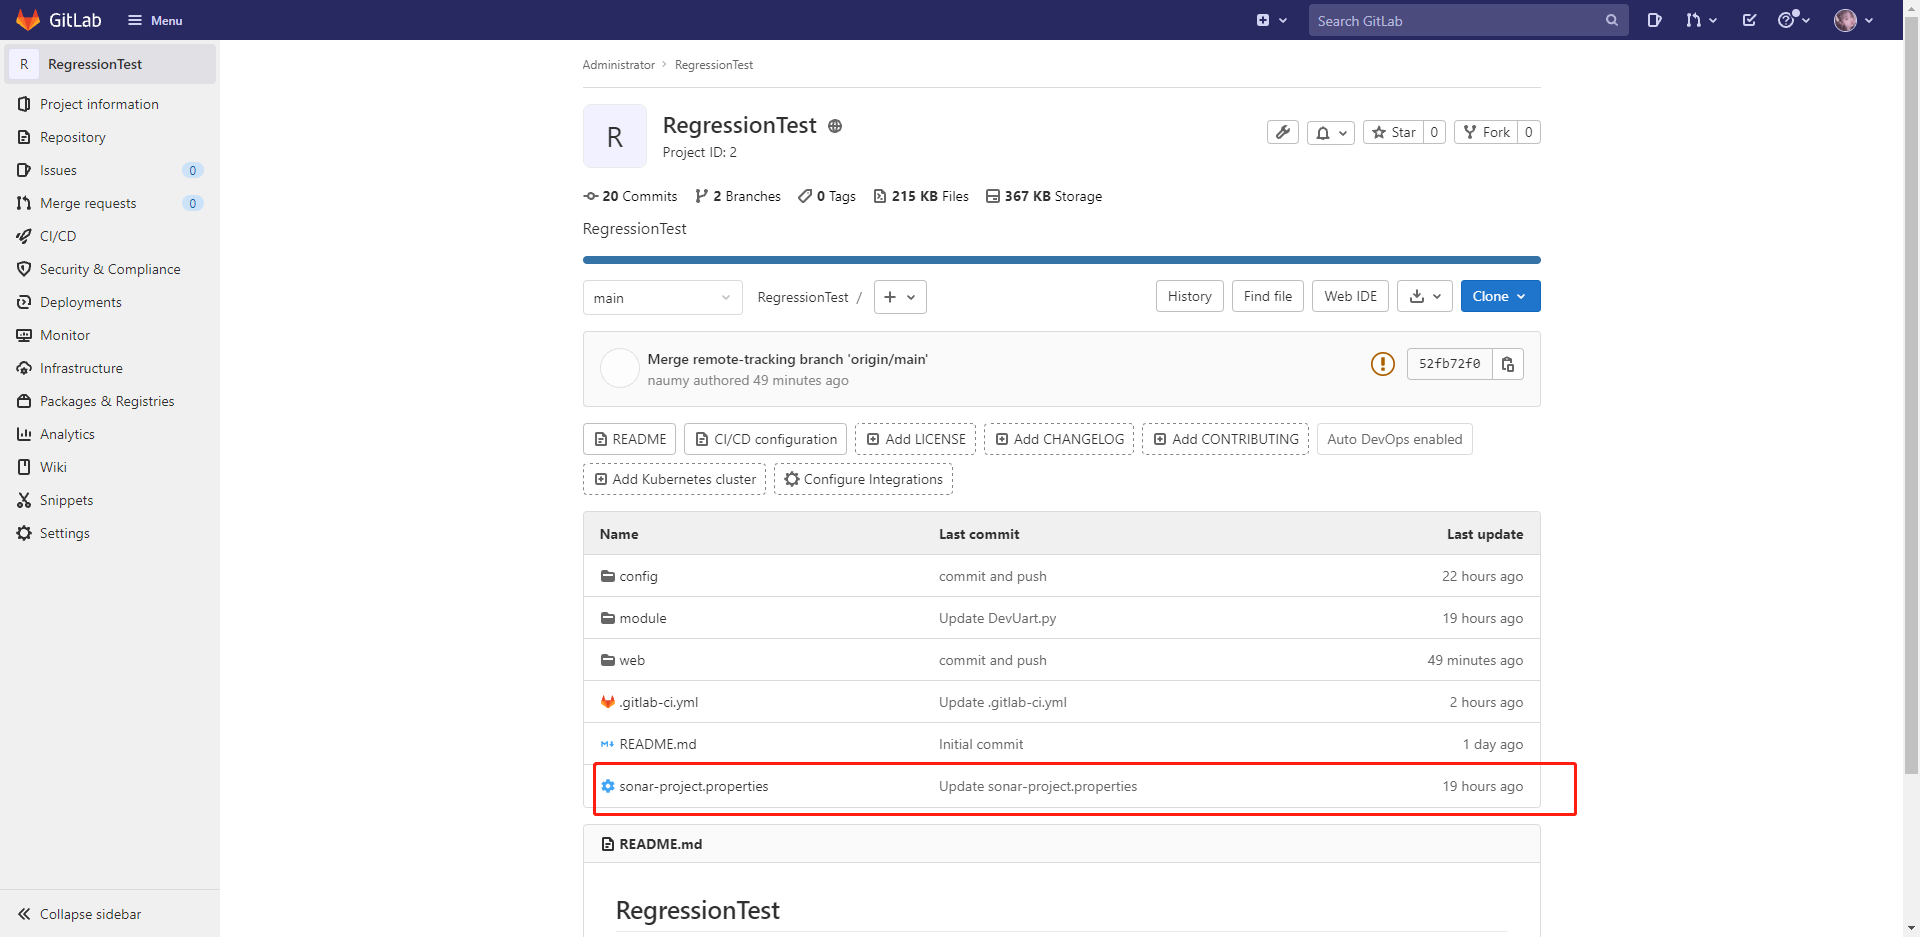
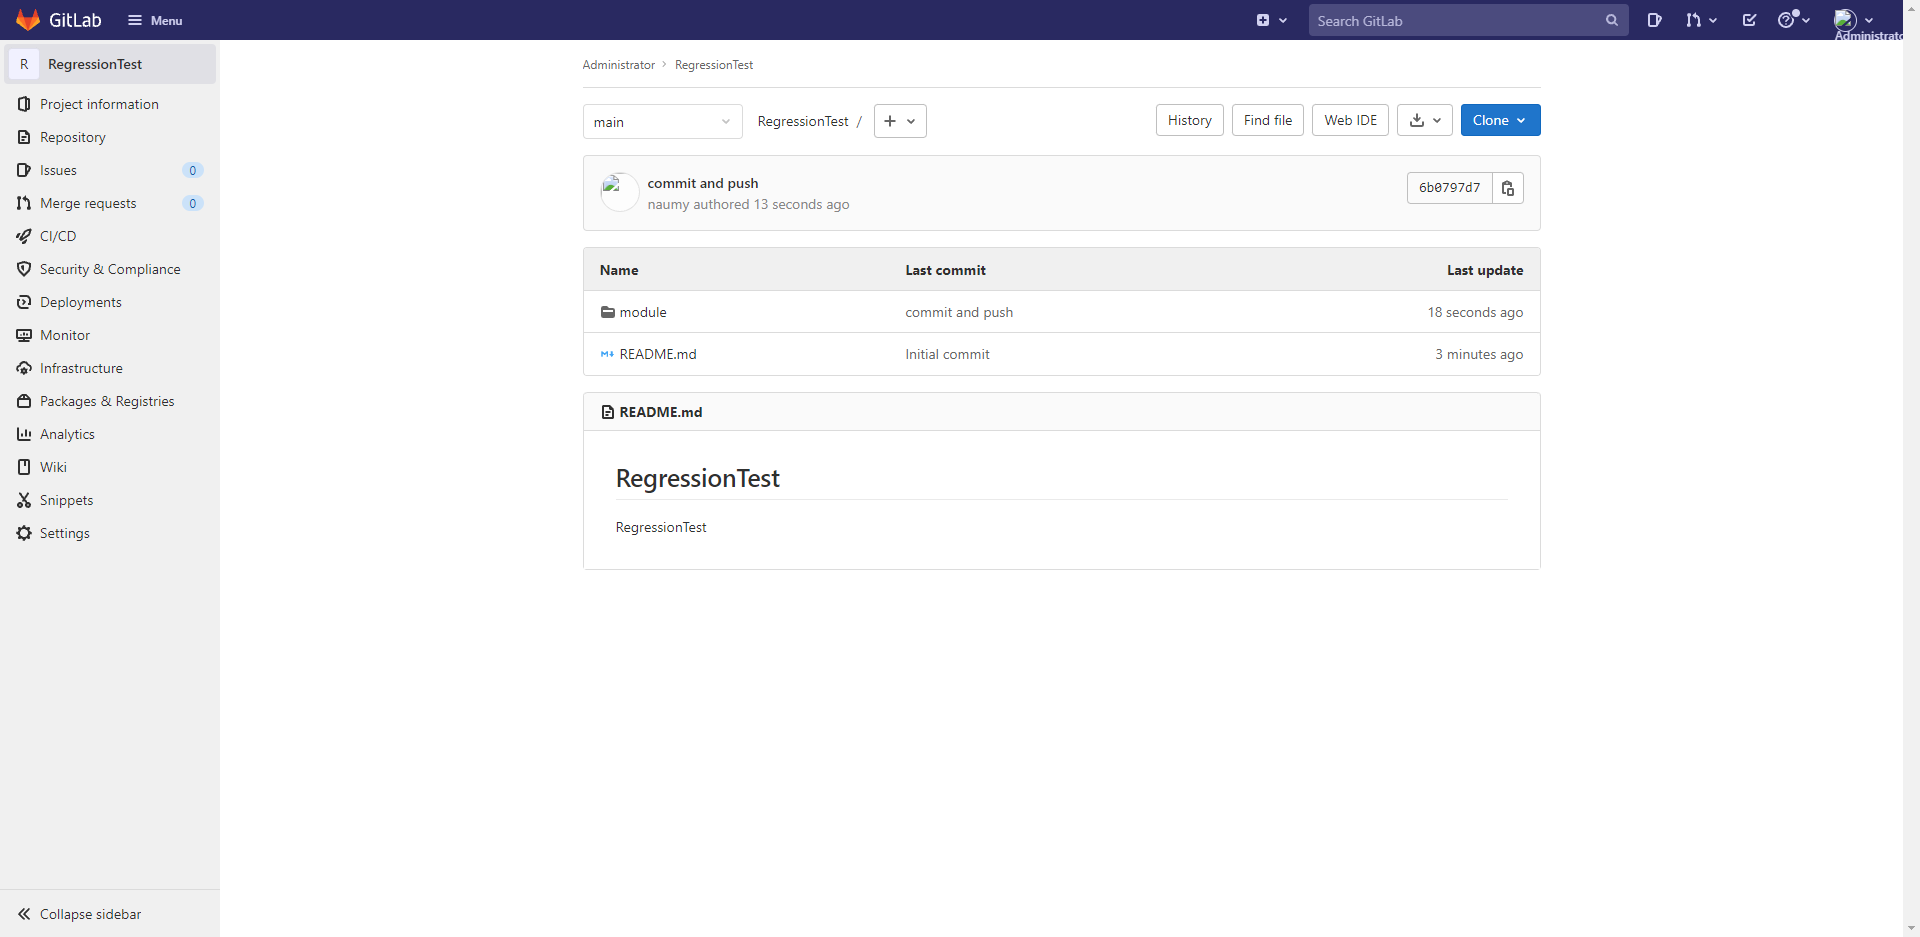
创建一个gitlab项目,实验使用的项目为python项目。
.gitlab-ci.yml文件内容为
# This file is a template, and might need editing before it works on your project.
# To contribute improvements to CI/CD templates, please follow the Development guide at:
# https://docs.gitlab.com/ee/development/cicd/templates.html
# This specific template is located at:
# https://gitlab.com/gitlab-org/gitlab/-/blob/master/lib/gitlab/ci/templates/Getting-Started.gitlab-ci.yml
# This is a sample GitLab CI/CD configuration file that should run without any modifications.
# It demonstrates a basic 3 stage CI/CD pipeline. Instead of real tests or scripts,
# it uses echo commands to simulate the pipeline execution.
#
# A pipeline is composed of independent jobs that run scripts, grouped into stages.
# Stages run in sequential order, but jobs within stages run in parallel.
#
# For more information, see: https://docs.gitlab.com/ee/ci/yaml/index.html#stages
stages:          # List of stages for jobs, and their order of execution
  - build
  - test
  - deploy
build-job:       # This job runs in the build stage, which runs first.
  stage: build
  script:
    - echo "Compiling the code..."
    - echo "Compile complete."
unit-test-job:   # This job runs in the test stage.
  stage: test    # It only starts when the job in the build stage completes successfully.
  script:
    - echo "Running unit tests... This will take about 60 seconds."
    - sleep 60
    - echo "Code coverage is 90%"
lint-test-job:   # This job also runs in the test stage.
  stage: test    # It can run at the same time as unit-test-job (in parallel).
  script:
    - echo "Linting code... This will take about 10 seconds."
    - sleep 10
    - echo "No lint issues found."
deploy-job:      # This job runs in the deploy stage.
  stage: deploy  # It only runs when *both* jobs in the test stage complete successfully.
  script:
    - echo "Deploying application..."
    - echo "Application successfully deployed."
image:
  name: sonarsource/sonar-scanner-cli:latest
  entrypoint: [""]
sonarqube-check:
  script:
    - sonar-scanner -X  -Dsonar.projectKey=gitlab-sonorqube -Dsonar.host.url=http://139.198.176.140:9000 -Dsonar.login=cbd26f998beeb61d7a991e0282efc430b020d9f1 -Dsonar.login=admin -Dsonar.password=admin -Dsonar.language=py  -Dsonar.java.binaries=build/  -Dsonar.projectVersion=1.0 -Dsonar.sources=.
  allow_failure: true
  only:
    - main # or the name of your main branch
提交代码后,可以获取到相应的测试信息。
https://sm.ms/image/ykYPlDgZVvuhzsq
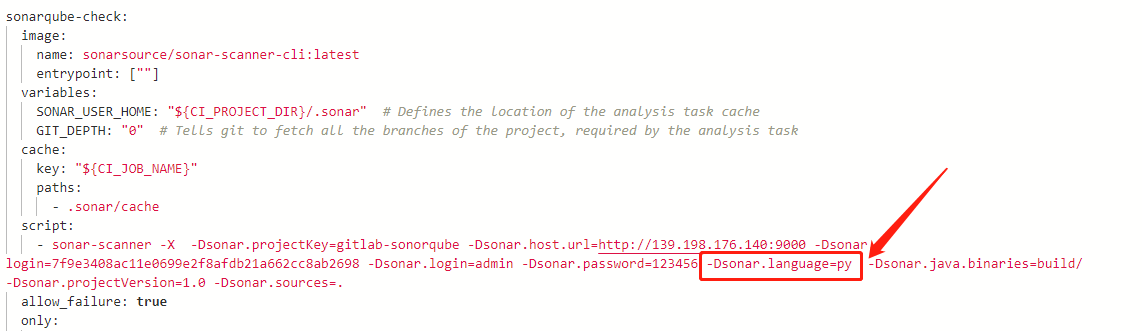
6.4.2版本为sonarqube-9.1-community.gitlab-ci.yml文件内容为
sonarqube-check:
  image:
    name: sonarsource/sonar-scanner-cli:latest
    entrypoint: [""]
  variables:
    SONAR_USER_HOME: "${CI_PROJECT_DIR}/.sonar"  # Defines the location of the analysis task cache
    GIT_DEPTH: "0"  # Tells git to fetch all the branches of the project, required by the analysis task
  cache:
    key: "${CI_JOB_NAME}"
    paths:
      - .sonar/cache
  script:
    - sonar-scanner -X  -Dsonar.projectKey=gitlab-sonorqube -Dsonar.host.url=http://139.198.176.140:9000 -Dsonar.login=7f9e3408ac11e0699e2f8afdb21a662cc8ab2698 -Dsonar.login=admin -Dsonar.password=123456 -Dsonar.language=py  -Dsonar.java.binaries=build/  -Dsonar.projectVersion=1.0 -Dsonar.sources=.
  allow_failure: true
  only:
    - main # or the name of your main branch
提交代码后gitlab会自动进行CI/CD:
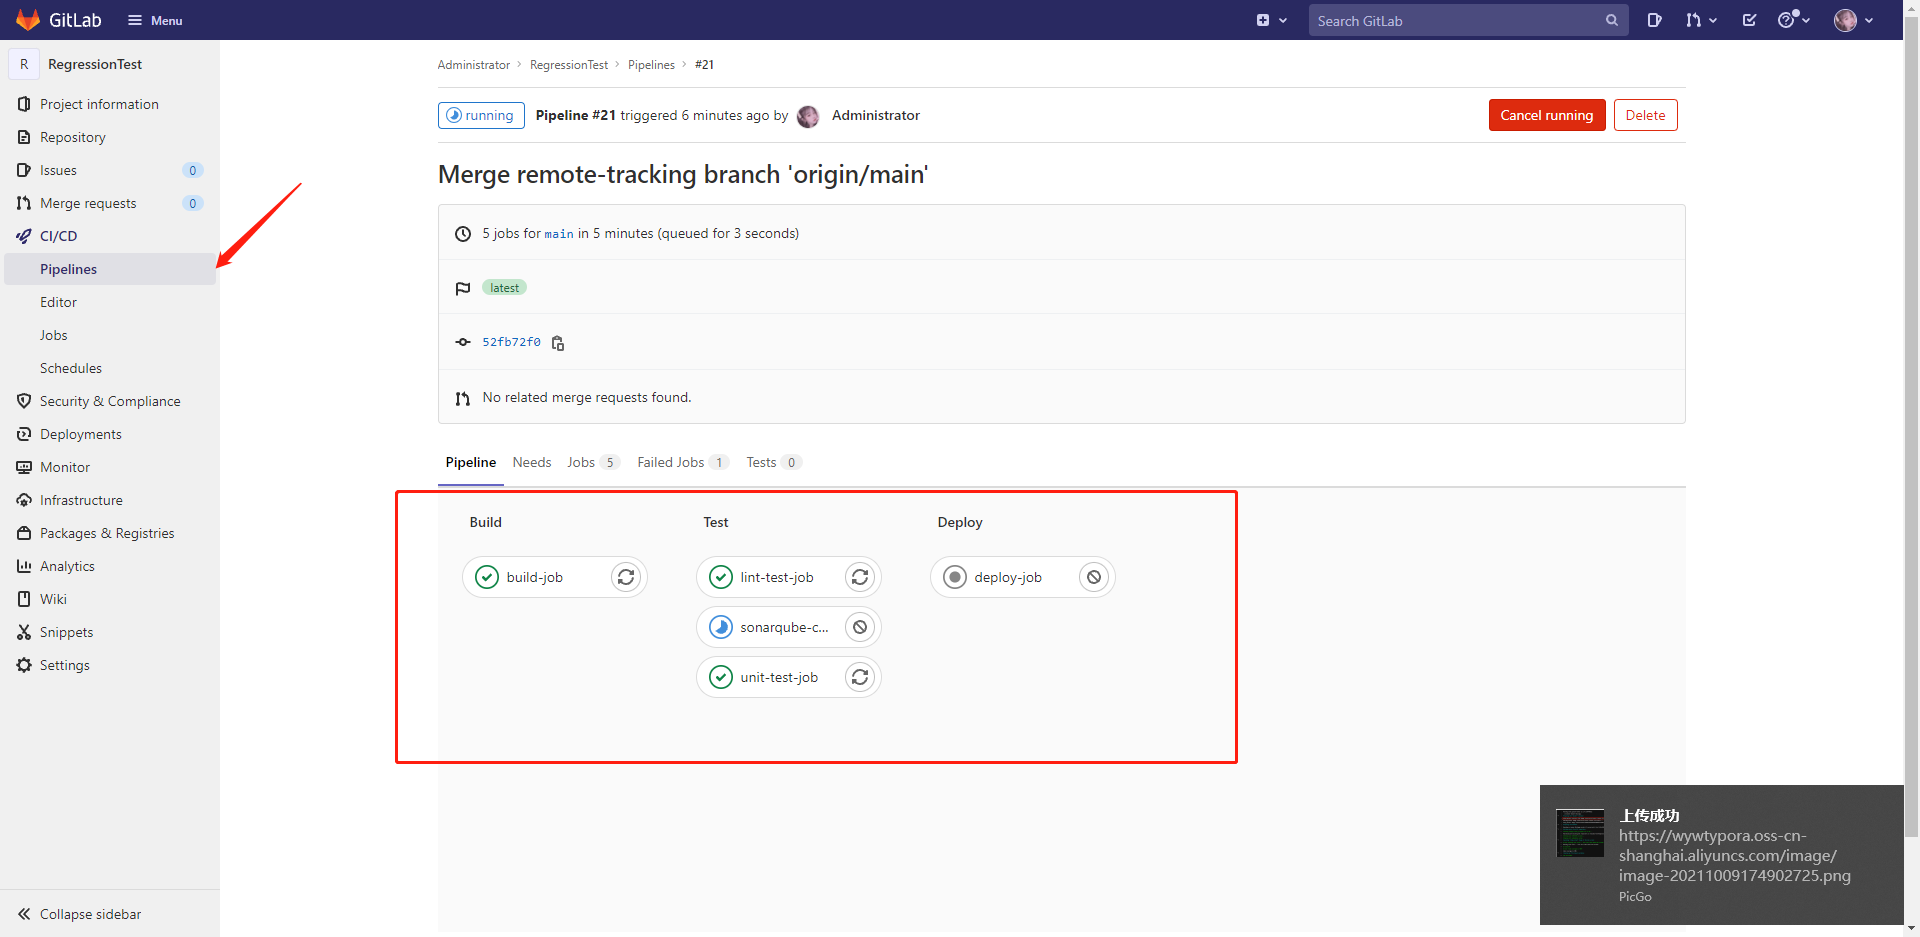
点入进去后查看相应的状态和内容是否符合需求:
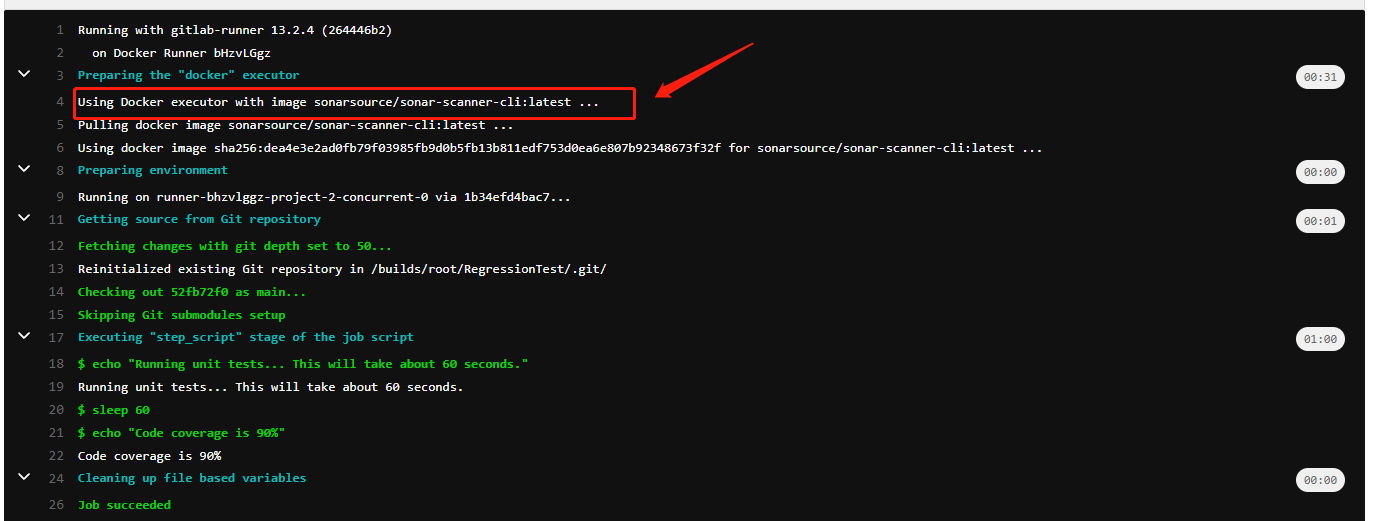
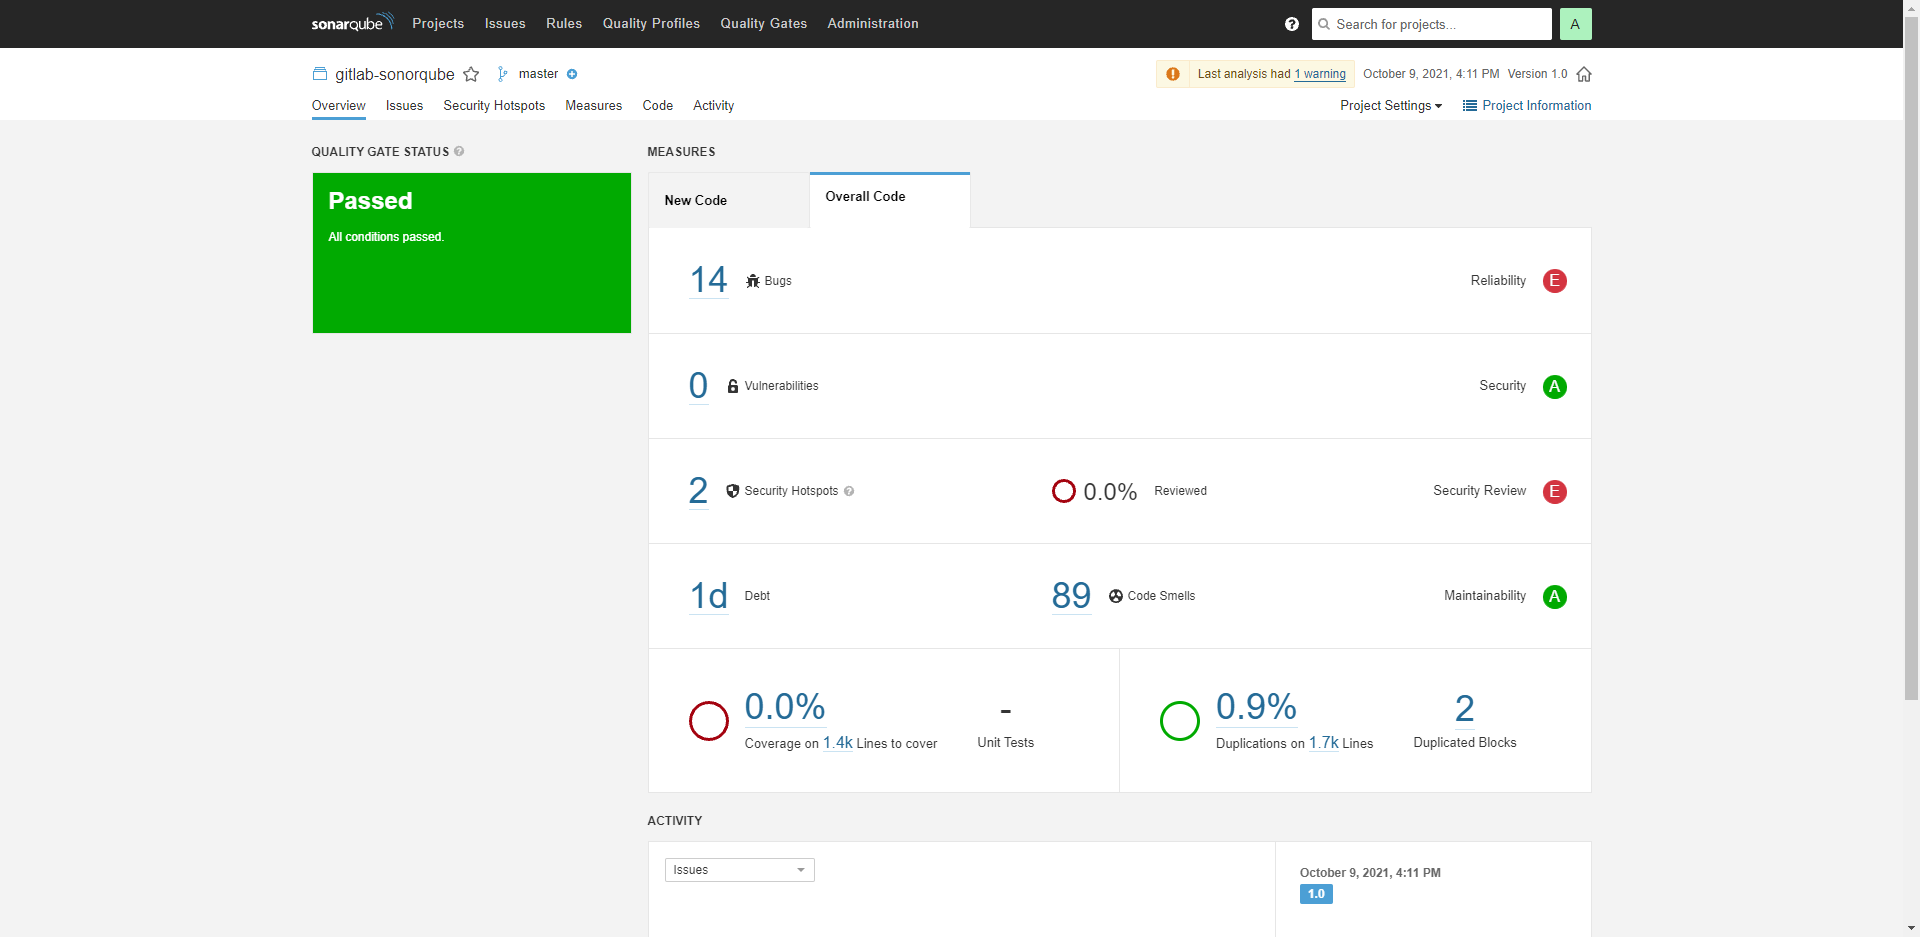
运行完成后,将看到对应的测试分析结果:

配置文件写错:
使用的python代码,所以后续将使用py作为语言选择。
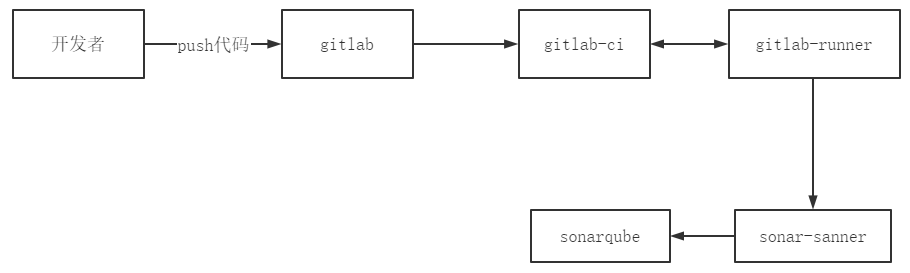
当前使用的工具有:
sonarqube:9.1.0-community 、gitlab/gitlab-runner:v13.2.4 、postgres:9.6.23 、gitlab/gitlab-ce、sonarsource/sonar-scanner-cli:latest

开发人员提交代码到gitlab仓库后,触发master分支自动合并任务,并进行代码扫描(可改成其他测试分支),扫面结果返回到sonarqube平台。
到此这篇关于Docker安装SonarQube的文章就介绍到这了,更多相关Docker安装SonarQube内容请搜索软件开发网以前的文章或继续浏览下面的相关文章希望大家以后多多支持软件开发网!