Centos 7 部署 OpenStack_Rocky版高可用集群3-1
控制主机三台(三网卡)+计算节点三台(双网卡、兼分布式存储OSD)+存储节点一台(双网卡部署MOD)
1.1.1组件| 组件 | 版本 | 备注 |
|---|---|---|
| CentOS | CentOS Linux release 7.7.1908 (Core) | |
| Openstack | Rocky | |
| Ceph | ceph version 12.2.12 luminous (stable) |
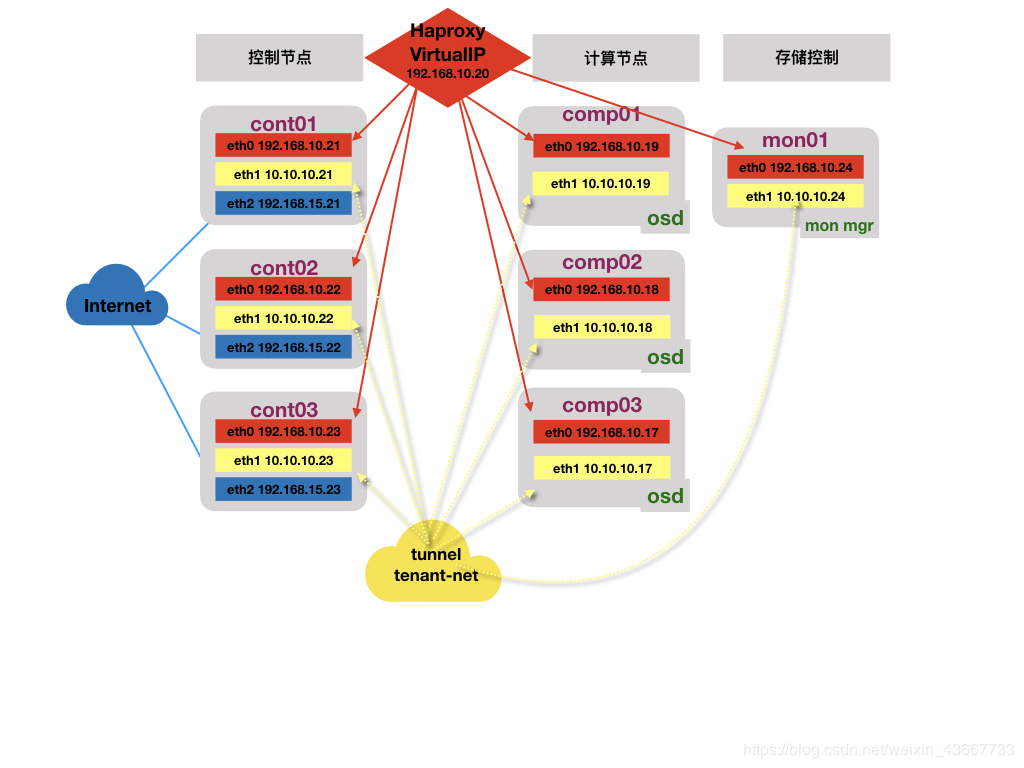
1.控制节点(cont01、cont02、cont03)运行MariaDB galeria,Haproxy,pacemaker,corosync,keystone, glance,horizon,nova&neutron&cinder管理相关组件和openstack相关的基础服务
2.计算节点(comp01、comp02、comp03)运行Nova-compute,neutron-openswitch-agent,ceph-osd等
3.存储控制节点(mon01)运行ceph-mon,ceph-mgr(如生产环境,建议也采用三个节点部署)
4.控制节点网络:
管理网络–>eth0:192.168.10.0/24 用于对openstack集群host os,api等网络管理
租户隧道VM网络–>eth1:10.10.10.0/24 用于集群内部的guest os之间的数据交换,采用vxlan/gre等方式
外部External网络–>eth2:主要用户计算节点访问internet/外部的floating ip
ps:此处的管理网络合并Management网络+API网络
5.计算节点网络:
管理网络–>eth0:192.168.10.0/24 用于对openstack集群host os,api等网络管理,
租户隧道网络–>eth1:10.10.10.0/24 用于集群内部的guest os之间的数据交换,采用vxlan/gre等方式
6.前端采用Haproxy做高可用,数据库采用MariaDB galeria,存储采用ceph分布式存储集群
7.无状态的服务,如xxx-api,采取active/active的模式运行;有状态的服务,如neturon-xxx-agent,cinder-volume等,建议采取active/passive的模式运行(因前端采用haproxy,客户端的多次请求可能会被转发到不同的控制节点,如果客户端请求被负载到无状态信息的控制节点,可能会导致操作请求失败);自身具有集群机制的服务,如rabbitmq,memcached等采用本身的集群机制。
1.1.3 物理拓扑(部分参考)
[root@cont02:/root]# vim /etc/hosts
192.168.10.21   cont01
192.168.10.22   cont02
192.168.10.23	  cont03
192.168.10.20	  VirtualIP
192.168.10.24   mon01
192.168.10.19   comp01
192.168.10.18	  comp02
192.168.10.17	  comp03
[root@cont02:/root]# scp /etc/hosts cont02:/etc/
[root@cont02:/root]# scp /etc/hosts cont03:/etc/
[root@cont02:/root]# scp /etc/hosts mon01:/etc/
[root@cont02:/root]# scp /etc/hosts comp01:/etc/
[root@cont02:/root]# scp /etc/hosts comp02:/etc/
[root@cont02:/root]# scp /etc/hosts comp03:/etc/
1.3 节点间设置免密互相登陆
[root@cont01:/root]# ssh-keygen
ssh-copy-id cont02
ssh-copy-id cont03
ssh-copy-id mon01
ssh-copy-id comp01
ssh-copy-id comp02
ssh-copy-id comp03
[root@cont02:/root]# ssh-keygen
ssh-copy-id cont01
ssh-copy-id cont03
ssh-copy-id mon01
ssh-copy-id comp01
ssh-copy-id comp02
ssh-copy-id comp03
[root@cont03:/root]# ssh-keygen
ssh-copy-id cont01
ssh-copy-id cont02
ssh-copy-id mon01
ssh-copy-id comp01
ssh-copy-id comp02
ssh-copy-id comp03
1.4 配置NTP服务
1.4.1 在控制节点进行配置(cont01、cont02、cont03)
[root@cont02:/root]# yum install system-config-date -y
[root@cont02:/root]# vim /etc/chrony.conf
  3 server 0.centos.pool.ntp.org iburst
  4 server 192.168.10.21    iburst
  5 server 192.168.10.22    iburst
  6 server 192.168.10.23    iburst
 25 # Allow NTP client access from local network.
 26 allow 192.168.0.0/16
[root@cont02:/root]# scp /etc/chrony.conf cont01:/etc/chrony.conf
[root@cont02:/root]# scp /etc/chrony.conf cont03:/etc/chrony.conf
[root@cont01:/root]# systemctl enable chronyd && systemctl restart chronyd
[root@cont01:/root]# systemctl status chronyd
[root@cont02:/root]# systemctl enable chronyd && systemctl restart chronyd
[root@cont02:/root]# systemctl status chronyd
[root@cont03:/root]# systemctl enable chronyd && systemctl restart chronyd
[root@cont03:/root]# systemctl status chronyd
[root@cont01:/root]# chronyc sources
210 Number of sources = 3
MS Name/IP address         Stratum Poll Reach LastRx Last sample
===============================================================================
^? cont02                        0   7     0     -     +0ns[   +0ns] +/-    0ns
^? cont03                        0   7     0     -     +0ns[   +0ns] +/-    0ns
^* 119.28.206.193                2   6    37    21   +197us[+1847us] +/-   55ms
[root@cont02:/root]# chronyc sources
210 Number of sources = 3
MS Name/IP address         Stratum Poll Reach LastRx Last sample
===============================================================================
^? cont01                        0   7     0     -     +0ns[   +0ns] +/-    0ns
^? cont03                        0   7     0     -     +0ns[   +0ns] +/-    0ns
^* 162.159.200.123               3   6    37    51  +2273us[ +143us] +/-  121ms
[root@cont03:/root]# chronyc sources
210 Number of sources = 3
MS Name/IP address         Stratum Poll Reach LastRx Last sample
===============================================================================
^? cont01                        0   8     0     -     +0ns[   +0ns] +/-    0ns
^? cont02                        0   8     0     -     +0ns[   +0ns] +/-    0ns
^? tick.ntp.infomaniak.ch        0   8     0     -     +0ns[   +0ns] +/-    0ns
[root@cont02:/root]# ssh cont01 'date'; ssh cont03 'date' ; date
Tue Feb 11 20:32:16 CST 2020
Tue Feb 11 20:32:16 CST 2020
Tue Feb 11 20:32:16 CST 2020
1.4.2 在其他节点上安装NTP软件(mon01、comp01、comp02、comp03)
[root@mon01:/root]# yum install chrony -y
[root@comp01:/root]# yum install chrony -y
[root@comp02:/root]# yum install chrony -y
[root@comp03:/root]# yum install chrony -y
[root@mon01:/root]# vim /etc/chrony.conf
  3 server 192.168.10.22    iburst
  4 server 192.168.10.21    iburst
  5 server 192.168.10.23    iburst
  6 #server 3.centos.pool.ntp.org iburst
[root@comp01:/root]# vim /etc/chrony.conf
  3 server 192.168.10.22    iburst
  4 server 192.168.10.21    iburst
  5 server 192.168.10.23    iburst
  6 #server 3.centos.pool.ntp.org iburst
[root@comp02:/root]# vim /etc/chrony.conf
  3 server 192.168.10.22    iburst
  4 server 192.168.10.21    iburst
  5 server 192.168.10.23    iburst
  6 #server 3.centos.pool.ntp.org iburst
  [root@comp03:/root]# vim /etc/chrony.conf
  3 server 192.168.10.22    iburst
  4 server 192.168.10.21    iburst
  5 server 192.168.10.23    iburst
  6 #server 3.centos.pool.ntp.org iburst
[root@mon01:/root]# systemctl enable chronyd && systemctl restart chronyd
[root@mon01:/root]# systemctl status chronyd
[root@comp01:/root]# systemctl enable chronyd && systemctl restart chronyd
[root@comp01:/root]# systemctl status chronyd
[root@comp02:/root]# systemctl enable chronyd && systemctl restart chronyd
[root@comp02:/root]# systemctl status chronyd
[root@comp03:/root]# systemctl enable chronyd && systemctl restart chronyd
[root@comp03:/root]# systemctl status chronyd
[root@mon01:/root]# chronyc sources
210 Number of sources = 3
MS Name/IP address         Stratum Poll Reach LastRx Last sample
===============================================================================
^? cont02                        0   7     0     -     +0ns[   +0ns] +/-    0ns
^? cont01                        0   7     0     -     +0ns[   +0ns] +/-    0ns
^? cont03                        0   7     0     -     +0ns[   +0ns] +/-    0ns
[root@mon01:/root]# timedatectl
      Local time: Wed 2020-01-15 11:22:23 CST
  Universal time: Wed 2020-01-15 03:22:23 UTC
        RTC time: Wed 2020-01-15 03:22:24
       Time zone: Asia/Shanghai (CST, +0800)
     NTP enabled: yes
NTP synchronized: no
 RTC in local TZ: no
      DST active: n/a
[root@comp01:/root]# chronyc sources
210 Number of sources = 3
MS Name/IP address         Stratum Poll Reach LastRx Last sample
===============================================================================
^? cont02                        0   7     0     -     +0ns[   +0ns] +/-    0ns
^? cont01                        0   7     0     -     +0ns[   +0ns] +/-    0ns
^? cont03                        0   7     0     -     +0ns[   +0ns] +/-    0ns
[root@comp01:/root]# timedatectl
      Local time: Wed 2020-01-15 11:22:24 CST
  Universal time: Wed 2020-01-15 03:22:24 UTC
        RTC time: Wed 2020-01-15 03:22:24
       Time zone: Asia/Shanghai (CST, +0800)
     NTP enabled: yes
NTP synchronized: no
 RTC in local TZ: no
      DST active: n/a
[root@comp02:/root]# chronyc sources
210 Number of sources = 3
MS Name/IP address         Stratum Poll Reach LastRx Last sample
===============================================================================
^? cont02                        0   7     0     -     +0ns[   +0ns] +/-    0ns
^? cont01                        0   7     0     -     +0ns[   +0ns] +/-    0ns
^? cont03                        0   7     0     -     +0ns[   +0ns] +/-    0ns
[root@comp02:/root]# timedatectl
      Local time: Wed 2020-01-15 11:22:24 CST
  Universal time: Wed 2020-01-15 03:22:24 UTC
        RTC time: Wed 2020-01-15 03:22:24
       Time zone: Asia/Shanghai (CST, +0800)
     NTP enabled: yes
NTP synchronized: no
 RTC in local TZ: no
      DST active: n/a
1.5 系统初始设置
1.5.1 所有节点关闭防火墙和selinux
systemctl stop firewalld && systemctl disable firewalld
setenforce 0
sed -i 's/SELINUX=enforcing/SELINUX=permissive/' /etc/selinux/config
1.5.2 所有节点编辑limits.conf和sysctl.conf文件
cat >>/etc/security/limits.conf<>/etc/sysctl.conf<<eof
   fs.file-max=655350
   net.ipv4.ip_local_port_range = 1025 65000
   net.ipv4.tcp_tw_recycle = 1
   net.ipv4.ip_nonlocal_bind = 1
eof
sysctl -p
2、部署MariaDB Galeria集群
2.1 控制节点安装mariadb(cont01、cont02、cont03)
Galera是Galera Cluster,是一种为数据库设计的新型的、数据不共享的、高度冗余的高可用方案,galera mariadb就是集成了Galera插件的MariaDB集群,Galera本身是具有多主特性的,所以galera mariadb不是传统的主备模式的集群,而是多主节点架构。
2.1.1 控制节点添加mariadb-10.4.11的yum源[root@cont01:/root]# vim /etc/yum.repos.d/mariadb.repo
[mariadb]
name = MariaDB
baseurl = http://mirror.netinch.com/pub/mariadb//mariadb-10.4.11/yum/centos7-amd64/
gpgcheck = 0
enabled = 1
[root@cont01:/root]# yum makecache
[root@cont02:/root]#
cat > /etc/yum.repos.d/mariadb.repo << EOF
[mariadb]
name = MariaDB
baseurl = http://mirror.netinch.com/pub/mariadb//mariadb-10.4.11/yum/centos7-amd64/
gpgcheck = 0
enabled = 1
EOF
[root@cont02:/root]# yum makecache
[root@cont02:/root]# scp /etc/yum.repos.d/mariadb.repo cont03:/etc/yum.repos.d/
[root@cont03:/root]# yum makecache
2.1.2 控制节点yum安装mariadb软件包并开启服务
[root@cont01:/root]# yum -y install MariaDB-server MariaDB-client galera-4 rsync xinetd wget ntpdate
[root@cont01:/root]# systemctl enable mariadb && systemctl start mariadb
[root@cont01:/root]# systemctl status mariadb
[root@cont02:/root]# yum -y install MariaDB-server MariaDB-client galera-4 rsync xinetd wget ntpdate
[root@cont02:/root]# systemctl enable mariadb && systemctl start mariadb
[root@cont02:/root]# systemctl status mariadb
[root@cont03:/root]# yum -y install MariaDB-server MariaDB-client galera-4 rsync xinetd wget ntpdate
[root@cont03:/root]# systemctl enable mariadb && systemctl start mariadb
[root@cont03:/root]# systemctl status mariadb
2.1.3 控制节点数据库安全设置、登陆数据库设置密码并授权
[root@cont02:/root]# mysql_secure_installation
注:Disallow root login remotely? [Y/n] n
密码:typora#2019
[root@cont02:/root]# mysql
MariaDB [(none)]> SET password=PASSWORD('typora#2019');
//密码设置过的可以省略
Query OK, 0 rows affected (0.002 sec)
MariaDB [(none)]> grant all privileges on *.* to 'root'@'%' identified by 'typora#2019' with grant option;
Query OK, 0 rows affected (0.002 sec)
MariaDB [(none)]> grant all privileges on *.* to 'mysql'@'%' identified by 'typora#2019' with grant option;
Query OK, 0 rows affected (0.008 sec)
MariaDB [(none)]> grant all privileges on *.* to 'root'@'localhost' identified by 'typora#2019' with grant option;
Query OK, 0 rows affected (0.002 sec)
MariaDB [(none)]> grant all privileges on *.* to 'mysql'@'localhost' identified by 'typora#2019' with grant option;
Query OK, 0 rows affected (0.008 sec)
MariaDB [(none)]> flush privileges;
Query OK, 0 rows affected (0.001 sec)
MariaDB [(none)]> exit
Bye
[root@cont01:/root]# mysql_secure_installation
注:Disallow root login remotely? [Y/n] n
密码:typora#2019
[root@cont01:/root]# mysql
MariaDB [(none)]> SET password=PASSWORD('typora#2019');
//密码设置过的可以省略
Query OK, 0 rows affected (0.012 sec)
MariaDB [(none)]> grant all privileges on *.* to 'root'@'%' identified by 'typora#2019' with grant option;
Query OK, 0 rows affected (0.008 sec)
MariaDB [(none)]> grant all privileges on *.* to 'mysql'@'%' identified by 'typora#2019' with grant option;
Query OK, 0 rows affected (0.008 sec)
MariaDB [(none)]> grant all privileges on *.* to 'root'@'localhost' identified by 'typora#2019' with grant option;
Query OK, 0 rows affected (0.002 sec)
MariaDB [(none)]> grant all privileges on *.* to 'mysql'@'localhost' identified by 'typora#2019' with grant option;
Query OK, 0 rows affected (0.008 sec)
MariaDB [(none)]> flush privileges;
Query OK, 0 rows affected (0.001 sec)
MariaDB [(none)]> exit
Bye
[root@cont03:/root]# mysql_secure_installation
注:Disallow root login remotely? [Y/n] n
密码:typora#2019
[root@cont03:/root]#  mysql
MariaDB [(none)]>  SET password=PASSWORD('typora#2019');
//密码设置过的可以省略
Query OK, 0 rows affected (0.009 sec)
MariaDB [(none)]> grant all privileges on *.* to 'root'@'localhost' identified by 'typora#2019' with grant option;
Query OK, 0 rows affected (0.002 sec)
MariaDB [(none)]> grant all privileges on *.* to 'mysql'@'localhost' identified by 'typora#2019' with grant option;
Query OK, 0 rows affected (0.008 sec)
MariaDB [(none)]> grant all privileges on *.* to 'root'@'%' identified by 'typora#2019' with grant option;
Query OK, 0 rows affected (0.016 sec)
MariaDB [(none)]> grant all privileges on *.* to 'mysql'@'%' identified by 'typora#2019' with grant option;
Query OK, 0 rows affected (0.008 sec)
MariaDB [(none)]> flush privileges;
Query OK, 0 rows affected (0.001 sec)
MariaDB [(none)]>  exit
Bye
2.1.4 配置MariaDB Galeria 集群 (控制节点全修改配置文件/etc/my.cnf.d/server.cnf)
[root@cont02:/root]# vim /etc/my.cnf.d/server.cnf
[server]
# this is only for the mysqld standalone daemon
[mysqld]
#
# * Galera-related settings
#
[galera]
# Mandatory settings
##wsrep_on=ON   #开启全同步复制模式
wsrep_on=ON
wsrep_provider=/usr/lib64/galera-4/libgalera_smm.so
wsrep_cluster_address="gcomm://192.168.10.22,192.168.10.23,192.168.10.21"
binlog_format=row
default_storage_engine=InnoDB
innodb_autoinc_lock_mode=2
##innodb_autoinc_lock_mode=2   #主键自增模式修改为交叉模式
##wsrep_slave_threads=8  #开启并行复制线程,根据CPU核数设置
#
# Allow server to accept connections on all interfaces.
#
bind-address=192.168.10.22
#
# Optional setting
#wsrep_slave_threads=1
#innodb_flush_log_at_trx_commit=0   #事务提交每隔1秒刷盘
##wsrep_certify_nonPK=ON #为没有显式申明主键的表生成一个用于certificationtest的主键,默认为ON
##query_cache_size=0      #关闭查询缓存
##wsrep_provider_options="gcache.size=4G" #同步复制缓冲池
wsrep_provider_options="gcache.size=1G"
wsrep_cluster_name=MariaDB-Galera-Cluster
wsrep_node_name=cont02
wsrep_node_address=192.168.10.22
wsrep_sst_method=rsync
##innodb_buffer_pool_size=2G
# this is only for embedded server
[embedded]
# This group is only read by MariaDB servers, not by MySQL.
# If you use the same .cnf file for MySQL and MariaDB,
# you can put MariaDB-only options here
[mariadb]
# This group is only read by MariaDB-10.4 servers.
# If you use the same .cnf file for MariaDB of different versions,
# use this group for options that older servers don't understand
[mariadb-10.4]
[root@cont01:/root]# vim /etc/my.cnf.d/server.cnf
[server]
# this is only for the mysqld standalone daemon
[mysqld]
#
# * Galera-related settings
#
[galera]
# Mandatory settings
wsrep_on=ON
wsrep_provider=/usr/lib64/galera-4/libgalera_smm.so
wsrep_cluster_address="gcomm://192.168.10.21,192.168.10.22,192.168.10.23"
binlog_format=row
default_storage_engine=InnoDB
innodb_autoinc_lock_mode=2
#
# Allow server to accept connections on all interfaces.
#
bind-address=192.168.10.21
#
# Optional setting
#wsrep_slave_threads=1
#innodb_flush_log_at_trx_commit=0
wsrep_provider_options="gcache.size=1G"
wsrep_cluster_name=MariaDB-Galera-Cluster
wsrep_node_name=cont01
wsrep_node_address=192.168.10.21
wsrep_sst_method=rsync
# this is only for embedded server
[embedded]
# This group is only read by MariaDB servers, not by MySQL.
# If you use the same .cnf file for MySQL and MariaDB,
# you can put MariaDB-only options here
[mariadb]
# This group is only read by MariaDB-10.4 servers.
# If you use the same .cnf file for MariaDB of different versions,
# use this group for options that older servers don't understand
[mariadb-10.4]
[root@cont03:/root]# vim /etc/my.cnf.d/server.cnf
[server]
# this is only for the mysqld standalone daemon
[mysqld]
#
# * Galera-related settings
#
[galera]
# Mandatory settings
wsrep_on=ON
wsrep_provider=/usr/lib64/galera-4/libgalera_smm.so
wsrep_cluster_address="gcomm://192.168.10.23,192.168.10.22,192.168.10.21"
binlog_format=row
default_storage_engine=InnoDB
innodb_autoinc_lock_mode=2
#
# Allow server to accept connections on all interfaces.
#
bind-address=192.168.10.23
#
# Optional setting
#wsrep_slave_threads=1
#innodb_flush_log_at_trx_commit=0
wsrep_provider_options="gcache.size=1G"
wsrep_cluster_name=MariaDB-Galera-Cluster
wsrep_node_name=cont03
wsrep_node_address=192.168.10.23
wsrep_sst_method=rsync
# this is only for embedded server
[embedded]
# This group is only read by MariaDB servers, not by MySQL.
# If you use the same .cnf file for MySQL and MariaDB,
# you can put MariaDB-only options here
[mariadb]
# This group is only read by MariaDB-10.4 servers.
# If you use the same .cnf file for MariaDB of different versions,
# use this group for options that older servers don't understand
[mariadb-10.4]
2.1.5 控制节点停止mariadb.service
[root@cont01:/root]# systemctl daemon-reload
[root@cont01:/root]# systemctl stop mariadb.service
[root@cont02:/root]# systemctl daemon-reload
[root@cont02:/root]# systemctl stop mariadb.service
[root@cont03:/root]# systemctl daemon-reload
[root@cont03:/root]# systemctl stop mariadb.service
2.1.6 启动初始化集群
[root@cont02:/root]# mysqld_safe --defaults-file=/etc/my.cnf.d/server.cnf --user=mysql --wsrep-new-cluster &
[root@cont03:/root]# systemctl start mariadb
[root@cont03:/root]# systemctl status mariadb
[root@cont03:/root]# systemctl enable mariadb
[root@cont01:/root]# systemctl start mariadb
[root@cont01:/root]# systemctl status mariadb
[root@cont01:/root]# systemctl enable mariadb
注:两个节点启动成功后,在重新启动第一个节点:(删除第一个节点数据)
[root@cont02:/root]# pkill -9 mysql
[1]+  Killed                  mysqld_safe --defaults-file=/etc/my.cnf.d/server.cnf --user=mysql --wsrep-new-cluster
[root@cont02:/root]# rm -rf /var/lib/mysql/*
[root@cont02:/root]# systemctl start mariadb.service
[root@cont02:/root]# systemctl enable mariadb.service
Created symlink from /etc/systemd/system/mysql.service to /usr/lib/systemd/system/mariadb.service.
Created symlink from /etc/systemd/system/mysqld.service to /usr/lib/systemd/system/mariadb.service.
Created symlink from /etc/systemd/system/multi-user.target.wants/mariadb.service to /usr/lib/systemd/system/mariadb.service.
[root@cont02:/root]# systemctl status mariadb.service
注意:每次在第一台集群上,需要使用下面的命令来启动:
galera_new_cluster
2.2 登录数据库,查看集群状态
[root@cont02:/root]# mysql -uroot -p"typora#2019"
Welcome to the MariaDB monitor.  Commands end with ; or \g.
Your MariaDB connection id is 13
Server version: 10.4.11-MariaDB MariaDB Server
Copyright (c) 2000, 2018, Oracle, MariaDB Corporation Ab and others.
Type 'help;' or '\h' for help. Type '\c' to clear the current input statement.
MariaDB [(none)]> show databases;
+--------------------+
| Database           |
+--------------------+
| information_schema |
| mysql              |
| performance_schema |
+--------------------+
3 rows in set (0.002 sec)
MariaDB [(none)]> show status like 'wsrep_cluster_size';
+--------------------+-------+
| Variable_name      | Value |
+--------------------+-------+
| wsrep_cluster_size | 3     |
+--------------------+-------+
1 row in set (0.002 sec)
MariaDB [(none)]> show status like 'wsrep%';
+-------------------------------+----------------------------------------------------
| Variable_name                 | Value
+-------------------------------+----------------------------------------------------
| wsrep_local_state_uuid        | a2b7231d-383a-11ea-b086-83d5778583b5
| wsrep_protocol_version        | 10
| wsrep_last_committed          | 5
| wsrep_replicated              | 0
| wsrep_replicated_bytes        | 0
| wsrep_repl_keys               | 0
| wsrep_repl_keys_bytes         | 0
| wsrep_repl_data_bytes         | 0
| wsrep_repl_other_bytes        | 0
| wsrep_received                | 3
| wsrep_received_bytes          | 256
| wsrep_local_commits           | 0
| wsrep_local_cert_failures     | 0
| wsrep_local_replays           | 0
| wsrep_local_send_queue        | 0
| wsrep_local_send_queue_max    | 1
| wsrep_local_send_queue_min    | 0
| wsrep_local_send_queue_avg    | 0
| wsrep_local_recv_queue        | 0
| wsrep_local_recv_queue_max    | 1
| wsrep_local_recv_queue_min    | 0
| wsrep_local_recv_queue_avg    | 0
| wsrep_local_cached_downto     | 5
| wsrep_flow_control_paused_ns  | 0
| wsrep_flow_control_paused     | 0
| wsrep_flow_control_sent       | 0
| wsrep_flow_control_recv       | 0
| wsrep_cert_deps_distance      | 0
| wsrep_apply_oooe              | 0
| wsrep_apply_oool              | 0
| wsrep_apply_window            | 0
| wsrep_commit_oooe             | 0
| wsrep_commit_oool             | 0
| wsrep_commit_window           | 0
| wsrep_local_state             | 4
| wsrep_local_state_comment     | Synced
| wsrep_cert_index_size         | 0
| wsrep_causal_reads            | 0
| wsrep_cert_interval           | 0
| wsrep_open_transactions       | 0
| wsrep_open_connections        | 0
| wsrep_incoming_addresses      | AUTO,AUTO,AUTO
| wsrep_cluster_weight          | 3
| wsrep_desync_count            | 0
| wsrep_evs_delayed             |
| wsrep_evs_evict_list          |
| wsrep_evs_repl_latency        | 0/0/0/0/0
| wsrep_evs_state               | OPERATIONAL
| wsrep_gcomm_uuid              | d5a23bb7-383a-11ea-b735-86c7a20615b4
| wsrep_applier_thread_count    | 1
| wsrep_cluster_capabilities    |
| wsrep_cluster_conf_id         | 18446744073709551615
| wsrep_cluster_size            | 3
| wsrep_cluster_state_uuid      | a2b7231d-383a-11ea-b086-83d5778583b5
| wsrep_cluster_status          | Primary
| wsrep_connected               | ON
| wsrep_local_bf_aborts         | 0
| wsrep_local_index             | 0
| wsrep_provider_capabilities   | :MULTI_MASTER:CERTIFICATION:PARALLEL_APPLYING:TRX_REPLAY:ISOLATION:PAUSE:CAUSAL_READS:INCREMENTAL_WRITESET:UNORDERED:PREORDERED:STREAMING:NBO: |
| wsrep_provider_name           | Galera
| wsrep_provider_vendor         | Codership Oy
| wsrep_provider_version        | 26.4.3(r4535)
| wsrep_ready                   | ON
| wsrep_rollbacker_thread_count | 1
| wsrep_thread_count            | 2                                                   +-------------------------------+---------------------------------------------
65 rows in set (0.002 sec)
MariaDB [(none)]> exit
Bye
[root@cont01:/var/lib/mysql]#  cat grastate.dat gvwstate.dat
# GALERA saved state
version: 2.1
uuid:    a2b7231d-383a-11ea-b086-83d5778583b5
seqno:   -1
safe_to_bootstrap: 0
my_uuid: b3a02e5e-383a-11ea-ab01-07face985b92
#vwbeg
view_id: 3 ac080e34-383a-11ea-9d9d-22f77c5f5aa6 5
bootstrap: 0
member: ac080e34-383a-11ea-9d9d-22f77c5f5aa6 0
member: b3a02e5e-383a-11ea-ab01-07face985b92 0
member: d5a23bb7-383a-11ea-b735-86c7a20615b4 0
#vwend
[root@cont02:/var/lib/mysql]#  cat grastate.dat gvwstate.dat
# GALERA saved state
version: 2.1
uuid:    a2b7231d-383a-11ea-b086-83d5778583b5
seqno:   -1
safe_to_bootstrap: 0
my_uuid: d5a23bb7-383a-11ea-b735-86c7a20615b4
#vwbeg
view_id: 3 ac080e34-383a-11ea-9d9d-22f77c5f5aa6 5
bootstrap: 0
member: ac080e34-383a-11ea-9d9d-22f77c5f5aa6 0
member: b3a02e5e-383a-11ea-ab01-07face985b92 0
member: d5a23bb7-383a-11ea-b735-86c7a20615b4 0
#vwend
[root@cont03:/var/lib/mysql]# cat grastate.dat gvwstate.dat
# GALERA saved state
version: 2.1
uuid:    a2b7231d-383a-11ea-b086-83d5778583b5
seqno:   -1
safe_to_bootstrap: 0
my_uuid: ac080e34-383a-11ea-9d9d-22f77c5f5aa6
#vwbeg
view_id: 3 ac080e34-383a-11ea-9d9d-22f77c5f5aa6 5
bootstrap: 0
member: ac080e34-383a-11ea-9d9d-22f77c5f5aa6 0
member: b3a02e5e-383a-11ea-ab01-07face985b92 0
member: d5a23bb7-383a-11ea-b735-86c7a20615b4 0
#vwend
2.3 每个控制节点/usr/bin 目录下面编辑心跳检测clustercheck脚本
[root@cont01:/root]# cd /usr/bin/
[root@cont01:/usr/bin]# wget https://raw.githubusercontent.com/olafz/percona-clustercheck/master/clustercheck
[root@cont01:/usr/bin]# chmod +x /usr/bin/clustercheck
[root@cont01:/usr/bin]# ls -ld /usr/bin/clustercheck
-rwxr-xr-x. 1 root root 3882 Jan 15 19:19 /usr/bin/clustercheck
[root@cont02:/root]# cd /usr/bin/
[root@cont02:/usr/bin]# wget https://raw.githubusercontent.com/olafz/percona-clustercheck/master/clustercheck
[root@cont02:/usr/bin]# chmod +x /usr/bin/clustercheck
[root@cont02:/usr/bin]# ls -ld /usr/bin/clustercheck
-rwxr-xr-x. 1 root root 3882 Jan 15 19:18 /usr/bin/clustercheck
[root@cont03:/root]# cd /usr/bin/
[root@cont03:/usr/bin]# wget https://raw.githubusercontent.com/olafz/percona-clustercheck/master/clustercheck
[root@cont03:/usr/bin]# chmod +x /usr/bin/clustercheck
[root@cont03:/usr/bin]# ls -ld /usr/bin/clustercheck
-rwxr-xr-x. 1 root root 3882 Jan 15 19:20 /usr/bin/clustercheck
3、部署xinetd服务
3.1 控制节点安装xinetd服务,用于监控Galera服务(cont01、cont02、cont03)
yum install xinetd -y
3.2 控制节点创建xinetd配置文件
[root@cont01:/root]#
cat </etc/xinetd.d/mysqlchk
#default:on
##description:mysqlchk
service mysqlchk
{
        disable = no
        flags   = REUSE
        socket_type     = stream
        port    = 9200
        wait    =       no
        user    = nobody
        server  = /usr/bin/clustercheck
        log_on_failure   += USERID
        only_from       = 0.0.0.0/0
        per_source      = UNLIMITED
}
END
[root@cont01:/root]# scp /etc/xinetd.d/mysqlchk cont02:/etc/xinetd.d/
[root@cont01:/root]# scp /etc/xinetd.d/mysqlchk cont03:/etc/xinetd.d/
3.3 控制节点修改/etc/services
echo ‘mysqlchk 9200/tcp #mysqlchk’>>/etc/services
[root@cont02:/root]# vim /etc/services
转到第10101行,注释使用端口9200的服务,并为mysqlchk / clustercheck添加一行。
mysqlchk        9200/tcp                # mysqlchk
#wap-wsp         9200/tcp                # WAP connectionless session service
#wap-wsp         9200/udp                # WAP connectionless session service
[root@cont01:/root]# vim /etc/services
转到第10101行,注释使用端口9200的服务,并为mysqlchk / clustercheck添加一行。
mysqlchk        9200/tcp                # mysqlchk
#wap-wsp         9200/tcp                # WAP connectionless session service
#wap-wsp         9200/udp                # WAP connectionless session service
[root@cont03:/root]# vim /etc/services
转到第10101行,注释使用端口9200的服务,并为mysqlchk / clustercheck添加一行。
mysqlchk        9200/tcp                # mysqlchk
#wap-wsp         9200/tcp                # WAP connectionless session service
#wap-wsp         9200/udp                # WAP connectionless session service
3.4 控制节点启动xinetd服务(cont01、cont02、cont03)
systemctl enable xinetd && systemctl start xinetd
systemctl status xinetd
3.5 故障场景的恢复
①首先判断当前数据库集群中是否有服务在启动着,如果有则直接启动服务即可,其中1个节点挂了,一般只需要重启A节点的服务即可。
② 如果当前所有节点的数据库服务都挂了,则需要找状态最新的那个节点让它携带–wsrep-new-cluster参数启动,启动起来之后其它节点直接启动服务即可。
查找最新节点策略:首先获取各节点的grastate.dat文件中的seqno值,值最大的那个就是最新的节点;如果所有节点的seqno都是-1,则去比较所有节点的gvwstate.dat文件中的my_uuid和view_id是否相等,相等的那个则作为第一个启动节点,第一个启动节点启动后,其它节点正常启动即可;如果依然未找到则需要人工干预来恢复了。
//启动
mysqld_safe --defaults-file=/etc/my.cnf.d/server.cnf --user=mysql --wsrep-new-cluster &
③如果以上两种方法全部无效。尝试采用下面操作(进过测试,此方法成功过)
第一步:数据库无法启动情况下把/var/lib/mysql下的几个文件:grastate.dat gvwstate.dat galera.cache mysql.sock统统删掉再重启
第二步:更改配置文件中的 “gcomm://” 是特殊的地址,仅仅是galera cluster初始化启动时候使用。如果集群启动以后,我们关闭了第一个节点,那么再次启动的时候必须先修改"gcomm://"为其他节点的集群地址,首次作为发起人则此处为空,不向任何人同步数据。
第三步:本机启动服务:systemctl start mariadb
第四部:启动集群:galera_new_cluster
第五步:启动其余节点上的mariadb: systemctl start mariadb
第六步:更改回 “gcomm://” 重启数据库systemctl restart mariadb
监测状态说明
集群完整性检查:
wsrep_cluster_state_uuid:在集群所有节点的值应该是相同的,有不同值的节点,说明其没有连接入集群.
wsrep_cluster_conf_id:正常情况下所有节点上该值是一样的.如果值不同,说明该节点被临时”分区”了.当节点之间网络连接恢复的时候应该会恢复一样的值.
wsrep_cluster_size:如果这个值跟预期的节点数一致,则所有的集群节点已经连接.
wsrep_cluster_status:集群组成的状态.如果不为”Primary”,说明出现”分区”或是”split-brain”状况.
节点状态检查:
wsrep_ready: 该值为ON,则说明可以接受SQL负载.如果为Off,则需要检查wsrep_connected.
wsrep_connected: 如果该值为Off,且wsrep_ready的值也为Off,则说明该节点没有连接到集群.(可能是wsrep_cluster_address或wsrep_cluster_name等配置错造成的.具体错误需要查看错误日志)
wsrep_local_state_comment:如果wsrep_connected为On,但wsrep_ready为OFF,则可以从该项查看原因.
复制健康检查:
wsrep_flow_control_paused:表示复制停止了多长时间.即表明集群因为Slave延迟而慢的程度.值为0~1,越靠近0越好,值为1表示复制完全停止.可优化wsrep_slave_threads的值来改善.
wsrep_cert_deps_distance:有多少事务可以并行应用处理.wsrep_slave_threads设置的值不应该高出该值太多.
wsrep_flow_control_sent:表示该节点已经停止复制了多少次.
wsrep_local_recv_queue_avg:表示slave事务队列的平均长度.slave瓶颈的预兆.
当前节点数据库状态
MariaDB [(none)]> show status like 'wsrep_local_state_comment';
+---------------------------+--------+
| Variable_name | Value |
+---------------------------+--------+
| wsrep_local_state_comment | Synced |
+---------------------------+--------+
MariaDB [(none)]> show status like 'wsrep_cluster_size';
+--------------------+-------+
| Variable_name      | Value |
+--------------------+-------+
| wsrep_cluster_size | 3     |
+--------------------+-------+
1 row in set (0.001 sec)
MariaDB [(none)]> show status like 'wsrep_cluster_state_uuid';
MariaDB [(none)]> show status like 'wsrep_cluster_status';
状态查询表:
Open  :节点启动成功,尝试连接到集群
Primary :节点已处于集群中,在新节点加入时,选取donor进行数据库同步时会产生的状态
Joiner  :节点处于等待接收或正在接收同步文件的状态
Joined  :节点完成数据同步,但还有部分数据不是最新的,在追赶与集群数据一致的状态
Synced  :节点正常提供服务的状态,表示当前节点数据状态与集群数据状态是一致的
Donor   :表示该节点被选为Donor节点,正在为新加进来的节点进行全量数据同步,此时该节点对客户端不提供服务
4、部署rabbitmq消息队列
4.1、所有控制节点安装rabbitmq和erlang软件包(cont01、cont02、cont03、//节点:cont01
[root@cont01:/root]# yum install epel-release -y
[root@cont01:/root]# yum install -y erlang rabbitmq-server.noarch
[root@cont01:/root]# systemctl enable rabbitmq-server && systemctl start rabbitmq-server
[root@cont01:/root]# systemctl status rabbitmq-server
[root@cont01:/root]# netstat -ntlpa | grep 5672
//节点:cont02
[root@cont02:/root]# yum install epel-release -y
[root@cont02:/root]# yum install -y erlang rabbitmq-server.noarch
[root@cont02:/root]# systemctl enable rabbitmq-server && systemctl start rabbitmq-server
[root@cont02:/root]# systemctl status rabbitmq-server
[root@cont02:/root]# netstat -ntlpa | grep 5672
//节点:cont03
[root@cont03:/root]# yum install epel-release -y
[root@cont03:/root]# yum install -y erlang rabbitmq-server.noarch
[root@cont03:/root]# systemctl enable rabbitmq-server && systemctl start rabbitmq-server
[root@cont03:/root]# systemctl status rabbitmq-server
[root@cont03:/root]# netstat -ntlpa | grep 5672
//节点:mon01
[root@mon01:/root]# yum install epel-release -y
[root@mon01:/root]# yum install -y erlang rabbitmq-server.noarch
[root@mon01:/root]# systemctl enable rabbitmq-server && systemctl start rabbitmq-server
[root@mon01:/root]# systemctl status rabbitmq-server
[root@mon01:/root]# netstat -ntlpa | grep 5672
4.2 查看集群状态
(提示:Rabbitmq的配置文件/etc/rabbitmq/rabbitmq.config)
[root@cont01:/root]# rabbitmqctl cluster_status
Cluster status of node rabbit@cont01 ...
[{nodes,[{disc,[rabbit@cont01]}]},
 {running_nodes,[rabbit@cont01]},
 {cluster_name,<>},
 {partitions,[]}]
...done.
[root@cont02:/root]# rabbitmqctl cluster_status
Cluster status of node rabbit@cont02 ...
[{nodes,[{disc,[rabbit@cont02]}]},
 {running_nodes,[rabbit@cont02]},
 {cluster_name,<>},
 {partitions,[]}]
...done.
[root@cont03:/root]# rabbitmqctl cluster_status
Cluster status of node rabbit@cont03 ...
[{nodes,[{disc,[rabbit@cont03]}]},
 {running_nodes,[rabbit@cont03]},
 {cluster_name,<>},
 {partitions,[]}]
...done.
[root@mon01:/root]# rabbitmqctl cluster_status
Cluster status of node rabbit@mon01 ...
[{nodes,[{disc,[rabbit@mon01]}]},
 {running_nodes,[rabbit@mon01]},
 {cluster_name,<>},
 {partitions,[]}]
...done.
//*注:partitions里如果有节点一般非正常,可以通过重启rabbitmq-server服务来恢复*//
4.3 编辑rabbitmq变量文件
[root@cont01:/root]# vim /etc/rabbitmq/rabbitmq-env.conf
##
RABBITMQ_NODE_PORT=5672
ulimit -S -n 4096
RABBITMQ_SERVER_ERL_ARGS="+K true +A30 +P 1048576 -kernel inet_default_connect_options [{nodelay,true},{raw,6,18,<>}] -kernel inet_default_listen_options [{raw,6,18,<>}]"
RABBITMQ_NODE_IP_ADDRESS=192.168.10.21
[root@cont02:/root]# vim /etc/rabbitmq/rabbitmq-env.conf
##
RABBITMQ_NODE_PORT=5672
ulimit -S -n 4096
RABBITMQ_SERVER_ERL_ARGS="+K true +A30 +P 1048576 -kernel inet_default_connect_options [{nodelay,true},{raw,6,18,<>}] -kernel inet_default_listen_options [{raw,6,18,<>}]"
RABBITMQ_NODE_IP_ADDRESS=192.168.10.22
[root@cont03:/root]# vim /etc/rabbitmq/rabbitmq-env.conf
##
RABBITMQ_NODE_PORT=5672
ulimit -S -n 4096
RABBITMQ_SERVER_ERL_ARGS="+K true +A30 +P 1048576 -kernel inet_default_connect_options [{nodelay,true},{raw,6,18,<>}] -kernel inet_default_listen_options [{raw,6,18,<>}]"
RABBITMQ_NODE_IP_ADDRESS=192.168.10.23
[root@mon01:/root]# vim /etc/rabbitmq/rabbitmq-env.conf
##
RABBITMQ_NODE_PORT=5672
ulimit -S -n 4096
RABBITMQ_SERVER_ERL_ARGS="+K true +A30 +P 1048576 -kernel inet_default_connect_options [{nodelay,true},{raw,6,18,<>}] -kernel inet_default_listen_options [{raw,6,18,<>}]"
RABBITMQ_NODE_IP_ADDRESS=192.168.10.24
4.4 查看rabbitmq插件
[root@cont01:/root]# /usr/lib/rabbitmq/bin/rabbitmq-plugins list
[ ] amqp_client                       3.3.5
[ ] cowboy                            0.5.0-rmq3.3.5-git4b93c2d
[ ] eldap                             3.3.5-gite309de4
[ ] mochiweb                          2.7.0-rmq3.3.5-git680dba8
[ ] rabbitmq_amqp1_0                  3.3.5
[ ] rabbitmq_auth_backend_ldap        3.3.5
[ ] rabbitmq_auth_mechanism_ssl       3.3.5
[ ] rabbitmq_consistent_hash_exchange 3.3.5
[ ] rabbitmq_federation               3.3.5
[ ] rabbitmq_federation_management    3.3.5
[ ] rabbitmq_management               3.3.5
[ ] rabbitmq_management_agent         3.3.5
[ ] rabbitmq_management_visualiser    3.3.5
[ ] rabbitmq_mqtt                     3.3.5
[ ] rabbitmq_shovel                   3.3.5
[ ] rabbitmq_shovel_management        3.3.5
[ ] rabbitmq_stomp                    3.3.5
[ ] rabbitmq_test                     3.3.5
[ ] rabbitmq_tracing                  3.3.5
[ ] rabbitmq_web_dispatch             3.3.5
[ ] rabbitmq_web_stomp                3.3.5
[ ] rabbitmq_web_stomp_examples       3.3.5
[ ] sockjs                            0.3.4-rmq3.3.5-git3132eb9
[ ] webmachine                        1.10.3-rmq3.3.5-gite9359c7
4.5 所有node开启rabbitmq的web管理页面
rabbitmq-plugins enable rabbitmq_management
systemctl restart rabbitmq-server
systemctl status rabbitmq-server
4.6 查看rabbitmq插件是否加载成功(成功后前面有E)
[root@cont01:/root]# /usr/lib/rabbitmq/bin/rabbitmq-plugins list
[e] amqp_client                       3.3.5
[ ] cowboy                            0.5.0-rmq3.3.5-git4b93c2d
[ ] eldap                             3.3.5-gite309de4
[e] mochiweb                          2.7.0-rmq3.3.5-git680dba8
[ ] rabbitmq_amqp1_0                  3.3.5
[ ] rabbitmq_auth_backend_ldap        3.3.5
[ ] rabbitmq_auth_mechanism_ssl       3.3.5
[ ] rabbitmq_consistent_hash_exchange 3.3.5
[ ] rabbitmq_federation               3.3.5
[ ] rabbitmq_federation_management    3.3.5
[E] rabbitmq_management               3.3.5
[e] rabbitmq_management_agent         3.3.5
[ ] rabbitmq_management_visualiser    3.3.5
[ ] rabbitmq_mqtt                     3.3.5
[ ] rabbitmq_shovel                   3.3.5
[ ] rabbitmq_shovel_management        3.3.5
[ ] rabbitmq_stomp                    3.3.5
[ ] rabbitmq_test                     3.3.5
[ ] rabbitmq_tracing                  3.3.5
[e] rabbitmq_web_dispatch             3.3.5
[ ] rabbitmq_web_stomp                3.3.5
[ ] rabbitmq_web_stomp_examples       3.3.5
[ ] sockjs                            0.3.4-rmq3.3.5-git3132eb9
[e] webmachine                        1.10.3-rmq3.3.5-gite9359c7
提示:rabbitmq: web默认端口15672 rabbitmq: server默认端口5672
4.7 访问:http://192.168.10.22:15672/注:如果是阿里云服务器,需要打开15672端口.(后期可能有80端口被占用情况)
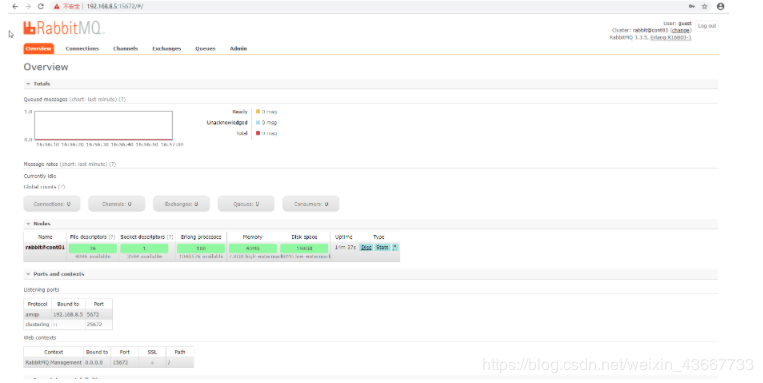
默认账户:guest/guest
4.8 所有node修改guest密码为adminrabbitmq(默认用户为:guest 密码为:guest)[root@cont01:/root]# rabbitmqctl change_password guest adminrabbitmq
Changing password for user "guest" ...
...done.
[1]+ Done rabbitmqctl change_password guest admin
[root@cont02:/root]# rabbitmqctl change_password guest adminrabbitmq
Changing password for user "guest" ...
...done.
[1]+ Done rabbitmqctl change_password guest admin
[root@cont03:/root]# rabbitmqctl change_password guest adminrabbitmq
Changing password for user "guest" ...
...done.
[root@mon01:/root]# rabbitmqctl change_password guest adminrabbitmq
Changing password for user "guest" ...
...done.
[1]+ Done rabbitmqctl change_password guest admin
4.9 cont02添加一个openstack的用户,并设密码为adminopenstack。并设置权限成为管理员(成集群后,cont02和cont03上也可以登录)
[root@cont02:/root]# rabbitmqctl add_user openstack adminopenstack
Creating user "openstack" ...
...done.
[root@cont02:/root]# rabbitmqctl set_permissions openstack ".*" ".*" ".*"
Setting permissions for user "openstack" in vhost "/" ...
...done.
[root@cont02:/root]# rabbitmqctl set_user_tags openstack administrator
Setting tags for user "openstack" to [administrator] ...
...done.
[root@cont02:/root]# rabbitmqctl list_users
Listing users ...
guest	[administrator]
openstack	[administrator]
...done.
4.10 发送cont01上的erlang.cookie到其他节点配置集群
[root@cont02:/root]# rabbitmqctl status
Status of node rabbit@cont02 ...
[{pid,12512},
 {running_applications,
     [{rabbitmq_management,"RabbitMQ Management Console","3.3.5"},
      {rabbitmq_web_dispatch,"RabbitMQ Web Dispatcher","3.3.5"},
      {webmachine,"webmachine","1.10.3-rmq3.3.5-gite9359c7"},
      {mochiweb,"MochiMedia Web Server","2.7.0-rmq3.3.5-git680dba8"},
      {rabbitmq_management_agent,"RabbitMQ Management Agent","3.3.5"},
      {rabbit,"RabbitMQ","3.3.5"},
      {os_mon,"CPO  CXC 138 46","2.2.14"},
      {inets,"INETS  CXC 138 49","5.9.8"},
      {mnesia,"MNESIA  CXC 138 12","4.11"},
      {amqp_client,"RabbitMQ AMQP Client","3.3.5"},
      {xmerl,"XML parser","1.3.6"},
      {sasl,"SASL  CXC 138 11","2.3.4"},
      {stdlib,"ERTS  CXC 138 10","1.19.4"},
      {kernel,"ERTS  CXC 138 10","2.16.4"}]},
 {os,{unix,linux}},
 {erlang_version,
     "Erlang R16B03-1 (erts-5.10.4) [source] [64-bit] [smp:8:8] [async-threads:30] [hipe] [kernel-poll:true]\n"},
 {memory,
     [{total,41896520},
      {connection_procs,5600},
      {queue_procs,5600},
      {plugins,385080},
      {other_proc,13866040},
      {mnesia,60888},
      {mgmt_db,50256},
      {msg_index,34528},
      {other_ets,1114200},
      {binary,74848},
      {code,20229052},
      {atom,711569},
      {other_system,5358859}]},
 {alarms,[]},
 {listeners,[{clustering,25672,"::"},{amqp,5672,"192.168.10.22"}]},
 {vm_memory_high_watermark,0.4},
 {vm_memory_limit,8331886592},
 {disk_free_limit,50000000},
 {disk_free,178624393216},
 {file_descriptors,
     [{total_limit,3996},
      {total_used,3},
      {sockets_limit,3594},
      {sockets_used,1}]},
 {processes,[{limit,1048576},{used,190}]},
 {run_queue,0},
 {uptime,369}]
...done.
[root@cont02:/root]# scp /var/lib/rabbitmq/.erlang.cookie cont01:/var/lib/rabbitmq/
[root@cont02:/root]# scp /var/lib/rabbitmq/.erlang.cookie cont03:/var/lib/rabbitmq/
[root@cont02:/root]# scp /var/lib/rabbitmq/.erlang.cookie mon01:/var/lib/rabbitmq/
4.11 cont01、cont03、mon01停止应用,并ram的方式加入cont01节点,之后重启应用(先查看cont01集群名字)
[root@cont02:/root]# rabbitmqctl cluster_status
Cluster status of node rabbit@cont02 ...
[{nodes,[{disc,[rabbit@cont02]}]},
 {running_nodes,[rabbit@cont02]},
 {cluster_name,<>},
 {partitions,[]}]
...done.
[root@cont01:/root]# systemctl restart rabbitmq-server
[root@cont01:/root]# systemctl status rabbitmq-server
[root@cont01:/root]# rabbitmqctl stop_app
Stopping node rabbit@cont01 ...
...done.
[root@cont01:/root]# rabbitmqctl join_cluster --ram rabbit@cont02
Clustering node rabbit@cont01 with rabbit@cont02 ...
...done.
[root@cont01:/root]# rabbitmqctl start_app
Starting node rabbit@cont01 ...
...done.
[root@cont03:/root]# systemctl restart rabbitmq-server
[root@cont03:/root]# systemctl status rabbitmq-server
[root@cont03:/root]# rabbitmqctl stop_app
[root@cont03:/root]# rabbitmqctl join_cluster --ram rabbit@cont02
Clustering node rabbit@cont03 with rabbit@cont02 ...
...done.
[root@cont03:/root]# rabbitmqctl start_app
Starting node rabbit@cont03 ...
...done.
[root@mon01:/root]# systemctl restart rabbitmq-server
[root@mon01:/root]# systemctl status rabbitmq-server
[root@mon01:/root]# rabbitmqctl stop_app
Stopping node rabbit@mon01 ...
...done.
[root@mon01:/root]# rabbitmqctl join_cluster --ram rabbit@cont02
Clustering node rabbit@mon01 with rabbit@cont02 ...
...done.
[root@mon01:/root]# rabbitmqctl start_app
Starting node rabbit@mon01 ...
...done.
4.12 检测集群状态
[root@cont01:/root]# rabbitmqctl cluster_status
Cluster status of node rabbit@cont01 ...
[{nodes,[{disc,[rabbit@cont02]},
         {ram,[rabbit@mon01,rabbit@cont03,rabbit@cont01]}]},
 {running_nodes,[rabbit@mon01,rabbit@cont03,rabbit@cont02,rabbit@cont01]},
 {cluster_name,<>},
 {partitions,[]}]
...done.
[root@cont02:/root]# rabbitmqctl cluster_status
Cluster status of node rabbit@cont02 ...
[{nodes,[{disc,[rabbit@cont02]},
         {ram,[rabbit@mon01,rabbit@cont03,rabbit@cont01]}]},
 {running_nodes,[rabbit@mon01,rabbit@cont03,rabbit@cont01,rabbit@cont02]},
 {cluster_name,<>},
 {partitions,[]}]
...done.
[root@cont03:/root]# rabbitmqctl cluster_status
Cluster status of node rabbit@cont03 ...
[{nodes,[{disc,[rabbit@cont02]},
         {ram,[rabbit@mon01,rabbit@cont03,rabbit@cont01,]}]},
 {running_nodes,[rabbit@mon01,rabbit@cont01,rabbit@cont02,rabbit@cont03]},
 {cluster_name,<>},
 {partitions,[]}]
...done.
[root@mon01:/root]# rabbitmqctl cluster_status
Cluster status of node rabbit@mon01 ...
[{nodes,[{disc,[rabbit@cont02]},
         {ram,[rabbit@mon01,rabbit@cont03,rabbit@cont01]}]},
 {running_nodes,[rabbit@cont01,rabbit@cont02,rabbit@cont03,rabbit@mon01]},
 {cluster_name,<>},
 {partitions,[]}]
...done.
4.13 为了保持rabbitmq的消息一致性,可以设置消息镜像模式策略 所有节点执行
rabbitmqctl set_policy ha-all "^" '{"ha-mode":"all"}'
优化RabbitMQQ性能
在RabbitMQQ中,socket descriptors 和 File descriptors的默认配额并不大
修改配置
在其配置文件中添加如下参数,其值请根据实际情况进行调整:
vim /usr/lib/systemd/system/rabbitmq-erver.service
[Service]
LimitNOFILE = 16384
重启rabbitmq
systemctl daemon-reload
systemctl restart rabbitmq-server
//下面为引用参考文案,如下:(节后调整)
在为OpenStack的服务配置使用rabbitmq消息队列服务时,可以如下配置:
transport_url = rabbit://openstack:adminopenstack@cont01,openstack:adminopenstack@cont02,openstack:adminopenstack@cont03
可以看到这里的配置方式是将所有节点的rabbitmq服务以拼接方式拼在一起,当cont1节点上的消息队列服务不可用时可以将请求转发给cont2,再不行可以再转发给cont3节点.
同时应该配置如下参数:
rabbit_retry_interval=1
rabbit_retry_backoff=2
rabbit_max_retries=0
rabbit_durable_queues=true
rabbit_ha_queues=true
4.14 RabbitMQ注意小计(故障恢复提示):①保证集群中至少有一个磁盘类型的节点以防数据丢失,在更改节点类型时尤其要注意。
②若整个集群被停掉了,应保证最后一个down掉的节点被最先启动,若不能则要使用forget_cluster_node命令将其移出集群。
③若集群中节点几乎同时以不可控的方式down 了,此时再其中一个节点使用force_boot 命令重启节点。
④如果加入集群后,意外关闭等造成rabbitmq-server启动不成功,可以尝试一下步骤:/var/lib/rabbitmq/mnesia 目录下存在rabbit@localhost.pid、rabbit@localhost、rabbit@localhost-plugins-expand,删除这3项后,并且删除 /var/lib/rabbitmq/ 目录下 .erlang.cookie和erl_crash.dump 再使用systemctl start rabbitmq-server启动
5、部署PCS 5.1 安装pcs+pacemaker+corosync (cont01、cont02和 cont03)所有控制节点安装pcs、pacemaker、corosync, pacemaker是资源管理器,corosync提供心跳机制。
[root@cont01:/root]# yum install -y lvm2 cifs-utils quota psmisc pcs pacemaker corosync fence-agents-all resource-agents crmsh
[root@cont02:/root]# yum install -y lvm2 cifs-utils quota psmisc pcs pacemaker corosync fence-agents-all resource-agents crmsh
[root@cont03:/root]# yum install -y lvm2 cifs-utils quota psmisc pcs pacemaker corosync fence-agents-all resource-agents crmsh
[root@cont01:/root]# systemctl enable pcsd corosync
[root@cont02:/root]# systemctl enable pcsd corosync
[root@cont03:/root]# systemctl enable pcsd corosync
[root@cont01:/root]# systemctl start pcsd && systemctl status pcsd
[root@cont02:/root]# systemctl start pcsd && systemctl status pcsd
[root@cont03:/root]# systemctl start pcsd && systemctl status pcsd
5.2 设置集群密码,而且三个节点密码需一直为:pcs#typora
[root@cont01:/root]# echo "pcs#typora" |passwd --stdin hacluster
[root@cont02:/root]# echo "pcs#typora" |passwd --stdin hacluster
[root@cont03:/root]# echo "pcs#typora" |passwd --stdin hacluster
5.3 控制节点创建配置文件corosync.conf
[root@cont02:/root]# cat </etc/corosync/corosync.conf
totem {
        version: 2
        secauth:off
        cluster_name:openstack-cluster
        transport:udpu
}
nodelist {
        node {
                ring0_addr:cont01
                nodeid:1
        }
        node {
                ring0_addr:cont02
                nodeid:2
        }
        node {
                ring0_addr:cont03
                nodeid:3
        }
}
logging {
        to_logfile: yes
        logfile: /var/log/cluster/corosync.log
        to_syslog: yes
        debug: off
}
quorum {
        provider: corosync_votequorum
}
EOF
[root@cont02:/root]# scp /etc/corosync/corosync.conf cont01:/etc/corosync/
[root@cont02:/root]# scp /etc/corosync/corosync.conf cont03:/etc/corosync/
5.4 配置集群,设置集群互相认证
ssh-keygen
ssh-copy-id cont01
ssh-copy-id cont02
ssh-copy-id cont03
5.5 配置节点认证
[root@cont02:/root]# pcs cluster auth cont01 cont02 cont03 -u hacluster -p"pcs#typora"
cont02: Authorized
cont03: Authorized
cont01: Authorized
pcs cluster auth cont01 cont02 -u hacluster -p {password}
{password}表示为刚才设置的密码
5.6 创建集群[root@cont02:/root]# pcs cluster setup --force --name openstack-cluster cont01 cont02 cont03
Destroying cluster on nodes: cont01, cont02, cont03...
cont02: Stopping Cluster (pacemaker)...
cont03: Stopping Cluster (pacemaker)...
cont01: Stopping Cluster (pacemaker)...
cont01: Successfully destroyed cluster
cont02: Successfully destroyed cluster
cont03: Successfully destroyed cluster
Sending 'pacemaker_remote authkey' to 'cont01', 'cont02', 'cont03'
cont01: successful distribution of the file 'pacemaker_remote authkey'
cont03: successful distribution of the file 'pacemaker_remote authkey'
cont02: successful distribution of the file 'pacemaker_remote authkey'
Sending cluster config files to the nodes...
cont01: Succeeded
cont02: Succeeded
cont03: Succeeded
Synchronizing pcsd certificates on nodes cont01, cont02, cont03...
cont02: Success
cont03: Success
cont01: Success
Restarting pcsd on the nodes in order to reload the certificates...
cont02: Success
cont03: Success
cont01: Success
5.7 启动集群并查看集群状态
[root@cont02:/root]# pcs cluster enable --all
cont01: Cluster Enabled
cont02: Cluster Enabled
cont03: Cluster Enabled
[root@cont02:/root]# pcs cluster start --all
cont01: Starting Cluster (corosync)...
cont02: Starting Cluster (corosync)...
cont03: Starting Cluster (corosync)...
cont01: Starting Cluster (pacemaker)...
cont03: Starting Cluster (pacemaker)...
cont02: Starting Cluster (pacemaker)...
[root@cont02:/root]# pcs cluster status
Cluster Status:
 Stack: corosync
 Current DC: cont03 (version 1.1.20-5.el7_7.2-3c4c782f70) - partition with quorum
 Last updated: Wed Jan 15 21:44:10 2020
 Last change: Wed Jan 15 21:43:53 2020 by hacluster via crmd on cont03
 3 nodes configured
 0 resources configured
PCSD Status:
  cont02: Online
  cont03: Online
  cont01: Online
[root@cont02:/root]# ps aux | grep pacemaker
root     15586  0.0  0.0 132972  8700 ?        Ss   21:43   0:00 /usr/sbin/pacemakerd -f
haclust+ 15587  0.1  0.0 136244 14620 ?        Ss   21:43   0:00 /usr/libexec/pacemaker/cib
root     15588  0.0  0.0 136064  7664 ?        Ss   21:43   0:00 /usr/libexec/pacemaker/stonithd
root     15589  0.0  0.0  98836  4372 ?        Ss   21:43   0:00 /usr/libexec/pacemaker/lrmd
haclust+ 15590  0.0  0.0 128068  6620 ?        Ss   21:43   0:00 /usr/libexec/pacemaker/attrd
haclust+ 15591  0.0  0.0  80508  3500 ?        Ss   21:43   0:00 /usr/libexec/pacemaker/pengine
haclust+ 15592  0.0  0.0 140380  8260 ?        Ss   21:43   0:00 /usr/libexec/pacemaker/crmd
root     15632  0.0  0.0 112712   960 pts/0    S+   21:44   0:00 grep --color=auto pacemaker
5.8 检验corosync状态
(执行crm_verify -L -V时会报错)
[root@cont02:/root]# corosync-cfgtool -s
Printing ring status.
Local node ID 2
RING ID 0
	id	= 192.168.10.22
	status	= ring 0 active with no faults
[root@cont02:/root]# corosync-cmapctl | grep members
runtime.totem.pg.mrp.srp.members.1.config_version (u64) = 0
runtime.totem.pg.mrp.srp.members.1.ip (str) = r(0) ip(192.168.10.21)
runtime.totem.pg.mrp.srp.members.1.join_count (u32) = 1
runtime.totem.pg.mrp.srp.members.1.status (str) = joined
runtime.totem.pg.mrp.srp.members.2.config_version (u64) = 0
runtime.totem.pg.mrp.srp.members.2.ip (str) = r(0) ip(192.168.10.22)
runtime.totem.pg.mrp.srp.members.2.join_count (u32) = 1
runtime.totem.pg.mrp.srp.members.2.status (str) = joined
runtime.totem.pg.mrp.srp.members.3.config_version (u64) = 0
runtime.totem.pg.mrp.srp.members.3.ip (str) = r(0) ip(192.168.10.23)
runtime.totem.pg.mrp.srp.members.3.join_count (u32) = 1
runtime.totem.pg.mrp.srp.members.3.status (str) = joined
[root@cont02:/root]# pcs status corosync
Membership information
----------------------
    Nodeid      Votes Name
         1          1 cont01
         2          1 cont02 (local)
         3          1 cont03
[root@cont02:/root]# crm_verify -L -V
   error: unpack_resources:	Resource start-up disabled since no STONITH resources have been defined
   error: unpack_resources:	Either configure some or disable STONITH with the stonith-enabled option
   error: unpack_resources:	NOTE: Clusters with shared data need STONITH to ensure data integrity
Errors found during check: config not valid
[root@cont02:/root]# pcs property set stonith-enabled=false
[root@cont02:/root]# pcs property set no-quorum-policy=ignore
[root@cont02:/root]# crm_verify -L -V
[root@cont02:/root]# pcs property set pe-warn-series-max=1000 pe-input-series-max=1000 pe-error-series-max=1000
[root@cont02:/root]# pcs property set cluster-recheck-interval=1000
检测配置(执行时会报错)
crm_verify -L -V
根据检测结果
pcs property set stonith-enabled=false #禁用STONITH
pcs property set no-quorum-policy=ignore #忽略仲裁
crm_verify -L -V #error 消失了
crm 交互式命令,比较好用
设置合适的输入处理历史记录及策略引擎生成的错误与警告
pcs property set pe-warn-series-max=1000 pe-input-series-max=1000 pe-error-series-max=1000
基于时间驱动的方式进行状态处理
pcs property set cluster-recheck-interval=1000
5.9 创建集群VIP (预设VIP地址为192.168.10.20)[root@cont02:/root]# pcs resource create VirtualIP ocf:heartbeat:IPaddr2 ip=192.168.10.20 cidr_netmask=32 op monitor interval=30s
6、部署Haproxy
6.1 所有控制节点安装Haproxy,并保持相同的配置,对于配置文件,建议根据实际情况进行优化。
6.1.1安装并配置haproxy
[root@cont01:/root]# yum -y install haproxy
[root@cont02:/root]# yum -y install haproxy
[root@cont03:/root]# yum -y install haproxy
[root@cont02:/root]# vim /etc/rsyslog.d/haproxy.conf
##配置HAProxy的日志
$ModLoad imudp
$UDPServerRun 514
$template Haproxy,"%msg%n"
local3.info -/var/log/haproxy.log;Haproxy
local3.notice -/var/log/haproxy-status.log;Haproxy
local3.*~
[root@cont02:/root]# scp /etc/rsyslog.d/haproxy.conf cont01:/etc/rsyslog.d/
[root@cont02:/root]# scp /etc/rsyslog.d/haproxy.conf cont03:/etc/rsyslog.d/
[root@cont01:/root]# systemctl enable haproxy.service
[root@cont01:/root]# systemctl restart rsyslog.service
[root@cont01:/root]# syste