Sign in with Apple(object-c) 从开发者后台到服务端验证
根据Apple发布的新政策,如果你的App有第三方登录,例如微信、QQ、Facebook、twitter等第三方登录一定需要增加AppleID的登录方式。具体可以参考Apple的官方文档:
https://developer.apple.com/cn/app-store/review/guidelines/#sign-in-with-apple
2020.04月上架或更新的Apple适用:https://developer.apple.com/cn/news/
Apple登录免用户密码输入,并且可以修改显示的名称及隐藏电子邮箱,安全性很高。
准备工作Apple原生的SDK只适用于iOS 13.0+ 系统,测试时需要一台13+系统测试机。
升级Xcode 到 11+版本。
开发者后台对应的indentify下勾选 sign in with apple登录选项,重新下载profiler文件。步骤如下:
登录您的Apple开发者账号-
选择左边 Identifier 栏目,在右侧选择要开通 **苹果授权登录(Sign in with Apple)**的 Identifiers 点击打开。
下拉找到 Sign In with Apple 打钩。
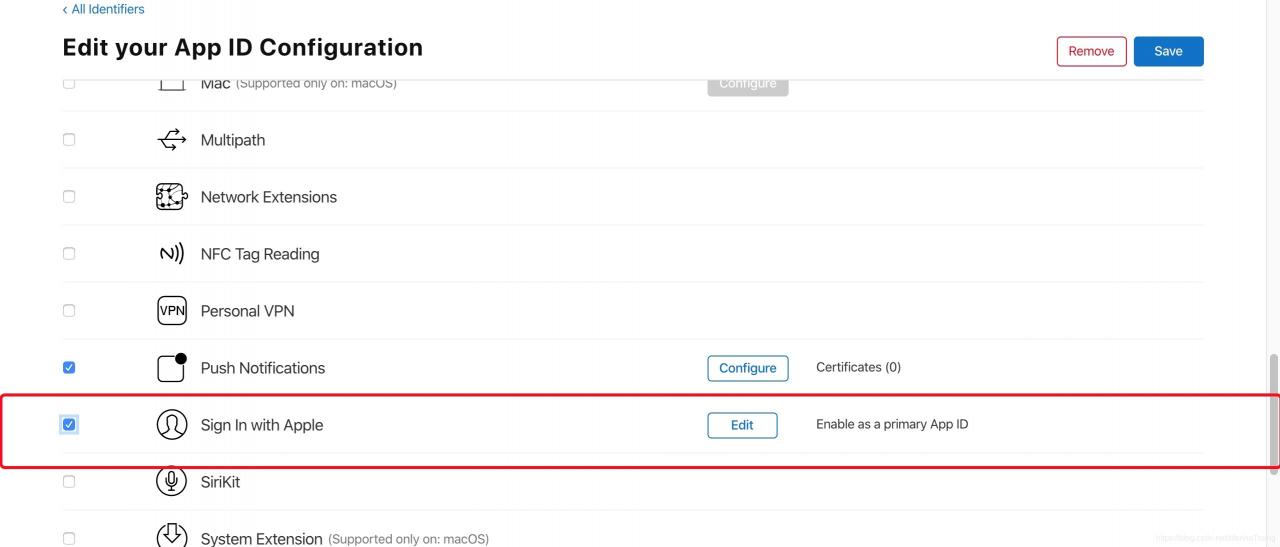
注:开启后 profile 将失效需要重新编辑 profile 文件。
在xcode项目中开启sign in with apple,步骤如下:
在左侧PROJECT中选择对应的项目target
选择signing & capabilities,点击Capability,搜索sign in with apple,双击即可。
开发工作(object-c编写)
基本流程
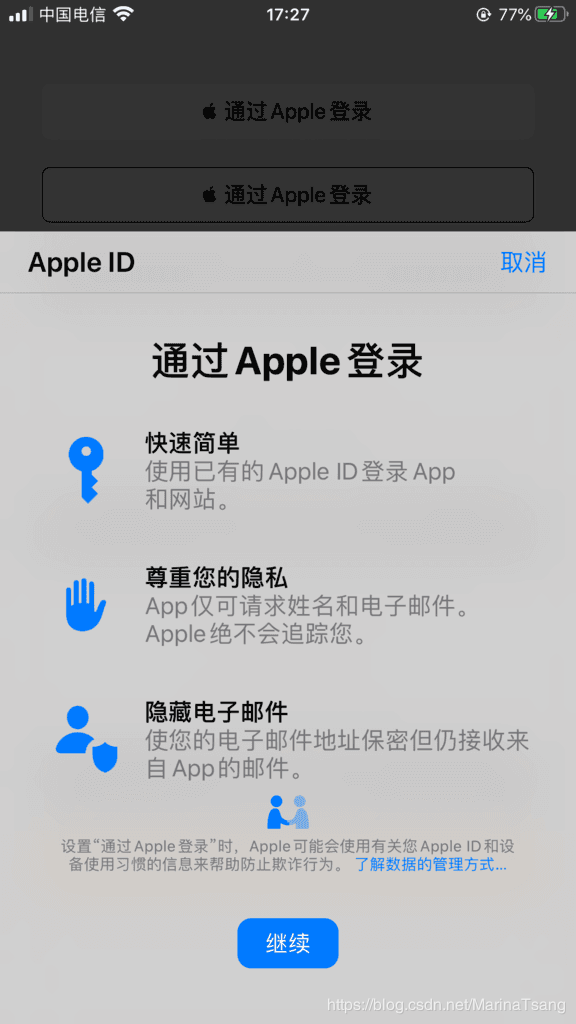
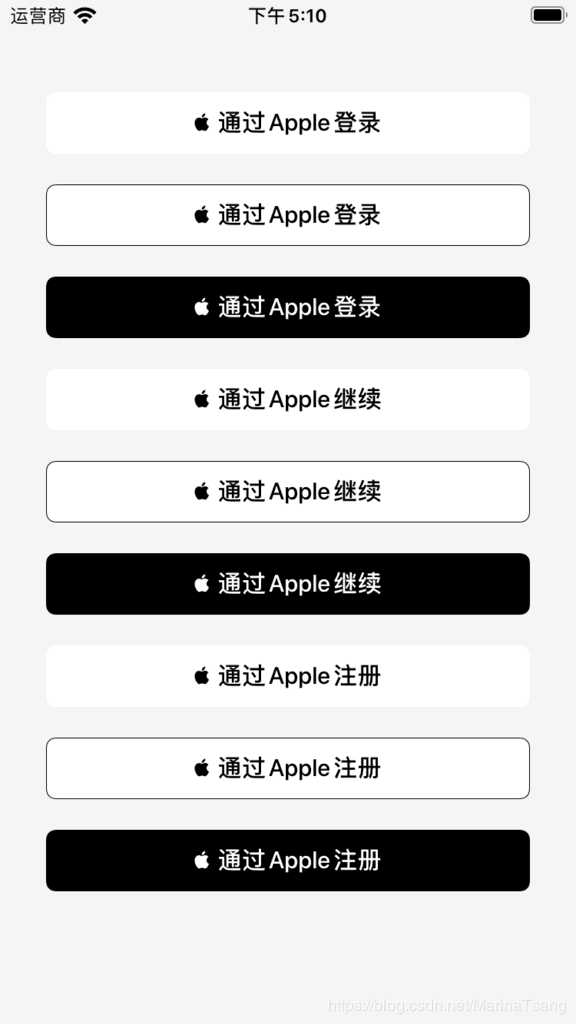
创建 Apple登录Button
向Apple发起请求
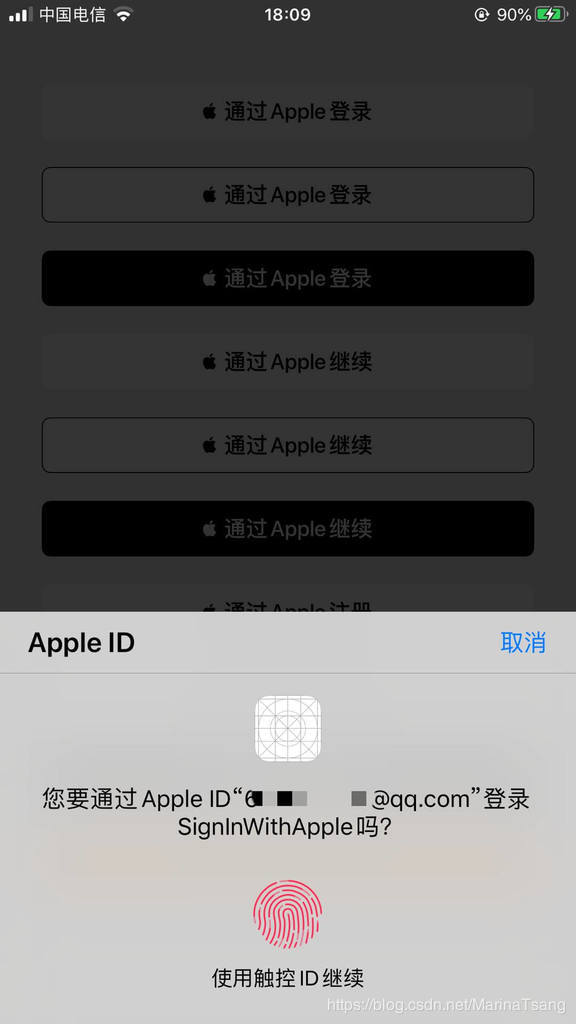
处理Apple登录后的结果
将Apple登录后的用户信息传给服务器端验证(可选)
处理用户更换AppleID或停用AppleID问题。
初次登录时可以让用户编辑显示的用户名及是否隐藏邮箱,第二次登录之后用户进行认证即可。

苹果开发官方文档:https://developer.apple.com/documentation/authenticationservices
在选择project-build phase -link binary with libraries-搜索 AuthenticationServices.framework 添加。
Apple提供了官方sign in with apple button,如果需要自定义按钮,自定义按钮的规则如下:https://developer.apple.com/documentation/signinwithapplejs/incorporating_sign_in_with_apple_into_other_platforms
 if (@available(iOS 13.0,*)) {
        ASAuthorizationAppleIDButtonType type = ASAuthorizationAppleIDButtonTypeSignIn;
         ASAuthorizationAppleIDButton*  authorizationButton = [ASAuthorizationAppleIDButton buttonWithType:type style:ASAuthorizationAppleIDButtonStyleWhite];
         // add to your viewcontainer
         ....
        [authorizationButton addTarget:self action:@selector(showAppleLogin) forControlEvents:UIControlEventTouchUpInside];
        [_firstLoginView addSubview:authorizationButton];
   }
-(void)showAppleLogin{
	// add your code to apple login
	.....
}
Button 的type有登录类型ASAuthorizationAppleIDButtonTypeSignIn和注册类型ASAuthorizationAppleIDButtonTypeSignUp(只能在13.2+有效,13.0-13.2需要自定义)。
Button的style的有几种类型,但都是黑白配。
苹果还把 iCloud KeyChain password 集成到了这套 API 里,我们在使用的时候,只需要在创建 request 的时候,多创建一个 ASAuthorizationPasswordRequest,这样如果 KeyChain 里面也有登录信息的话,可以直接使用里面保存的用户名和密码进行登录。
#import
-(void)signInWithAppleNative API_AVAILABLE(ios(13.0)){
    ASAuthorizationAppleIDProvider *provider = [[ASAuthorizationAppleIDProvider alloc] init];
    ASAuthorizationAppleIDRequest *authAppleIDRequest = [provider createRequest];
    // 在用户授权期间请求的联系信息
    authAppleIDRequest.requestedScopes = @[ASAuthorizationScopeFullName, ASAuthorizationScopeEmail];
//     ASAuthorizationPasswordRequest *passwordRequest = [[ASAuthorizationPasswordProvider new] createRequest];
    NSMutableArray * array = [NSMutableArray arrayWithCapacity:2];
    if (authAppleIDRequest) {
        [array addObject:authAppleIDRequest];
    }
//    if (passwordRequest) {
//        [array addObject:passwordRequest];
//    }
    NSArray * requests = [array copy];
    // 由ASAuthorizationAppleIDProvider创建的授权请求 管理授权请求的控制器
    ASAuthorizationController *authorizationController = [[ASAuthorizationController alloc] initWithAuthorizationRequests:requests];
    authorizationController.delegate = self;
     // 设置提供 展示上下文的代理,在这个上下文中 系统可以展示授权界面给用户
    authorizationController.presentationContextProvider = self;
     // 在控制器初始化期间启动授权流
    [authorizationController performRequests];
}
注:
1、sign in with apple 工具类设成全局变量,或使用单例类,如果使用局部变量,和IAP工具类一样苹果的回调不会执行。
**2、当启用 **ASAuthorizationPasswordRequest 且 停止使用 Apple ID(真机-设置-账户-密码与安全性-使用您 Apple ID 的 App-App列表-停止使用 Apple ID),如果 KeyChain 里面没有登录信息且重新使用 苹果授权登录(Sign in with Apple) 会报未知错误.
SignInWithApple[2759:550203] [core] Authorization failed: Error Domain=AKAuthenticationError Code=-7001 "(null)" UserInfo={AKClientBundleID=com.wangquanwei.SignInWithApple}
接收Apple的回调
// 成功的回调
-(void)authorizationController:(ASAuthorizationController *)controller didCompleteWithAuthorization:(ASAuthorization *)authorization API_AVAILABLE(ios(13.0)){
   // the credential is an Apple ID
    if([authorization.credential isKindOfClass:[ASAuthorizationAppleIDCredential class]]){
        // 获取信息并将信息保存在 钥匙串中
        ASAuthorizationAppleIDCredential *authorizeCredential = authorization.credential;
        NSString * nickname = authorizeCredential.fullName.givenName;
        NSString * userID = authorizeCredential.user; // 同一个开发者账号下的app 返回的值一样的
        NSString * email = authorizeCredential.email;
        NSData * authorizationCode = authorizeCredential.authorizationCode;
        NSData * identityToken =authorizeCredential.identityToken;
        // 将ID保存到钥匙串--示例
        if (userID) {
           [Utility setKeychainValue:[userID dataUsingEncoding:NSUTF8StringEncoding] key:@"appleUserID"];
        }
//        NSLog(@"state: %@", state);
       NSLog(@"userID: %@", userID);
       NSLog(@"fullName: %@", nickname);
       NSLog(@"email: %@", email);
       NSLog(@"authorizationCode: %@", authorizationCode);
       NSLog(@"identityToken: %@", [[NSString alloc] initWithData:identityToken encoding:NSUTF8StringEncoding] );
//       NSLog(@"realUserStatus: %@", @(realUserStatus));
// 示例-将信息回调到服务器端进行验证
       [self setAppleUserCallback:YES userId:userID authorizeCode:authorizationCode identityToken:identityToken name:nickname];
  // If the credential is a password credential, the system displays an alert allowing the user to authenticate with the existing account.
    }else if ([authorization.credential isKindOfClass:[ASPasswordCredential class]]) {
        ASPasswordCredential *passwordCredential = authorization.credential;
        NSString *userIdentifier = passwordCredential.user;
        NSString *password = passwordCredential.password;
        // 可以直接登录
//        NSLog(@"userIdentifier: %@", userIdentifier);
//        NSLog(@"password: %@", password);
        [self setAppleUserCallback:YES userId:userIdentifier authorizeCode:nil identityToken:nil name:nil];
    }
}
// 失败的回调
- (void)authorizationController:(ASAuthorizationController *)controller didCompleteWithError:(NSError *)error
API_AVAILABLE(ios(13.0)){
    NSString * errorMsg = nil;
    AppleLoginCallbackVO *kvo = [[AppleLoginCallbackVO alloc] init];
    kvo.isSucceed = NO;
    switch (error.code) {
        case ASAuthorizationErrorCanceled:
            errorMsg = @"Authorization is cancled.";
            break;
        case ASAuthorizationErrorFailed:
            errorMsg = @"Authorize failed.";
            break;
        case ASAuthorizationErrorInvalidResponse:
            errorMsg = @"Authoraized response invalid.";
            break;
        case ASAuthorizationErrorNotHandled:
            errorMsg = @"Authorization can not handle.";
            break;
        case ASAuthorizationErrorUnknown:
        default:
             errorMsg = @"Unknown reason failed for authorization.";
            break;
    }
}
注意:
获取的用户信息中:email、NSPersonNameComponents对象所有属性是只有第一次请求的时候才会返回,之后就算 停止使用 Apple ID 再重新授权都不会返回用户信息。
authorizeCredential.user 是用户的唯一ID,同一个开发者账号下这个ID一致。
authorizeCredential.authorizationCode验证码,每次返回的不一样,看服务端使用那种验证方式而定是否使用。
authorizeCredential.identityToken用户的验证token,有一定的有效期,到期后会刷新。
Apple建议将用户ID保存在钥匙串中以便在App启动的时候进行检查AppleID的登录状态。
用户注销 AppleId 或 停止使用 Apple ID 的状态处理
在application:didFinishLaunchingWithOptions进行APPID的登录状态检查。
-(void)checkAuthoriza API_AVAILABLE(ios(13.0)){
	// 从钥匙串中取出用户ID
    NSData* appleUserId = [tility valueKeyChain:@"appleUserID"];
    if (appleUserId) {
        NSString *appleIdentifyId = [[NSString alloc] initWithData:appleUserId encoding:NSUTF8StringEncoding];
        ASAuthorizationAppleIDProvider *provider = [ASAuthorizationAppleIDProvider new];
        [provider getCredentialStateForUserID:appleIdentifyId completion:^(ASAuthorizationAppleIDProviderCredentialState credentialState, NSError * _Nullable error) {
            switch (credentialState) {
                case ASAuthorizationAppleIDProviderCredentialAuthorized:
                    //
                    NSLog(@"has authorized");
                    break;
                case ASAuthorizationAppleIDProviderCredentialRevoked:
                    NSLog(@"revoked,please sign out apple login");
                    // 删除钥匙串保存的信息
                    [Utility removeObjectKeyChainForKey:@"appleUserID"];
                    // 登出Apple登录,等待下次重新登录
                    break;
                case ASAuthorizationAppleIDProviderCredentialNotFound:
                    NSLog(@"not found....");
                    [Utility removeObjectKeyChainForKey:@"appleUserID"];
                default:
                    break;
            }
        }];
    }
}
2、检查用户的APPID的登录状态还可以使用观察者的方式
// 注册通知
[[NSNotificationCenter defaultCenter] addObserver:self selector:@selector(handleSignInWithAppleStateChanged:) name:ASAuthorizationAppleIDProviderCredentialRevokedNotification object:nil];
#pragma mark- apple授权状态 更改通知
- (void)handleSignInWithAppleStateChanged:(NSNotification *)notification
{
    NSLog(@"%@", notification.userInfo);
}
服务端验证
服务端验证分两种验证方式:一种是验证码验证、一种是JWT验证。具体详见Apple 官方文档:https://developer.apple.com/documentation/signinwithapplerestapi
手机端需要提交 user 、authorizationCode 、 identityToken 字段信息(code和token字段苹果返回的是 base64 Data 形式,手机端可以先转换 base64 字符串之后在给服务器)到服务器。然后服务器通过 https://appleid.apple.com/auth/token 该接口,并拼接对应参数去验证,接口相关信息苹果有提供。
参数介绍:
Client_id:App 的BundleID client_secret:后台生成的JWT key,生成方法见后续。 Code:客户端传过的authorizationCode
grant_type:常量authorizationCode
参数的获取方法:
登录Apple开发者账号-menbership 获取teamid ;
创建private_key:进入证书栏certificates、IDs&Profiles,选择keys标签(如果没有keys标签,可能是您登录的Apple开发者账号不是超管账号,没有权限。)-现在添加–给key命名并选择对应的bundleid。
注:该private_key只能下载一次。
根据Apple返回的结果中sub字段即是用户的ID,可以和手机端的user字段对比验证。
找不到AuthenticationServices
AuthenticationServices 是只有在iOS13+系统才有效,在使用对应API的时候需要限定是 13.0+
无法引入App.kit [
AppKit is not available when building for iOS. Consider using #if TARGET_OS_MACCATALYST to conditionally import this framework when building for Mac Catalyst, first importing TargetConditionals.h if necessary.
按照提示在引入App.kit 增加判断:
#if TARGET_OS_MACCATALYST
    #import
#endif
Authorization failed: Error Domain=AKAuthenticationError Code=-7001 “(null)”
停止使用 ASAuthorizationPasswordRequest。
作者:MarinaTsang