《python编程从入门到实践》——武装飞船详解
import pygame
import sys
def run_game():
    # 初始化游戏并创建一个屏幕对象
    pygame.init()
    screen = pygame.display.set_mode(1200,800)
    pygame.display.set_caption('Alien Invasion')
while True :
 	# 监视鼠标键盘是否有QUIT事件
 	for event in pygame.event.get()
 		if event.type == pygame.QUIT()
 			sys.exit()
 	# 让最近绘制的屏幕可见
 	pygame.dispaly.flip()
run_game()
1.pygame.init()
init的作用是初始话,在初始化之前,无法做任何事情。
当我们调用python.init()的时候python.display会自动初始化。有着向下传递的关系。
这里有十分详细的解释display的函数的解释
链接: link.
pygame.event.get()的意思是监控鼠标和键盘每一个动作,而pygame.QUIT()中的QUIT是一个事件,可以理解为鼠标或键盘的某种操作(我认为就是鼠标点击×)
4.sys不做解释link.这里有sys模块的详解。
二.背景色用一个变量bg_color只是一个好记的名字,也可以是ag_color。
screen.fill(R,G,B)中screen表示的就是调用出来的屏幕对象,fill函数中RGB三个参数分别表示:红色(R),绿色(G)和蓝色(B)
class Settings():
    """储存《外星人入侵》的所有设置的类"""
    def __init__(self):
        """初始化屏幕设置"""
        self.screen_width = 1200
        self.screen_height = 800
        self.ag_color = (230,232,230)
我将它下面的代码放在一起来讲
def run_game():
    # 初始化游戏并创建一个屏幕对象
    pygame.init()
    ai_settings = Settings()
    screen = pygame.display.set_mode((ai_settings.screen_width,ai_settings.screen_height))
    ag_color = ai_settings.ag_color
    pygame.display.set_caption('Alien Invasion')
    # 开始游戏的主循环
    while True :
	while True :
 	# 监视鼠标键盘是否有QUIT事件
 	for event in pygame.event.get()
 		if event.type == pygame.QUIT()
 				sys.exit()
 	#每次循环时都重绘屏幕
 	screen.fill(ai_settings.bg_color)
 	# 让最近绘制的屏幕可见
 	pygame.dispaly.flip()
run_game()
1.Settings类的建立
因为一个游戏中要设置的东西十分多,我们可以将所有东西放在一个类中,这样可以显得简单一些。
**这是一个需要养成的好习惯!**如果没用这个类,当我们要更改数据时,我们则需要一个一个去翻,十分麻烦。
ai_settings做为Settings的实例,ai_settings的属性在类中已经定义过,将他们放在改放的位置即可。
3.飞船添加图像可自己安装书本操作。
import pygame
class Ship():
    def __init__(self,screen,ai_settings):
        """初始化飞船并设置初始位置"""
        self.screen = screen
        self.ai_settings = ai_settings
        # 加载飞船图像并获取其外接矩形
        self.image = pygame.image.load(image/ship.bmp')
        self.rect = self.image.get_rect()
        # self.screen_rect = screen.get_rect()
        # 将每艘飞船放在屏幕底部中央
        self.rect.centerx = screen.get_rect().centerx
        self.rect.bottom = screen.get_rect().bottom
	def blitme(self):
        """在指定位置绘制飞船"""
        self.screen.blit(self.image,self.rect)
1.self.iamge = pygame.image.load(‘image/ship.bmp’’)
这个pygame.image.load()函数,参数接受的是你图像的地址,返回的是一个表示飞船的surface,
值得注意的是,当初的screen也是一个surface,我们在这里姑且将surface当作一个画板。
self.image就是飞船的图像。
关于image这里有详解link
get_rect()是一个处理矩形图像的方法,返回值包含矩形的居中属性( center centerx centery ) top bottom left right
self.rect() = self.image.get_rect()的意思及把self.image的属性返回并符值给self.rect()
***self.screen_rect = screen.get_rect()***这一步的理解十分重要
首先是对self.screen_rect的理解,这里的self很明显等等会作为Ship创造ship飞船的实例,ship.screen_rect的意思就是飞船这个实例里面的屏幕。但是其实我认为这一步是可以省略的,我们大可把self.rect.centerx = self.screen_rect.centerx中的self.screen_rect换成screen.get_rect()。(有可能换了代码会比较难读懂,但是换了也是正确的。)
接下来的重构我就不解读,安装书本上的来即可,养成好习惯
这是我ship.py最终的版本,我的书本可以有所不同,我的增加了上下键
import pygame
class Ship():
    def __init__(self,screen,ai_settings):
        """初始化飞船并设置初始位置"""
        self.screen = screen
        self.ai_settings = ai_settings
        # 加载飞船图像并获取其外接矩形
        self.image = pygame.image.load(r'C:\Users\86183\Pictures\Saved Pictures\plane.png')
        self.rect = self.image.get_rect()
        # self.screen_rect = screen.get_rect()
        # 将每艘飞船放在屏幕底部中央
        self.rect.centerx = screen.get_rect().centerx
        self.rect.bottom = screen.get_rect().bottom
        # 在飞船的书写center中储存小数值
        self.center_x = float(self.rect.centerx)
        self.center_y = float(self.rect.centery)
        # 移动标志
        self.moving_right = False
        self.moving_left = False
        self.moving_bottom = False
        self.moving_top = False
    def update(self):
        """根据移动标志调整飞船的位置"""
        # 跟新飞船center的值,而不是rect
        # 当还是使用self.rect.centerx或y时,当速度为1.5小数时,向下和向右的速度不对还是1,这是因为centerx(y)一直都是整数并不会因为参与小数运算变成小数(但是一般来说整数应该要变成小数)
        if self.moving_right and self.rect.right  0:
            self.center_x -= self.ai_settings.ship_speed_factor
        if self.moving_bottom and self.rect.bottom  0:
            self.center_y -= self.ai_settings.ship_speed_factor
        # 向上下的加减要注意,因为屏幕是以左上点为(0,0)
        # 根据self.center更新rect对象,因为最终输出的位置的参数是self.rect的xy
        self.rect.centery = self.center_y
        self.rect.centerx = self.center_x
    def blitme(self):
        """在指定位置绘制飞船"""
        self.screen.blit(self.image,self.rect)
1.我们先来解释几个词
KEYDOWN——当我们按下任何一个键是,我们将创造一个KEYDOWN事件,可以理解为我们按下的键
KEYUP——当我们松开任何一个键时,我们将创造一个KEYUP事件。
K_RIGHT(LEFT,UP,DOWN)——我们按下的"上"“下”“左”"右"键
当我们理解这些词我们大概也就跟好的理解了代码。
这一步我认为是最难理解的。
首先,self.center中的center并不是什么属性,self.center仅仅只是个变量名字,意思是让原来self.rect.centerx变成浮点型,并储存在self.center中。
第二,为什么要变成浮点型呢?
a = 2
print(type(a))
b = 1.5
a = b * a
print(a)
print(type(a))
3
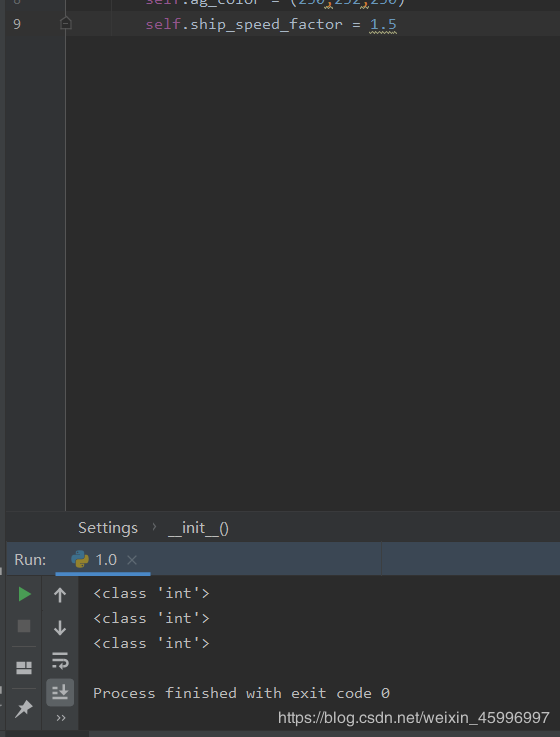
这个例子我们很清楚的可以看出当整型和浮点型运算后一定是浮点型,就算运算结果等于整数,那么我们的self.rect.centerx也会这样嘛?答案是否定的,self.rect.centerx一直都是整型!


当然那就不用更新了。
我将x方向还是不变,然后去寻找self.rect.centerx的类型

我在这里设的是1.5,按照正常情况这个self.rect.centerx和1.5运算应该是浮点型

但是,我们发现他还是整型!!!这就是为什么我们要用float强制将self.rect.center(这里是书中的,我的应该还要个x)转换成浮点型。
我原本是没有强制转换这一步的,但是当速度为1.5的时候我们可以明显的发现运算“-”(也就是向左)比运算“+”(向右)要快一些。这里的解释我可以举个例子
a = 2
b = 1.5
a = a + b
print(int(a))
3
a = 2
b = 1.5
a = a - b
print(int(a))
0
我们可以清楚的看出,减法比加法更加“快”,所以我们移动飞机时就会有向左会比向右快。
五.射击 1.bullet.pyimport pygame
from pygame.sprite import Sprite
class Bullet(Sprite):
"""一个对飞船发射的子弹进行管理的类"""
def __init__(self,ai_settings,screen,ship):
"""在飞船所处的位置创建一个子弹对象"""
super(Bullet,self).__init__()
self.screen = screen
# 在(0,0)处创建一个表示子弹的矩阵,在设置正确的位置
self.rect = pygame.Rect(0,0,ai_settings.bullet_width,
ai_settings.bullet_height)
self.rect.centerx = ship.rect.centerx
self.rect.top = ship.rect.top
# 储存用小数表示的子弹位置
self.y = float(self.rect.y)
self.color = ai_settings.bullet_color
self.speed_factor = ai_settings.bullet_speed_factor
def update(self):
"""向上移动子弹"""
# 更新表示子弹位置的小数值
self.y -= self.speed_factor
# 跟新表示子弹的rect的位置
self.rect.y = self.y
def draw_bullet(self):
"""在屏幕绘制子弹"""
pygame.draw.rect(self.screen, self.color, self.rect)
1.关于sprite
Sprite类;作为sprite的基类(在面向对象设计中,被定义为包含所有实体共性的class类型,被称为“基类”。)源代码
class Sprite(builtins.object)
 |  Sprite(*groups)
 |
 |  simple base class for visible game objects
 |
 |  pygame.sprite.Sprite(*groups): return Sprite
 |
 |  The base class for visible game objects. Derived classes will want to
 |  override the Sprite.update() method and assign Sprite.image and Sprite.rect
 |  attributes.  The initializer can accept any number of Group instances that
 |  the Sprite will become a member of.
 |
 |  When subclassing the Sprite class, be sure to call the base initializer
 |  before adding the Sprite to Groups.
 |
 |  Methods defined here:
 |
 |  __init__(self, *groups)
 |      Initialize self.  See help(type(self)) for accurate signature.
 |
 |  __repr__(self)
 |      Return repr(self).
 |
 |  add(self, *groups)
 |      add the sprite to groups
 |
 |      Sprite.add(*groups): return None
 |
 |      Any number of Group instances can be passed as arguments. The
 |      Sprite will be added to the Groups it is not already a member of.
 |
 |  add_internal(self, group)
 |
 |  alive(self)
 |      does the sprite belong to any groups
 |
 |      Sprite.alive(): return bool
 |
 |      Returns True when the Sprite belongs to one or more Groups.
 |
 |  groups(self)
 |      list of Groups that contain this Sprite
 |
 |      Sprite.groups(): return group_list
 |
 |      Returns a list of all the Groups that contain this Sprite.
 |
 |  kill(self)
 |      remove the Sprite from all Groups
 |
 |      Sprite.kill(): return None
 |
 |      The Sprite is removed from all the Groups that contain it. This won't
 |      change anything about the state of the Sprite. It is possible to
 |      continue to use the Sprite after this method has been called, including
 |      adding it to Groups.
 |
 |  remove(self, *groups)
 |      remove the sprite from groups
 |
 |      Sprite.remove(*groups): return None
 |
 |      Any number of Group instances can be passed as arguments. The Sprite
 |      will be removed from the Groups it is currently a member of.
 |
 |  remove_internal(self, group)
 |
 |  update(self, *args)
 |      method to control sprite behavior
 |
 |      Sprite.update(*args):
 |
 |      The default implementation of this method does nothing; it's just a
 |      convenient "hook" that you can override. This method is called by
 |      Group.update() with whatever arguments you give it.
 |
 |      There is no need to use this method if not using the convenience
 |      method by the same name in the Group class.
 |
 |  ----------------------------------------------------------------------
 |  Data descriptors defined here:
 |
 |  __dict__
 |      dictionary for instance variables (if defined)
 |
 |  __weakref__
 |      list of weak references to the object (if defined)
看不懂源代码的可以打开这个网站 link.
他其中add()和remove()我们有用到,但是值得我们特殊注意的是他原来就有一个update函数,,所以如果我们要用自己想要的update函数,需要重新def一个。
Group()用于保存和管理多个Sprite对象的容器类。
super(Bullet,self).init()(旁边还有"__" 但是打不出来)
这样的继承和仅仅是在定义时后面加上一个父类**class 子类(父类)又区别。
前者用了super可以调用父类的属性和方法,但是仅仅是class 子类(父类)**的话,我们仅仅只能调用父类的方法,无法调用属性。
这个问题其实和上面调整飞船速度时,要将飞船的sship.rect.centerx变成小数是一样的。
2.删除已经消失的子弹。 # 删除已经消失的子弹
for bullet in bullets.copy():
if bullet.rect.bottom <= 0:
bullets.remove(bullet)
print(len(bullets)) # 表示bullets编组中还有多少颗子弹
bullets.copy 这里有详细解释link.
自此,我把我认为需要较难的部分讲完了,当然书中还有很多我没有提到。如有讲错,还请留言。
如有不懂,也可以留言。
作者:hsrkk