iOS实现通过按钮添加和删除控件的方法
本文实例为大家分享了iOS通过按钮添加和删除控件,供大家参考,具体内容如下
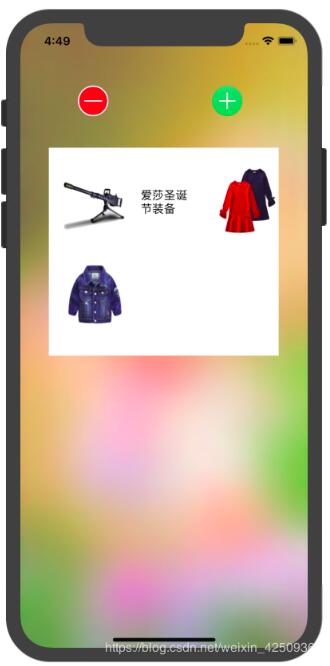
想要达到的效果如下:
先讲一下这个demo主要部分,即通过按钮实现增删图标
分析:
1、每一个图标需要两个数据,即图片和描述用的字符串 ,所以创建一个Item类来封装从plist文件读取出来的数据:
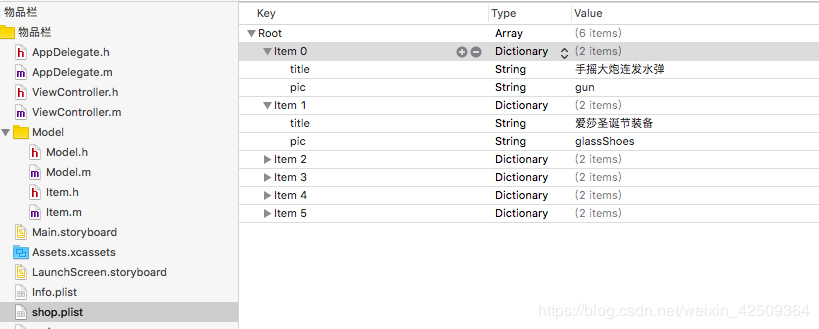
1)plist文件如下:
2)Item类:
.h文件
#import <Foundation/Foundation.h>
@interface Item : NSObject
//描述的字符串
@property(nonatomic,copy)NSString * desStr;
//图片路径
@property(nonatomic,copy)NSString * imgPath;
-(instancetype)initWithString:(NSString *)desStr andimgPath:(NSString *)imgPath;
@end
.m文件
#import "Item.h"
@implementation Item
-(instancetype)initWithString:(NSString *)desStr andimgPath:(NSString *)imgPath{
 self = [super init];
 if (self) {
  self.desStr = desStr;
  self.imgPath = imgPath;
 }
 return self;
}
@end
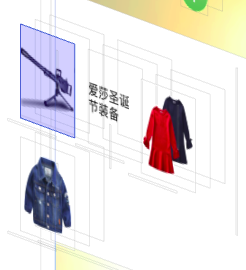
2、然后创建一个Model类用于封装自定义的图标模型,我的模型是将Model类继承于UIScrollView类,然后设置其可以滚动,然后再创建一个占据整个scrollview可滚动部分大小的button添加上去。再分别在button上半部分添加UIImageView显示图片,在下半部分添加UILabel显示描述文字,结构如下
重写model的init方法,在创建对象时用item对象初始化:
model类:
1).h文件
#import <UIKit/UIKit.h>
#import "Item.h"
@interface Model : UIScrollView
@property(nonatomic,strong)UIButton *button;
@property(nonatomic,strong)UILabel *label;
//判断button是否被点击
@property(nonatomic,assign)BOOL isClicked;
-(instancetype)initWithItem:(Item *)item;
//重置模型
-(void)resetModel;
@end
2).m文件
-(instancetype)initWithItem:(Item *)item{
 self = [super initWithFrame:CGRectMake(20, 20, 80, 100)];
 if (self) {
  //设置模块
  self.contentSize = CGSizeMake(80, self.frame.size.height * 2);
  self.pagingEnabled = NO;
  //设置模块属性
  self.button = [[UIButton alloc] initWithFrame:CGRectMake(0, 0, self.frame.size.width, self.contentSize.height)];
  [self.button addTarget:self action:@selector(buttonDidClicked) forControlEvents:UIControlEventTouchUpInside];
  //添加图片视图到button上
  UIImageView *imgView = [[UIImageView alloc] initWithFrame:CGRectMake(0, 0, self.frame.size.width, self.frame.size.height)];
  [imgView setImage:[UIImage imageNamed:item.imgPath]];
  [self.button addSubview:imgView];
  //设置button是否被点击
  self.isClicked = NO;
  [self addSubview:self.button];
  self.label = [[UILabel alloc] initWithFrame:CGRectMake(0, self.frame.size.height, self.frame.size.width, self.frame.size.height)];
  self.label.text = item.desStr;
  self.label.font = [UIFont systemFontOfSize:15];
  self.label.textColor = [UIColor blackColor];
  self.label.numberOfLines = 0;
  self.label.textAlignment = NSTextAlignmentLeft;
  [self addSubview:self.label];
 }
 return self;
}
3)button的点击事件:即点击图片文字描述就会从下面升上来,再点击就会降下去的动作:
/label升降
-(void)buttonDidClicked{
 if (self.isClicked == NO) {
  [UIView animateWithDuration:0.5 animations:^{
   self.contentOffset = CGPointMake(0, self.frame.size.height);
  }];
  self.isClicked = YES;
 }else if (self.isClicked == YES) {
  [UIView animateWithDuration:0.5 animations:^{
   self.contentOffset = CGPointMake(0, 0);
  }];
  self.isClicked = NO;
 }
}
另外,由于必须保证每次添加model到视图上时显示的是图片,所以需要一个方法来复原到初始状态,即一旦从视图上删除就复原:
//复原
-(void)resetModel{
  self.contentOffset = CGPointMake(0, 0);
  self.isClicked = NO;
}
3、模型准备好了,下面在viewController类里面写一个方法将plist文件数据读取出来封装到item对象里面,再用item对象初始化model对象,将所有model对象存入可变数组(_allItems)里面:
//加载数据到物品
-(void)loadData{
//读取数据
 NSString *filePath = [[NSBundle mainBundle] pathForResource:@"shop" ofType:@"plist"];
 NSArray *itemArr = [NSArray arrayWithContentsOfFile:filePath];
 //创建模型
 for (int i =0;i <[itemArr count] ; i++) {
  Item *item = [[Item alloc] initWithString:[[itemArr objectAtIndex:i] objectForKey:@"title"] andimgPath:[[itemArr objectAtIndex:i] objectForKey:@"pic"]];
  Model *model = [[Model alloc] initWithItem:item];
  //未被添加的为0,添加好的为1
  model.tag = 0;
  [_allItems addObject:model];
 }
}
**注意:**model的tag是用于判断model是否已经被添加到视图里面,从而只会添加数组里面未添加的model,已添加的model也会用一个数组(displayedItems)来存储,方便删除
4、添加和删除按钮及其响应的方法:
1)add按钮:
创建:
//添加添加按钮
 UIButton *addButton = [[UIButton alloc] initWithFrame:CGRectMake(_width*2/3, _height/10, 40, 40)];
 [addButton setImage:[UIImage imageNamed:@"add"] forState:UIControlStateNormal];
 [addButton addTarget:self action:@selector(add) forControlEvents:UIControlEventTouchUpInside];
 [self.view addSubview:addButton];
add方法:
//添加事件
-(void)add{
 NSInteger itemCount = [_displayedItems count];
 for (Model* model in _allItems) {
  if (model.tag == 0) {
   switch (itemCount) {
    case 1:
     model.frame = CGRectMake(40 + model.frame.size.width, 20, 80, 100);
     break;
    case 2:
     model.frame = CGRectMake(60 + model.frame.size.width*2, 20, 80, 100);
     break;
    case 3:
     model.frame = CGRectMake(20,40 + model.frame.size.height, 80, 100);
     break;
    case 4:
     model.frame = CGRectMake(40 + model.frame.size.width, 40 + model.frame.size.height, 80, 100);
     break;
    case 5:
     model.frame = CGRectMake(60 + model.frame.size.width*2, 40 + model.frame.size.height, 80, 100);
     break;
    default:
     break;
   }
   [_scrollView addSubview:model];
   [_displayedItems addObject:model];
   model.tag = 1;
   break;
  }
 }
}
2)delete按钮:
//添加删除按钮
 UIButton *deleteButton = [[UIButton alloc] initWithFrame: CGRectMake(_width/5, _height/10, 40, 40)];
 [deleteButton setImage:[UIImage imageNamed:@"delete"] forState:UIControlStateNormal];
 [deleteButton addTarget:self action:@selector(delete) forControlEvents:UIControlEventTouchUpInside];
 [self.view addSubview:deleteButton];
delete方法:
-(void)delete{
 Model *model = _displayedItems.lastObject;
 [model removeFromSuperview];
 model.tag = 0;
 [model resetModel];
 [_displayedItems removeObject:model];
}
嗯,由于这里为了方便,所以添加控件时的位置判断直接写死了,所以还有待改进。以上就是用按钮添加控件这个demo的主要部分,另外还有那个背景图片的模糊处理使用的是UIVisualEffectView类实现的,在此不详述了。
代码不足之处:
1、位置判断写死了
2、模型其实建一个类就够了,Item类有点多余
进阶方案:
1、通过拖动图标放置在父视图任何位置
2、点击控件文字显示于图片之上,图片成为背景并虚化