java版spring cloud分布式微服务(七)Spring Cloud Sleuth-b2b2c小程序电子商务
一、构建工程
本文的案例主要有三个工程组成:一个server-zipkin,它的主要作用使用ZipkinServer 的功能,收集调用数据,并展示;一个service-hi,对外暴露hi接口;一个service-miya,对外暴露miya接口;这两个service可以相互调用;并且只有调用了,server-zipkin才会收集数据的,这就是为什么叫服务追踪了。了解springcloud架构可以加求求:三五三六二四七二五九
二、构建server-zipkin
建一个spring-boot工程取名为server-zipkin,在其pom引入依赖:
			org.springframework.boot
			spring-boot-starter
			org.springframework.boot
			spring-boot-starter-web
			org.springframework.boot
			spring-boot-starter-test
			test
			io.zipkin.java
			zipkin-server
			io.zipkin.java
			zipkin-autoconfigure-ui
				org.springframework.cloud
				spring-cloud-dependencies
				Camden.SR6
				pom
				import
在其程序入口类, 加上注解@EnableZipkinServer,开启ZipkinServer的功能:
@SpringBootApplication
@EnableZipkinServer
public class ServerZipkinApplication {
	public static void main(String[] args) {
		SpringApplication.run(ServerZipkinApplication.class, args);
	}
}
在配置文件application.yml指定服务端口为:
server.port=9411
三、 创建service-hi
在其pom引入起步依赖spring-cloud-starter-zipkin,代码如下:
			org.springframework.boot
			spring-boot-starter-web

			org.springframework.cloud
			spring-cloud-starter-zipkin
			org.springframework.boot
			spring-boot-starter-test
			test
				org.springframework.cloud
				spring-cloud-dependencies
				Dalston.RC1
				pom
				import
在其配置文件application.yml指定zipkin server的地址,头通过配置“spring.zipkin.base-url”指定:
@SpringBootApplication
@EnableZipkinServer
public class ServerZipkinApplication {
	public static void main(String[] args) {
		SpringApplication.run(ServerZipkinApplication.class, args);
	}
}
通过引入spring-cloud-starter-zipkin依赖和设置spring.zipkin.base-url就可以了。
对外暴露接口:
@SpringBootApplication
@RestController
public class ServiceHiApplication {
	public static void main(String[] args) {
		SpringApplication.run(ServiceHiApplication.class, args);
	}
	private static final Logger LOG = Logger.getLogger(ServiceHiApplication.class.getName());
	@Autowired
	private RestTemplate restTemplate;
	@Bean
	public RestTemplate getRestTemplate(){
		return new RestTemplate();
	}
	@RequestMapping("/hi")
	public String callHome(){
		LOG.log(Level.INFO, "calling trace service-hi  ");
		return restTemplate.getForObject("http://localhost:8989/miya", String.class);
	}
	@RequestMapping("/info")
	public String info(){
		LOG.log(Level.INFO, "calling trace service-hi ");
		return "i'm service-hi";
	}
	@Bean
	public AlwaysSampler defaultSampler(){
		return new AlwaysSampler();
	}
}
四、 创建service-miya
创建过程痛service-hi,引入相同的依赖,配置下spring.zipkin.base-url。
对外暴露接口:
@SpringBootApplication
@RestController
public class ServiceMiyaApplication {
	public static void main(String[] args) {
		SpringApplication.run(ServiceMiyaApplication.class, args);
	}
	private static final Logger LOG = Logger.getLogger(ServiceMiyaApplication.class.getName());
	@RequestMapping("/hi")
	public String home(){
		LOG.log(Level.INFO, "hi is being called");
		return "hi i'm miya!";
	}
	@RequestMapping("/miya")
	public String info(){
		LOG.log(Level.INFO, "info is being called");
		return restTemplate.getForObject("http://localhost:8988/info",String.class);
	}
	@Autowired
	private RestTemplate restTemplate;
	@Bean
	public RestTemplate getRestTemplate(){
		return new RestTemplate();
	}
}
在其配置文件application.yml指定zipkin server的地址,头通过配置“spring.zipkin.base-url”指定:
server.port=8988
spring.zipkin.base-url=http://localhost:9411
spring.application.name=service-hi
通过引入spring-cloud-starter-zipkin依赖和设置spring.zipkin.base-url就可以了。
对外暴露接口:
@SpringBootApplication
@RestController
public class ServiceHiApplication {
	public static void main(String[] args) {
		SpringApplication.run(ServiceHiApplication.class, args);
	}
	private static final Logger LOG = Logger.getLogger(ServiceHiApplication.class.getName());
	@Autowired
	private RestTemplate restTemplate;
	@Bean
	public RestTemplate getRestTemplate(){
		return new RestTemplate();
	}
	@RequestMapping("/hi")
	public String callHome(){
		LOG.log(Level.INFO, "calling trace service-hi  ");
		return restTemplate.getForObject("http://localhost:8989/miya", String.class);
	}
	@RequestMapping("/info")
	public String info(){
		LOG.log(Level.INFO, "calling trace service-hi ");
		return "i'm service-hi";
	}
	@Bean
	public AlwaysSampler defaultSampler(){
		return new AlwaysSampler();
	}
}
启动工程,演示追踪
依次启动上面的三个工程,打开浏览器访问:http://localhost:9411/,会出现以下界面:

访问:http://localhost:8989/miya,浏览器出现:
i’m service-hi
再打开http://localhost:9411/的界面,点击Dependencies,可以发现服务的依赖关系:

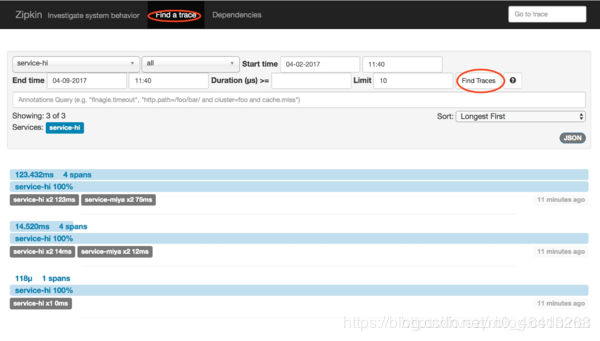
点击find traces,可以看到具体服务相互调用的数据:
在这里插入图片描述

作者:m0_46413263