react中context传值和生命周期详解
目录
context传值用途
Context传值优点
何时使用 Context
ContextAPI
项目案例:主题色切换。
添加自定义颜色
添加监听context变化
类组件的生命周期
假设:
项目中存在复杂组件树:

数据是通过 props 属性自上而下(由父及子)进行传递的,但这种做法对于某些类型的属性而言是极其繁琐的(例如:地区偏好,UI 主题),这些属性是应用程序中许多组件都需要的。
Context传值优点Context 提供了一种在组件之间共享此类值的方式,而不必显式地通过组件树的逐层传递 props。
何时使用 ContextContext 设计目的是为了共享那些对于一个组件树而言是“全局”的数据,例如当前认证的用户、主题或首选语言。
ContextAPI1.React.createContext API
功能:
创建一个 Context 对象。
//代码
//创建context对象的
import React from 'react'
let context=React.createContext();
export default context;
2.Context.Provider API
功能:
Provider 是context对象提供的内置组件 限定在某个作用域中使用context传值。
限定作用域传值。
3.Context.Consumer
context对象的内置组件
<MyContext.Consumer>
{value => /* 基于 context 值进行渲染*/}
</MyContext.Consumer>
作用:监听订阅的context变更,
这个函数接收当前的 context 值,返回一个 React 节点。
项目案例:主题色切换。
1.创建context.js文件
  创建context对象  用来做context传值。
//创建context对象的
import React from 'react'
export default React.createContext();
2。使用context找到限定范围使用内置组件Provider
 {/* 使用Provider 内置组件限定context范围 */}
 {/* value 必填  context传递的值 */}
        <ThemeContext.Provider>
          <div className="Admin">
            <div className="LeftMenu">
              <LeftMenu></LeftMenu>
            </div>
            <div className="RightContent">
              <div className="RightContent-top">
                <TopHeader></TopHeader>
              </div>
              <div className="RightContent-bottom">
                <Dashborder></Dashborder>
              </div>
            </div>
</ThemeContext.Provider>
浏览器报错:

3.在使用context的组件中进行订阅
左侧菜单组件
import React, { Component } from "react";
console.log(Component);
//引入context对象
import ThemeContext from "../components/context";
class LeftMenu extends Component {
  constructor(props) {
    super(props);
    this.state = {};
  }
  render() {
    return (
      <>
        <div>左侧菜单</div>
      </>
    );
  }
}
//class类组件存在contextType  绑定context对象
LeftMenu.contextType = ThemeContext;
组件中绑定context之后使用:
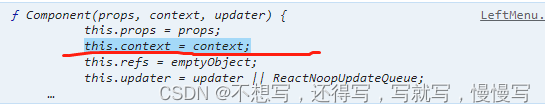
意味着订阅context组件的内部使用this.context获取。
render() {
    //获取context
    let theme = this.context;
    return (
      <>
        <div className={theme}>左侧菜单</div>
      </>
    );
  }
固定主体修改为动态主体
修改了context文件代码
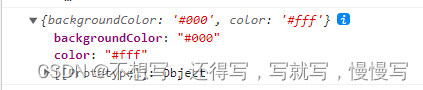
//定义默认主体色
export const themes = {
dark: {
backgroundColor: "#000",
color: "#fff",
},
light: {
backgroundColor: "#fff",
color: "#000",
},
};
//创建context对象的
import React from "react";
export const ThemeContext = React.createContext();
app.js文件中获取主题,动态切换主题。使用主题变量
constructor(props) {
    super(props);
    this.state = {
      //将固定的主体设置为state状态
      themeType: "dark",//控制主体切换
      nowTheme: themes["dark"],//获取当前默认主体
    };
  }
  render() {
    //解构获取
    let { nowTheme } = this.state;
    return (
      <>
        {/* 使用Provider 内置组件限定context范围 */}
        {/* value 必填  context传递的值 */}
        <ThemeContext.Provider value={nowTheme}>
订阅组件中使用this.context获取订阅
render() {
    //获取context
    let { backgroundColor, color } = this.context;
    return (
      <>
      //直接绑定行内css
        <div style={{ backgroundColor: backgroundColor, color: color }}>
          左侧菜单
        </div>
      </>
    );
  }

用户点击其他组件修改主题的按钮来变更主题
注意:不能直接使用this.context修改变量值
//可以在provider组件上 value中携带修改函数传递。在订阅组件中获取修改方法,执行反向传递值。
//修改主题变量方法
  changeTheme(type) {
    console.log("测试", type);
    this.setState({ themeType: type, nowTheme: themes[type] });
  }
  render() {
    //解构获取
    let { nowTheme } = this.state;
    return (
      <>
        {/* 使用Provider 内置组件限定context范围 */}
        {/* value 必填  context传递的值 */}
        <ThemeContext.Provider
          value={{ ...nowTheme, handler: this.changeTheme.bind(this) }}
        >
          <div className="Admin">
            <div className="LeftMenu">
              <LeftMenu></LeftMenu>
            </div>
            <div className="RightContent">
              <div className="RightContent-top">
                <TopHeader></TopHeader>
              </div>
              <div className="RightContent-bottom">
                <Dashborder></Dashborder>
              </div>
            </div>
          </div>
        </ThemeContext.Provider>
      </>
    );
 //在订阅组件中直接使用
 //修改主题的方法
  change(themeType) {
    console.log(themeType);
    //获取provider传递方法
    let { handler } = this.context;
    handler(themeType);
  }
  render() {
    let { themeButton } = this.state;
    return (
      <>
        <div>
          <span>主题色:</span>
          <div>
            {/* 控制左侧菜单和上header背景色 */}
            {themeButton.map((item, index) => {
              return (
                <button key={index} onClick={this.change.bind(this, item.type)}>
                  {item.name}
                </button>
              );
            })}
          </div>
        </div>
      </>
    );
添加自定义颜色
 {/* 颜色选择器 */}
          背景色:
          <input
            type="color"
            name="selectbgColor"
            value={selectbgColor}
            onChange={this.changeColor.bind(this)}
          />
          字体色:
          <input
            type="color"
            name="selectColor"
            value={selectColor}
            onChange={this.changeColor.bind(this)}
          />
          <button onClick={this.yesHandler.bind(this)}>确认</button>
   //代码区域操作事件向父级传递参数
     //确认修改
  yesHandler() {
    let { myhandler } = this.context;
    let { selectbgColor, selectColor } = this.state;
    console.log(selectbgColor, selectColor);
    myhandler(selectbgColor, selectColor);
  }
添加监听context变化
 {/*监听context value值*/}
          <ThemeContext.Consumer>
            {(value) => {
              let { backgroundColor, color } = value;
              return (
                <>
                  <span>背景色:{backgroundColor}</span>
                  <span>文字色:{color}</span>
                </>
              );
            }}
          </ThemeContext.Consumer>

组件生命周期解释:组件初始化到销毁整个过程。
生命周期三类:
Mounting(挂载):已插入真实 DOM
Updating(更新):正在被重新渲染
Unmounting(卸载):已移出真实 DOM
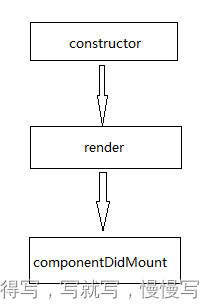
第一个阶段:
代码演示第一个阶段初始化挂载阶段
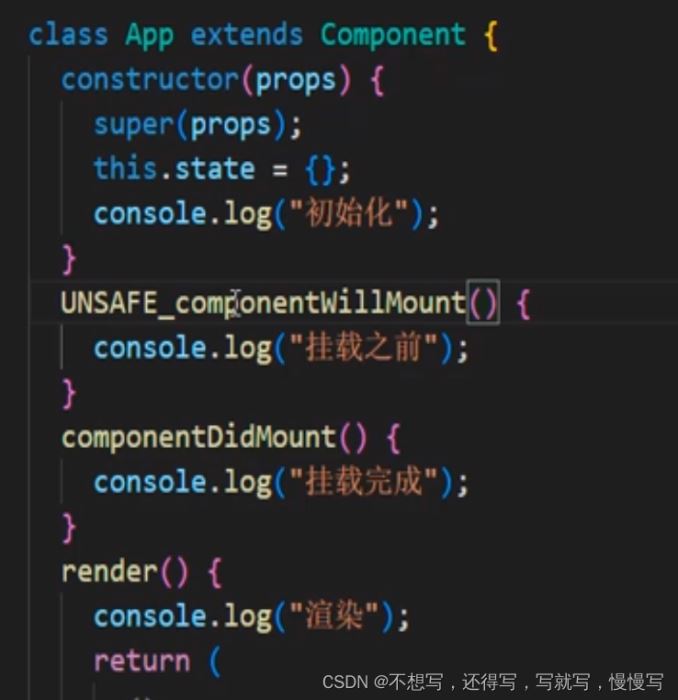
import React, { Component } from "react";
class App extends Component {
constructor(props) {
super(props);
this.state = {};
console.log("初始化");
}
componentDidMount() {
console.log("挂载完成");
}
render() {
console.log("渲染");
return (
<>
<div>测试</div>
</>
);
}
}
export default App;

添加了挂载之前周期
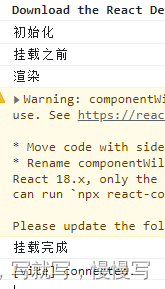
 UNSAFE_componentWillMount() {
    console.log("挂载之前");
  }
 //18.x 版本中UNSAFE_ 前缀
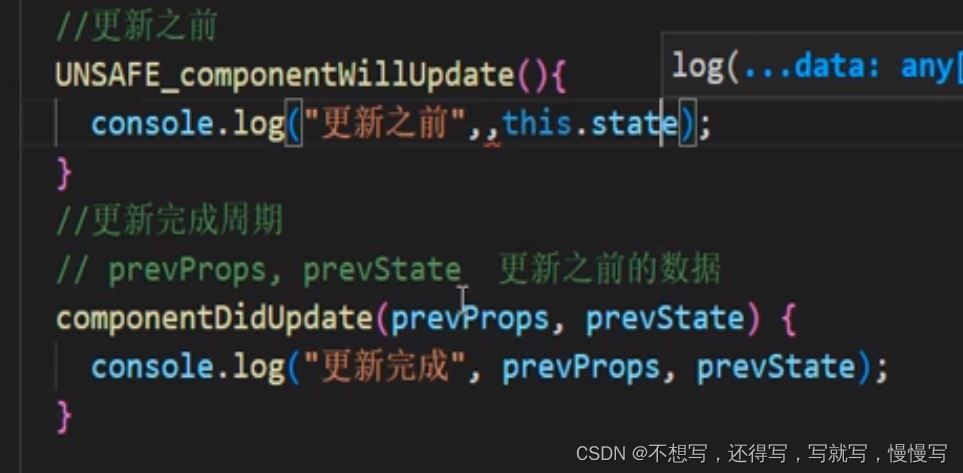
第二个阶段:更新阶段
能触发类组件更新  props state


添加了更新之前周期
componentWillUpdate() {
    console.log("更新之前");
}


第三阶段卸载:

 //卸载周期
  componentWillUnmount() {
    console.log("组件卸载");
  }
常用周期:

测试完成之后:18版本直接使用周期以上三个。
react推荐网络请求在componentDidMount
卸载清除副作用   componentWillUnmount
确认当前组件是否更新周期
//确认是否更新周期
  //必须带返回值  true  false
  //提升性能
  shouldComponentUpdate(nextProps, nextState, nextContext) {
    console.log(nextProps);
    if (nextProps.name == this.props.name) return false;
    else return true;
  }
  不写该周期默认是执行更新
1.componentWillMount() - 在染之前执行,在客户端和服务器端都会执行.
2.componentDidMount() - 是挂在完成之后执行一次
3.componentWillReceiveProps() - 当从父类接收到 props 并且在调用另一个渲染器器之前调用。4.shouldComponentUpdatel) -根据特定条件返回 true 或 false如果你希望更新组件,请返回true 否则返它返回 false。
5.componentWillUpdate() - 是当前组件state和props发生变化之前执行
6.componentDidUpdate()-是当前组件state和props发生变化执行
7.componentWillUnmount0) - 从 DOM 卸载组件后调用。用于清理内存空间
到此这篇关于react中context传值和生命周期的文章就介绍到这了,更多相关react context传值和生命周期内容请搜索软件开发网以前的文章或继续浏览下面的相关文章希望大家以后多多支持软件开发网!
相关文章
Yasmin
2021-05-01
Serepta
2020-09-11
Anna
2023-05-16
Jacinthe
2023-05-16
Elita
2023-05-17
Tani
2023-05-18
Viveka
2023-05-18
Karli
2023-05-18
Tia
2023-05-18
Ula
2023-07-17
Hasana
2023-07-17
Jacinda
2023-07-20
Nova
2023-07-20
Beth
2023-07-20
Viridis
2023-07-20
Georgia
2023-07-20
Shaine
2023-07-20
Isleta
2023-07-20