python-opencv图像处理之车牌识别+区域划分+车牌提取+保存图片(2)
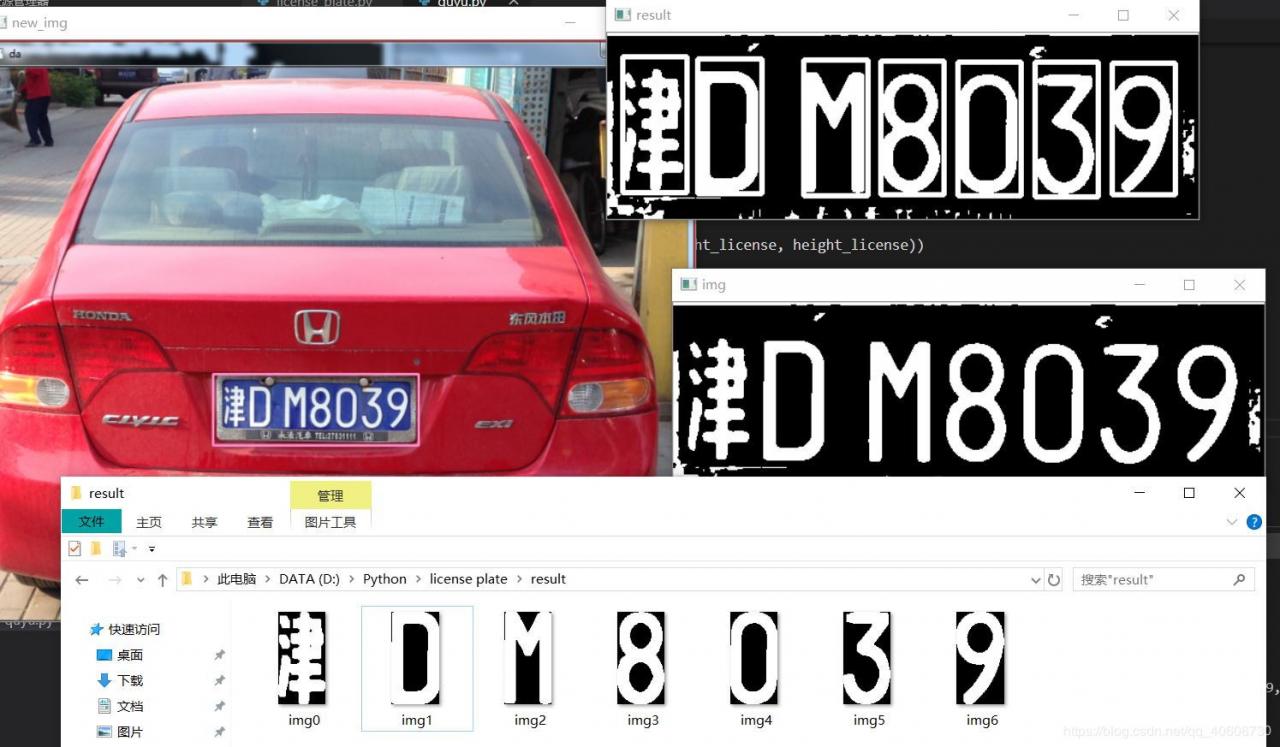
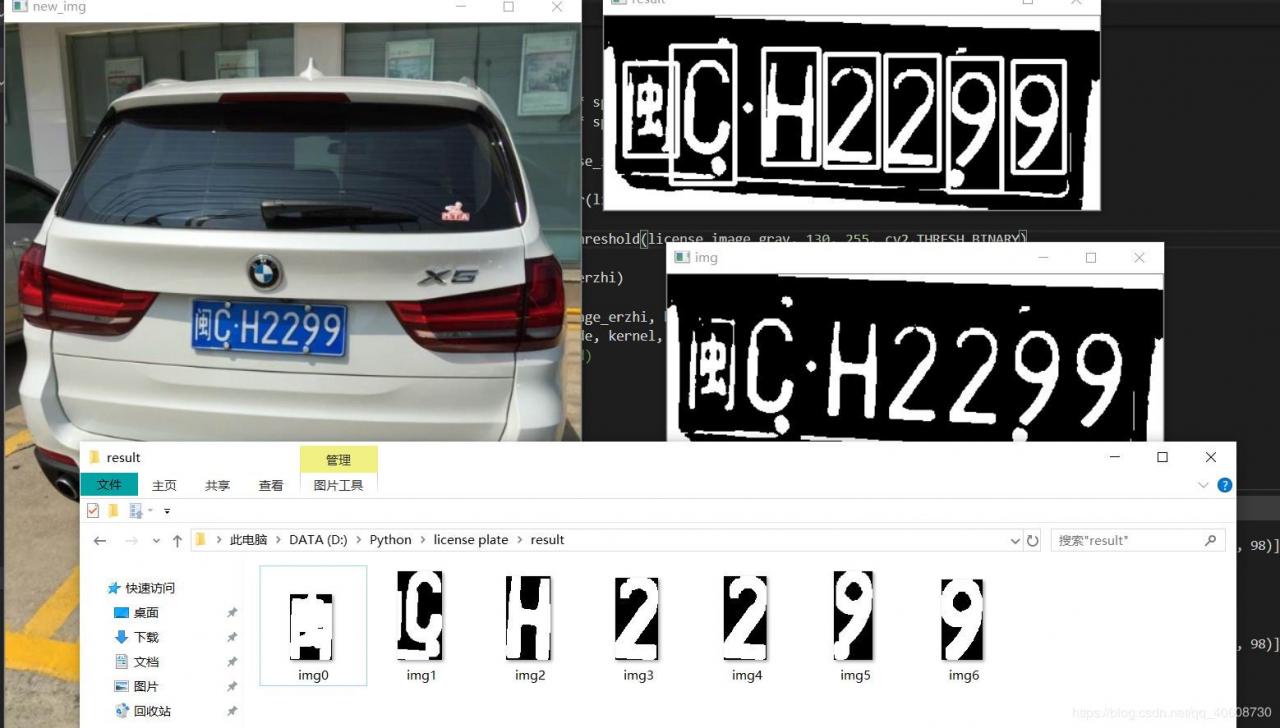
话不多说,先上效果图:

把车牌的每一个字母和数字都完美的分开,并保存在想保存的区域。车牌区域的划分详见我的另一个博客:python-opencv图像处理之基于HSV、面积、角度的车牌定位里面讲的比较详细。
在得到我们要的车牌之后,我们要把此区域提取出来,因为照片就是矩阵,所以我们可以通过
license_image = new_img[round( c ):round(d), round(a):round(b)]
的方式提取出车牌,但是要注意rect[2]这个角度,否则的话,有可能提取的是竖着的,不是横着的。
接着进行车牌的放大和二值化,二值化选用的参数要根据车牌识别的情况进行调整,也就是其中的160这个数值,需要按情况调整。
ret, license_image_erzhi = cv2.threshold(license_image_gray, 160, 255,
cv2.THRESH_BINARY)
然后进行腐蚀和膨胀
img_erode = cv2.erode(license_image_erzhi, kernel, iterations=1)
img_dilated = cv2.dilate(img_erode, kernel, iterations=2)
腐蚀和膨胀的次数也要进行调整,一般都不超过4。
接着就是你要保存的路径,os操作
在轮廓提取中,提取出的是车牌数字和字母在二值化图像中的位置信息,构成数组,由起始点的横坐标和纵坐标,以及高和宽构成。
设置count参数记录个数,正常是7个,但也有可能多或者少,可以根据面积参数进行筛选。
location_list.append((x,y,w,h))
用来向数组添加参数
要根据车牌从左往右的顺序提取车牌,所以还要进行排序
def takefirst(elem):
return elem[0]
#指定第一个元素排序
location_list.sort(key=takefirst)
排序完成之后就可以进行车牌的再次切割和保存了,并在二值图上标出
for i in range(0, count):
    license_image_1  = img_dilated[ location_list[i][1] :location_list[i][1] + location_list[i][3], location_list[i][0] : location_list[i][0]+location_list[i][2]]
    file_name = 'img' + str(i) + '.jpg'
    cv2.imwrite(path + file_name, license_image_1)
    cv2.rectangle(license_image_erzhi, (location_list[i][0], location_list[i][1]-10), (location_list[i][0] + location_list[i][2], location_list[i][1] + location_list[i][3]), (255, 255, 255), 4)
接下来给出完整代码:
from cv2 import cv2
import numpy as np
import os
lower_blue = np.array([90,90,0])
upper_blue = np.array([120,210,250])
img = cv2.imread('d:/Python/license plate/chepai/7.jpg')
n = 0.8
sp = img.shape
height = round(n*sp[0])
weight = round(n*sp[1])
new_img = cv2.resize(img,(weight,height))
cv2.imshow('new_img',new_img)
hsv = cv2.cvtColor(new_img, cv2.COLOR_BGR2HSV)
mark = cv2.inRange(hsv, lower_blue, upper_blue)
# mark = cv2.bitwise_not(mark)
# cv2.imshow("mark", mark)
# 腐蚀和膨胀
kernel = cv2.getStructuringElement(cv2.MORPH_RECT,(4,5))         #定义矩形结构元素
img_erode = cv2.erode(mark, kernel, iterations=1)
img_dilated = cv2.dilate(mark, kernel, iterations=3)
# cv2.imshow('erode', img_dilated)
contours, hierarchy = cv2.findContours(img_dilated,cv2.RETR_EXTERNAL,cv2.CHAIN_APPROX_SIMPLE)
for i in range(len(contours)):
    area = cv2.contourArea(contours[i])
    if area > 4000:
        rect = cv2.minAreaRect(contours[i]) #提取矩形坐标
        box = cv2.boxPoints(rect)
        box = np.int0(box)
        angle =abs(abs(rect[2])-45)
        length = max(rect[1])
        wideth = min(rect[1])
        bili = length / (wideth + 0.01)
        area = rect[1][0] * rect[1][1]
        if  area > 20000 or angle  3.3 or bili < 2.5 :
            continue
        print(area)
        print(bili)
        print(rect[2])
        # cv2.drawContours(new_img, [box], 0, (0, 0, 255), 2)
        if abs(rect[2]) < 45:
            a = rect[0][0]-0.5*rect[1][0]
            b = rect[0][0]+0.5*rect[1][0]
            c = rect[0][1]-0.5*rect[1][1]
            d = rect[0][1]+0.5*rect[1][1]
        else:
            a = rect[0][0]-0.5*rect[1][1]
            b = rect[0][0]+0.5*rect[1][1]
            c = rect[0][1]-0.5*rect[1][0]
            d = rect[0][1]+0.5*rect[1][0]
        # print(a,b,c,d)
        license_image = new_img[round(c):round(d), round(a):round(b)]
n_license = 3
sp = license_image.shape
weight_license = round(n_license* sp[1])
height_license = round(n_license* sp[0])
license_image = cv2.resize(license_image,(weight_license, height_license))
license_image_gray = cv2.cvtColor(license_image, cv2.COLOR_BGR2GRAY)
ret, license_image_erzhi = cv2.threshold(license_image_gray, 160, 255, cv2.THRESH_BINARY)
cv2.imshow('img', license_image_erzhi)
img_erode = cv2.erode(license_image_erzhi, kernel, iterations=1)
img_dilated = cv2.dilate(img_erode, kernel, iterations=2)
# cv2.imshow('erode', img_dilated)
path = 'd:/Python/license plate/result//'
if not os.path.exists(path):
    os.mkdir(path)
location_list = []
contours, hierarchy = cv2.findContours(img_dilated,cv2.RETR_EXTERNAL,cv2.CHAIN_APPROX_SIMPLE)
count = 0
for i in range(len(contours)):
    x, y, w, h = cv2.boundingRect(contours[i])
    # 在img图像画出矩形,(x, y), (x + w, y + h)是矩形坐标,(0, 255, 0)设置通道颜色,2是设置线条粗度
    area = w* h
    length = max(w, h)
    wideth = min(w, h)
    bili = length / (wideth + 0.01)
    if area  10000 or bili > 3:
        continue
    location_list.append((x,y,w,h))
    count = count + 1
print(count)
def takefirst(elem):
    return elem[0]
# 指定第一个元素排序
location_list.sort(key=takefirst)
print(location_list)
for i in range(0, count):
    license_image_1  = img_dilated[ location_list[i][1] :location_list[i][1] + location_list[i][3], location_list[i][0] : location_list[i][0]+location_list[i][2]]
    file_name = 'img' + str(i) + '.jpg'
    cv2.imwrite(path + file_name, license_image_1)
    cv2.rectangle(license_image_erzhi, (location_list[i][0], location_list[i][1]-10), (location_list[i][0] + location_list[i][2], location_list[i][1] + location_list[i][3]), (255, 255, 255), 4)
cv2.imshow('result', license_image_erzhi)
cv2.waitKey(0)
通过以上参数的调整基本上就可以提取出车牌了,当然为了识别车牌,你还可以构建相应的神经网络,进行训练识别,但是我能力有限,只能到这了。
这个对斜着的车牌效果不太好,可以通过旋转操作使车牌摆正。旋转的部分可以自己构造

作者:啥也不会的刘同学