第一个完整的cppunit单元测试程序
在极限编程中,测试程序本应该在编写主程序之前要写好,然后将写好的类程序放在测试程序中进行测试,但考虑到项目中需求文档等并未将接口定义好,我无从开始,而且,自己对单元测试也是刚刚熟悉,需要一边写测试程序一边解决遇到的问题,时间周期较长。在本次编程中,我是直接把github上小组的程序下载下来,看有哪些接口,再来编写的测试程序。 测试对象:robot类中的solver类(https://github.com/TeamWork-Robot/Team1/tree/master/Robot);选择solver类的理由主要原因:1.robot类中未找到易于测试的函数,返回值一般为void;2.自以为point类,frame类比较简单,没什么好测试的,而solver类本身具有一定复杂度,而且函数返回类型一般为point; 编写好solver类的测试程序后,发现错误太多,花了好长时间也没有解决(主要是发现solver类本身还有不少需要改进的地方);于是退而求其次,先写一个能测试point类的程序,解决遇到的问题。 1 #include <cppunit/extensions/HelperMacros.h> 2 #include <Point.h> 3 4 class testpoint :public CppUnit::TestFixture 5 { 6 CPPUNIT_TEST_SUITE(testpoint); 7 CPPUNIT_TEST(testget); 8 //CPPUNIT_TEST(testrotate); 9 CPPUNIT_TEST_SUITE_END(); 10 public: 11 void setUp(); 12 void tearDown(); 13 testpoint(); 14 //~testsolver(); 15 void testget(); 16 //void testrotate(); 17 }; 1 #include "test_point.h" 2 #include "Point.h" 3 #include <string> 4 #include<iostream> 5 #include <cppunit/TestCase.h> 6 #include "cppunit/TestAssert.h" 7 8 CPPUNIT_TEST_SUITE_NAMED_REGISTRATION(testpoint, "alltest"); 9 10 testpoint::testpoint() 11 { 12 }; 13 14 void testpoint::setUp() 15 { 16 std::cout << "test begin" << std::endl; 17 }; 18 19 void testpoint::tearDown() 20 { 21 std::cout << "test end" << std::endl; 22 }; 23 24 void testpoint::testget() 25 { 26 Point point1(3, 4); 27 int resultx = point1.getX(); 28 int resulty = point1.getY(); 29 CPPUNIT_ASSERT(resultx == 3); 30 CPPUNIT_ASSERT(resulty == 4); 31 } 1 #include <cppunit/TestResultCollector.h> 2 #include <cppunit/BriefTestProgressListener.h> 3 #include <cppunit/TextOutputter.h> 4 5 int main() 6 { 7 CppUnit::TestResult r; 8 CppUnit::TestResultCollector rc; 9 r.addListener(&rc); // 准备好结果收集器 10 11 CppUnit::TestRunner runner; // 定义执行实体 12 runner.addTest(CppUnit::TestFactoryRegistry::getRegistry("alltest").makeTest()); 13 runner.run(r); // 运行测试 14 15 CppUnit::TextOutputter o(&rc, std::cout); 16 o.write(); // 将结果输出 17 18 system("pause"); 19 20 return rc.wasSuccessful() ? 0 : -1; 21 } 把point类的头文件和源程序加进去后,结果如下:(加了system("pause");)

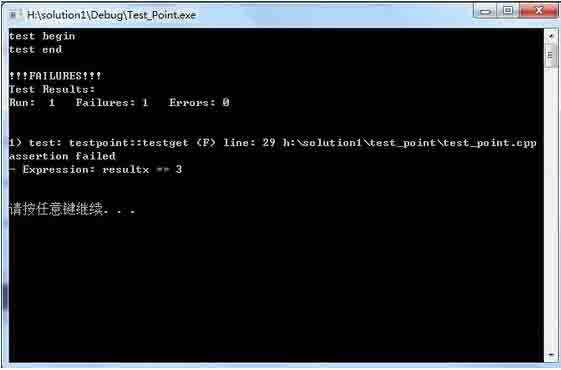
将Point.cpp中的get函数的返回值人为的加一之后,结果如下:
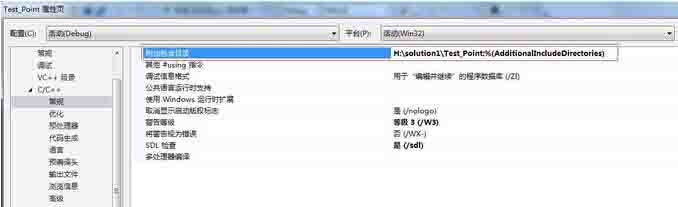
下面介绍一下这其中遇到的问题及解决办法,为需要解决类似问题的同学提供参考: 1.fatal error C1083: 无法打开包括文件:“Point.h”: No such file or directory:这个问题的解决办法如下,首先找到出错文件的位置,右键项目属性 ->C/C++ ->常规->附加包含目录,将出错文件位置放进去。
2. error C2011: “Point”:“class”类型重定义;由于Point.h文件在一开始没有使用宏定义,导致运行测试类时显示Point.h重编译;解决办法将Point.h文件中加上宏定义#ifndef POINT_H #define POINT_H #endif即可。 程序相关语句解释: 1.class testpoint :public CppUnit::TestFixture 继承自TestFixture的类testpoint; 2.CPPUNIT_TEST_SUITE(testpoint);将testpoint添加到测试包 CPPUNIT_TEST(testget);testget为测试函数 3.CPPUNIT_TEST_SUITE_NAMED_REGISTRATION(testpoint, "alltest");将测试包testpoint注册为alltest 4.main函数在测试包改变时基本不变; CppUnit::TestResult r; CppUnit::TestResultCollector rc; r.addListener(&rc); // 三句共同完成结果收集器的准备工作 CppUnit::TestRunner runner; // 定义执行实体 runner.addTest(CppUnit::TestFactoryRegistry::getRegistry("alltest").makeTest()); runner.run(r); // 运行测试 CppUnit::TextOutputter o(&rc, std::cout); o.write(); // 将结果输出 system("pause");//主要为了避免exe程序运行后立即退出; return rc.wasSuccessful() ? 0 : -1;//若测试通过,则返回值为0; 主要了解测试程序编写的相关细节,明天继续测试稍复杂一些的类。