Android编程自定义扁平化对话框示例
本文实例讲述了Android编程自定义扁平化对话框。分享给大家供大家参考,具体如下:
平时我们开发的大多数的Android、iOS的APP,它们的风格都是拟物化设计。如Android 4.X、iOS 7、WP8采用的是扁平化设计,可以看出扁平化设计是未来UI设计的趋势。其实扁平化设计要比拟物化设计要简单一点,扁平化设计更加的简约,给人视觉上更加舒服。
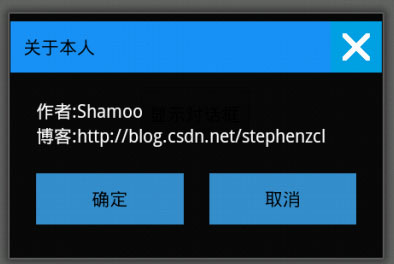
Shamoo想到在Android平台上弄一个扁平化的对话框。参考过一篇帖子,然后改了一下。
这个Demo比较简单,首先是一个dialog的布局文件,这个dialog的布局要实例化成对话框可以通过AlertDialog.Builder的setView方法,将LayoutInflater实例化的dialog布局设置对话框具体显示内容。效果图如下:

下面直接贴代码
DialogWindows.Java
package com.example.dialogwindows;
import android.net.Uri;
import android.os.Bundle;
import android.app.Activity;
import android.app.AlertDialog;
import android.app.AlertDialog.Builder;
import android.content.Context;
import android.content.Intent;
import android.view.LayoutInflater;
import android.view.Menu;
import android.view.View;
import android.view.View.OnClickListener;
import android.widget.Button;
import android.widget.ImageButton;
import android.widget.ImageView;
import android.widget.Toast;
public class DialogWindows extends Activity {
  private Button button;
  private View dialogView;
  protected void onCreate(Bundle savedInstanceState) {
    super.onCreate(savedInstanceState);
    setContentView(R.layout.main);
    button = (Button) findViewById(R.id.btn);
    button.setOnClickListener(new OnClickListener() {
      public void onClick(View v) {
        Builder builder = myBuilder(DialogWindows.this);
        final AlertDialog dialog = builder.show();
        //点击屏幕外侧,dialog不消失
        dialog.setCanceledOnTouchOutside(false);
        Button btnOK = (Button) dialogView.findViewById(R.id.btn_ok);
        btnOK.setOnClickListener(new OnClickListener() {
          public void onClick(View v) {
            Toast.makeText(DialogWindows.this, "你点击了确定按钮", Toast.LENGTH_SHORT).show();
            dialog.dismiss();
          }
        });
        Button btnCancel = (Button) dialogView.findViewById(R.id.btn_cancel);
        btnCancel.setOnClickListener(new OnClickListener() {
        public void onClick(View v) {
          Toast.makeText(DialogWindows.this, "你点击了取消按钮", Toast.LENGTH_SHORT).show();
          dialog.dismiss();
        }
      });
        ImageButton customviewtvimgCancel = (ImageButton) dialogView.findViewById(R.id.btn_exit);
        customviewtvimgCancel.setOnClickListener(new OnClickListener() {
          public void onClick(View v) {
            Toast.makeText(DialogWindows.this, "你点击了退出按钮", Toast.LENGTH_SHORT).show();
            dialog.dismiss();
          }
        });
      }
    });
  }
  protected Builder myBuilder(Context context) {
    LayoutInflater inflater = getLayoutInflater();
    AlertDialog.Builder builder = new AlertDialog.Builder(context);
    dialogView = inflater.inflate(R.layout.dialog, null);
    return builder.setView(dialogView);
  }
}
dialog.xml
<?xml version="1.0" encoding="utf-8"?>
<RelativeLayout xmlns:android="http://schemas.android.com/apk/res/android"
  android:layout_width="match_parent"
  android:layout_height="match_parent"
  android:orientation="vertical" >
  <!-- 标题栏 -->
  <RelativeLayout
    android:id="@+id/dialog_title"
    android:layout_width="fill_parent"
    android:layout_height="wrap_content"
    android:background="#1A94F9" >
    <TextView
      android:id="@+id/tv_title"
      android:layout_width="wrap_content"
      android:layout_height="wrap_content"
      android:layout_centerVertical="true"
      android:padding="10dp"
      android:text="@string/about"
      android:textColor="#000000" />
    <ImageButton
      android:id="@+id/btn_exit"
      android:layout_width="40dp"
      android:layout_height="40dp"
      android:layout_alignParentRight="true"
      android:layout_centerVertical="true"
      android:background="@drawable/canceltor" />
  </RelativeLayout>
  <!-- 显示的内容 -->
  <LinearLayout
    android:id="@+id/dialog_msg"
    android:layout_width="wrap_content"
    android:layout_height="wrap_content"
    android:orientation="vertical"
    android:layout_below="@id/dialog_title"
    android:padding="20dp" >
    <TextView
      android:layout_width="wrap_content"
      android:layout_height="wrap_content"
      android:text="@string/author"
      android:textColor="#ffffff" />
    <TextView
      android:layout_width="wrap_content"
      android:layout_height="wrap_content"
      android:linksClickable="true"
      android:text="@string/blog"
      android:textColor="#ffffff" />
  </LinearLayout>
  <!-- 底部按钮 -->
  <LinearLayout
    android:id="@+id/customviewlayLink"
    android:layout_width="fill_parent"
    android:layout_height="wrap_content"
    android:layout_below="@id/dialog_msg"
    android:orientation="horizontal"
    android:paddingLeft="20dp"
    android:paddingRight="20dp"
    android:paddingBottom="20dp" >
    <Button
      android:id="@+id/btn_ok"
      android:layout_width="fill_parent"
      android:layout_height="40dp"
      android:background="@drawable/linkbtnbged"
      android:linksClickable="true"
      android:layout_weight="1"
      android:layout_marginRight="10dp"
      android:text="@string/btn_ok" />
    <Button
      android:id="@+id/btn_cancel"
      android:layout_width="fill_parent"
      android:layout_height="40dp"
      android:linksClickable="true"
      android:background="@drawable/linkbtnbged"
      android:text="@string/btn_cancel"
      android:layout_marginLeft="10dp"
      android:layout_weight="1" />
  </LinearLayout>
</RelativeLayout>
main.xml
<RelativeLayout xmlns:android="http://schemas.android.com/apk/res/android"
  xmlns:tools="http://schemas.android.com/tools"
  android:layout_width="match_parent"
  android:layout_height="match_parent" >
  <Button
    android:id="@+id/btn"
    android:layout_width="wrap_content"
    android:layout_height="wrap_content"
    android:layout_centerHorizontal="true"
    android:layout_centerVertical="true"
    android:text="@string/show_dialog" />
</RelativeLayout>
更多关于Android相关内容感兴趣的读者可查看本站专题:《Android开发入门与进阶教程》、《Android调试技巧与常见问题解决方法汇总》、《Android基本组件用法总结》、《Android视图View技巧总结》、《Android布局layout技巧总结》及《Android控件用法总结》
希望本文所述对大家Android程序设计有所帮助。
您可能感兴趣的文章:Android自定义EditText实现登录界面Android取消EditText自动获取焦点默认行为Android控件系列之EditText使用方法android同时控制EditText输入字符个数和禁止特殊字符输入的方法Android中EditText实现不可编辑解决办法Android定制自己的EditText轻松改变底线颜色Android中EditText显示明文与密码的两种方式Android更改EditText下划线颜色样式的方法android基础教程之android的listview与edittext冲突解决方法Android EditText实现扁平化的登录界面