Linux下基于xampp的TestLink的安装部署
1、xampp xampp下载地址:www.apachefriends.org 或http://www.xampp.cc/archives/62,下载后的文件是以.run后缀的文件,分32位和64位。 1)赋权限 chmod +x xampp-linux-1.8.3-5-installer.run 2)安装 ./xampp-linux-1.8.3-5-installer.run 然后根据提示,依次输入y,继续安装,安装到目录/opt/lampp下。 3)启动xampp # /opt/lampp/lampp start 4)停止xampp # /opt/lampp/lampp stop 5)卸载xampp # /opt/lampp/lampp stop # rm -rf /opt/lampp 6)验证是否安装成功 在浏览器中输入:http://localhost进行检查,如果出现下面界面,则代表Xampp安装成功。

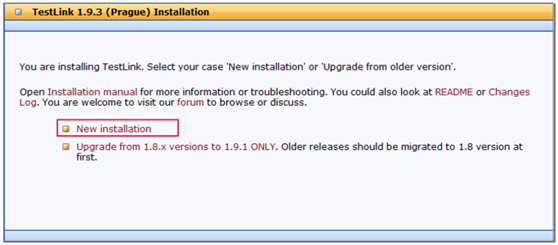
7)安装设置 在默认的安装过程中,xampp所有均是没有密码的,为了安全,我们应该为xampp设置密码。该如何操作呢? # /opt/lampp/lampp security 设置xampp的密码: XAMPP:Quick security check… XAMPP: Your XAMPP pages are NOT secured by apassword. XAMPP: Do you want to set a password? [yes] yew XAMPP: Doyou want to set a password? [yes] yes XAMPP: Password: XAMPP:Password (again): 用户名默认是:xampp 设置phpMyAdmin的密码: XAMPP:The MySQL/phpMyAdmin user pma has no password set!!! XAMPP: Do you wantto set a password? [yes] yes XAMPP: Password: XAMPP: Password(again): XAMPP: Setting new MySQL pma password. XAMPP: SettingphpMyAdmin’s pma password to the new one. 设置mysql的root账户: XAMPP: MySQL has no root passwort set!!! XAMPP: Do you wantto set a password? [yes] yes XAMPP: Write the password somewhere down tomake sure you won’t forget it!!! XAMPP: Password: XAMPP: Password(again): XAMPP: Setting new MySQL root password. XAMPP: ChangephpMyAdmin’s authentication method. 设置ftp密码: XAMPP: TheFTP password for user ‘daemon’ is still set to ‘xampp’. XAMPP: Do youwant to change the password? [yes] yes XAMPP: Password: XAMPP:Password (again): PS:此处设置的MySQL的root密码,在testlink安装设置中可用到。 如果跳过设置MySQL密码,可以重启xampp之后,再次尝试 8)让局域网均可访问 关闭防火墙:service iptales stop xampp的配置文件:/opt/lampp/etc/extra/httpd-xampp.conf中将一下内容屏蔽 <LocationMatch"^/(?i:(?:xampp|security|licenses|phpmyadmin|webalizer|server-status|server-info))"> #Requirelocal ErrorDocument 403/error/XAMPP_FORBIDDEN.html.var 通过以上步骤,基本的设置搞定了,已经达到可用的程度。 2、testlink 1)解压 tar –zxvf testlink-1.9.14.tar.gz 2)移动至xampp目录(/opt/lampp/htdocs下) mv testlink-1.9.14 /opt/lampp/htdocs/testlink 3)赋权限 依次执行: # chmod 777 gui/templates_c # chmod 777 logs # chmod 777 upload_area 4)配置 1.testlink需要配置的地方不多,此处简单介绍几个配置点。打开config_inc.php,修改配置参数.如下: 将$tlCfg->config_check_warning_mode = FILE';改成 $tlCfg->config_check_warning_mode='SILENT'; 将$tlCfg->log_path= '/var/testlink/logs/'改成 $tlCfg->log_path='/opt/lampp/htdocs/testlink/logs/' 【注意:testlink1.9。9版本有此项设置,其他版本 是:$tlCfg->log_path= TL_ABS_PATH . 'logs' . DIRECTORY_SEPARATOR ;不用修改】 将$g_repositoryPath = '/var/testlink/upload_area/';改成 $g_repositoryPath='/opt/lampp/htdocs/testlink/upload_area/'; 【注意:testlink1.9。9版本有此项设置,其 他版本是:$g_repositoryPath= TL_ABS_PATH . "upload_area" .DIRECTORY_SEPARATOR;】 将$tlCfg->default_language = 'en_GB';改成 $tlCfg->default_language= ' zh_CN';2.更改导入测试套件和测试用例文件大小 a. 打开config.inc.php,查找$tlCfg->import_file_max_size_bytes,将后面的数据‘409600’改为期望的数据值。(建议修改为2M,即2097152) b. $tlCfg->import_max_row='10000'是导入文件一行的大小限制。 3. 禁止新用户注册 打开config.inc.php,找到$tlCfg->user_self_signup,将其后true改为false,在登录界面便取消了NewUser链接。 5)打开浏览器,输入http://localhost/testlink,会自动跳到testlink安装页面. 在页面中点击“new installation”
PS: 如:出现路径异常,需要自己去找到对应路径,然后再config_inc里面自己去修改路径参数。 6)进入配置页面,配置参数如下图:
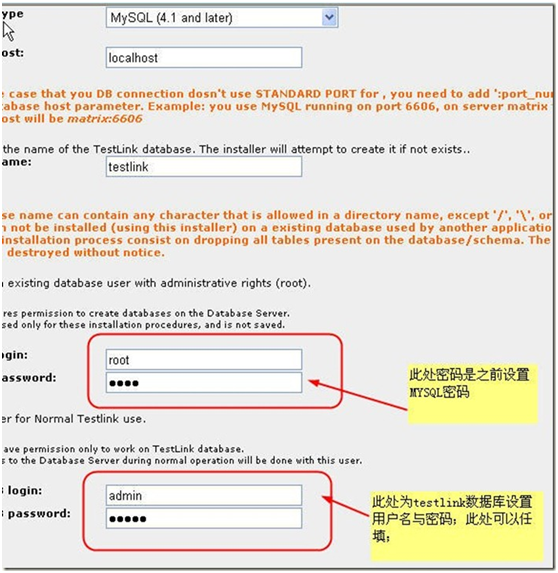
上述参数配置好后,点击页面中【Process Tesklink Setup】按钮; 当出现以下页面提示时,表示配置成功

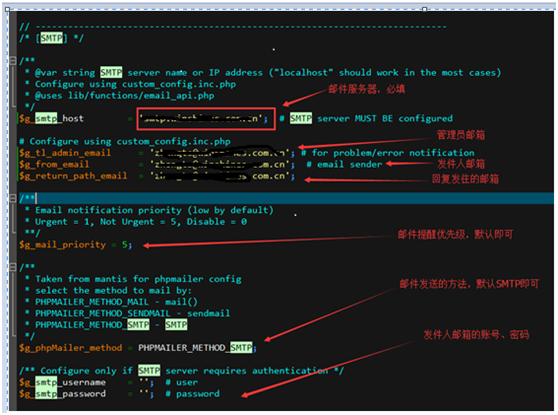
7)点击页面下方的红色字体链接:TestLink即可进入testlink登录页面(admin/admin) 登陆testlink默认账号密码:admin / admin,后续安装成功后,可以修改默认管理员密码。 8)邮件配置: 在上一步的操作页面中,有邮件配置提示:

即在config.inc.php文件配置好SMTP部分的内容后,再复制该SMTP的内容到custom_config.inc.php即可。(可新建该文件,同时赋予读写权限)

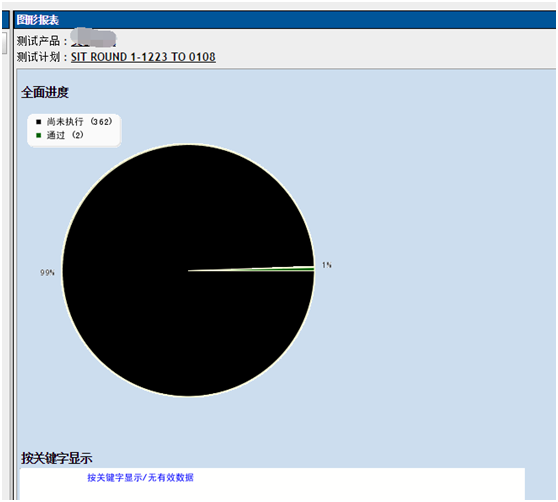
PS:要保证邮箱服务器、账号密码都正确,支持SMTP协议的邮箱服务器(没开启时,先要开启)。 用XAMPP发布的,一般只能通过phpmyadmin来管理数据库; 3、常见异常 1)、TestLink couldn'twrite the config file. Please copy the following into the ../config_db.inc.phpfile: <?php // Automatically Generated by TestLinkInstaller - Tue, 22 Dec 15 07:04:44 +0100 define('DB_TYPE', 'mysql'); define('DB_USER', 'admin'); define('DB_PASS', 'ysth2015'); define('DB_HOST', 'localhost'); define('DB_NAME', 'testlink'); define('DB_TABLE_PREFIX', ''); Once that's been done, you can log into TestLink by pointing your browser atyour TestLink site. 解决方式: 在testlink目录中创建config_db.inc.php文件,并拷贝php的代码即可 同时赋可写读写权限 (chmod 777 config_db.inc.php) 2)、访问phpmyadmin报错 Thissetting can be configured in the file "httpd-xampp.conf". 解决:打开/opt/lampp/etc/extra路径下的httpd-xampp.conf将其中的 Require Local 注释掉好了,然后重启:/opt/lampp/ lamp restart即可。 3)Testlink图表中文乱码 在测试结果和进度>图表的页面中,部分中文显示乱码,如下图:
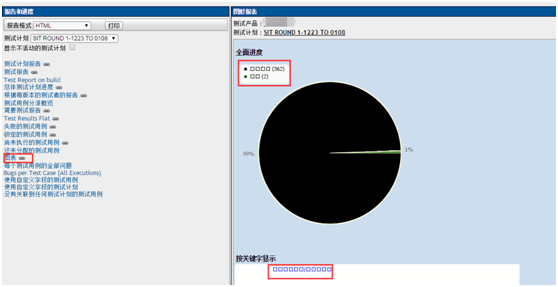
原因:testlink默认情况下图表不支持中文显示; 解决:添加支持中文的字体即可。(幼圆字体(SIMYOU.TTF)或者黑体(simhei.ttf)) 步骤: 1)打开C:WindowsFonts,找到幼圆字体(SIMYOU.TTF)或者黑体(simhei.ttf); 2)复制到testlink的指定目录下: ${ testlink _home} /third_party/pchart/Fonts/ 3)修改testlink的配置文件config.inc.php: 修改前:

修改后:

4)刷新testlink页面即可。