Android studio 广播的简单使用代码详解
1.在布局文件里面加入按钮,等会发送广播
<?xml version="1.0" encoding="utf-8"?>
<LinearLayout
    xmlns:android="http://schemas.android.com/apk/res/android"
    xmlns:app="http://schemas.android.com/apk/res-auto"
    xmlns:tools="http://schemas.android.com/tools"
    android:layout_width="match_parent"
    android:layout_height="match_parent"
    android:gravity="center"
    tools:context=".MainActivity3">
    <Button
        android:id="@+id/send"
        android:layout_width="wrap_content"
        android:layout_height="wrap_content"
        android:text="发送广播"></Button>
</LinearLayout>
2.使用广播的第一步当然是创建一个广播接受者
public class MyBrodestReciver extends BroadcastReceiver{
        @Override
        public void onReceive(Context context, Intent intent) {
            //判断action是否为添加的action,如果是则toast
            String action = intent.getAction();
            if (action.equals("one_brodest")){
                Toast.makeText(context, "发送了一个广播", Toast.LENGTH_SHORT).show();
            }
        }
    }
3.创建完广播接受者以后注册广播,并且添加一个action
//新建intentFilter对象 通过addAction添加广播
     IntentFilter intentFilter = new IntentFilter();
     intentFilter.addAction("one_brodest");
4.然后注册一个广播
//注册广播
     MyBrodestReciver myBrodestReciver = new MyBrodestReciver();
     registerReceiver(myBrodestReciver,intentFilter);
5.到这里广播的注册已经完成接下来就是使用了
//做一个点击事件发送一个广播
     send.setOnClickListener(new View.OnClickListener() {
         @Override
         public void onClick(View v) {
             Intent intent = new Intent();
             intent.setAction("one_brodest");
             sendBroadcast(intent);
         }
     });
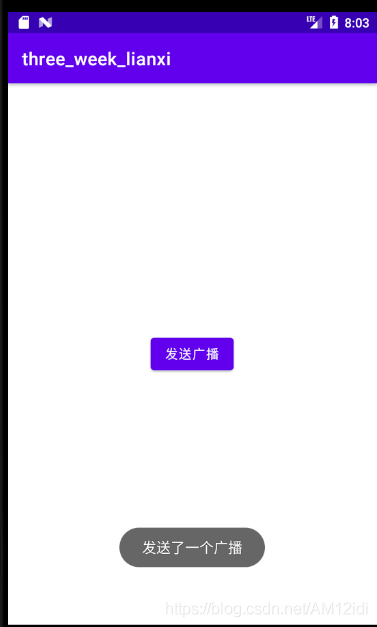
6.这就是点击之后的效果,成功发送了一个广播!!!!!!!!!!!!!!!
7.最后一步,销毁广播
@Override
    protected void onDestroy() {
        super.onDestroy();
        //销毁广播
        unregisterReceiver(brodestReciver);
    }
到此这篇关于Android studio 广播的简单使用的文章就介绍到这了,更多相关Android studio 广播内容请搜索软件开发网以前的文章或继续浏览下面的相关文章希望大家以后多多支持软件开发网!