Android自定义View绘制居中文本
本文实例为大家分享了Android自定义View绘制居中文本的具体代码,供大家参考,具体内容如下
自定义view的步骤:1、自定义View的属性
2、在View的构造方法中获得我们自定义的属性
3、重写onMesure(非必须)
4、重写onDraw
1、自定义View的属性,首先在res/values/ 下建立一个attrs.xml , 在里面定义我们的属性,只定义三个,有文本、颜色和字体大小:
<!--CustomTextView-->
    <declare-styleable name="CustomTitleView">
        <attr name="titleText" format="string"/>
        <attr name="titleTextColor" format="color"/>
        <attr name="titleTextSize" format="dimension"/>
</declare-styleable>
2、自定义一个TextView继承View,在构造方法中获取我们自定义的属性:
public class CustomTextView extends View {
    /**
     * 文本
     */
    private String mTitleText;
    /**
     * 文本的颜色
     */
    private int mTitleTextColor;
    /**
     * 文本的大小
     */
    private int mTitleTextSize;
    /**
     * 绘制时控制文本绘制的范围
     */
    private Rect mBound;
    private Paint mPaint;
    public CustomTextView(Context context) {
        this(context, null);
    }
    public CustomTextView(Context context, @Nullable AttributeSet attrs) {
        this(context, attrs, 0);
    }
    public CustomTextView(Context context, @Nullable AttributeSet attrs, int defStyleAttr) {
        super(context, attrs, defStyleAttr);
        /**
         * 获得我们所定义的自定义样式属性
         */
        TypedArray a = context.getTheme().obtainStyledAttributes(attrs, R.styleable.CustomTitleView, defStyleAttr, 0);
        mTitleText = a.getString(R.styleable.CustomTitleView_titleText);
        mTitleTextColor = a.getColor(R.styleable.CustomTitleView_titleTextColor, Color.BLACK);
        mTitleTextSize = a.getDimensionPixelSize(R.styleable.CustomTitleView_titleTextSize, (int) TypedValue.applyDimension(
                TypedValue.COMPLEX_UNIT_SP, 16, getResources().getDisplayMetrics()));
        a.recycle();
        /**
         * 获得绘制文本的宽和高
         */
        mPaint = new Paint();
        mPaint.setTextSize(mTitleTextSize);
        // mPaint.setColor(mTitleTextColor);
        mBound = new Rect();
        mPaint.getTextBounds(mTitleText, 0, mTitleText.length(), mBound);
    }
 }
3、重写onMesure
我们在使用控件的时候一般会设置宽高。
设置类型有:wrap_content,match_parent,100dp(明确值)
自定义控件时, 如果设置了 明确的宽高(100dp),系统帮我们测量的结果就是我们设置的实际值;
如果是 wrap_content 或者 match_parent 系统帮我们测量的结果就是 match_parent。
所以当设置为 wrap_content 的时候我们需要 重写onMesure 方法重新测量。
重写之前了解 MeasureSpec 的 specMode,一共分为三种类型:
EXACTLY:一般表示设置了 明确值,或者 match_parent ;
AT_MOST:表示子控件限制在一个最大值内,一般为 wrap_content;
UNSPECIFIED:表示子控件像多大就多大,很少使用
 /**
     * EXACTLY:一般是设置了明确的值或者是MATCH_PARENT
     AT_MOST:表示子布局限制在一个最大值内,一般为WARP_CONTENT
     UNSPECIFIED:表示子布局想要多大就多大,很少使用
     * @param widthMeasureSpec
     * @param heightMeasureSpec
     */
    @Override
    protected void onMeasure(int widthMeasureSpec, int heightMeasureSpec) {
//        super.onMeasure(widthMeasureSpec, heightMeasureSpec);
        // 获取宽高的设置模式
        int widthMode = MeasureSpec.getMode(widthMeasureSpec);
        int heightMode = MeasureSpec.getMode(heightMeasureSpec);
        //获取宽高的大小
        int widthSize = MeasureSpec.getSize(widthMeasureSpec);
        int heightSize = MeasureSpec.getSize(heightMeasureSpec);
        //最终宽高
        int width;
        int height;
        if (widthMode == MeasureSpec.EXACTLY) {//当设定了宽度,测量的宽度就等于设定的宽度
            width = widthSize;
        } else {
            mPaint.setTextSize(mTitleTextSize);
            mPaint.getTextBounds(mTitleText, 0, mTitleText.length(), mBound);
            float textWidth = mBound.width();
            int desired = (int) (getPaddingLeft() + textWidth + getPaddingRight());
            width = desired;
        }
        if (heightMode == MeasureSpec.EXACTLY) {
            height = heightSize;
        } else {
            mPaint.setTextSize(mTitleTextSize);
            mPaint.getTextBounds(mTitleText, 0, mTitleText.length(), mBound);
            float textHeight = mBound.height();
            int desired = (int) (getPaddingTop() + textHeight + getPaddingBottom());
            height = desired;
        }
        //最终设置宽高
        setMeasuredDimension(width, height);
    }
原理就是:获取宽高的模式,如果是明确值,或者match_parent,直接获取原始值返回。
如果是 wrap_content,计算宽高:控件的宽高 + 左右(上下)内边距。
4、重写onDraw
@Override
    protected void onDraw(Canvas canvas) {
        mPaint.setColor(mTitleTextColor);
         /*
         * 控件宽度/2 - 文字宽度/2
         * getWidth() / 2 - mBound.width() / 2
         */
         /*
         * 控件高度/2 + 文字高度/2,绘制文字从文字左下角开始,因此"+"
         * getHeight() / 2 + mBound.height() / 2
         */
        canvas.drawText(mTitleText, getWidth() / 2 - mBound.width() / 2, getHeight() / 2 + mBound.height() / 2, mPaint);
    }
在xml中这样写:
<?xml version="1.0" encoding="utf-8"?>
<LinearLayout
    xmlns:android="http://schemas.android.com/apk/res/android"
    xmlns:custom="http://schemas.android.com/apk/res-auto"
    xmlns:tools="http://schemas.android.com/tools"
    android:layout_width="match_parent"
    android:layout_height="match_parent"
    android:orientation="vertical"
    tools:context="com.xp.baseapp.activity.CustomTvActivity">
    <LinearLayout
        android:layout_width="wrap_content"
        android:layout_height="wrap_content">
        <com.xp.baseapp.widget.drawview.CustomTextView
            android:layout_width="wrap_content"
            android:layout_height="wrap_content"
            android:background="#f0f"
            custom:titleText="大家好9527ing"
            custom:titleTextColor="#000000"
            custom:titleTextSize="20sp"
            />
        <TextView
            android:layout_width="wrap_content"
            android:layout_height="wrap_content"
            android:text="大家好9527ing"
            android:background="#ff0000"
            android:layout_marginLeft="3dp"
            android:textSize="20sp"/>
    </LinearLayout>
    <TextView
        android:layout_width="wrap_content"
        android:layout_height="wrap_content"
        android:text="大家好9527ing"
        android:layout_marginTop="3dp"
        android:background="#00f000"
        android:textSize="20sp"/>
</LinearLayout>
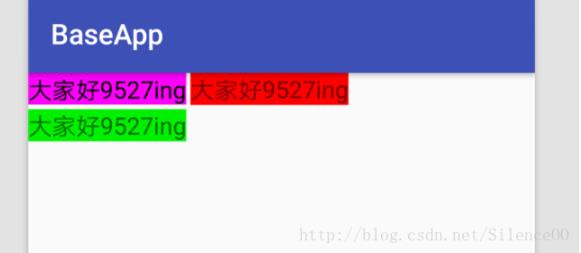
运行结果:
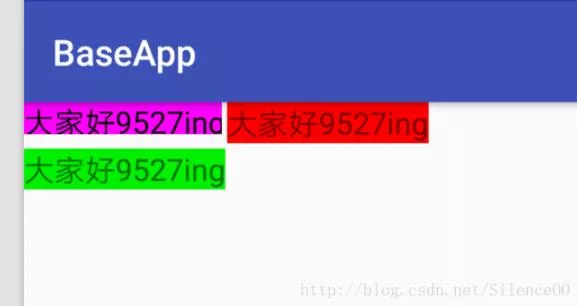
紫色的是自定义的TextView,红色和绿色的是系统的TextView。因为这里宽高设置为wrap_content,并且没有padding,和系统原生的TextView比宽度和高度都不够,还绘制不全。那接下来一个一个解决。
首先解决宽度:
将原来的测量方法:
float textWidth = mBound.width();//这样宽度会不全,比系统的textView短
改为比较精确的测量文本宽度的方法:
float textWidth = mPaint.measureText(mTitleText);//比较精确的测量文本宽度的方式
运行结果:

现在宽度就和系统的TextView一样宽了。
然后解决高度问题:
先了解一下Android是怎么样绘制文字的,这里涉及到几个概念,分别是文本的top,bottom,ascent,descent,baseline。
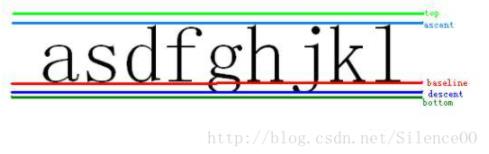
Baseline是基线,在android中,文字的绘制都是从Baseline处开始的,Baseline往上至字符“最高处”的距离我们称之为ascent(上坡度),Baseline往下至字符“最低处”的距离我们称之为descent(下坡度);
leading(行间距)则表示上一行字符的descent到该行字符的ascent之间的距离;
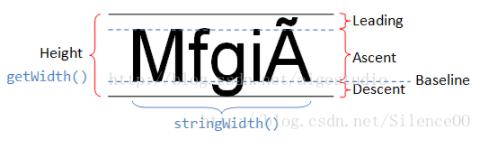
top和bottom文档描述地很模糊,其实这里我们可以借鉴一下TextView对文本的绘制,TextView在绘制文本的时候总会在文本的最外层留出一些内边距,因为TextView在绘制文本的时候考虑到了类似读音符号,下图中的A上面的符号就是一个拉丁文的类似读音符号的东西:
Baseline是基线,Baseline以上是负值,以下是正值,因此 ascent,top是负值, descent和bottom是正值。
因此我们这样改,将原来的测量方法:
float textHeight = mBound.height();
改为比较精确的测量文本宽度的方法:
Paint.FontMetrics fontMetrics = mPaint.getFontMetrics();
float textHeight = Math.abs((fontMetrics.bottom - fontMetrics.top));
运行结果:
最后就是解决文本居中的问题:
将之前的绘制文本宽度
getWidth() / 2 - mBound.width() / 2
改为
int startX = (int) (getWidth() / 2 - mPaint.measureText(mTitleText) / 2);
绘制文本高度
getHeight() / 2 + mBound.height() / 2
改为
//解决高度绘制不居中
Paint.FontMetricsInt fm = mPaint.getFontMetricsInt();
int startY = getHeight() / 2 - fm.descent + (fm.bottom - fm.top) / 2;
getHeight()/2-fm.descent 的意思是 将整个文字区域抬高至控件的1/2
(fm.bottom - fm.top)其实就是文本的高度,(fm.bottom - fm.top) / 2的意思就是将文本下沉文本高度的一半
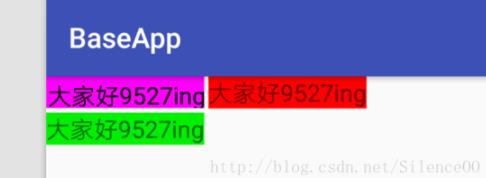
运行结果:
现在基本和系统的TextView效果差不多了。由于demo中写的东西比较多,这里就只贴出自定义类的源码
import android.content.Context;
import android.content.res.TypedArray;
import android.graphics.Canvas;
import android.graphics.Color;
import android.graphics.Paint;
import android.graphics.Rect;
import android.support.annotation.Nullable;
import android.util.AttributeSet;
import android.util.TypedValue;
import android.view.View;
import com.xp.baseapp.R;
public class CustomTextView extends View {
    /**
     * 文本
     */
    private String mTitleText;
    /**
     * 文本的颜色
     */
    private int mTitleTextColor;
    /**
     * 文本的大小
     */
    private int mTitleTextSize;
    /**
     * 绘制时控制文本绘制的范围
     */
    private Rect mBound;
    private Paint mPaint;
    public CustomTextView(Context context) {
        this(context, null);
    }
    public CustomTextView(Context context, @Nullable AttributeSet attrs) {
        this(context, attrs, 0);
    }
    public CustomTextView(Context context, @Nullable AttributeSet attrs, int defStyleAttr) {
        super(context, attrs, defStyleAttr);
        /**
         * 获得我们所定义的自定义样式属性
         */
        TypedArray a = context.getTheme().obtainStyledAttributes(attrs, R.styleable.CustomTitleView, defStyleAttr, 0);
        mTitleText = a.getString(R.styleable.CustomTitleView_titleText);
        mTitleTextColor = a.getColor(R.styleable.CustomTitleView_titleTextColor, Color.BLACK);
        mTitleTextSize = a.getDimensionPixelSize(R.styleable.CustomTitleView_titleTextSize, (int) TypedValue.applyDimension(
                TypedValue.COMPLEX_UNIT_SP, 16, getResources().getDisplayMetrics()));
        a.recycle();
        /**
         * 获得绘制文本的宽和高
         */
        mPaint = new Paint();
        mPaint.setTextSize(mTitleTextSize);
        // mPaint.setColor(mTitleTextColor);
        mBound = new Rect();
        mPaint.getTextBounds(mTitleText, 0, mTitleText.length(), mBound);
    }
    /**
     * EXACTLY:一般是设置了明确的值或者是MATCH_PARENT
     AT_MOST:表示子布局限制在一个最大值内,一般为WARP_CONTENT
     UNSPECIFIED:表示子布局想要多大就多大,很少使用
     * @param widthMeasureSpec
     * @param heightMeasureSpec
     */
    @Override
    protected void onMeasure(int widthMeasureSpec, int heightMeasureSpec) {
//        super.onMeasure(widthMeasureSpec, heightMeasureSpec);
        // 获取宽高的设置模式
        int widthMode = MeasureSpec.getMode(widthMeasureSpec);
        int heightMode = MeasureSpec.getMode(heightMeasureSpec);
        //获取宽高的大小
        int widthSize = MeasureSpec.getSize(widthMeasureSpec);
        int heightSize = MeasureSpec.getSize(heightMeasureSpec);
        //最终宽高
        int width;
        int height;
        if (widthMode == MeasureSpec.EXACTLY) {//当设定了宽度,测量的宽度就等于设定的宽度
            width = widthSize;
        } else {
            mPaint.setTextSize(mTitleTextSize);
            mPaint.getTextBounds(mTitleText, 0, mTitleText.length(), mBound);
//            float textWidth = mBound.width();//这样宽度会不全,比系统的textView短
            float textWidth = mPaint.measureText(mTitleText);//比较精确的测量文本宽度的方式
            int desired = (int) (getPaddingLeft() + textWidth + getPaddingRight());
            width = desired;
        }
        if (heightMode == MeasureSpec.EXACTLY) {
            height = heightSize;
        } else {
            mPaint.setTextSize(mTitleTextSize);
            mPaint.getTextBounds(mTitleText, 0, mTitleText.length(), mBound);
//            float textHeight = mBound.height();//这样高度会不全,比系统的textView窄
            Paint.FontMetrics fontMetrics = mPaint.getFontMetrics();
            float textHeight = Math.abs((fontMetrics.bottom - fontMetrics.top));
            int desired = (int) (getPaddingTop() + textHeight + getPaddingBottom());
            height = desired;
        }
        //最终设置宽高
        setMeasuredDimension(width, height);
    }
    @Override
    protected void onDraw(Canvas canvas) {
//        mPaint.setColor(Color.YELLOW);
//        canvas.drawRect(0, 0, getMeasuredWidth(), getMeasuredHeight(), mPaint);
        mPaint.setColor(mTitleTextColor);
         /*
         * 控件宽度/2 - 文字宽度/2
         * getWidth() / 2 - mBound.width() / 2
         */
         /*
         * 控件高度/2 + 文字高度/2,绘制文字从文字左下角开始,因此"+"
         * getHeight() / 2 + mBound.height() / 2
         */
        int startX = (int) (getWidth() / 2 - mPaint.measureText(mTitleText) / 2);
         //解决高度绘制不居中
        Paint.FontMetricsInt fm = mPaint.getFontMetricsInt();
        int startY = getHeight() / 2 - fm.descent + (fm.bottom - fm.top) / 2;
//        canvas.drawText(mTitleText, getWidth() / 2 - mBound.width() / 2, getHeight() / 2 + mBound.height() / 2, mPaint);
        canvas.drawText(mTitleText, startX, startY, mPaint);
    }
}