Android Bitmap像素级操作详解
相信大家都知道一张jpg或png放大后会是一个个小格子,称为一个像素(px),而且一个小格子是一种颜色,也就是一张jpg或png图片就是很多颜色的合集,而这些合集信息都被封装到了Bitmap类中。你可以使用Bitmap获取任意像素点,并修改它,对与某像素点而言,颜色信息是其主要的部分。所以像素级操作就是对一个个点的颜色超过。
二:载入与像素读写在Android SDK中,图像的像素读写能够通过getPixel与setPixel两个Bitmap的API实现。
2.1 getPixel读取像素Bitmap API读取像素的代码例如以下:
int pixel = bitmap.getPixel(col, row);// ARGB
int red = Color.red(pixel); // same as (pixel >> 16) &0xff
int green = Color.green(pixel); // same as (pixel >> 8) &0xff
int blue = Color.blue(pixel); // same as (pixel & 0xff)
int alpha = Color.alpha(pixel); // same as (pixel >>> 24)
得到像素pixel是32位的整数,四个字节分别相应透明通道、红色、绿色、蓝色通道。
getPixel参数说明:
col 表示的是第几行,下标从0开始。
row 表示的是第几列,下标从0开始。
比如获取第一个元素,也就是第一行第一列。
Bitmap bitmap = BitmapFactory.decodeResource(getResources(), R.mipmap.iv_test);
int color_0_0 = bitmap.getPixel(0, 0);//获取第1行,第1个像素颜色
获取所有的颜色就是如下这样:
Bitmap bitmap = BitmapFactory.decodeResource(getResources(), R.mipmap.iv_200x200);
 mColArr = new int[bitmap.getWidth()][bitmap.getHeight()];
 for (int i = 0; i < bitmap.getWidth(); i++) {
     for (int j = 0; j < bitmap.getHeight(); j++) {
         mColArr[i][j] = bitmap.getPixel(i, j);
     }
 }
这里i代表列数,j代表行数,mColArr[i][j]代表是一个图片第i列,第j行的像素颜色值。
2.2 setPixel写入像素在讲写入像素前,我们先看一下如何创建一个bitmap,创建bitmap代码如下:
比如我们创建一个2*2的ARGB_8888图片:颜色分别是黑(0,0)、白(0,1)、红(1,0)、蓝(1,1)
Bitmap bitmap = Bitmap.createBitmap(2, 2, Bitmap.Config.ARGB_8888);
bitmap.setPixel(0, 0, Color.BLACK);
bitmap.setPixel(1, 0, Color.RED);
bitmap.setPixel(0, 1, Color.WHITE);
bitmap.setPixel(1, 1, Color.BLUE);
如此,我们就创建了一个2行2列的bitmap。通过setPixel(col, row,color)方法为对应的点写入像素。
你是否会好奇,这样写入是否成功,那简单,通过上面我们知道getPixel可以读取像素点,我们验证一下。
首先,我们把创建的bitmap保存下来:
    /**
     * 保存bitmap到本地
     * @param path    路径
     * @param mBitmap 图片
     * @return 路径
     */
    public static String saveBitmap(String path, Bitmap mBitmap) {
        File filePic = FileHelper.get().createFile(path + ".png");
        try {
            FileOutputStream fos = new FileOutputStream(filePic);
            mBitmap.compress(Bitmap.CompressFormat.PNG, 100, fos);
            fos.flush();
            fos.close();
        } catch (IOException e) {
            e.printStackTrace();
            return null;
        }
        return filePic.getAbsolutePath();
    }
然后,对保存的bitmap做像素的读取工作,代码如下:
int pixel_0_0 = bitmap.getPixel(0, 0);
LogUtils.i("getPixel","pixel_0_0  is:"+pixel_0_0)
int pixel_1_0 = bitmap.getPixel(1, 0);
LogUtils.i("getPixel","pixel_1_0 is:"+pixel_1_0 )
int pixel_0_1 = bitmap.getPixel(0, 1);
LogUtils.i("getPixel","pixel_0_1 is:"+pixel_0_1 )
int pixel_1_1 = bitmap.getPixel(1, 1);
LogUtils.i("getPixel","pixel_1_1 is:"+pixel_1_1)
你会发现控制台的输出结果如下:
pixel_0_0 is:-16777216
pixel_1_0 is:-65536
pixel_0_1 is:-1
看了这些你可能比较模糊,不懂这么长一串是什么意思,都是负数,其实那就是颜色值。Color类中有几个方法可以方便获取argb分别对应的值,下面测试一下你就明白了。其实就是将int进行了位运算,分离出argb四个通道的值这里我简单转换一下:
praseColor("pixel_0_0", pixel_0_0);//黑:a:255, r:0, g:0, b:0
praseColor("pixel_1_0", pixel_1_0);//红:a:255, r:255, g:0, b:0
praseColor("pixel_0_1", pixel_0_1);//白:a:255, r:255, g:255, b:255
praseColor("pixel_1_1", pixel_1_1);//蓝:a:255, r:0, g:0, b:255
/**
 * 将颜色从int 拆分成argb,并打印出来
 * @param msg
 * @param color
 */
private void praseColor(String msg, int color) {
    int a = Color.alpha(color);
    int r = Color.red(color);
    int g = Color.green(color);
    int b = Color.blue(color);
    LogUtils.i(msg + "----a:" + a + ", r:" + r + ", g:" + g + ", b:" + b + L.l());
}
通过上面的列子,你会发现,通过setPixel(col, row)可以写入像素,当然,写入像素同时也是可以指定透明度的,代码例如以下:
bm.setPixel(col, row, Color.argb(alpha, red, green, blue));
通过Color.argb又一次组装成一个int的像素值。
使用BitmapFactory.decodeFile或者decodeResource等方法实现载入图像的Bitmap对象时。这些方法就会为要构建的Bitmap对象分配合适大小的内存。假设原始的图像文件数据非常大,就会导致DVM不能分配请求的内存大小。从而导致OOM(out of memory)问题。而通过配置BitmapFactory.Option预先读取图像高度与宽带,图像进行适当的下採样,就能够避免OOM问题的发生。预先仅仅获取图像高度与宽带的代码例如以下:
   // 获取Bitmap图像大小与类型属性
        BitmapFactory.Options options = new BitmapFactory.Options();
        options.inJustDecodeBounds = true;
        BitmapFactory.decodeResource(getResources(),
                                        R.drawable.test, options);
        int height = options.outHeight;
        int width = options.outWidth;
        String imageType = options.outMimeType;
基于下採样载入超大Bitmap图像的缩小版本号:
 // 下採样
        int inSampleSize = 1;
        if (height > reqHeight || width > reqWidth) {
            final int halfHeight = height / 2;
            final int halfWidth = width / 2;
            // Calculate the largest inSampleSize value
            // that is a power of 2 and keeps both
            // height and width larger than the requested height and width.
            while ((halfHeight / inSampleSize) > reqHeight
                    && (halfWidth / inSampleSize) > reqWidth) {
                inSampleSize *= 2;
            }
        }
        // 获取採样后的图像显示。避免OOM问题
        options.inJustDecodeBounds = false;
        srcImage = BitmapFactory.decodeResource(getResources(), R.drawable.test, options);
三:像素操作
通过上面的讲解,我们知道如何获取设写入像素颜色信息,拿到像素颜色信息,不就等于天下就是我的了吗?下面来电高级一点的像素操作。首先先讲一下android彩色图像灰度化。
3.1:android彩色图像灰度化android彩色图像灰度化的三个简单方法:
灰度化方法一:灰度值GRAY = (max(red, green, blue) + min(red, green, blue))/2
灰度化方法二:灰度值GRAY = (red + green + blue)/3
灰度化方法三:灰度值GRAY = red0.3 + green0.59 + blue*0.11
代码实现例如以下:
public Bitmap gray(Bitmap bitmap, int schema)
{
    Bitmap bm = Bitmap.createBitmap(bitmap.getWidth(),bitmap.getHeight(), bitmap.getConfig());
    int width = bitmap.getWidth();
    int height = bitmap.getHeight();
    for(int row=0; row<height; row++){
       for(int col=0; col<width; col++){
          int pixel = bitmap.getPixel(col, row);// ARGB
          int red = Color.red(pixel); // same as (pixel >> 16) &0xff
          int green = Color.green(pixel); // same as (pixel >> 8) &0xff
          int blue = Color.blue(pixel); // same as (pixel & 0xff)
          int alpha = Color.alpha(pixel); // same as (pixel >>> 24)
          int gray = 0;
          if(schema == 0)
          {
              gray = (Math.max(blue, Math.max(red, green)) +
                          Math.min(blue, Math.min(red, green))) / 2;
          }
          else if(schema == 1)
          {
              gray = (red + green + blue) / 3;
          }
          else if(schema == 2)
          {
              gray = (int)(0.3 * red + 0.59 * green + 0.11 * blue);
          }
          bm.setPixel(col, row, Color.argb(alpha, gray, gray, gray));
       }
    }
    return bm;
}
Bitmap图像镜像映射与亮度调整的代码实现例如以下:
public Bitmap brightness(Bitmap bitmap, double depth)
{
    Bitmap bm = Bitmap.createBitmap(bitmap.getWidth(),bitmap.getHeight(), bitmap.getConfig());
    int width = bitmap.getWidth();
    int height = bitmap.getHeight();
    for(int row=0; row<height; row++){
       for(int col=0; col<width; col++){
          int pixel = bitmap.getPixel(col, row);// ARGB
          int red = Color.red(pixel); // same as (pixel >> 16) &0xff
          int green = Color.green(pixel); // same as (pixel >> 8) &0xff
          int blue = Color.blue(pixel); // same as (pixel & 0xff)
          int alpha = Color.alpha(pixel); // same as (pixel >>> 24)
          double gray = (0.3 * red + 0.59 * green + 0.11 * blue);
          red += (depth * gray);
          if(red > 255) { red = 255; }
          green += (depth * gray);
          if(green > 255) { green = 255; }
          blue += (depth * gray);
          if(blue > 255) { blue = 255; }
          bm.setPixel(col, row, Color.argb(alpha, red, green, blue));
       }
    }
    return bm;
}
public Bitmap flip(Bitmap bitmap)
{
    Bitmap bm = Bitmap.createBitmap(bitmap.getWidth(),bitmap.getHeight(), bitmap.getConfig());
    int width = bitmap.getWidth();
    int height = bitmap.getHeight();
    for(int row=0; row<height; row++){
       for(int col=0; col<width; col++){
          int pixel = bitmap.getPixel(col, row);// ARGB
          int red = Color.red(pixel); // same as (pixel >> 16) &0xff
          int green = Color.green(pixel); // same as (pixel >> 8) &0xff
          int blue = Color.blue(pixel); // same as (pixel & 0xff)
          int alpha = Color.alpha(pixel); // same as (pixel >>> 24)
          int ncol = width - col - 1;
          bm.setPixel(ncol, row, Color.argb(alpha, red, green, blue));
       }
    }
    return bm;
}
3.2:bitmap的花样复刻
bitmap的花样复刻大致分如下几步实现:
1.bitmap复刻的粒子载体
public class Ball implements Cloneable {
    public float aX;//加速度
    public float aY;//加速度Y
    public float vX;//速度X
    public float vY;//速度Y
    public float x;//点位X
    public float y;//点位Y
    public int color;//颜色
    public float r;//半径
    public long born;//诞生时间
    public Ball clone() {
        Ball clone = null;
        try {
            clone = (Ball) super.clone();
        } catch (CloneNotSupportedException e) {
            e.printStackTrace();
        }
        return clone;
    }
}
2.初始化粒子:
private int d = 50;//复刻的像素边长
private List<Ball> mBalls = new ArrayList<>();//粒子集合
/**
 * 根像素初始化粒子
 * @param bitmap
 * @return
 */
private List<Ball> initBall(Bitmap bitmap) {
    for (int i = 0; i < bitmap.getHeight(); i++) {
        for (int j = 0; j < bitmap.getWidth(); j++) {
            Ball ball = new Ball();
            ball.x = i * d + d / 2;
            ball.y = j * d + d / 2;
            ball.color = bitmap.getPixel(i, j);
            mBalls.add(ball);
        }
    }
    return mBalls;
}
3.正方形粒子的绘制(原图复刻)
@Override
protected void onDraw(Canvas canvas) {
    super.onDraw(canvas);
    canvas.save();
    canvas.translate(mCoo.x, mCoo.y);
    for (Ball ball : mBalls) {
        mPaint.setColor(ball.color);
        canvas.drawRect(
                ball.x - d / 2, ball.y - d / 2, ball.x + d / 2, ball.y + d / 2, mPaint);
    }
    canvas.restore();
    HelpDraw.draw(canvas, mGridPicture, mCooPicture);
}
4.复刻其他图片资源文件
只要是bitmap就行了,我们可以decode图片变成Bitmap。注意:此处只是演示,画一张bitmap还是用原生的好,像素级的粒子化也有它的优势,比如运动。具体更具实际情况而定。
//加载图片数组
mBitmap = BitmapFactory.decodeResource(getResources(), R.mipmap.iv_200x200);
initBall(mBitmap);
/**
 * 根像素初始化粒子
 * @param bitmap
 * @return
 */
private List<Ball> initBall(Bitmap bitmap) {
    for (int i = 0; i < bitmap.getHeight(); i++) {
        for (int j = 0; j < bitmap.getWidth(); j++) {
            Ball ball = new Ball();
            ball.x = i * d + d / 2;
            ball.y = j * d + d / 2;
            ball.color = bitmap.getPixel(i, j);
            mBalls.add(ball);
        }
    }
    return mBalls;
}
5.圆形复刻
注意: 在第四步复刻其他图片资源文件时,图片已经不是bitmap了,而是由一个个小正方形堆积而成并且拥有自己的颜色。我们可以利用它实现很多有趣的定西,比如画正方形,画个圆…。现在你明白像素级操作什么了吧。也许你会感叹,还能有更好玩的吗,当然有,后面还有更惊叹的呢。
 for (Ball ball : mBalls) {
     mPaint.setColor(ball.color);
     canvas.drawCircle(ball.x, ball.y, d/2, mPaint);
 }
6.其他形状复刻
更具像素单元,你可以用任意的图形更换粒子单元,或者各种形状的粒子混合适用,画出你喜欢的形状。比如我们绘制一个五角星:
for (int i = 0; i < mBalls.size(); i++) {
    canvas.save();
    int line = i % mBitmap.getHeight();
    int row = i / mBitmap.getWidth();
    canvas.translate(row * 2 * d, line * 2 * d);
    mPaint.setColor(mBalls.get(i).color);
    canvas.drawPath(CommonPath.nStarPath(5, d, d / 2), mPaint);
    canvas.restore();
}
四:颜色操作
关于颜色操作,可以使用ColorFilter和ColorMatrix改变图片颜色,也可以采用“旁门左道”方式,毕竟通过上面的操作我们已经货可以获取像素点的颜色。
那就先将ColorFilter和ColorMatrix改变图片颜色,然后再讲采用“旁门左道”方式。
4.1 使用ColorFilter和ColorMatrix改变图片颜色1.ColorMatrix改变图片颜色
颜色矩阵M是一个5*4的矩阵,在Android中,颜色矩阵M是以一维数组m=[a,b,c,d,e,f,g,h,i,j,k,l,m,n,o,p,q,r,s,t]的方式进行存储的。如下图所示:
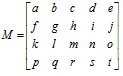
他通过RGBA四个通道来直接操作对应颜色,达到修改图像的效果。
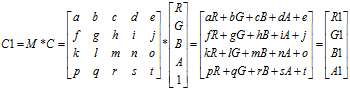
第一行决定红色 R
第二行决定绿色 G
第三行决定蓝色 B
第四行决定了透明度 A
第五列是颜色的偏移量
原图的RGBA的ColorMatrix颜色矩阵数组为:
[ 1, 0, 0, 0, 0,
0, 1, 0, 0, 0,
0, 0, 1, 0, 0,
0, 0, 0, 1, 0
]
在一张图片中,图像的RGBA(红色、绿色、蓝色、透明度)值决定了该图片所呈现出来的颜色效果。而图像的RGBA值则存储在一个5*1的颜色分量矩阵C中,由颜色分量矩阵C可以控制图像的颜色效果。颜色分量矩阵C如下所示:

要想改变一张图片的颜色效果,只需要改变图像的颜色分量矩阵即可。通过颜色矩阵可以很方便的修改图像的颜色分量矩阵。假设修改后的图像颜色分量矩阵为C1,则有如图3所示的颜色分量矩阵计算公式。
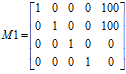
通常,改变颜色分量时可以通过修改第5列的颜色偏移量来实现,如下图所示的颜色矩阵M1,通过计算后可以得知该颜色矩阵的作用是使图像的红色分量和绿色分量均增加100,这样的效果就是图片泛黄(因为红色与绿色混合后得到黄色)。
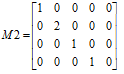
除此之外,也可以通过直接对颜色值乘以某一系数而达到改变颜色分量的目的。如下图所示的颜色矩阵M2,将绿色分量放大了2倍,这样的效果就是图片泛绿色。
讲了这么多,下面直入正题,聊聊如何使用ColorMatrix改变图片颜色。
使用ColorMatrix改变图片颜色的步骤大致如下:
通过Bitmap.createBitmap()方法获得一个空白的Bitmap对象。
使用Bitmap对象创建画布Canvas, 然后创建画笔Paint。
定义ColorMatrix,并指定RGBA矩阵。
使用ColorMatrix创建一个ColorMatrixColorFilter对象, 作为画笔的滤镜 paint.setColorFilter(new ColorMatrixColorFilter(colorMatrix))。
使用Canvas.drawBitmap()方法把原图使用定义的Paint画到空白的Bitmap对象上即可获得改变RGBA值后的图像。
最后更具如上步骤附上简单的代码如下:
布局代码:
<?xml version="1.0" encoding="utf-8"?>
<LinearLayout xmlns:android="http://schemas.android.com/apk/res/android"
    android:layout_width="match_parent"
    android:layout_height="match_parent"
    android:orientation="vertical">
    <TextView
        android:layout_width="wrap_content"
        android:layout_height="wrap_content"
        android:text="R" />
    <SeekBar
        android:id="@+id/sb_red"
        android:layout_width="match_parent"
        android:layout_height="wrap_content"
        android:max="255"
        android:progress="0" />
    <TextView
        android:layout_width="wrap_content"
        android:layout_height="wrap_content"
        android:text="G" />
    <SeekBar
        android:id="@+id/sb_green"
        android:layout_width="match_parent"
        android:layout_height="wrap_content"
        android:max="255"
        android:progress="0" />
    <TextView
        android:layout_width="wrap_content"
        android:layout_height="wrap_content"
        android:text="B" />
    <SeekBar
        android:id="@+id/sb_blue"
        android:layout_width="match_parent"
        android:layout_height="wrap_content"
        android:max="255"
        android:progress="0" />
    <TextView
        android:layout_width="wrap_content"
        android:layout_height="wrap_content"
        android:text="A" />
    <SeekBar
        android:id="@+id/sb_alpha"
        android:layout_width="match_parent"
        android:layout_height="wrap_content"
        android:max="255"
        android:progress="255" />
    <ImageView
        android:id="@+id/iv_color_show"
        android:layout_width="wrap_content"
        android:layout_height="wrap_content"
        android:layout_marginTop="30dp"
        android:layout_gravity="center_horizontal"
        android:src="@drawable/btn_pause" />
</LinearLayout>
控制逻辑代码:
public class ColorMatrixActivity extends ActionBarActivity {
    private SeekBar sb_red, sb_green, sb_blue, sb_alpha;
    private ImageView iv_show;
    private Bitmap afterBitmap;
    private Paint paint;
    private Canvas canvas;
    private Bitmap baseBitmap;
    @Override
    protected void onCreate(Bundle savedInstanceState) {
        super.onCreate(savedInstanceState);
        setContentView(R.layout.colormatrix_activity);
        initView();
    }
    private void initView() {
        iv_show = (ImageView) findViewById(R.id.iv_color_show);
        sb_red = (SeekBar) findViewById(R.id.sb_red);
        sb_green = (SeekBar) findViewById(R.id.sb_green);
        sb_blue = (SeekBar) findViewById(R.id.sb_blue);
        sb_alpha = (SeekBar) findViewById(R.id.sb_alpha);
        sb_red.setOnSeekBarChangeListener(seekBarChange);
        sb_green.setOnSeekBarChangeListener(seekBarChange);
        sb_blue.setOnSeekBarChangeListener(seekBarChange);
        sb_alpha.setOnSeekBarChangeListener(seekBarChange);
        baseBitmap = BitmapFactory.decodeResource(getResources(), R.drawable.btn_pause);
        // 1.获取一个与baseBitmap大小一致的可编辑的空图片
        afterBitmap = Bitmap.createBitmap(baseBitmap.getWidth(),
                baseBitmap.getHeight(), baseBitmap.getConfig());
        // 2.使用Bitmap对象创建画布Canvas, 然后创建画笔Paint。
        canvas = new Canvas(afterBitmap);
        paint = new Paint();
    }
    private SeekBar.OnSeekBarChangeListener seekBarChange = new SeekBar.OnSeekBarChangeListener() {
        @Override
        public void onStopTrackingTouch(SeekBar seekBar) {
            if(seekBar.getId() == R.id.sb_alpha){
                iv_show.getDrawable().setAlpha(sb_alpha.getProgress());
            }else{
                float progressR = sb_red.getProgress();
                float progressG = sb_green.getProgress();
                float progressB = sb_blue.getProgress();
                // 根据SeekBar定义RGBA的矩阵, 通过修改矩阵第五列颜色的偏移量改变图片的颜色
                float[] src = new float[]{
                        1, 0, 0, 0, progressR,
                        0, 1, 0, 0, progressG,
                        0, 0, 1, 0, progressB,
                        0, 0, 0, 1, 0};
                // 3.定义ColorMatrix,并指定RGBA矩阵
                ColorMatrix colorMatrix = new ColorMatrix();
                colorMatrix.set(src);
                // 4.使用ColorMatrix创建一个ColorMatrixColorFilter对象, 作为画笔的滤镜, 设置Paint的颜色
                paint.setColorFilter(new ColorMatrixColorFilter(src));
                // 5.通过指定了RGBA矩阵的Paint把原图画到空白图片上
                canvas.drawBitmap(baseBitmap, new Matrix(), paint);
                iv_show.setImageBitmap(afterBitmap);
            }
        }
        @Override
        public void onStartTrackingTouch(SeekBar seekBar) {
        }
        @Override
        public void onProgressChanged(SeekBar seekBar, int progress,boolean fromUser) {
        }
    };
}
2.ColorFilter 改变图片颜色
ColorFilter 改变图片颜色非常简单,使用如下:
//定义选中的颜色
int checkColor = context.getResources().getColor(R.color.theme_red);
//当选中该项时,显示选中颜色,否则显示未选中颜色
viewHolder.icon.setColorFilter(selectPosition==position? checkColor :Color.TRANSPARENT);
这样的的两行代码就可以改变颜色了。下面主要介绍一下的setColorFilter的第二个参数PorterDuff.Mode。
PorterDuff,一个陌生的单词,百度翻译和谷歌翻译都查无来处,原因在于它是一个组合词汇,来源于 Tomas Proter(托马斯波特)和 Tom Duff(汤姆达)两个名字。这俩人是在图形混合方面的大神级人物,他们在 1984 年发表了论文,第一次提出了图形混合的概念,也是取了两人的名字命名。
Android PorterDuff.Mode 便是提供了图片的各种混合模式,可以分为两类:
Alpha compositing modes(由俩大神的定义,包含 alpha 通道因素)
Blending modes(不是俩大神的作品,不包含 alpha 通道因素)
具体的可以看官方文档对 PorterDuff.Mode的介绍,我这里只说涉及到的 SRC_ATOP。
既然混合,两个图片,源图片和目标图片,如下:

SRC_ATOP 混合模式效果如下图,只保留源图片和目标图片的相交部分,其他部分舍弃:
总结:
合理使用 SetColorFilter() ,可以为 UI 好搭档节省了不少切图工作量,而且,同样能缩小了 APK 的体积。
3.其他方式
简单的使用旁门左道的方式实现图片的颜色改变。
图片黑白化的算法
以前在JavaScript用过,在Python用过,现在终于用到java上了,不免感慨,语言无界限,真理永恒。就像1+1=2是永远不变的。所以大家最好收集一下相关的真理,不管何时都不会过时,也不会错误。
private void BitmapToBall(Bitmap bitmap){
        int width = bitmap.getWidth();
        int height = bitmap.getHeight();
        int[] colorPixels = new int[width*height];
        bitmap.getPixels(colorPixels,0,width,0,0,width,height);
        for (int i = 0; i < bitmap.getWidth(); i++) {
            for (int j = 0; j < bitmap.getHeight(); j++) {
                int pixel = colorPixels[i+width*j];
                if (pixel < 0) {//此处过滤掉其他颜色,避免全部产生粒子
                    Ball ball = new Ball();//产生粒子---每个粒子拥有随机的一些属性信息
                    ball.vX = (float) (Math.pow(-1, Math.ceil(Math.random() * 1000)) * 20 * Math.random());
                    ball.vY = rangeInt(-15, 35);
                    ball.aY = 0.98f;
                    ball.x = i ;
                    ball.y = j ;
                    ball.color = pixel;
                    ball.born = System.currentTimeMillis();
                    mBalls.add(ball);
                }
            }
        }
    }
/**
 * 根像素初始化粒子
 *
 * @param bitmap
 * @return
 */
private List<Ball> initBall(Bitmap bitmap) {
    for (int i = 0; i < bitmap.getHeight(); i++) {
        for (int j = 0; j < bitmap.getWidth(); j++) {
            Ball ball = new Ball();
            ball.x = i * d + d / 2;
            ball.y = j * d + d / 2;
            //获取像素点的a、r、g、b
            int color_i_j = bitmap.getPixel(i, j);
            int a = Color.alpha(color_i_j);
            int r = Color.red(color_i_j);
            int g = Color.green(color_i_j);
            int b = Color.blue(color_i_j);
            ball.color = blackAndWhite(a, r, g, b);
            mBalls.add(ball);
        }
    }
    return mBalls;
}
/**
 * 配凑黑白颜色
 */
private int blackAndWhite(int a, int r, int g, int b) {
    //拼凑出新的颜色
    int grey = (int) (r * 0.3 + g * 0.59 + b * 0.11);
    if (grey > 255 / 2) {
        grey = 255;
    } else {
        grey = 0;
    }
    return Color.argb(a, grey, grey, grey);
}
灰色处理函数
/**
 * 配凑灰颜色
 */
private int grey(int a, int r, int g, int b) {
    //拼凑出新的颜色
    int grey = (int) (r * 0.3 + g * 0.59 + b * 0.11);
    return Color.argb(a, grey, grey, grey);
}
颜色反转
//颜色反转
private int reverse(int a, int r, int g, int b) {
    //拼凑出新的颜色
    return Color.argb(a, 255-r, 255-g, 255-b);
}
五:粒子运动
4.1 将一个图片粒子化的方法
这里速度x方向是正负等概率随机数值,所以粒子会呈现左右运动趋势。有一定的y方向速度,但加速度aY向下,导致粒子向下运动,综合效果就是两边四散加坠落。要改变粒子的运动方式,只要改变粒子的这些参数就行了。
/**
 * 根像素初始化粒子
 *
 * @param bitmap
 * @return
 */
private void initBall(Bitmap bitmap) {
    for (int i = 0; i < bitmap.getHeight(); i++) {
        for (int j = 0; j < bitmap.getWidth(); j++) {
            Ball ball = new Ball();//产生粒子---每个粒子拥有随机的一些属性信息
            ball.x = i * d + d / 2;
            ball.y = j * d + d / 2;
            ball.vX = (float) (Math.pow(-1, Math.ceil(Math.random() * 1000)) * 20 * Math.random());
            ball.vY = rangeInt(-15, 35);
            ball.aY = 0.98f;
            ball.color = bitmap.getPixel(i, j);
            ball.born = System.currentTimeMillis();
            mBalls.add(ball);
        }
    }
}
4.2 更新小球
/**
 * 更新小球
 */
private void updateBall() {
    for (int i = 0; i < mBalls.size(); i++) {
        Ball ball = mBalls.get(i);
        if (System.currentTimeMillis() - mRunTime > 2000) {
            mBalls.remove(i);
        }
        ball.x += ball.vX;
        ball.y += ball.vY;
        ball.vY += ball.aY;
        ball.vX += ball.aX;
    }
}
4.3初始化时间流:ValueAnimator
//初始化时间流ValueAnimator
mAnimator = ValueAnimator.ofFloat(0, 1);
mAnimator.setRepeatCount(-1);
mAnimator.setDuration(2000);
mAnimator.setInterpolator(new LinearInterpolator());
mAnimator.addUpdateListener(animation -> {
    updateBall();//更新小球位置
    invalidate();
});
4.4点击开启ValueAnimator
@Override
public boolean onTouchEvent(MotionEvent event) {
    switch (event.getAction()) {
        case MotionEvent.ACTION_DOWN:
            mRunTime = System.currentTimeMillis();//记录点击时间
            mAnimator.start();
            break;
    }
    return true;
}
总结
好了,到了这里关于bitmap的像素级超过基本介绍完毕,但你会像素级操作后,你发做成更多炫酷有趣的东西,比如各种美颜滤镜变量算法等。
以上就是android Bitmap像素级操作详解的详细内容,更多关于android Bitmap详解的资料请关注软件开发网其它相关文章!